Monthly Archives: March 2014

New Bimini and Cockpit Enclosure

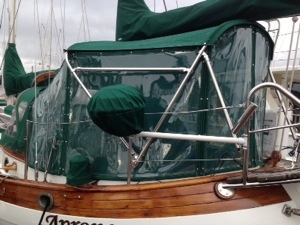
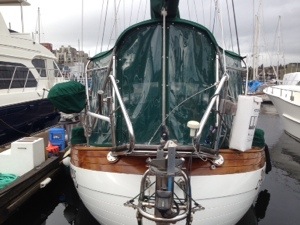
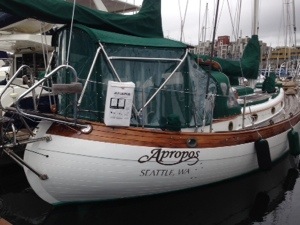
We decided to add a bimini for sun protection in the tropics and rain protection in the Pacific Northwest. Since we were able to see 2 of these installed on other Hans Christians and they were both Iverson designs, it was an easy decision to go with them. We also chose to have mesh-screen panels added to give the cockpit a full-enclosure. This also provides more shade from the sun while still allowing good visibility as well as air flow. The enclosure comes as 6 zip-on panels so various combinations can be used. A connector panel ties the bimini into our dodger. We made our own snap-on vinyl panels for keeping out the rain and wind. With the full enclosure and vinyl panels in place, the cockpit becomes an additional “room” during the winter months in Seattle. Even on a cold winter day, the sun warms the cockpit with the full enclosure in place.

Installation–I met the Iverson crew at the boat to go over the design. The biggest decision was the height of the bimini. The mizzen boom would need to be raised to allow clearance above the bimini AND I wanted the bimini high enough for me to be able to stand at the helm without ducking. This required me to move the boom up by about 13″. We also added a zipper onto the front edge of the dodger for the connector panel. This was all done before Iverson came back to begin building the bimini. They first built the custom stainless steel frame which they cut/bent/adjusted/installed on-site. Then they took measurements and returned a few weeks later with the canvas and mesh panels and everything fit perfectly.

Vinyl Panels–We decided to make our own vinyl panels. Instead of making separate panels to take the place of the mesh panels, we built the vinyl panes slightly small than the mesh panels and added snaps to make them easy to put on and take off. We used 30 mil vinyl and trimmed the edges with canvas. I did all the prep work (measuring, cutting, taping on the canvas binding) and Karen did all the sewing, using the “Beast”
(our Sailrite industrial-grade sewing machine). Then I took the 6 panels to the boat, removed the mesh panels, and hammered on the snaps. It was time consuming work but we were pleased with the results. Now I can sit in the cockpit playing guitar during a downpour!

Bimini and Full Enclosure w/ Vinyl Panels
20140330-231543.jpg

20140330-231558.jpg

20140330-231611.jpg

Share

Single Side Band Radio

I bought the ICOM IC-802 SSB radio at the 2012 Seattle Boat show. The package came with an auto-tuner AT-140, a GAM split lead antenna, a KISS counterpoise, and an SCS Pactor III modem.

Installation–Figuring out where to place the components was an important first step. Since the radio itself could be tucked away, I built a shelf for it under the nav station chart table. The remote display fit along side the chartplotter at an angle for easy viewing and tuning. I mounted the speaker higher up in against the bulkhead. Since the tuner wants to be as close to the antenna as possible, I found a place inside the transom that would be only a few feet from the antenna. The GAM split lead antenna has a split tubing that was easy to slide up a long side-stay with zip ties used every few feet. Lastly, the KISS counterpoise was run from the tuner under the starboard bunk. The Pactor modem easily fit atop the radio making it easy to connect to a laptop at the nav station. This installation kept everything relatively close together on the starboard side. Power to the radio was run from the DC panel using #8 AWG wire and a 30A breaker.

Testing–It’s hard to really test the SSB on a lake in the middle of the city. Interference, weather, and atmospheric conditions come into play with transmitting and receiving signals. At the marina, I was able to receive signals from far away (different languages) but couldn’t really test my transmitting capability. I did notice strange things happened when I keyed the mic to transmit–lights dimmed and some breaker panel lights turned on. I read this is normal and signifies you are sending some high power signals out. More experimentation is needed when I’m outside the city in more open water.

Sailmail–Sailmail

Radio and Modem Under Nav Station20140310-095719.jpg

SSB Remote at Nav Station20140310-095540.jpg

GAM Split Lead Antenna20140407-231406.jpg

Share

Flags

Another one of Karen’s side projects is making flags. My only job was to hammer on the grommets.

I used flagcloth polyester material, flagtape on the sides and fabric pens for the designs.

Here are some we hope to use on our trip (click on flag to identify):

Mexico

French Polynesia

Tahiti

Hans Christian Owners Association

Q flag


I have to say that I had the most fun designing the French Polynesia Flag, which I found out is not a courtesy flag in French Polynesia. The official courtesy flag is the French Tricolour. To get the design on the white portion of the flag I printed out a copy of the design and traced and coloured in the design using fabric pens directly.

For the Mexican Flag, which was my first attempt, I traced two designs onto white fabric patches and sewed them onto the flag. This design was so intricate I was afraid of making a permanent mistake if I traced it directly onto the fabric.

Share

Spectra Watermaker

I bought a Spectra Cape Horn watermaker at the 2014 Seattle Boat Show. I chose the Cape Horn because of its simplicity (manual control) and built-in redundancy (can run off 1 of the 2 pumps). With both pumps running, it can produce 14GPH at 18A (or 1.3 Ahrs/gal).

Installation–The Cape Horn is a modular system. The 3 largest components are the Clark pump/membrane, filter/pump1, and filter/pump 2. There’s also an accumulator tank, remote monitoring panel, product water valve, and test port to install. I had only a few options for the install location. Under the V-berth or under the port-side settee. Since accessibility is important for changing filters and throwing manual valves, I decided under the port-side settee would be the best location. The largest module (Clark pump) just fit after relocating a deck wash pump. The two filter/pump modules were slightly too tall so I modified a few hose fittings to allow them to fit within the available height and mounted them securely on starboard. I ran about 30′ of #4 AWG wire from the watermaker to a 30A breaker on my DC panel. I installed a brass spout at the galley sink for testing the product water and filling drinking bottles. Also in the galley is a valve for selecting the sink spout or the forward 60 gallon tank for product water. I installed a Tee in the sea water input hose for the head and piped the brine water output to the head sink drain. I also Tee’d into the pressure fresh water for the flush cleaning input. For filling the water tank, I drilled and tapped a hole in the top of the SS tank and installed a Parker fitting. The Parker fittings and 1/4″ tubing used on the product water side were easy to work with. The most difficult was running the 5/8″ tubing to the head and tying it into the 1-1/2″ sink drain. Since I couldn’t find an ideal place to mount the remote monitoring panel that didn’t require cutting into teak, I decided to mount it inside the galley engine access door. This was a convenient place since the valve was also mounted in that area. The panel has a flow rate gauge and a pressure gauge that should be monitored from time to time.

Completed Installation20140306-213515.jpg

Monitor Gauge and Manual Valve
20140306-213529.jpg

Monitor Gauge20140306-213538.jpg

Watermaker Output to SS Water Tank20140306-213545.jpg

Brine Discharge to Head Sink Drain20140307-171226.jpg

Video Showing Clark Pump Operating

Hands-On Taking Apart a Clark Pump20140407-232722.jpg

Lots of Seals and Gaskets20140407-232733.jpg

Share