Old System
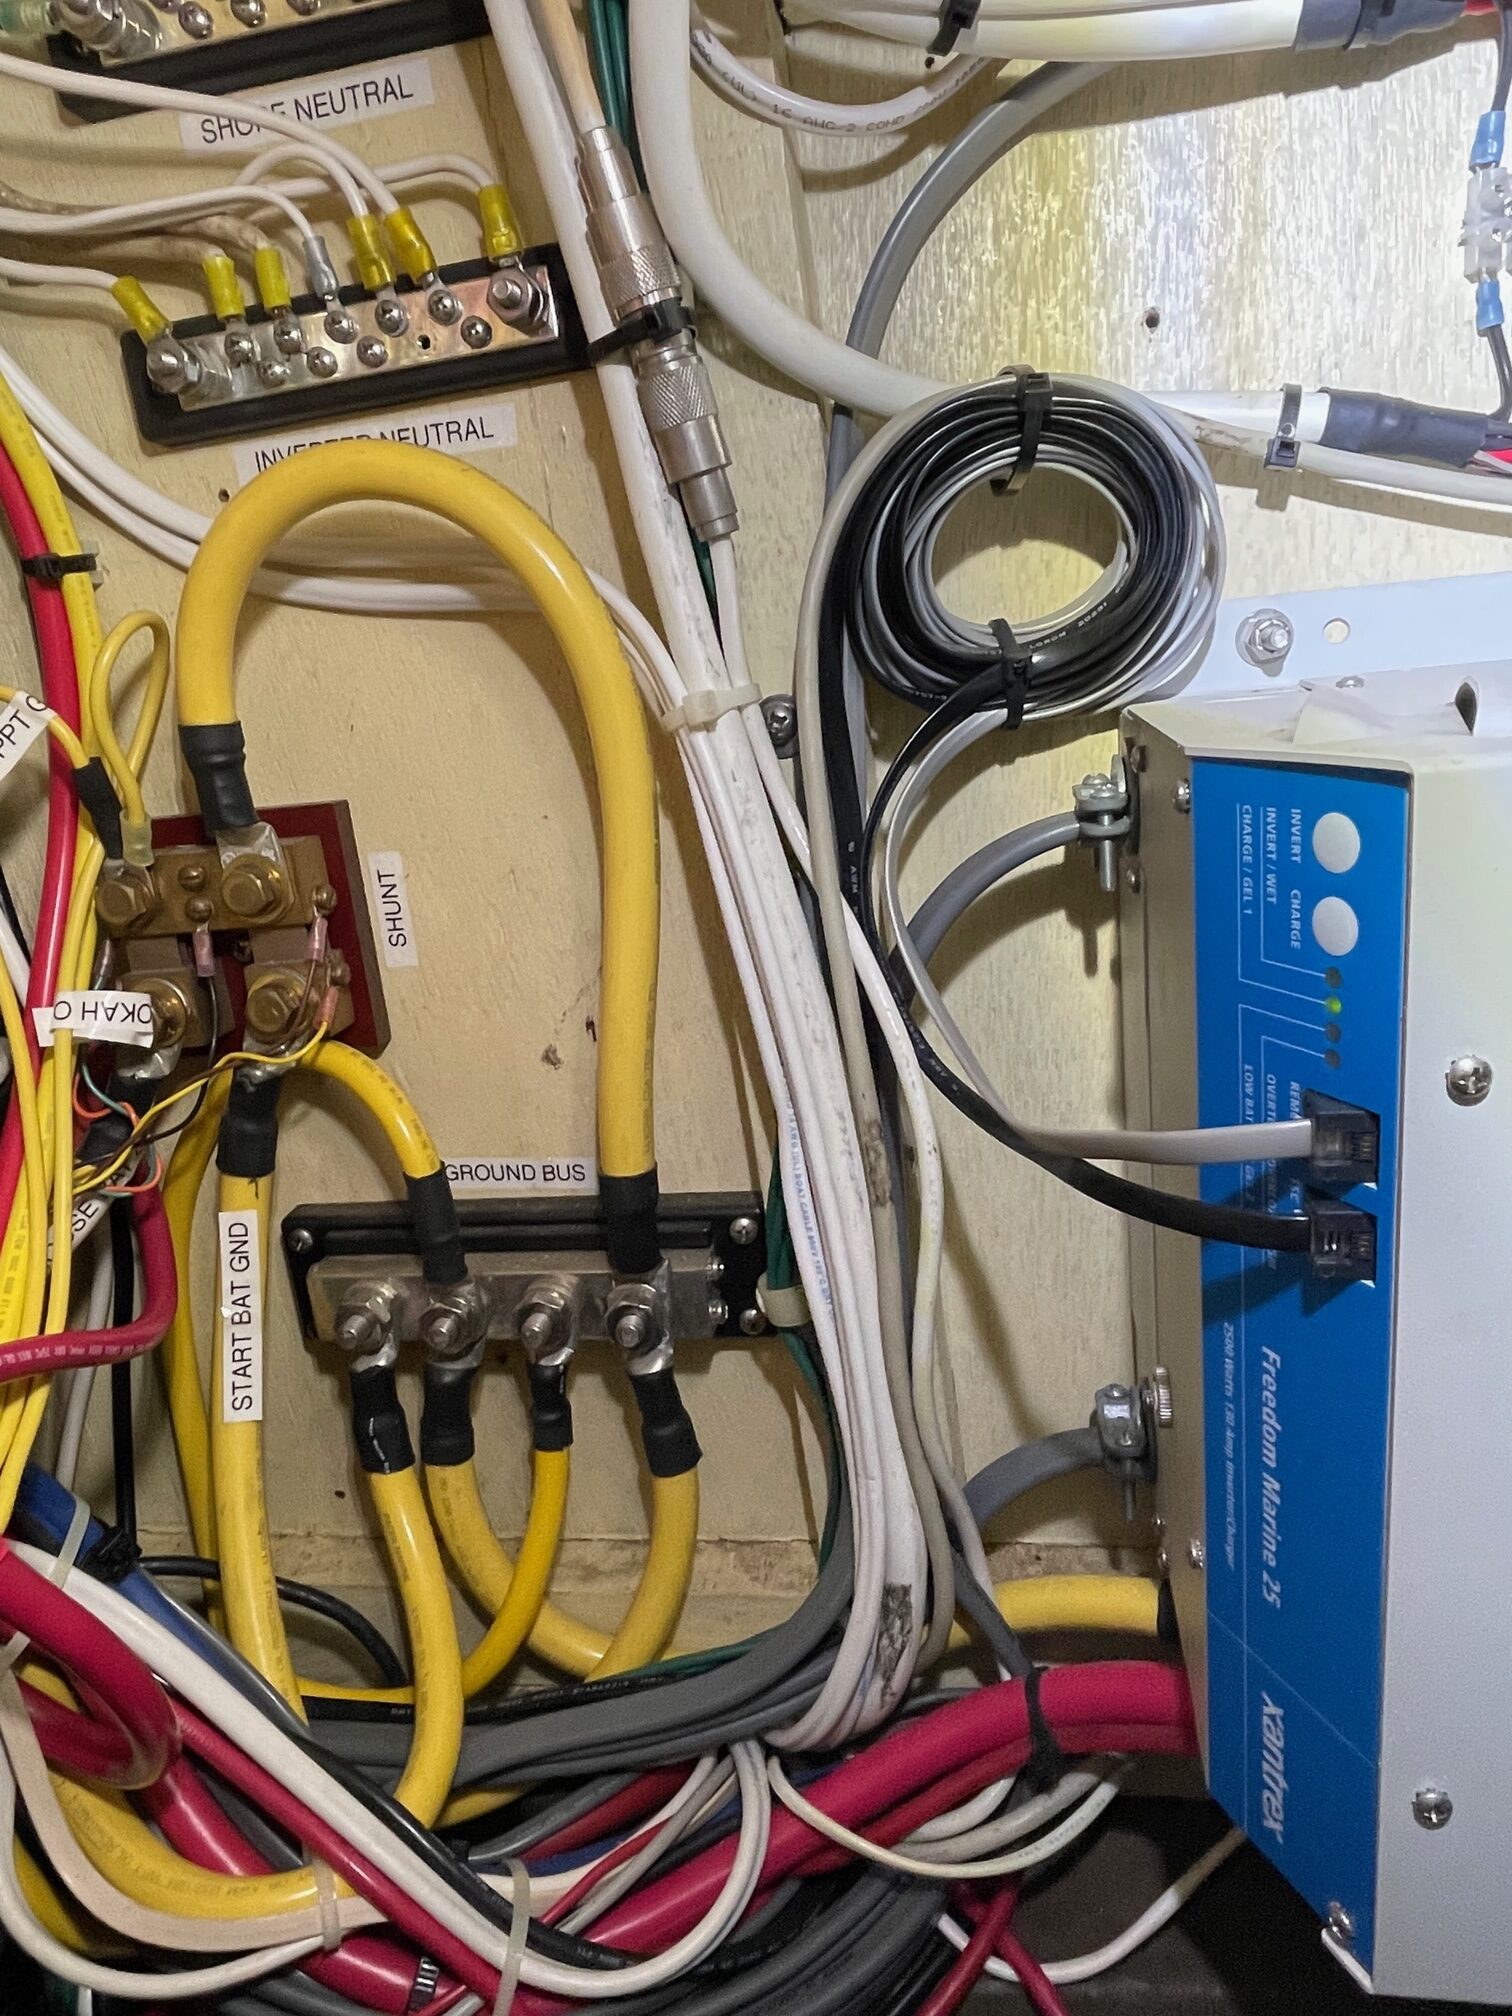
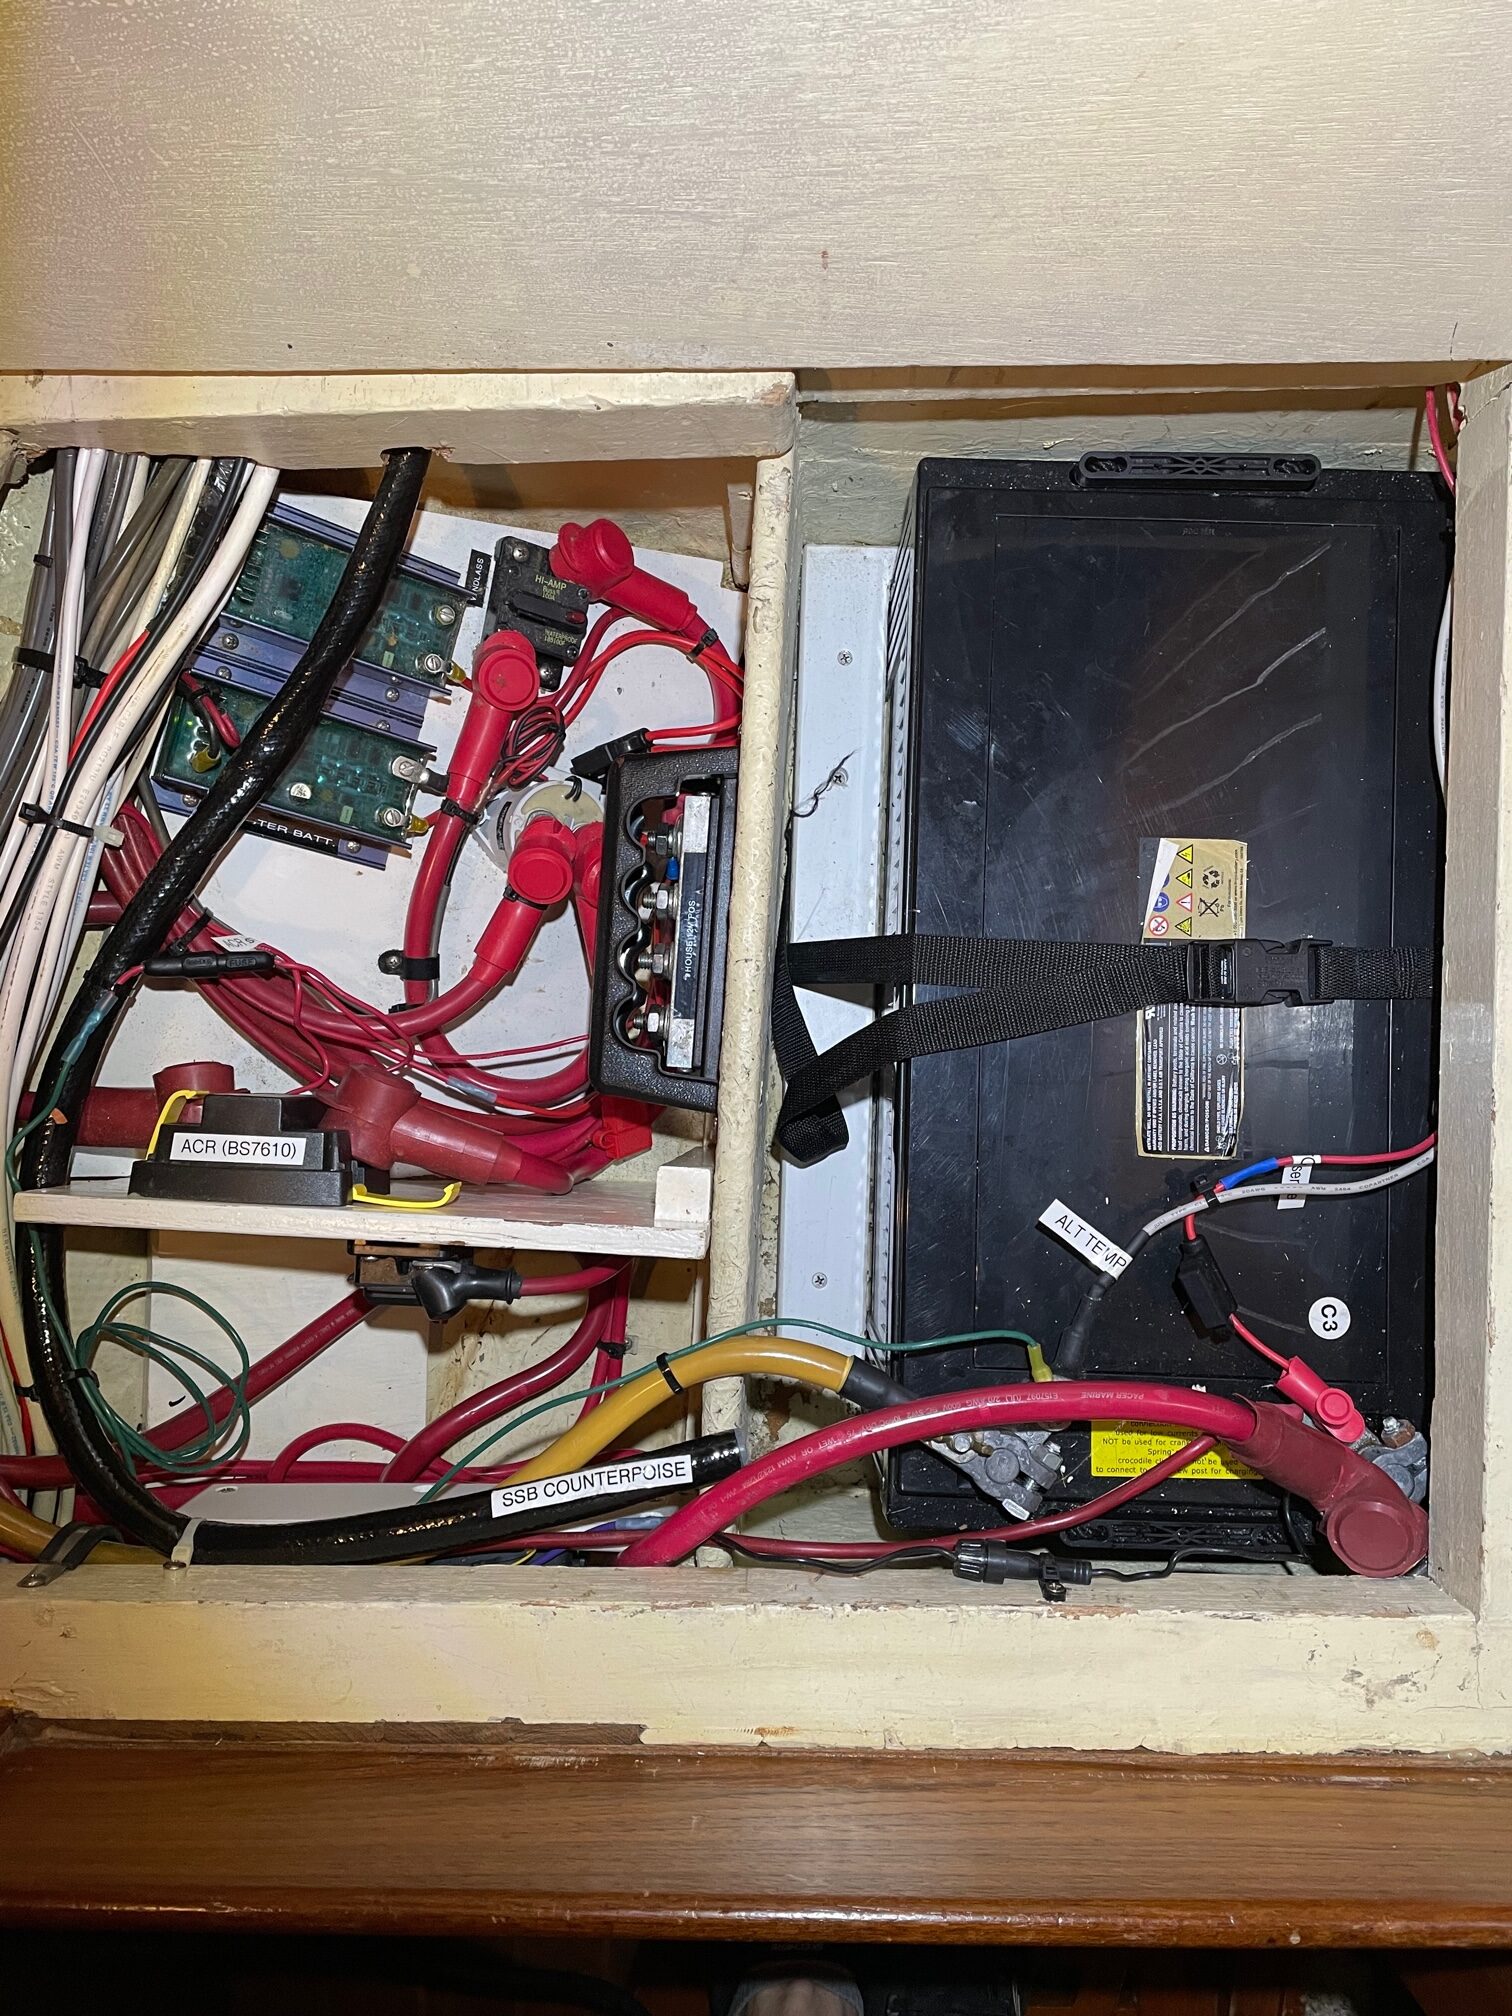
The battery and charging system on Apropos was as follows: an AGM 12V Group 8D Starter Battery, 6 AGM 6V series/parallel combo House bank (672 AHrs), and 2 AGM 12V parallel combo Windlass & Thruster bank. A Xantrex Charger/Inverter (Freedom 25) that outputs a modified sine wave for AC and a 130A max 12VDC charging current. An Automatic Charge Relay (ACR) used to combine the House and Starter batteries whenever a charging source is present (solar, shore power, alternator). A Xantrex Link 2000 that monitors and controls the charging of the House and Starter batteries. A solenoid parallels the House bank with the Windlass bank whenever the Windlass breaker is turned on. The charging of the Windlass battery bank is handled by a Balmar Digital Duo Charge (30A DC/DC converter) from the House bank. A 110A Balmar alternator with external Balmar MC-16 regulator is connected to the Starter battery.
This system was well thought out and worked well for 17 years. The only components I changed were battery replacement as needed, and the higher amp Alternator with external regulator. I also removed the manual battery ‘1-2-both’ switch and replaced it with an ACR.
The Good:
- Very reliable system
- Fully automated charging
The Bad:
- Long charge times, especially the last 10% of the battery
- 50% DOD (depth of discharge) for lead acid batteries
- Heavy lead acid batteries (468 lbs for house bank)
- Modified sin wave inverter not compatible with some electronics (Nespresso machine doesn’t work at all and Microwave struggles)
- Most components 17 years old
- Performance issues during year-long cruise with no shore power
- No remote monitoring/control of the system
In 2021 I noticed my House batteries were getting weak. They were fine for day sailing, but a week-long trip to the San Juan Islands where we mostly anchored really exposed their weakness. By mornings our battery voltage was below 12.0V until the sun came out and the solar panels brought them back to a normal voltage. I installed these AGM batteries way back in 2010, so they definitely exceeded their expected life.
This left me with a big decision–do I replace the 6-6V, 672AHr AGM batteries with the same (a 1-day project costing $2,500) OR switch to Lithium technology (a multi-week project and 3X cost)? I did a lot of research on Lithium-based systems and decided to update to Lithium Iron Phosphate (LiFePO4) house batteries, a new Inverter/Charger that could handle Lithium charge profiles and a new solar controller with LiFePO settings.
Goals:
- Safe and reliable system
- Higher overall amp hour capacity for house bank
- Faster charging rates especially while away from the dock
- Have capability to remotely monitor and control the system
New System
Batteries
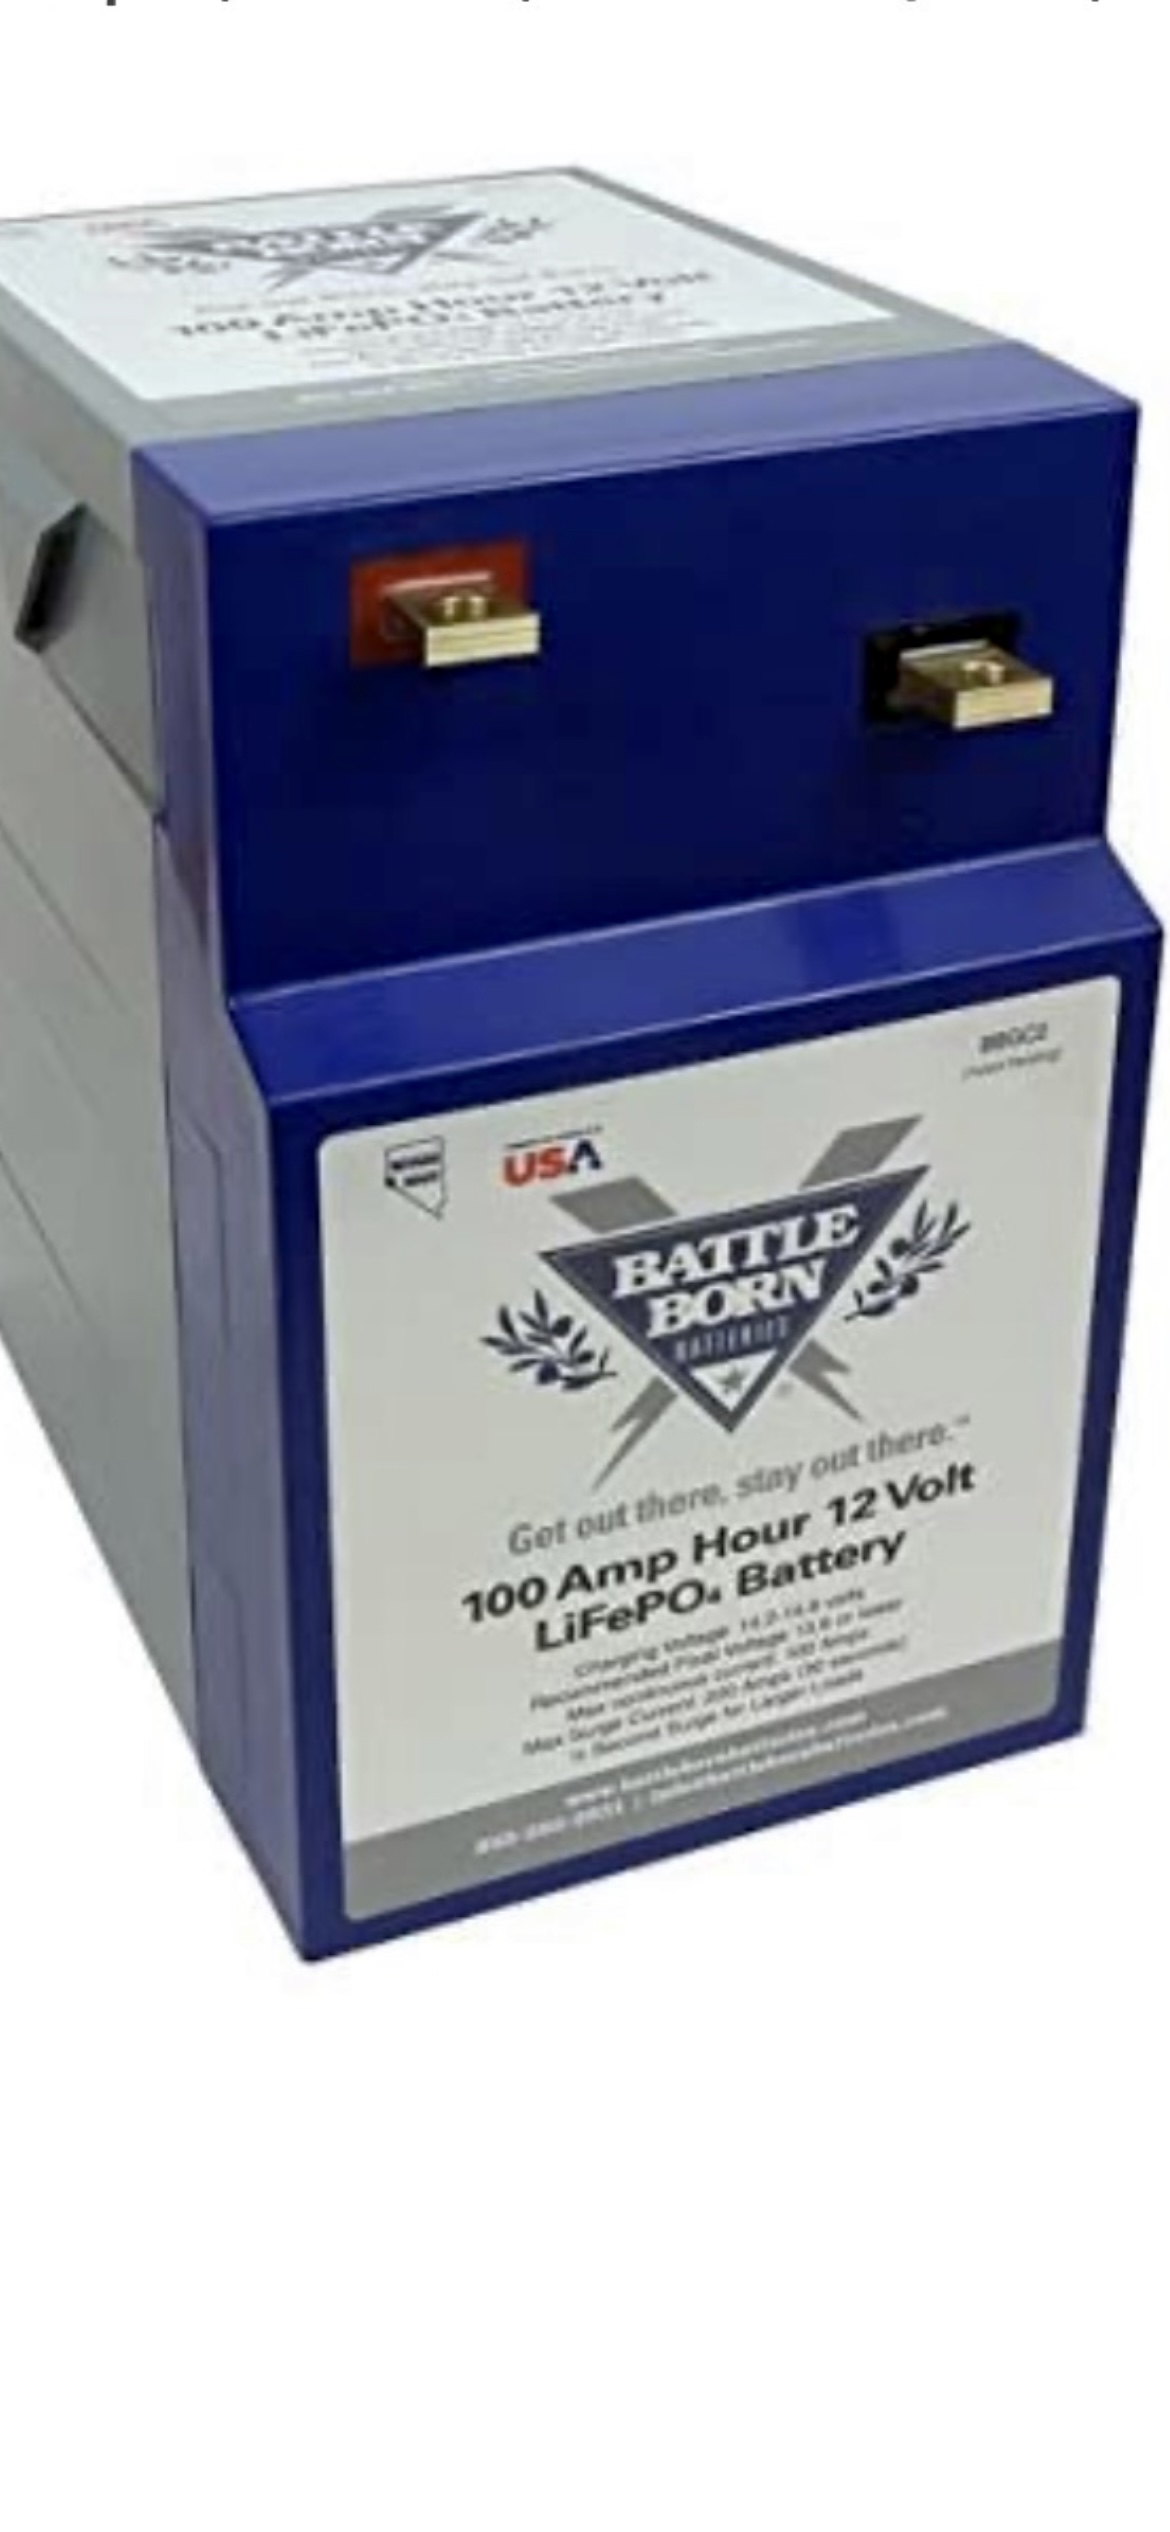
One of the biggest choices in the design was what type of battery to use. Lithium Iron Phosphate (LiFePO4) batteries have been around awhile and seem to be the choice for many boats converting over to Lithium. There are plenty of manufacturers with BattleBorn, Victron, VPR, Lithionics, and Relion being some that I looked into. I narrowed my choice to 100AHr “Drop-In” LiFePO4 with built-in BMS (battery management system). They are designed to drop-in nearly the same footprint as 6V lead acid batteries, making installation easier. The internal BMS built into each battery removes it from the bank when an unsafe condition is detected. This could happen to a single battery (eg a bad cell) or all batteries (eg faulty charging conditions).
Sizing:
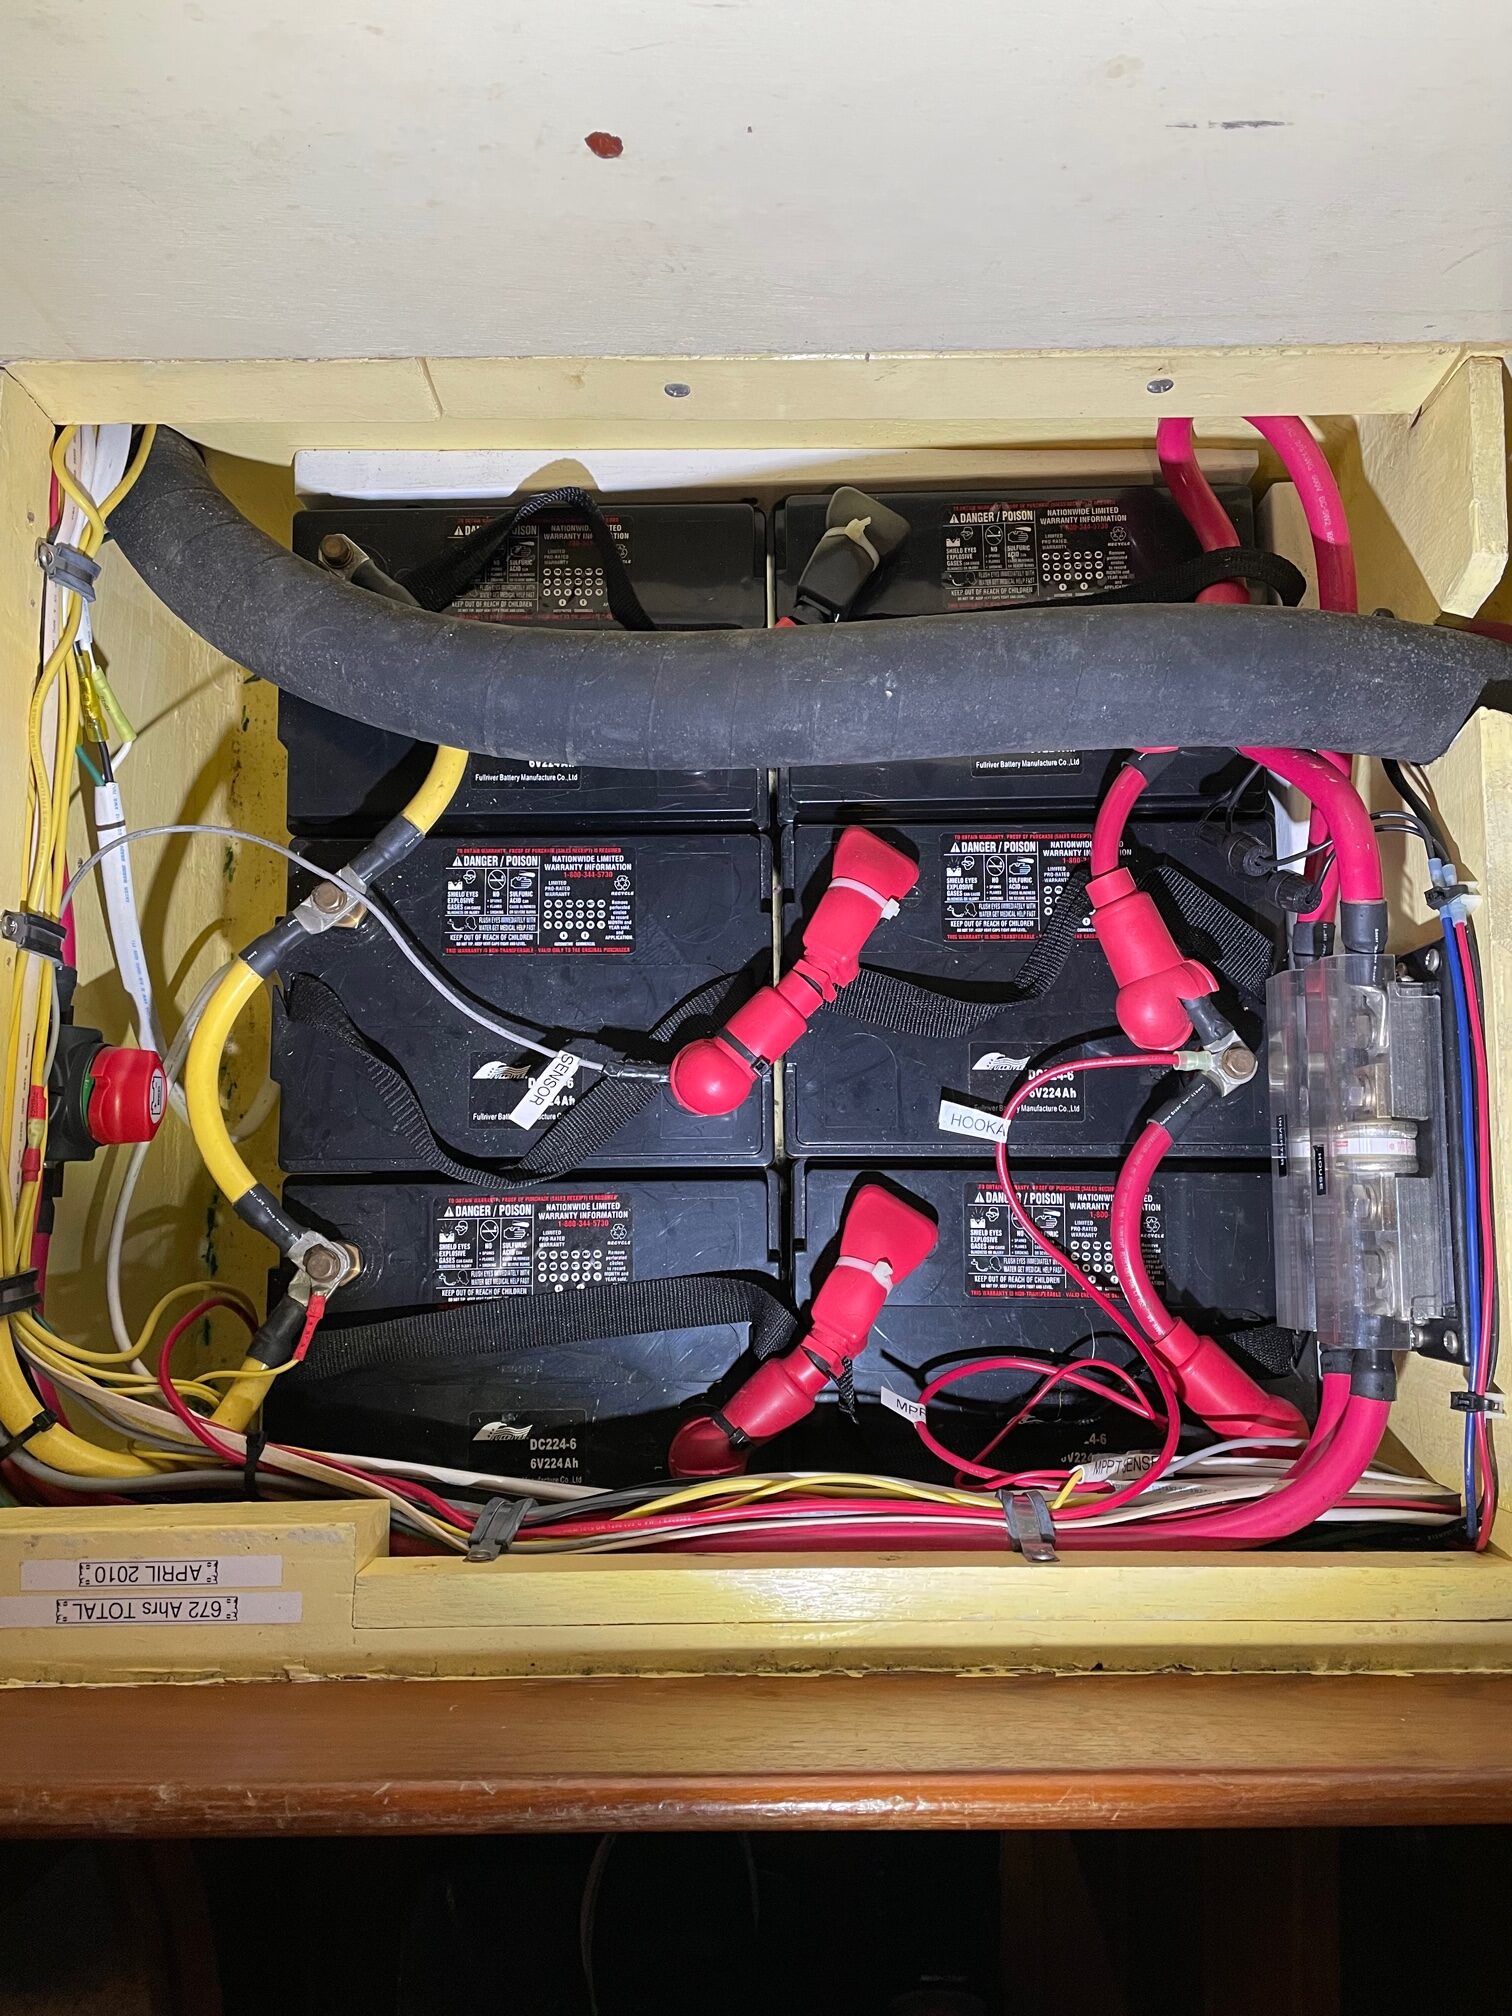
My AGM house bank was made up of 3 parallel sets of 2 series-connected 6V batteries (total of 6 batteries equaling 672 AHrs). Lead acid batteries are limited to 50% DOD for long life, meaning you should avoid discharging the bank more than 50%. In other words, my 672 AHr AGMs really only had 336 AHr of usable charge. And unless you’re plugged into shore power, it takes a very long time to charge the last 10% of a lead acid battery, making the usable AHrs even less. The reason is due to the charging profile of lead acid where the charge current is significantly reduced for that last 10%.
My design requirement was to at least match the usable AHrs when I switched to Lithium. But that doesn’t mean that I need 672 AHrs since Lithiums have nearly 100% DOD. So a 100AHr Lithium battery would be approximately the equivalent of a 200AHr AGM battery. I chose 4-100AHr BattleBorn LiFePO4 GC2 batteries for a 400AHr house bank.
Inverter/Charger
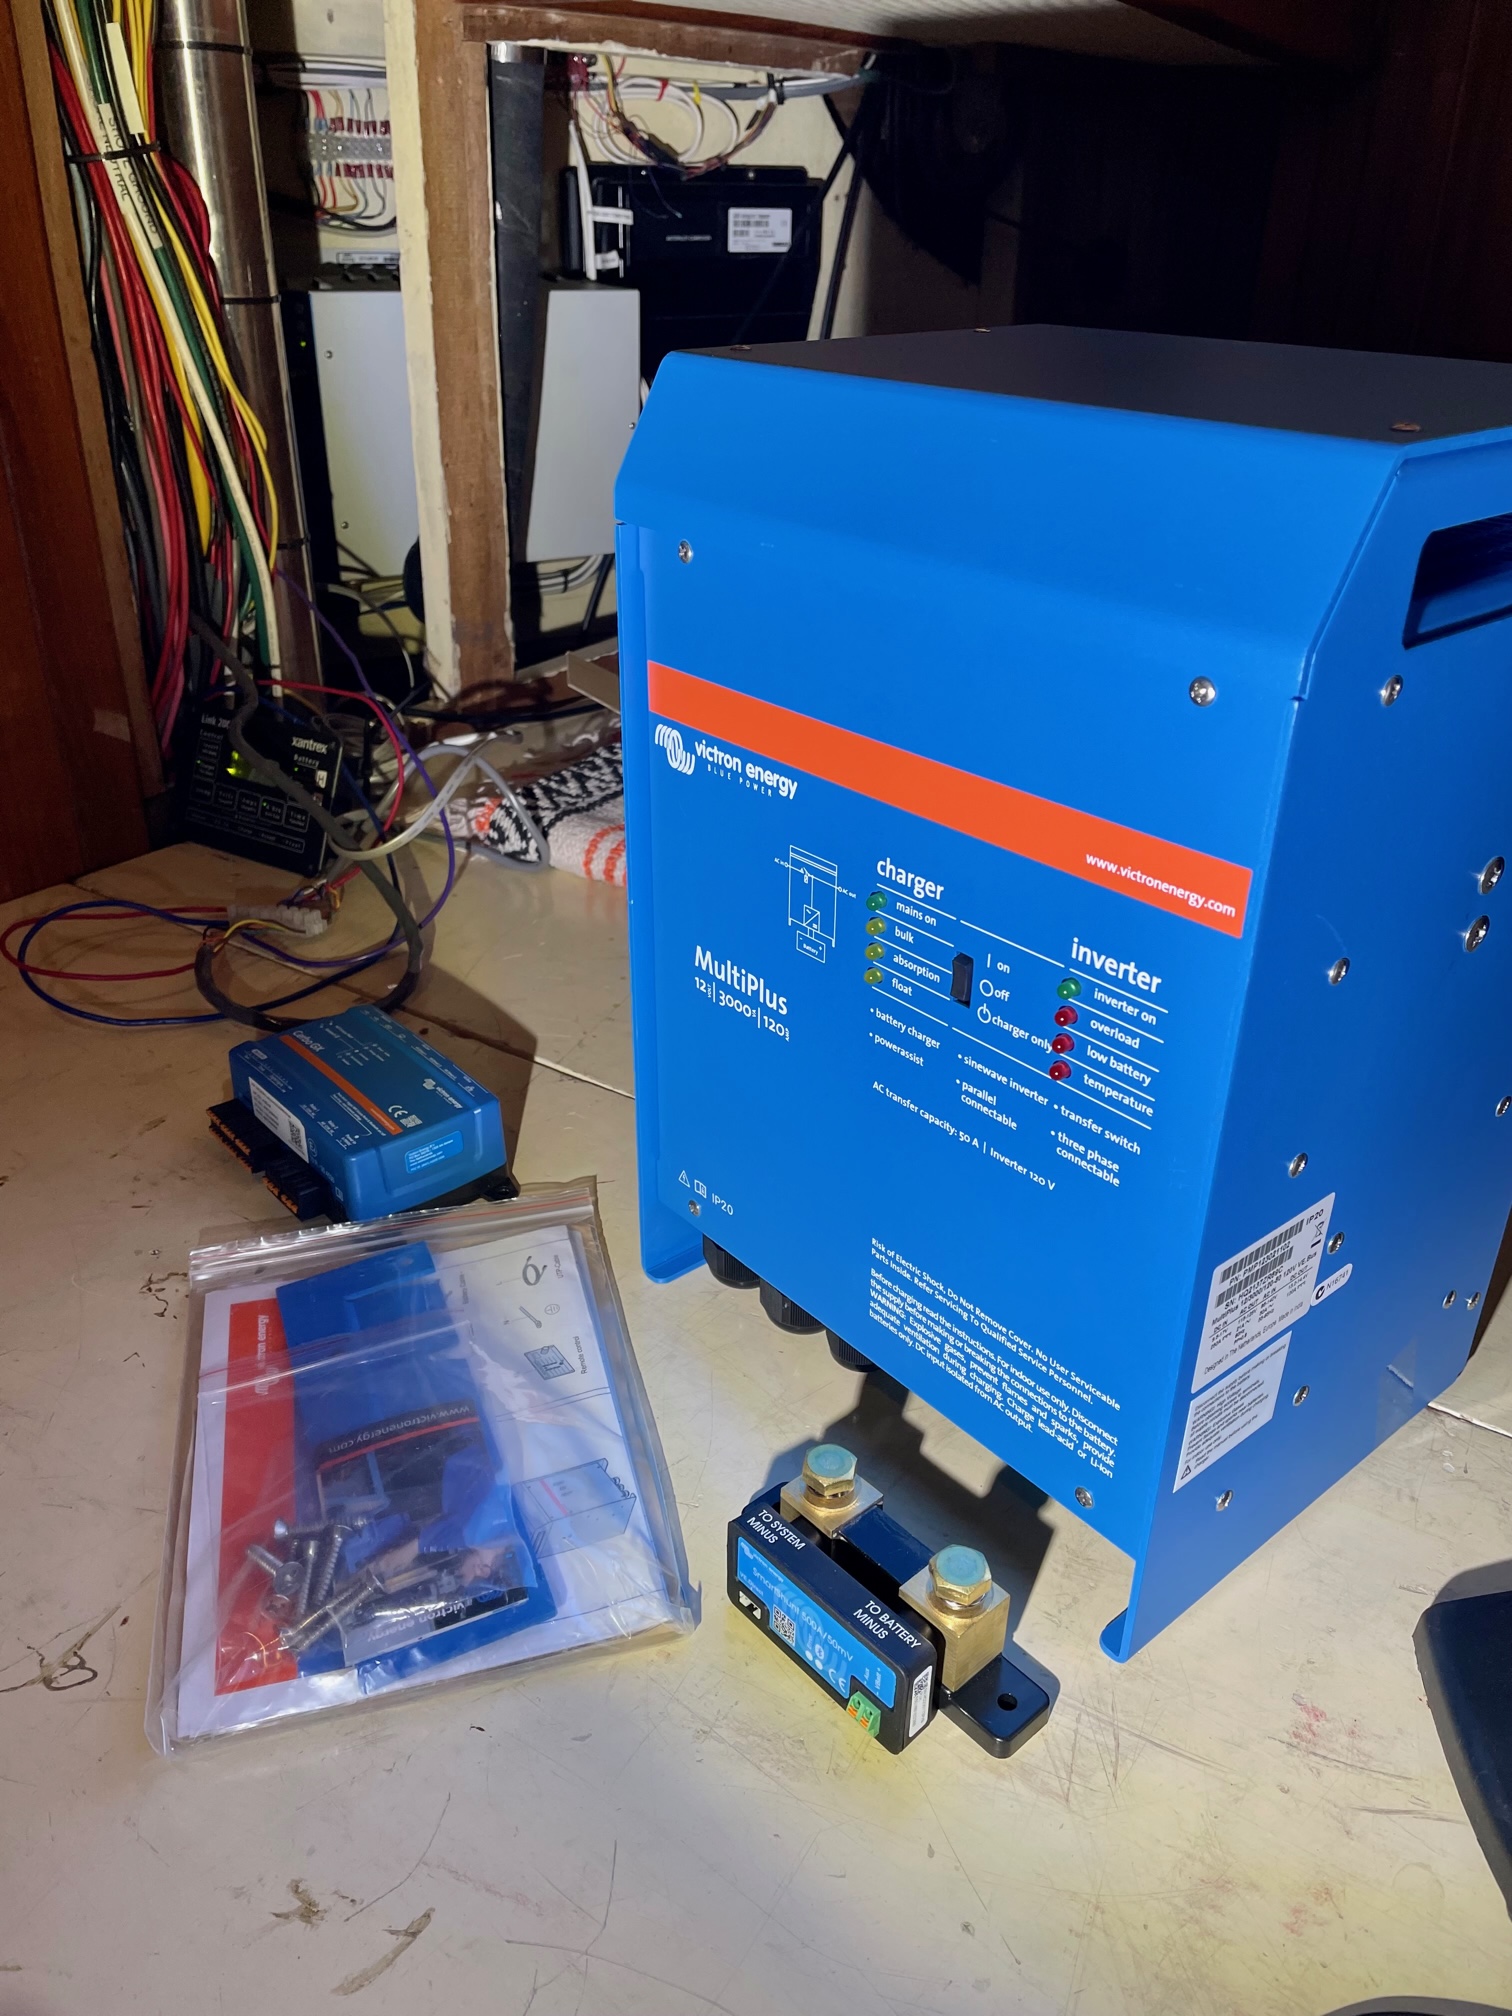
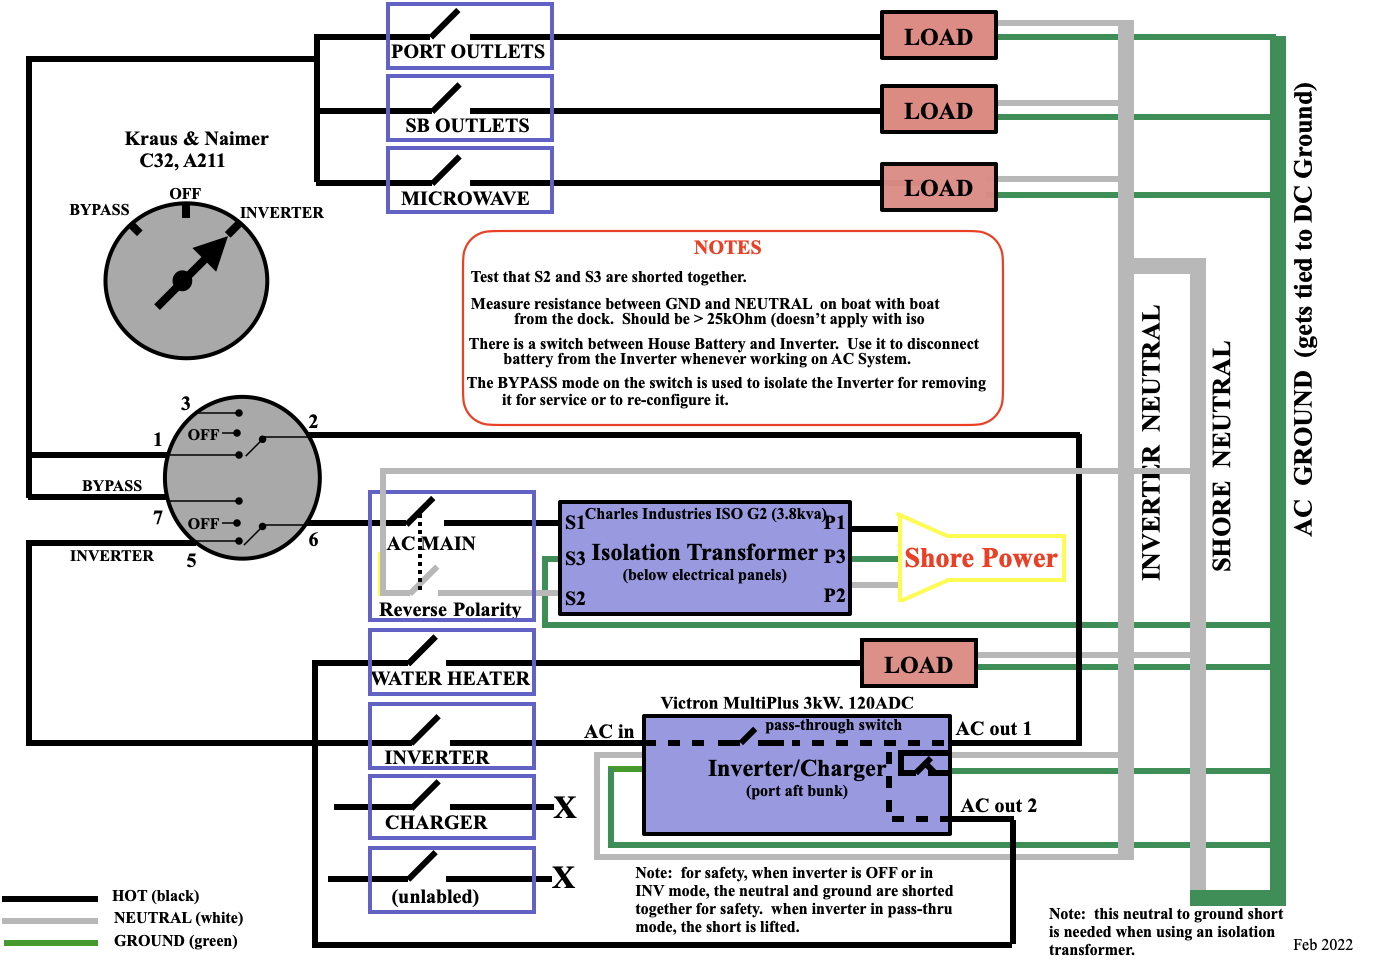
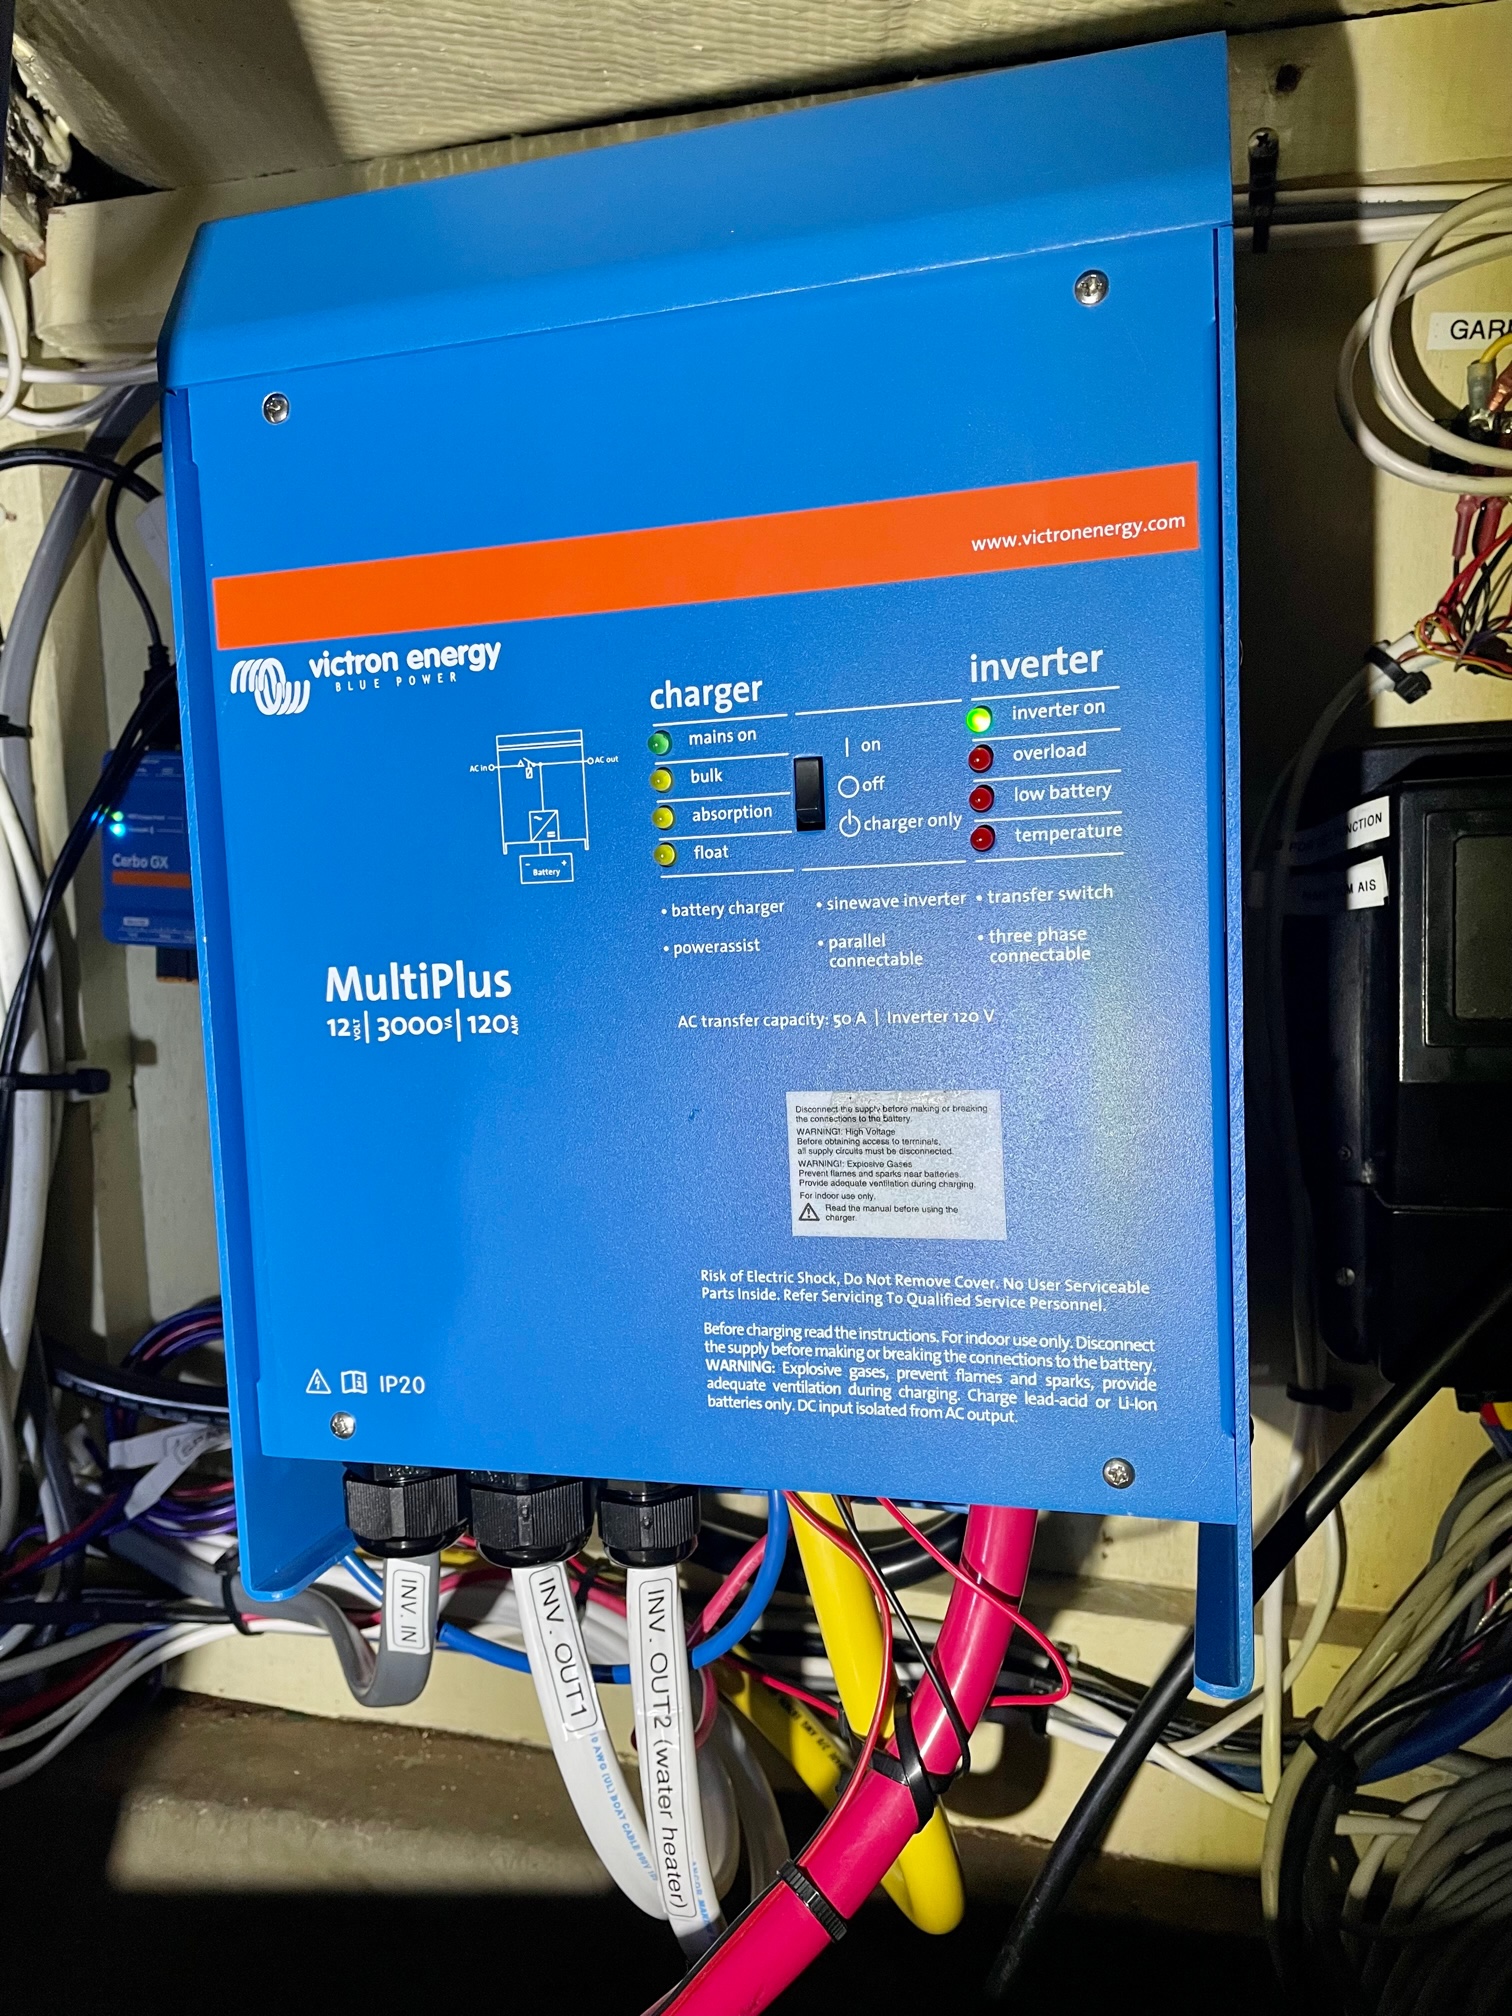
I installed a Victron MultiPlus 12/3000/120 Inverter/Charger. Due to the location of inputs/outputs on the MultiPlus, as well as the orientation, I had to replace some of the heavy 2/0 gauge wire on the DC side, and the 10 AWG on the AC side. The previous setup was not wired with the AC main going through the inverter before any loads, so I had some re-wiring to do at the AC panel. I used both AC outputs–AC1 supplies the AC outlets and the microwave, AC2 supplies the water heater. The MultiPlus passes the AC input through to both AC outputs when it detects an AC source coming in. When there is no AC source, it switches on the Inverter. Only AC1 output receives the Inverter output. This prevents overloading the Inverter and draining the batteries that would occur by trying to run the water heater with inverted power. I rewired the AC switch to be able to disconnect the MultiPlus AC input and output (bypass mode) in case it has to be removed for service. Here’s a picture of the new equipment and a diagram of my AC system.
Monitor/Control
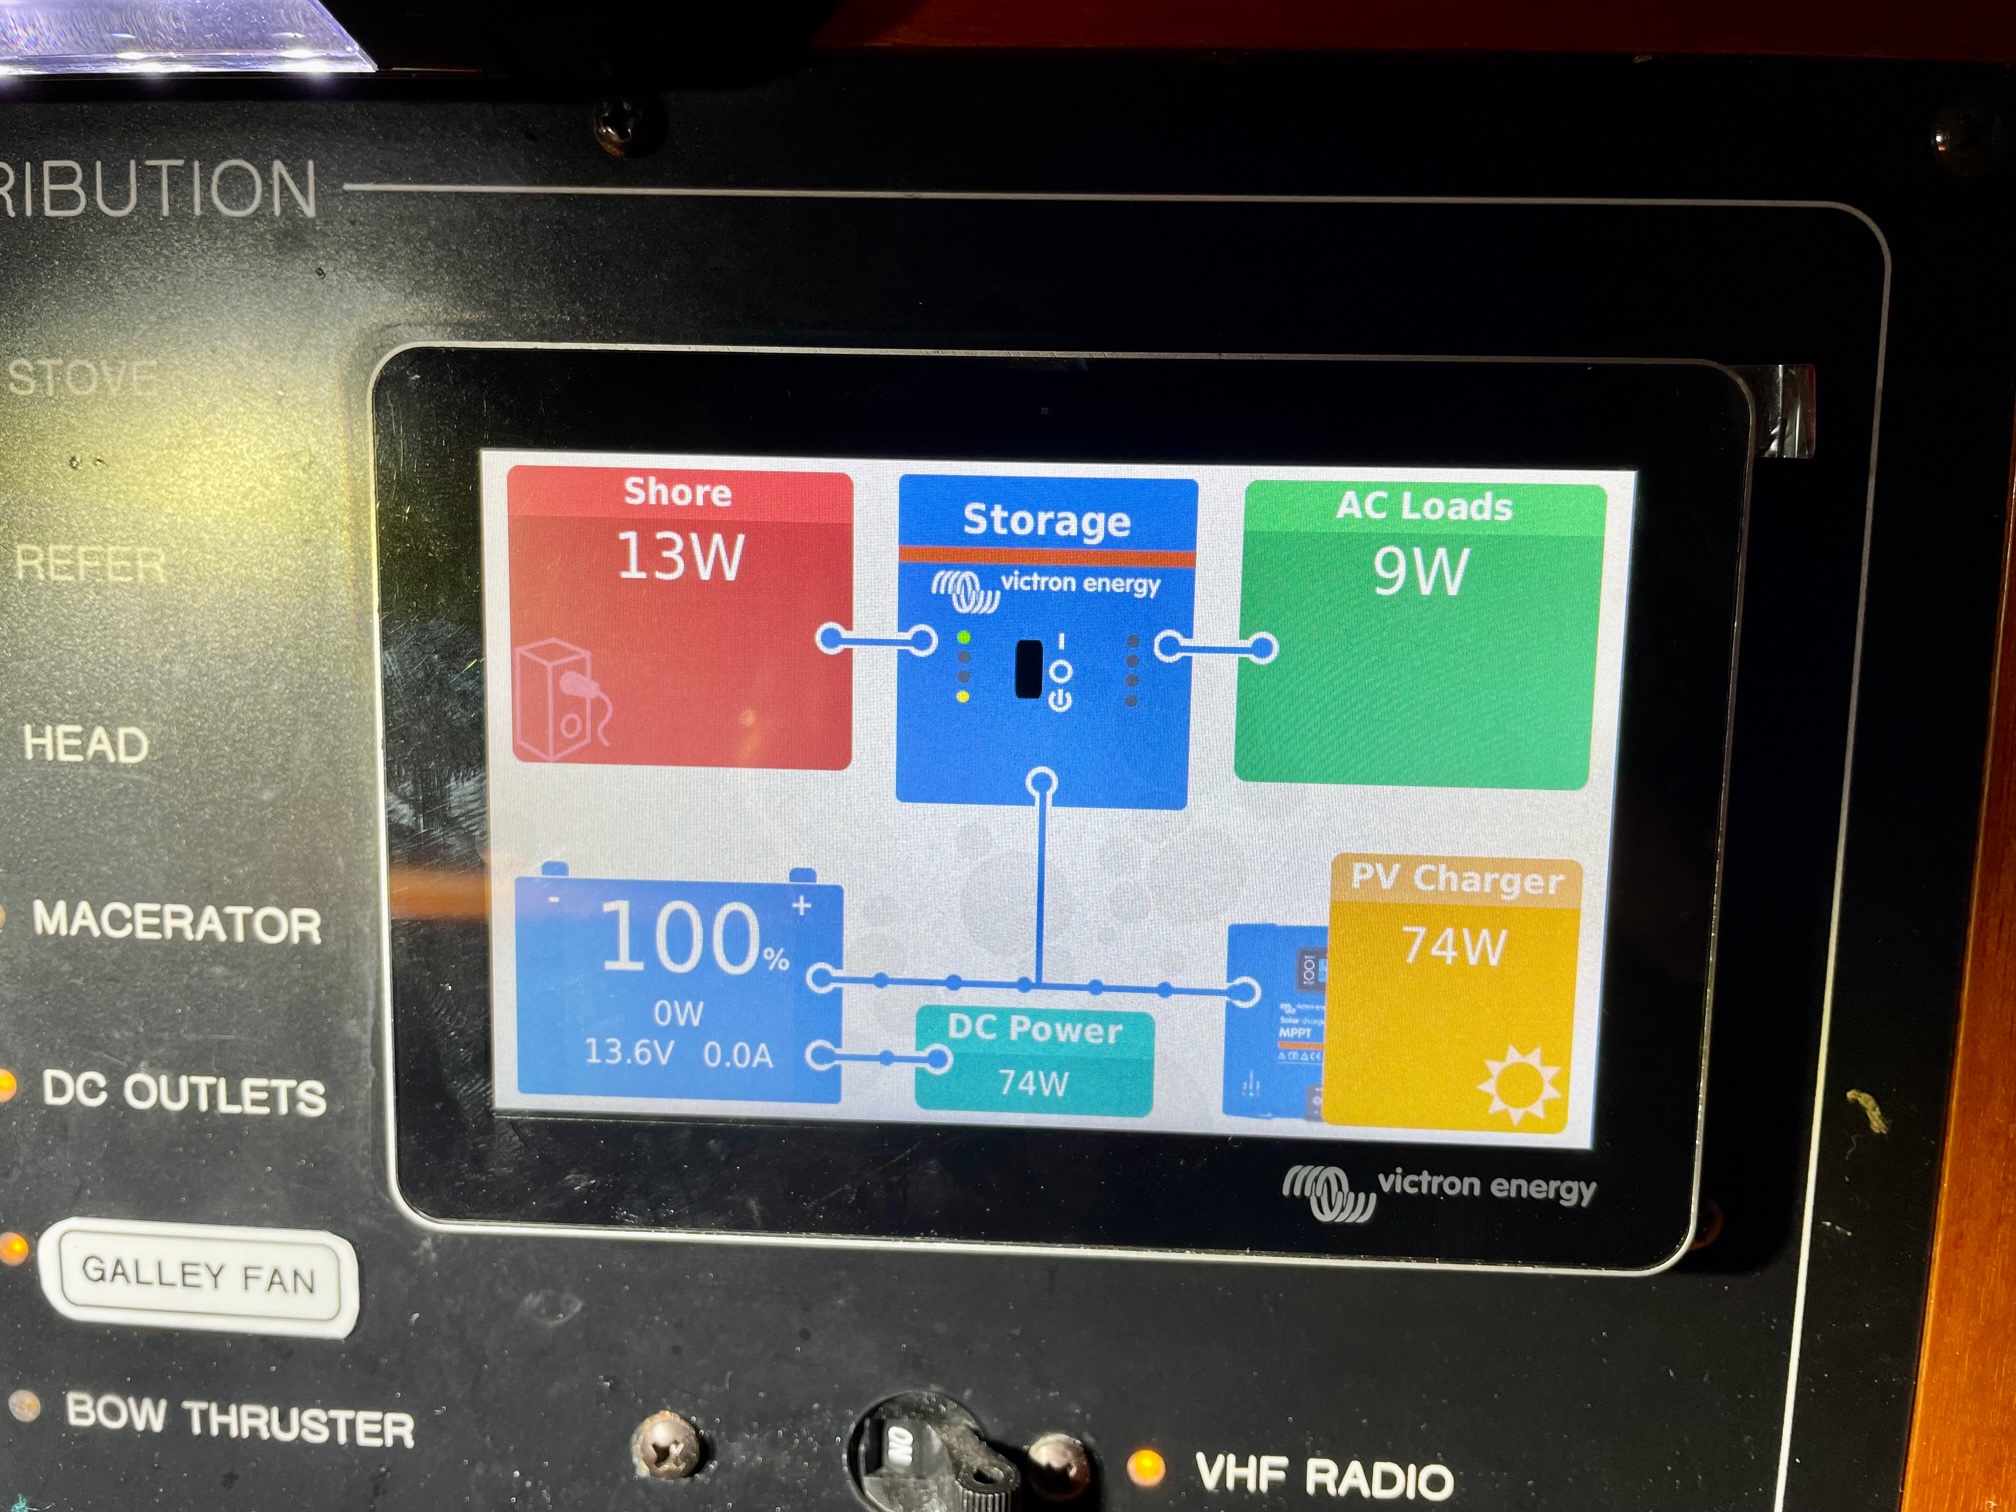
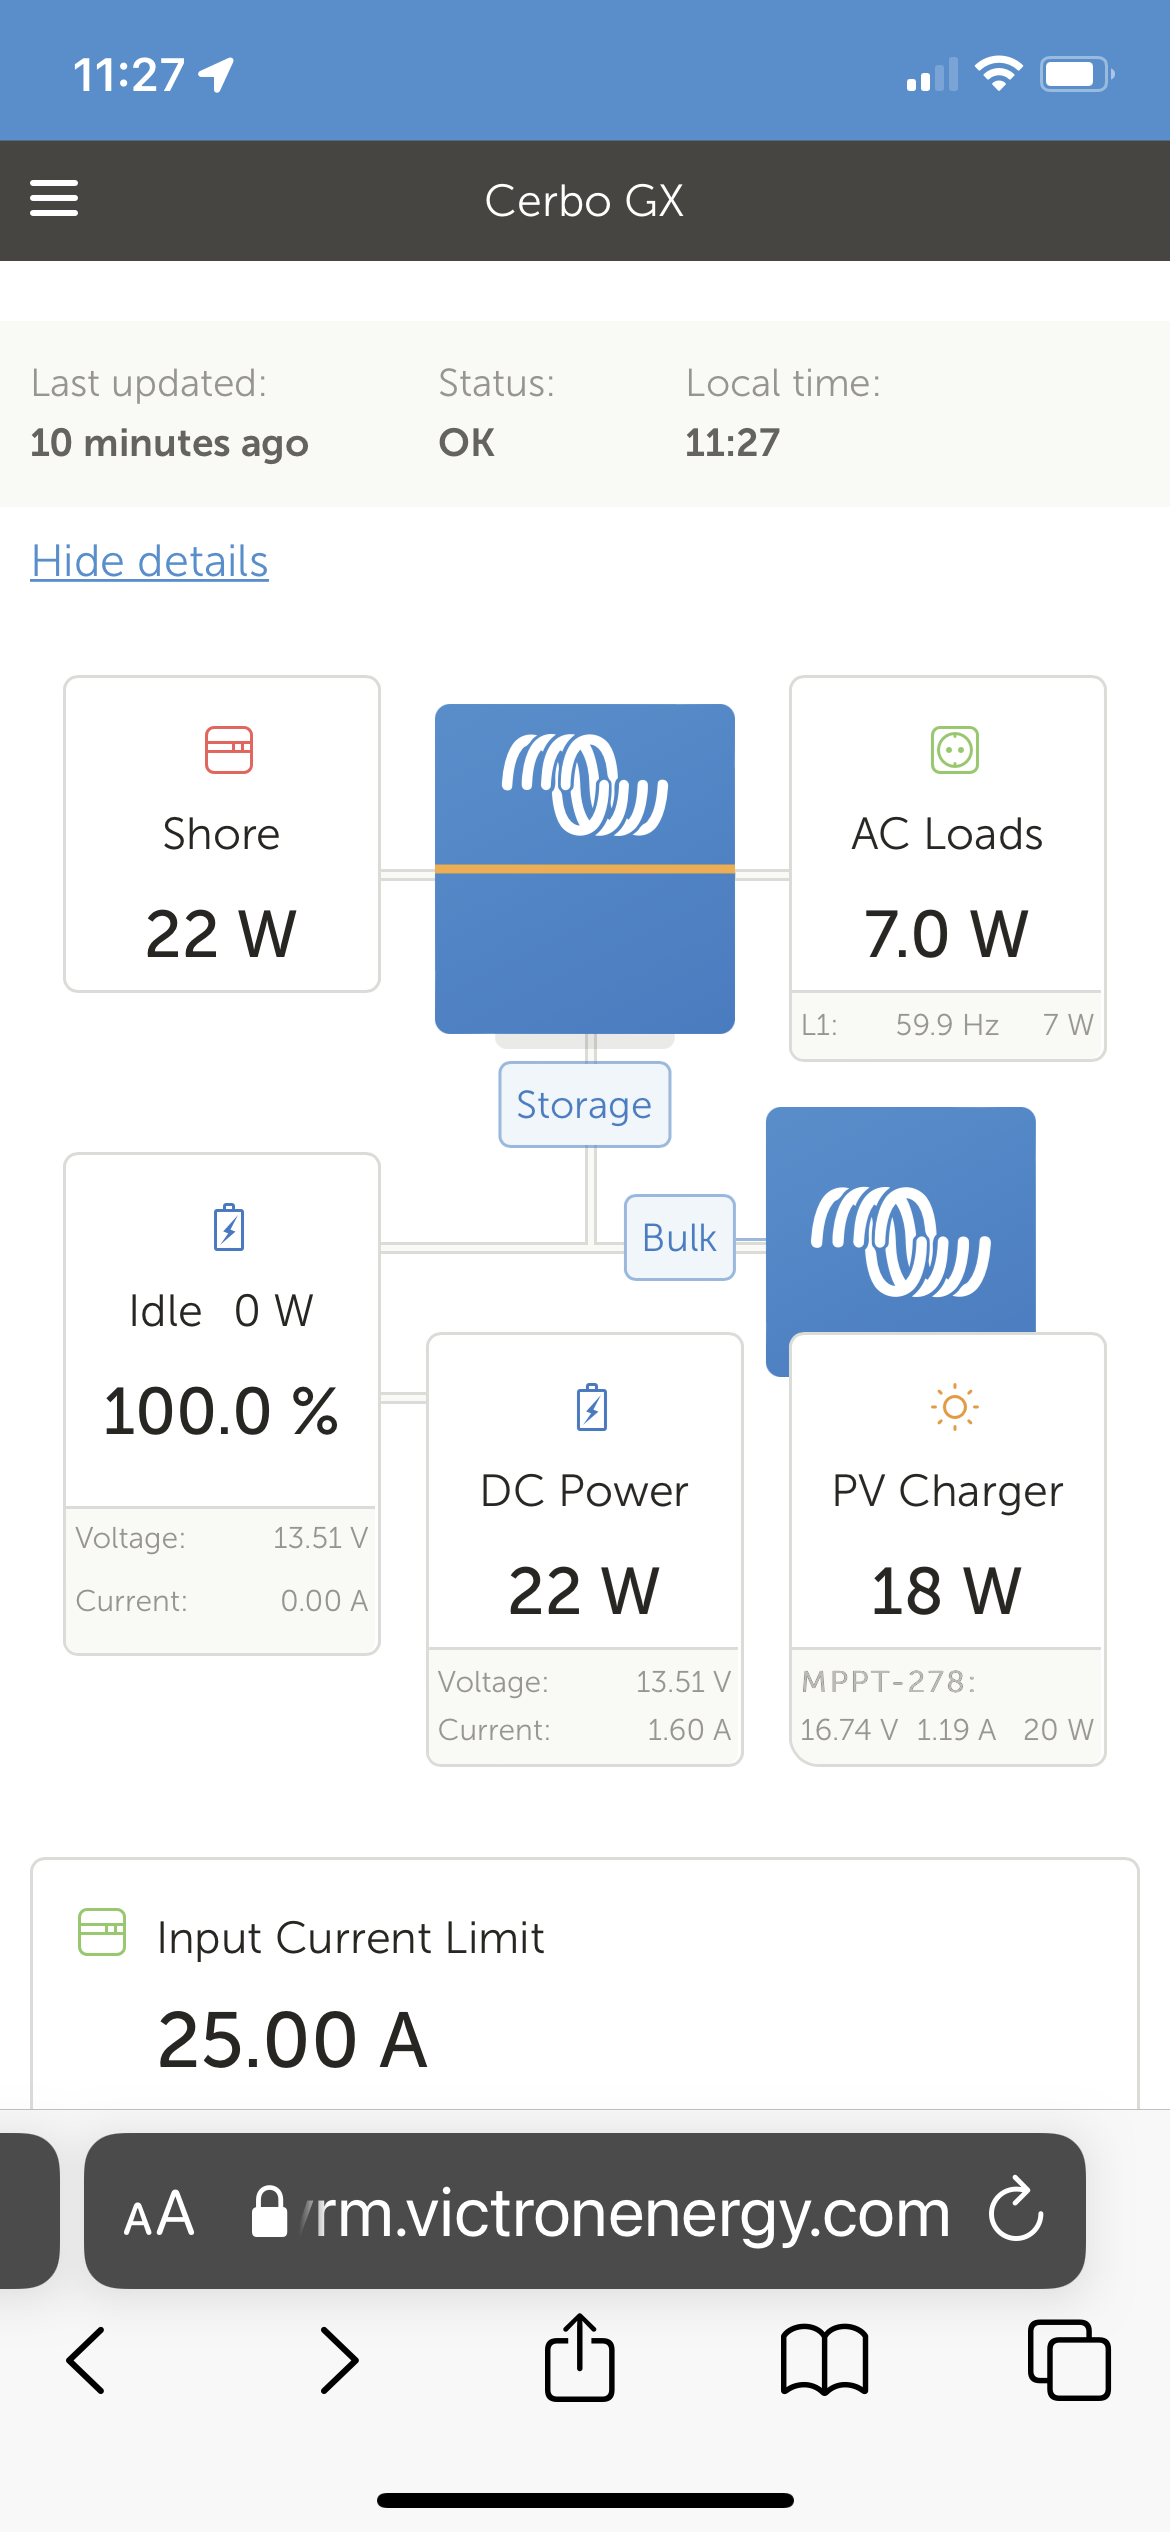
For the Monitor/Control, I installed a Victron Cerbo GX with a GX Touch display, and a SmartShunt. This allowed me to do most of the wiring near the MultiPlus while running a single wire to the touchscreen display. The 5″ display took the place of the old Link 2000 with minor changes to the DC distribution panel. The touchscreen has lots of info and menus for setup and making changes.
Solar PV MPPT Controller
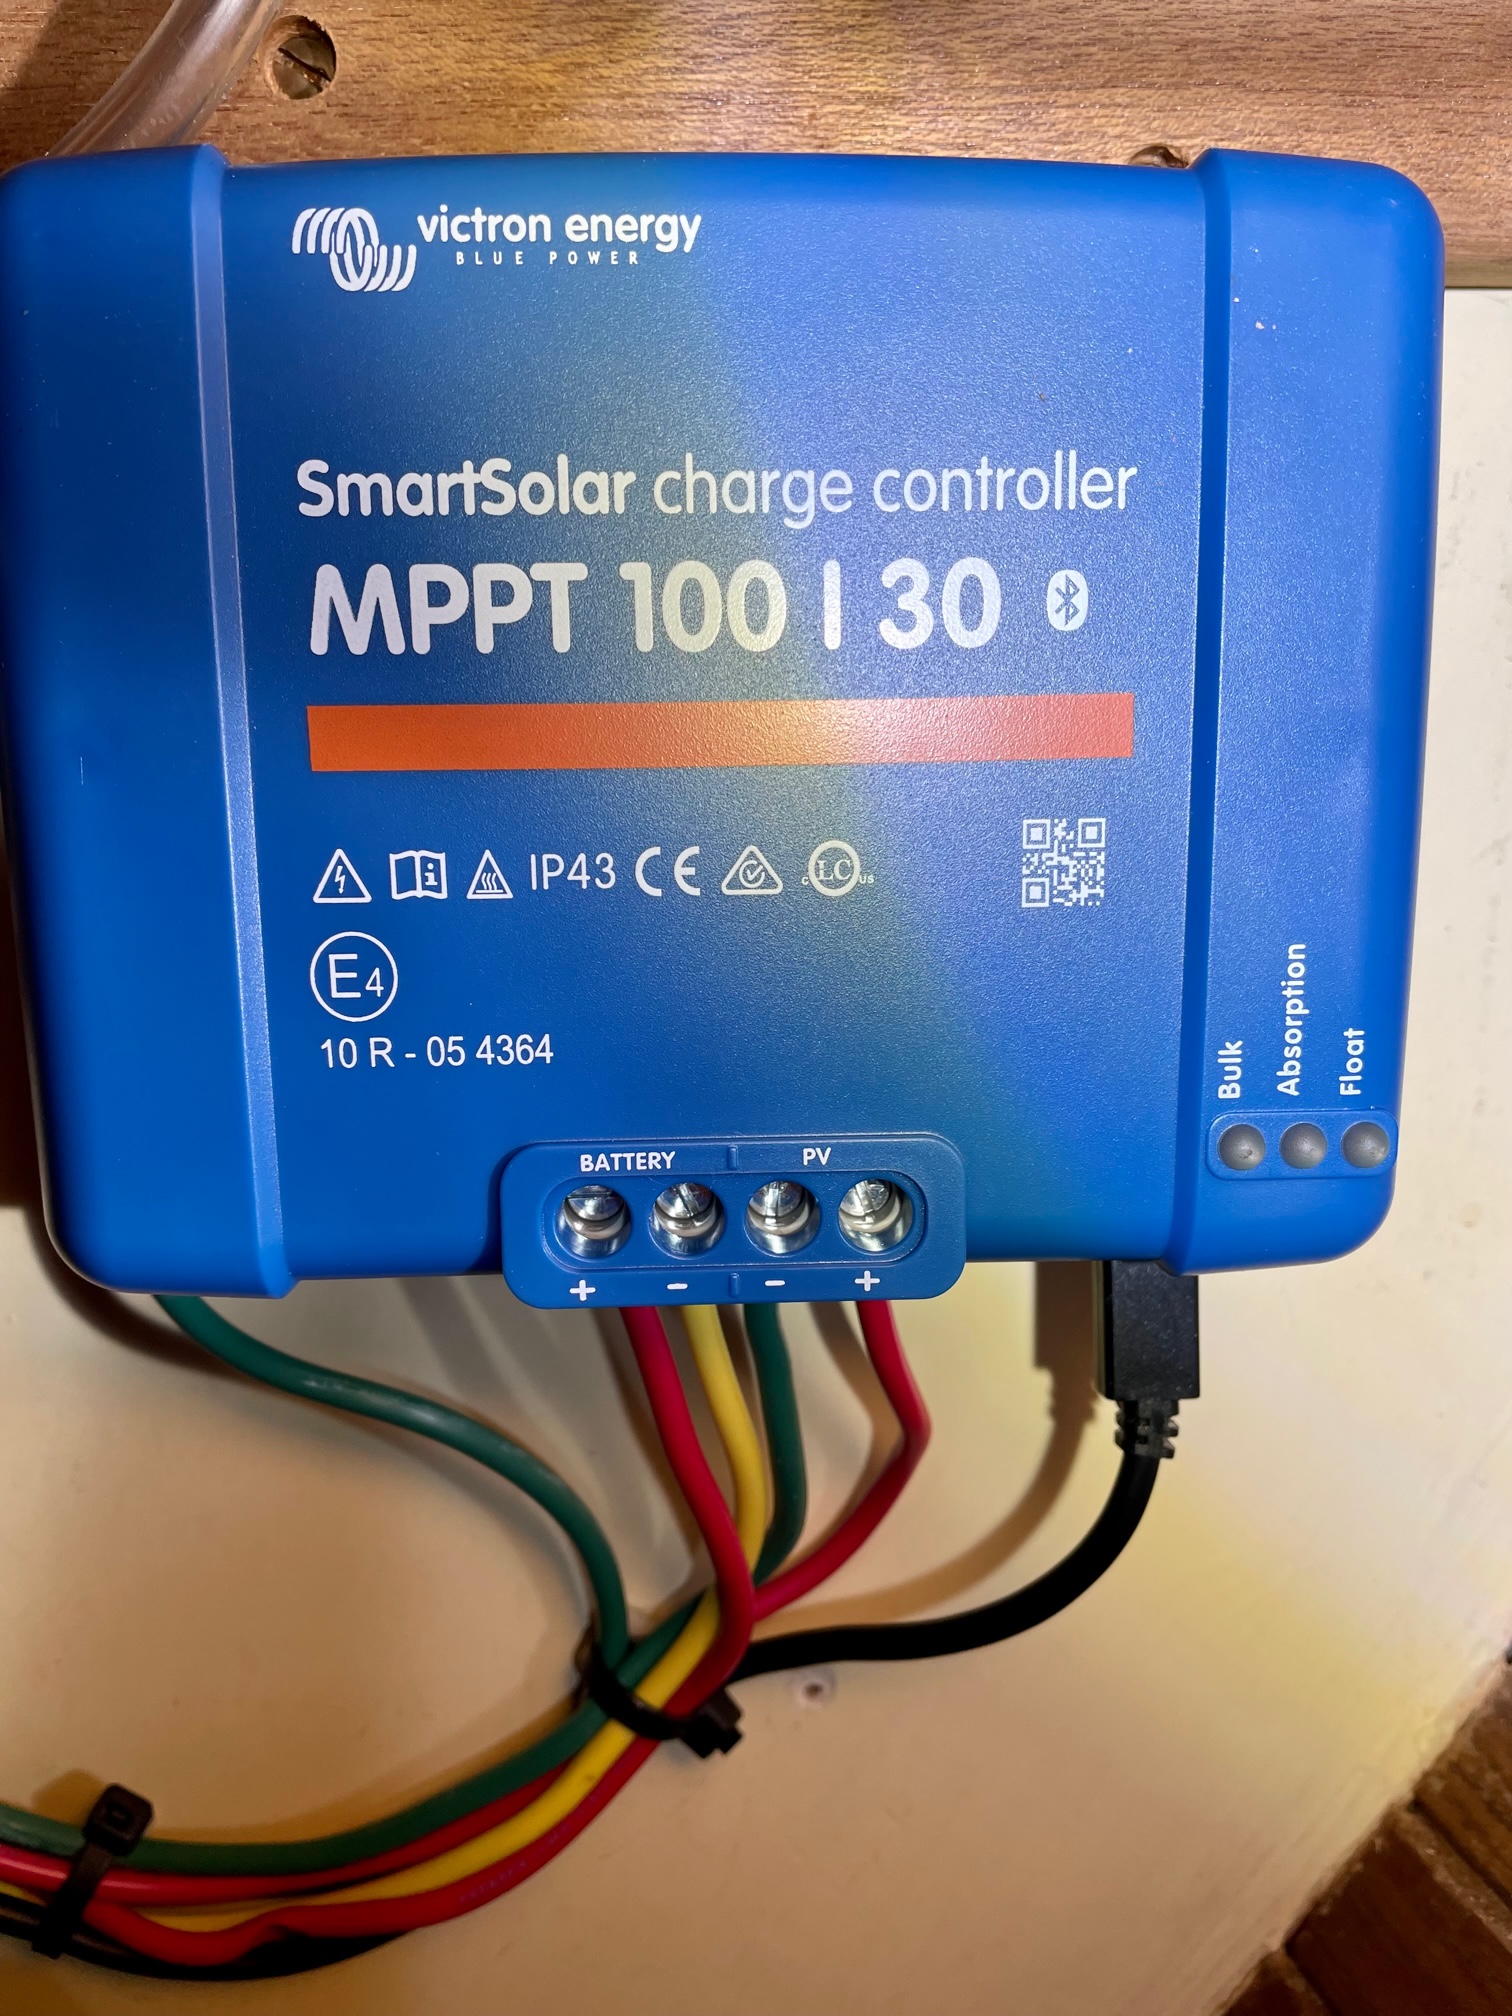
I decided to replace my older Outback Solar Controller with a new Victron SmartSolar 100/30. This integrates well with the Cerbo GX with a VE-direct cable and when connected, solar charging information appeared on the touchscreen as seen in the above picture (PV Charger). The controller can provide as much as 30A of solar charging to the Lithium batteries. On my boat, even in the tropics, the most output I ever saw from my 5 solar panels was about 20A since there’s almost always some amount of panel shading from the rigging. The built-in Bluetooth allows it to be controlled from anywhere by pairing it with a smartphone via Victron Connect.
Remote Monitoring
The Victron System (Charger/Inverter, SmartShunt, Cerbo GX, SmartSolar) is able to be monitored remotely as long there is WiFi on the boat. The VRM Portal is free and allows me to observe the following from anywhere in the world:
- the battery state of charge
- amount of AC shore power being drawn
- solar charger output
- amount of AC and DC loads are being consumed
- “time to go” before charging is needed (based on current consumption)
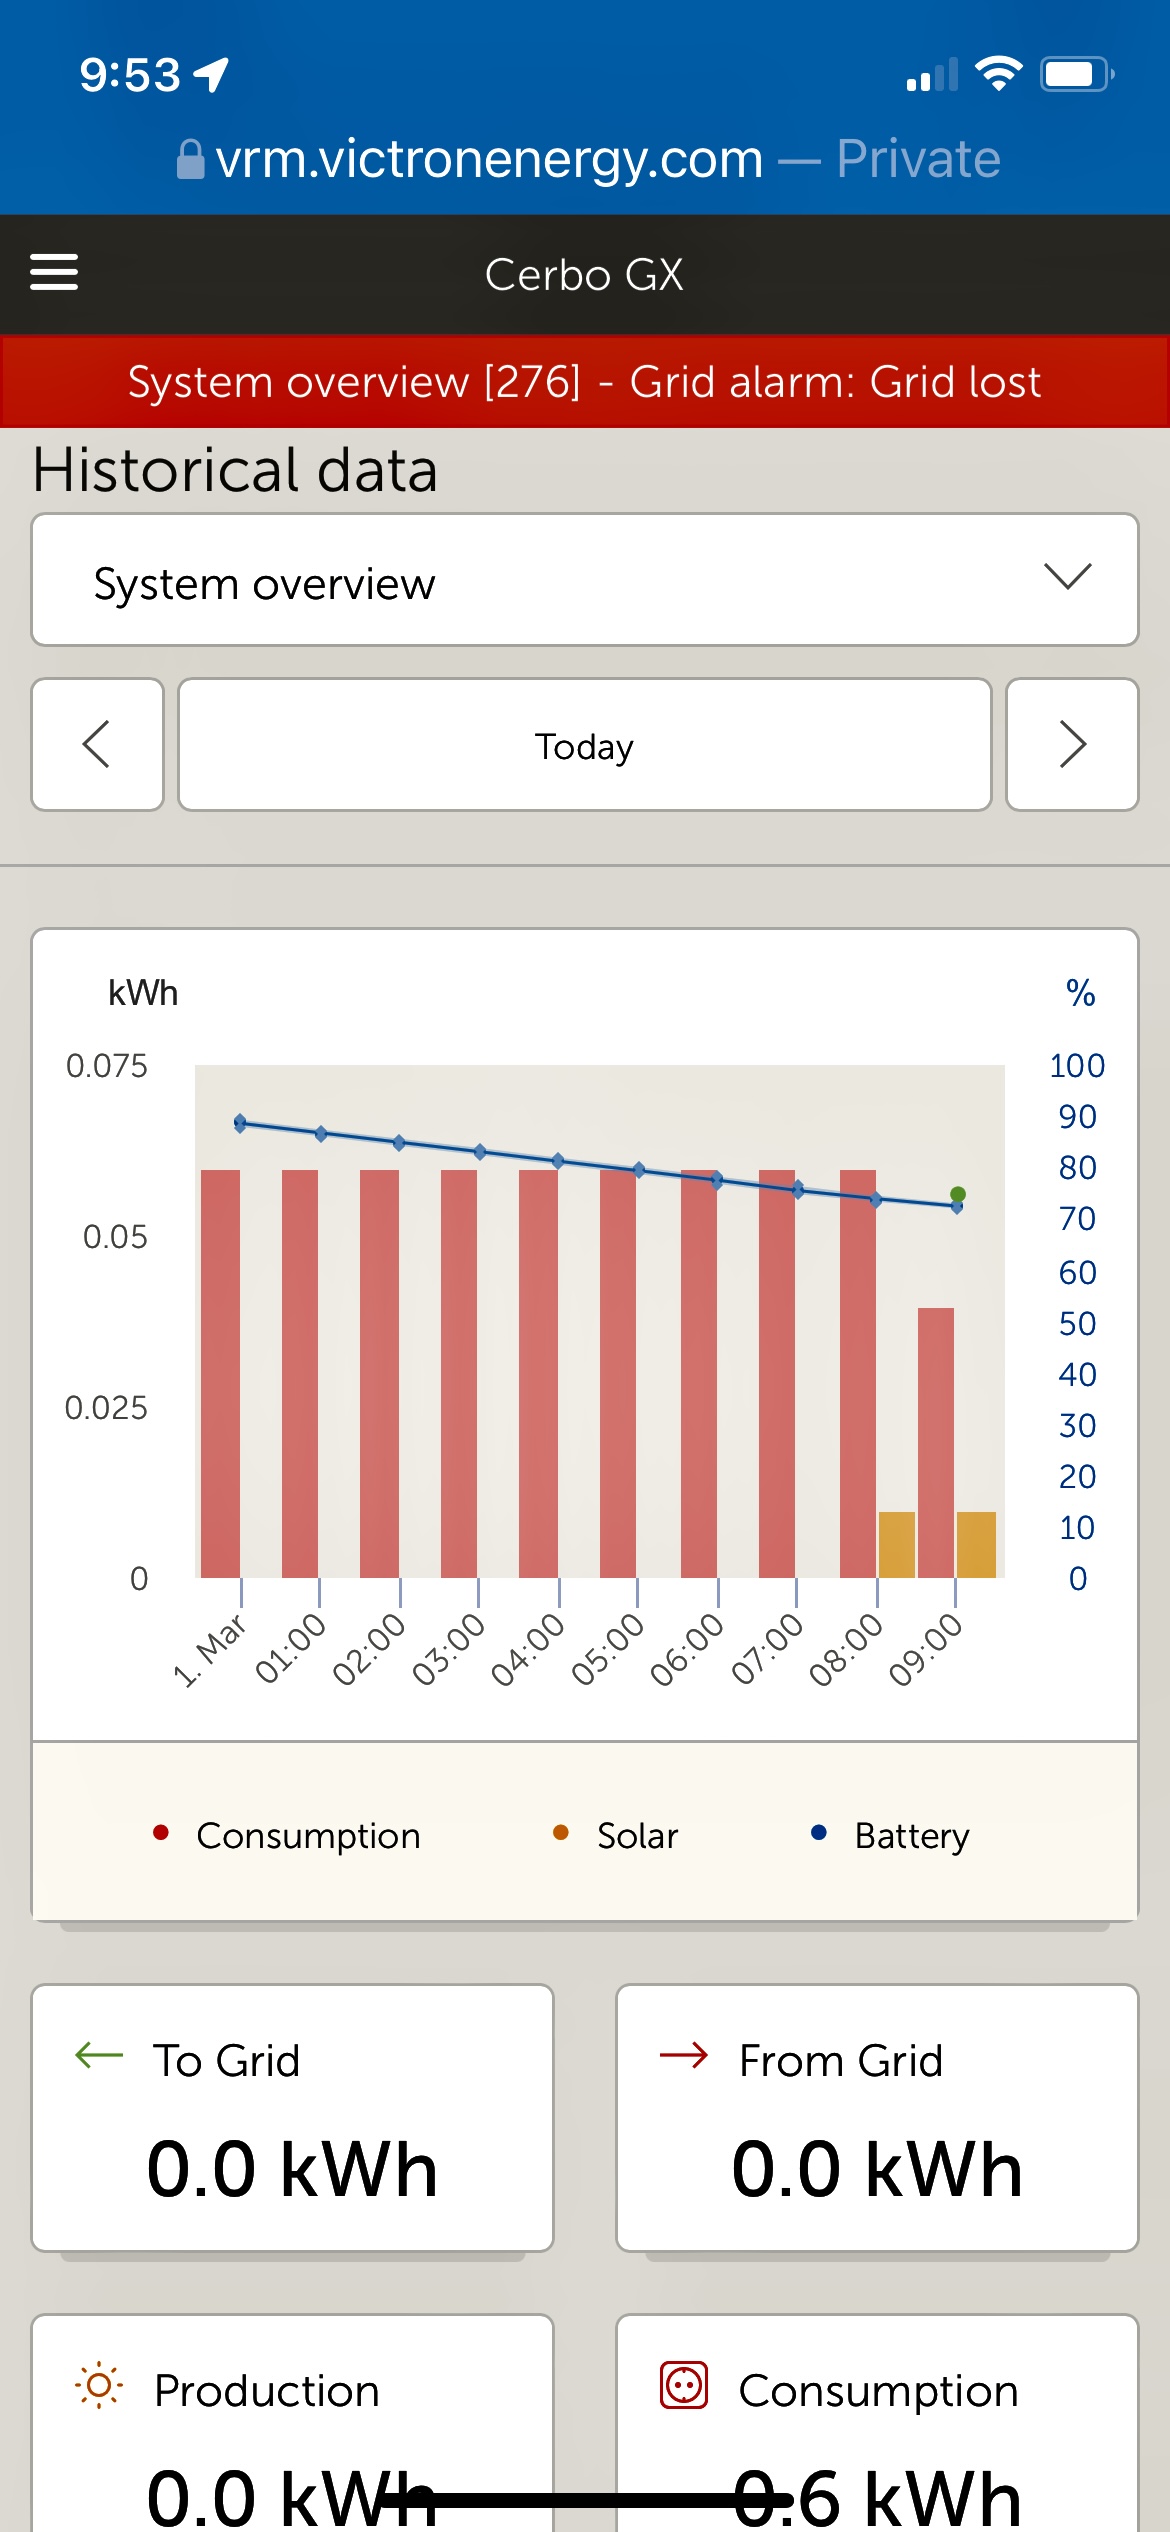
- historical data for power consumption, solar charging, and battery level
Installation
I decided to break the installation into 2 parts–first change out the Inverter/Charger, Controller & Monitor, Shunt, and Solar Controller and get that all working with my AGM house batteries. Then part 2 was to swap in the LiFePO batteries.
The first step of part 1 was to remove all the old equipment. As I was doing this, I realized that most of the AC and DC wiring to the Inverter would need to be replaced since it wouldn’t reach the location/orientation of the new Inverter. I also had to move the autopilot controller, radar wiring bus and a few other things to make room for the larger inverter. Most of the wiring was in hard to reach places, which is typical on boats. With the old equipment gone, I laid out the locations of the shunt and Cerbo GX, then mounted the touchscreen on the DC panel, and finally the Inverter/Charger. Everything tested out fine when I powered it up. Next I swapped the old solar controller for the Victron SmartSolar. I programmed the Inverter/Charger for AGM batteries, and also set the switch on the solar controller to AGM.
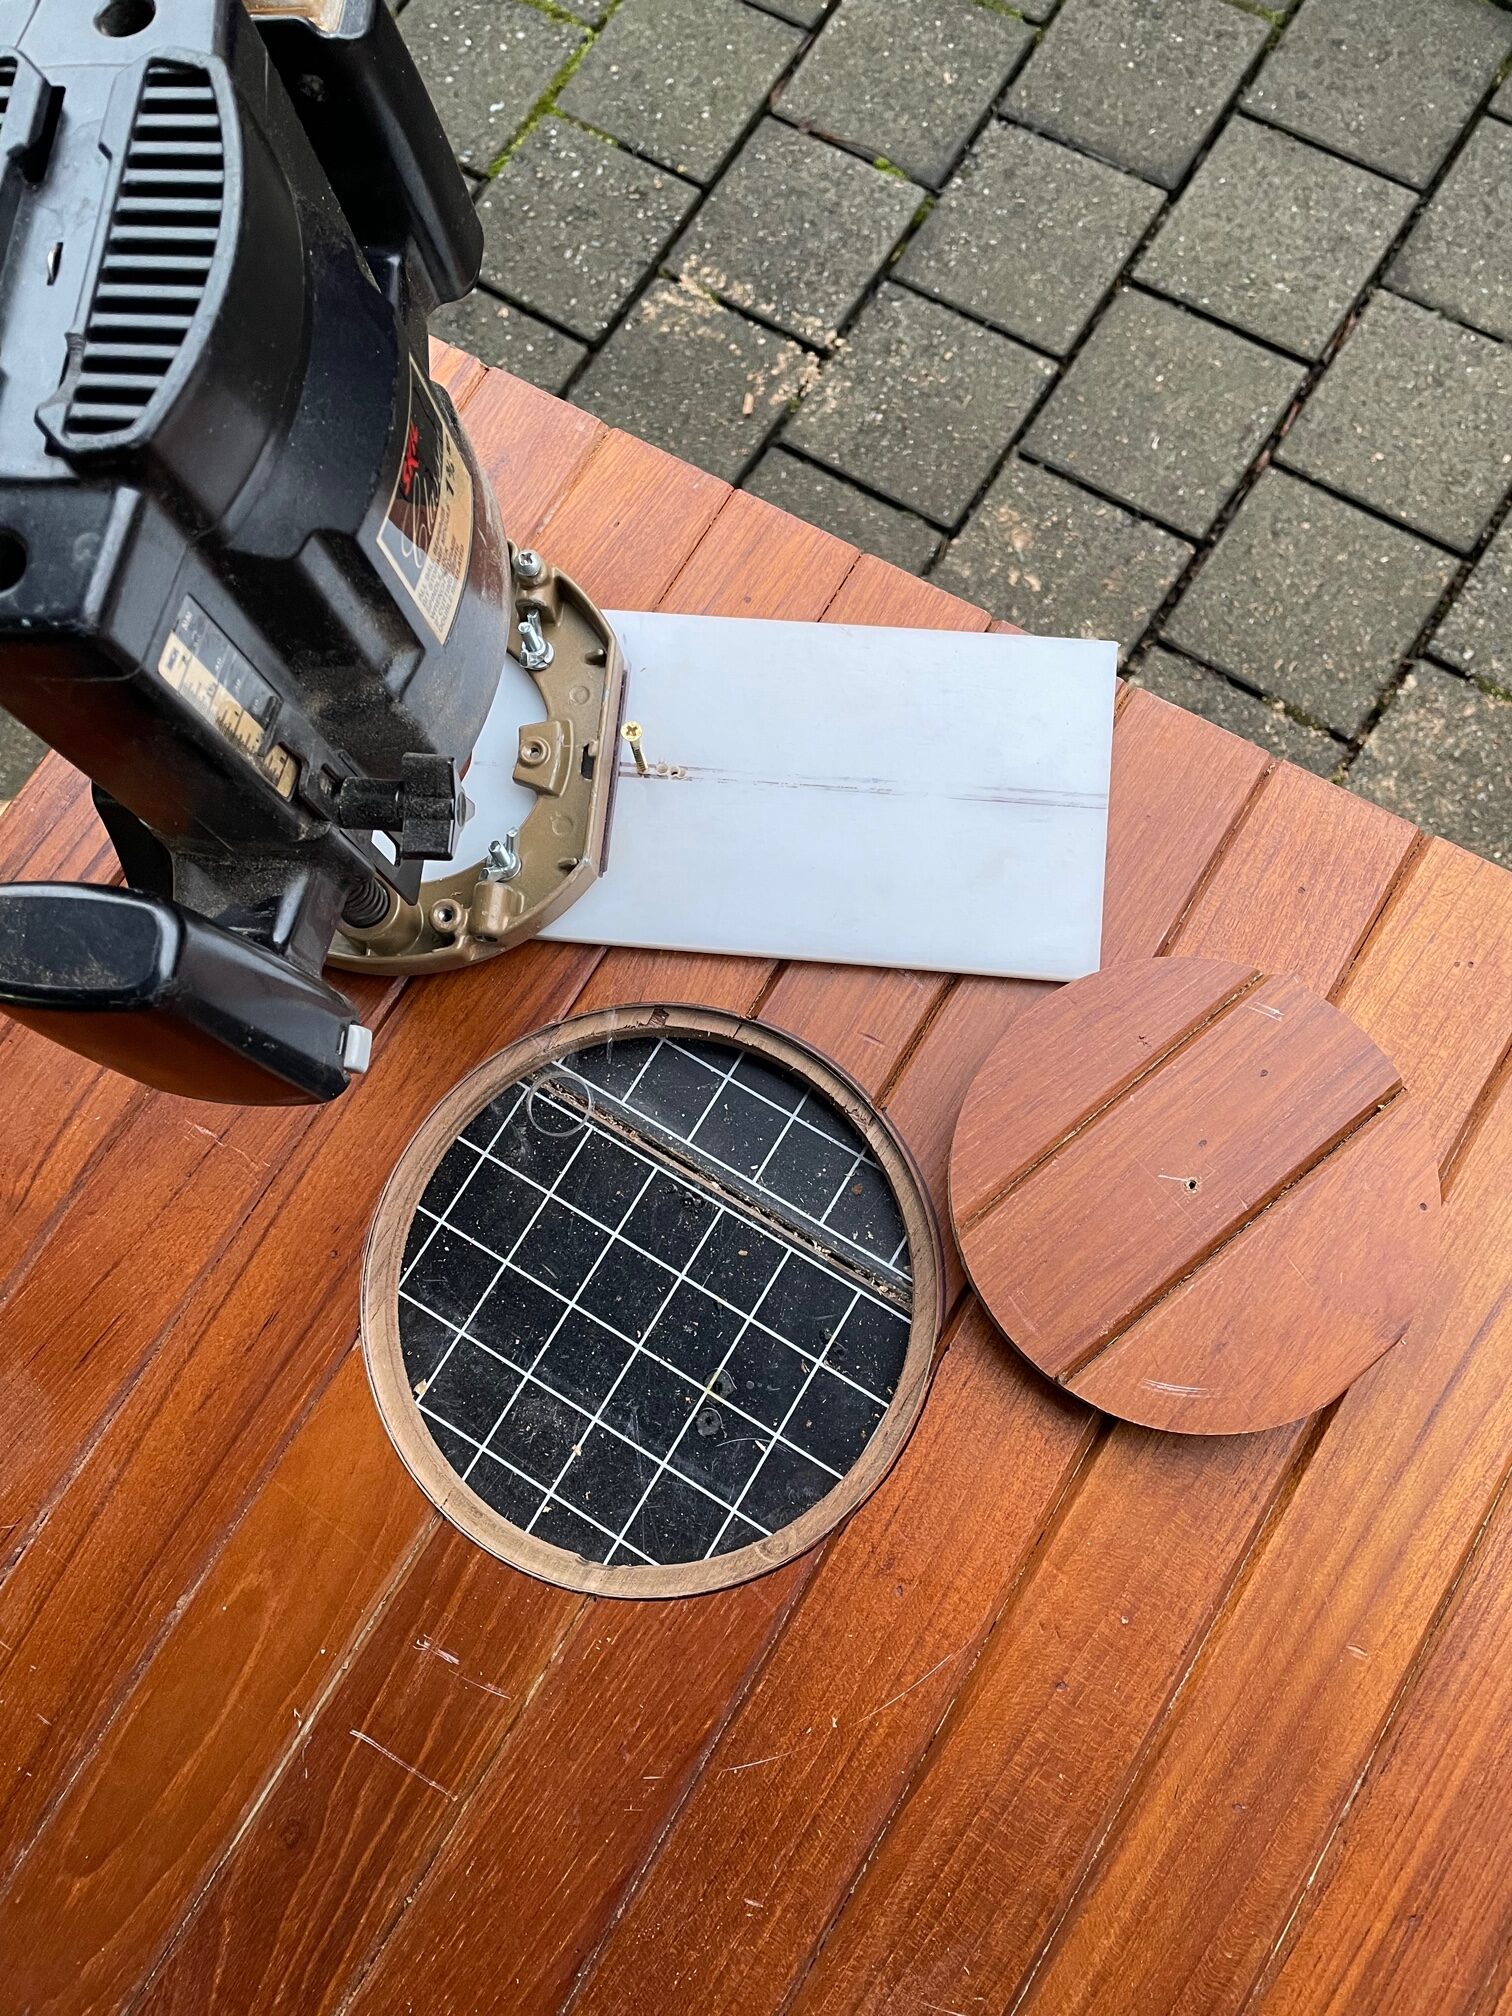
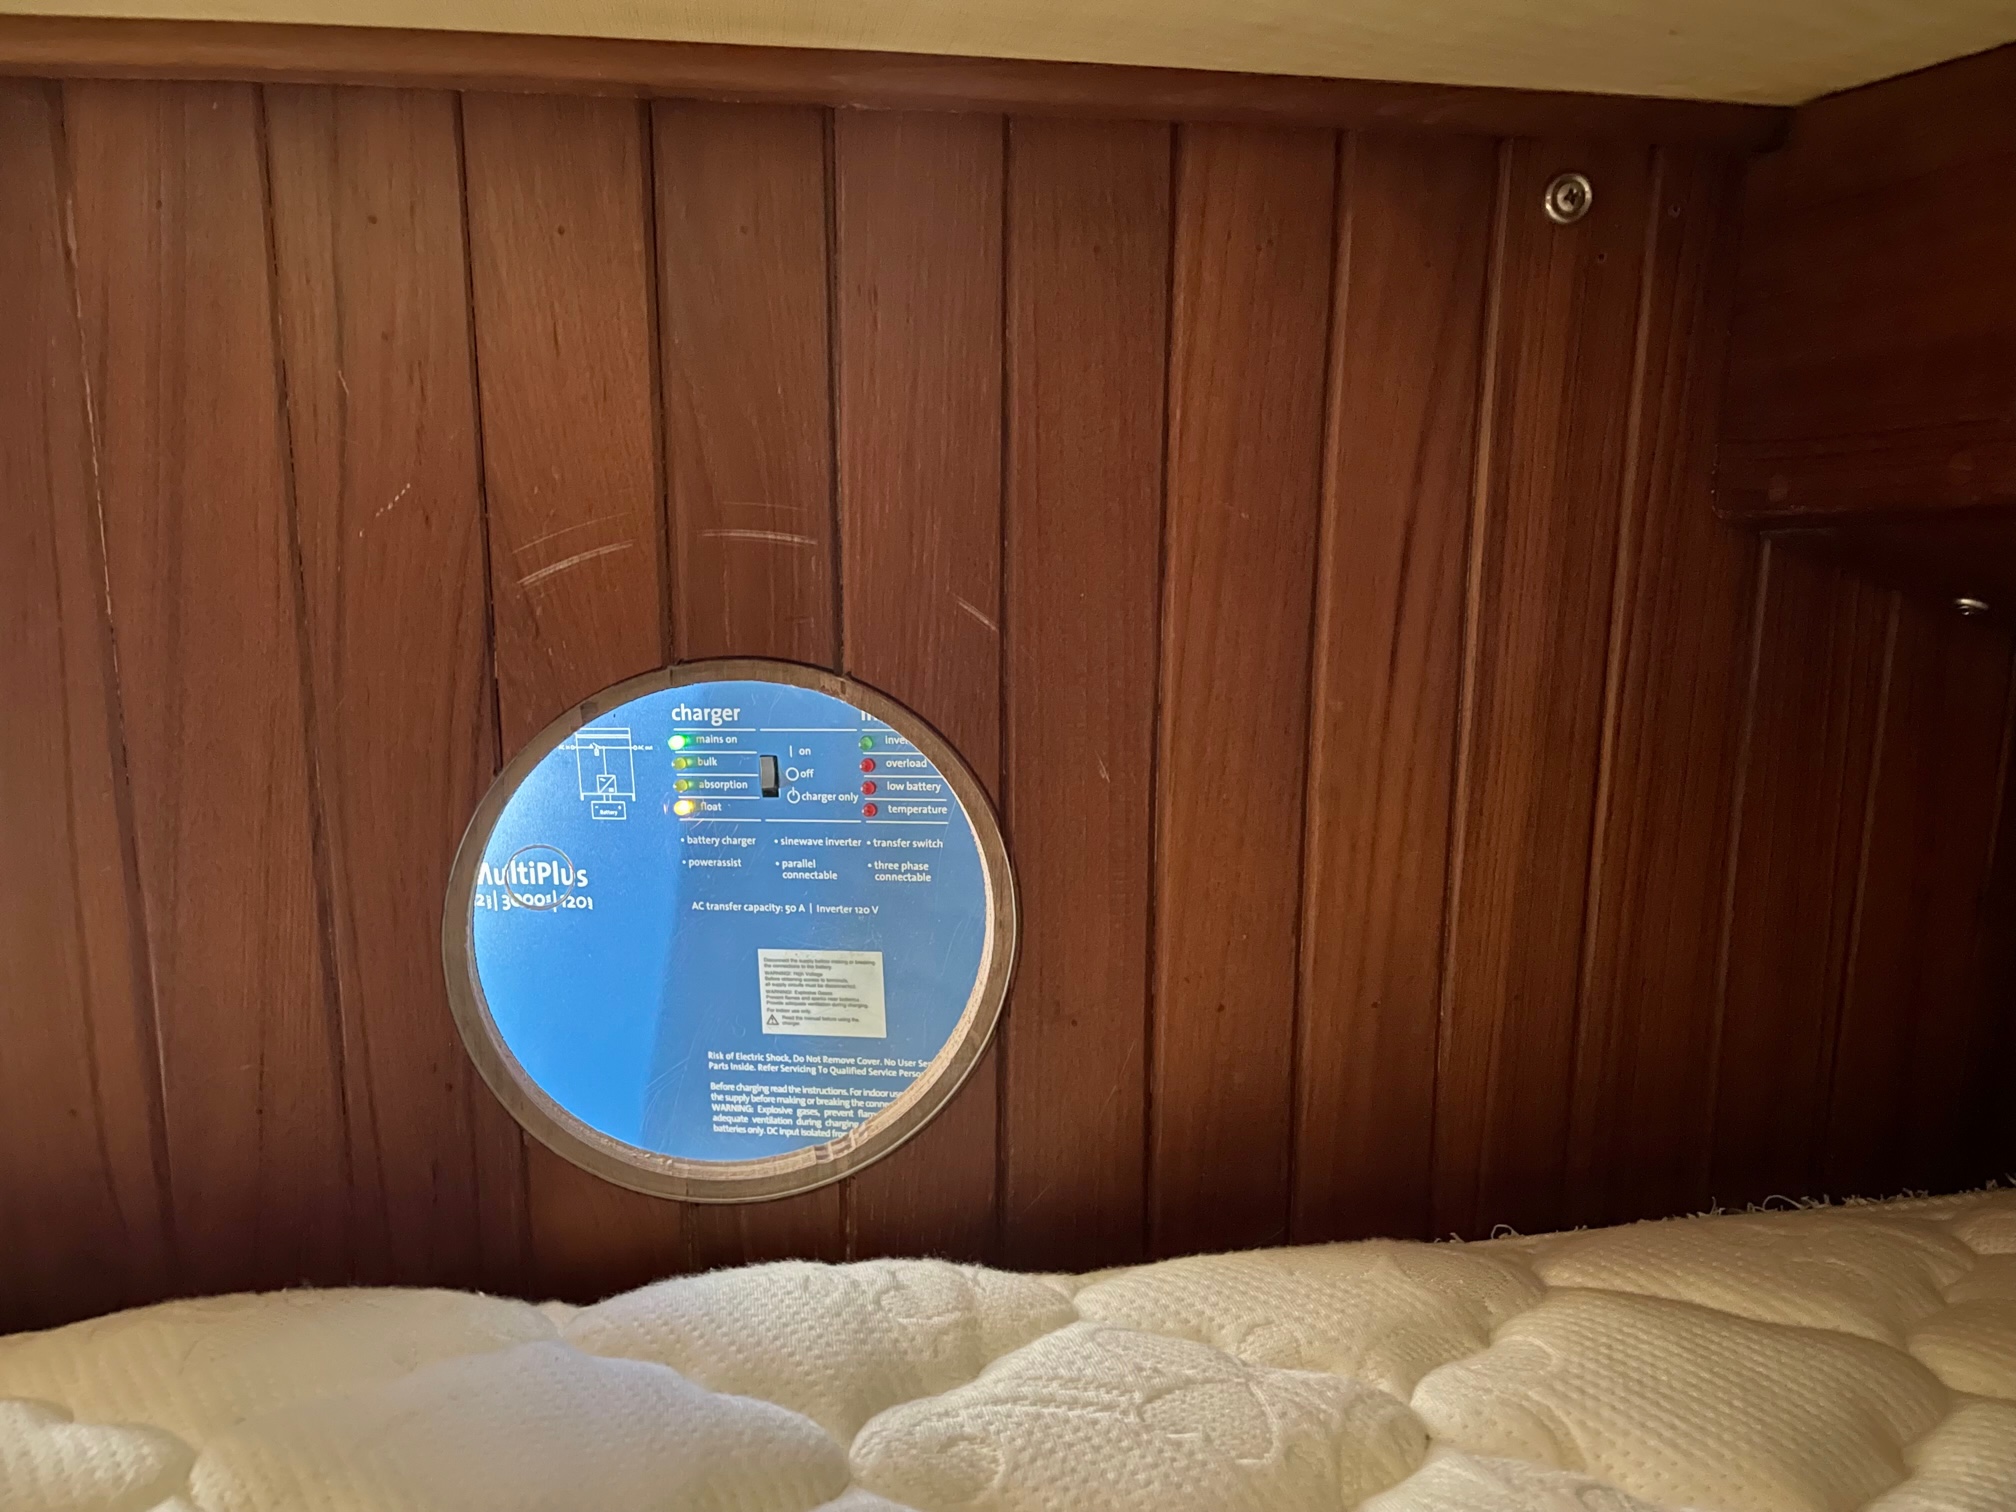
Since the Inverter/Charger and Cerbo GX are behind a panel in the aft berth, I wanted a way to observe and access them quickly without removing the entire panel, so I used a router to cut a 6-3/4″ circle with a 1/4″ lip for a 7″ acrylic port.
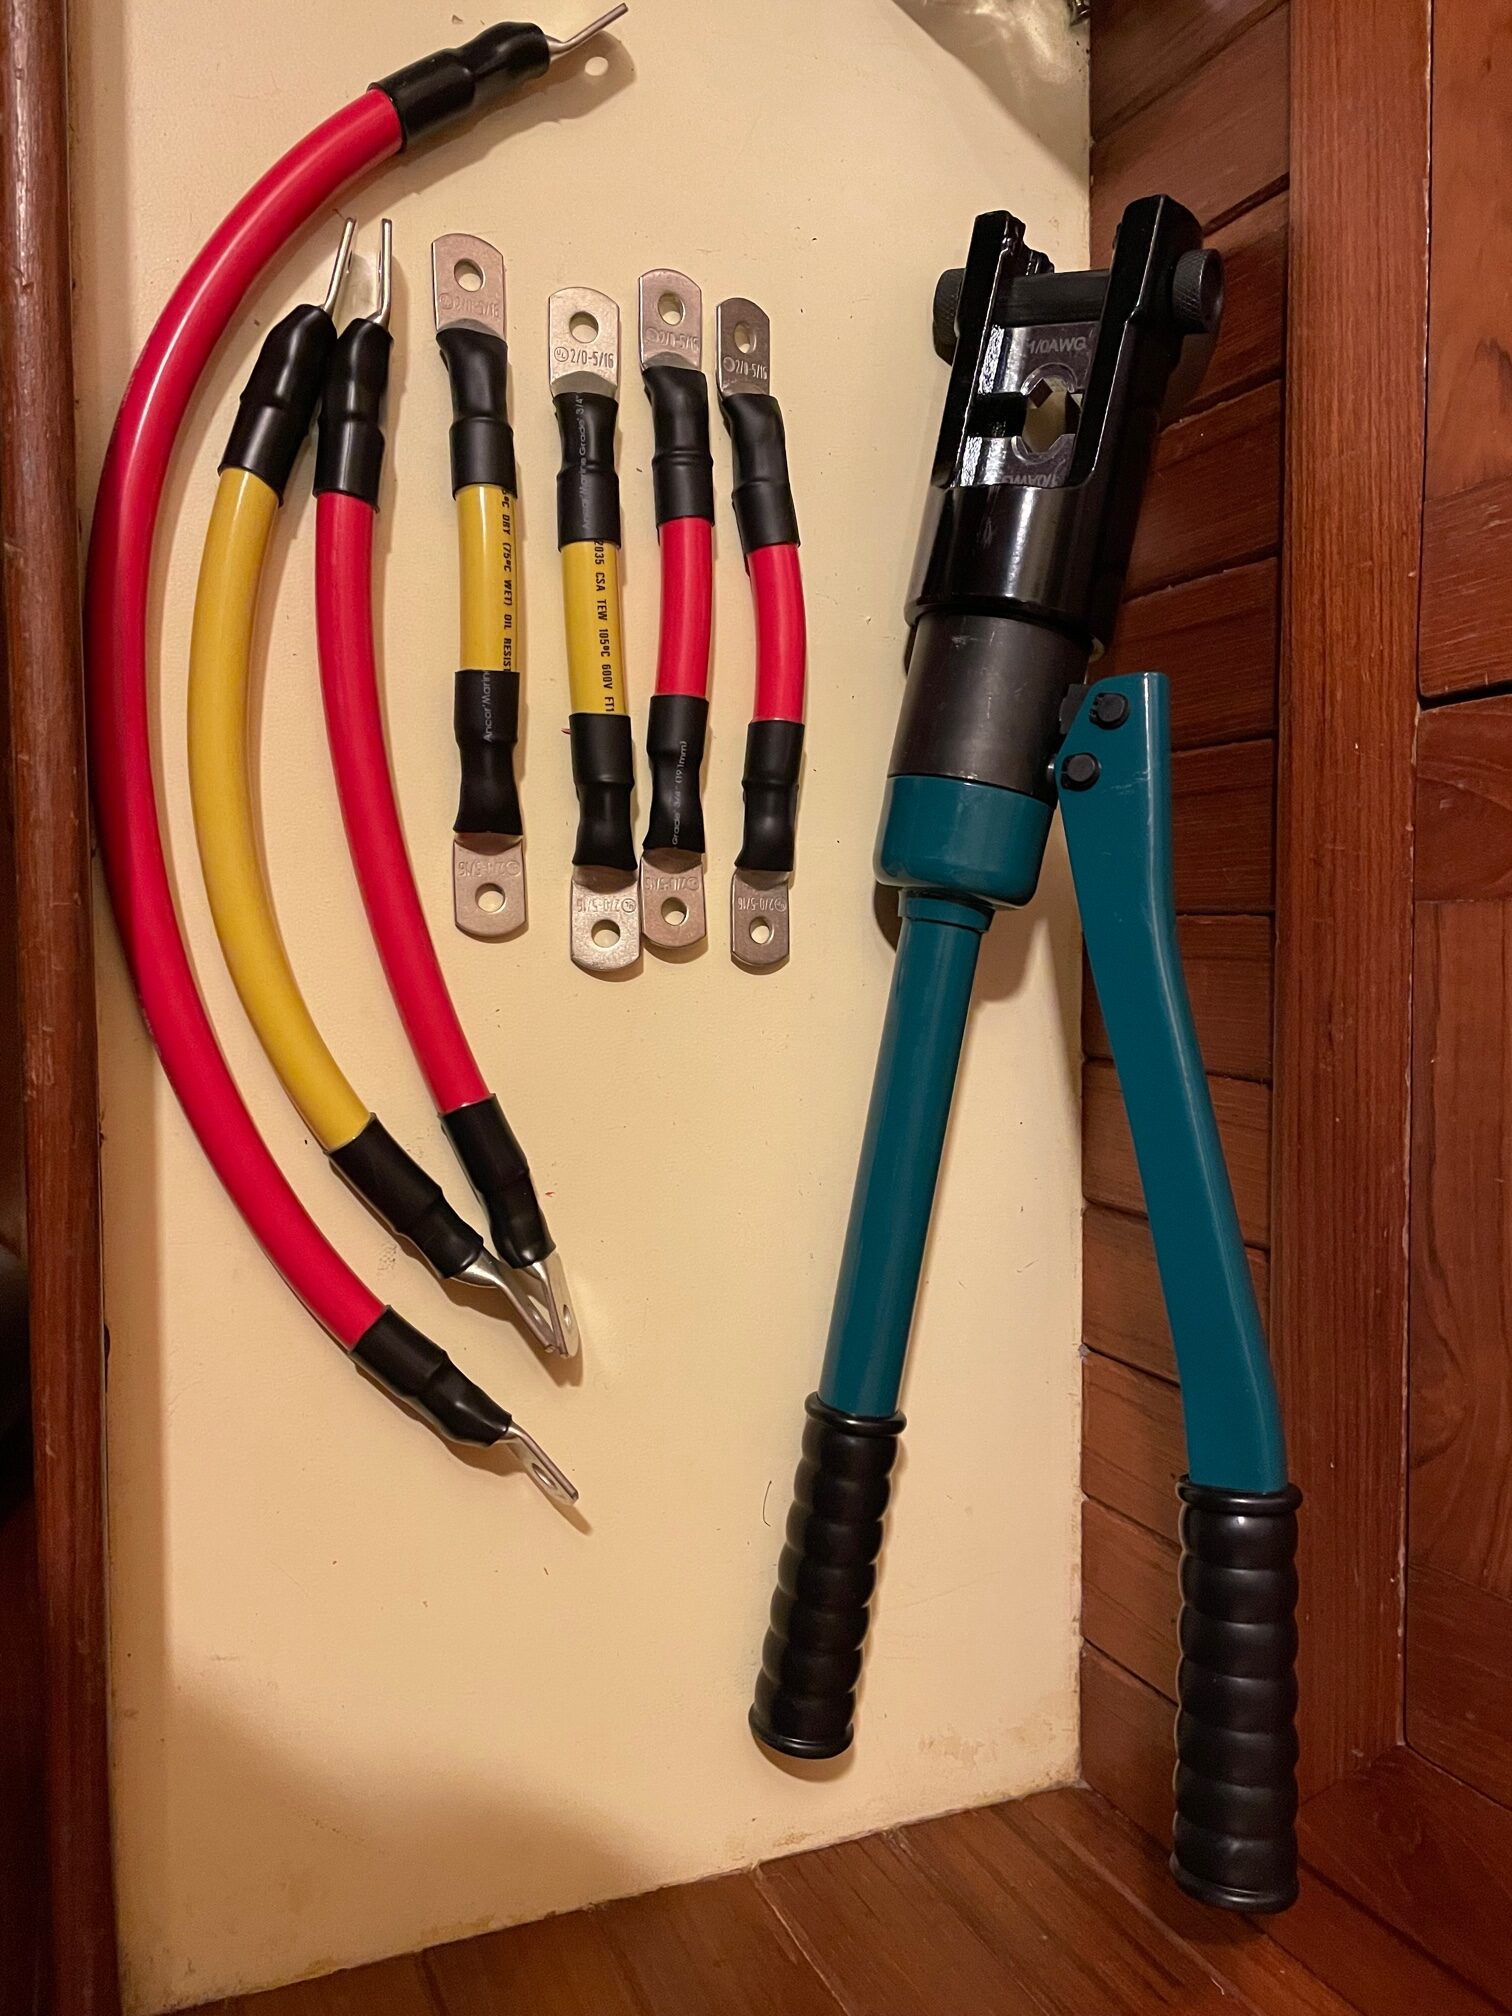
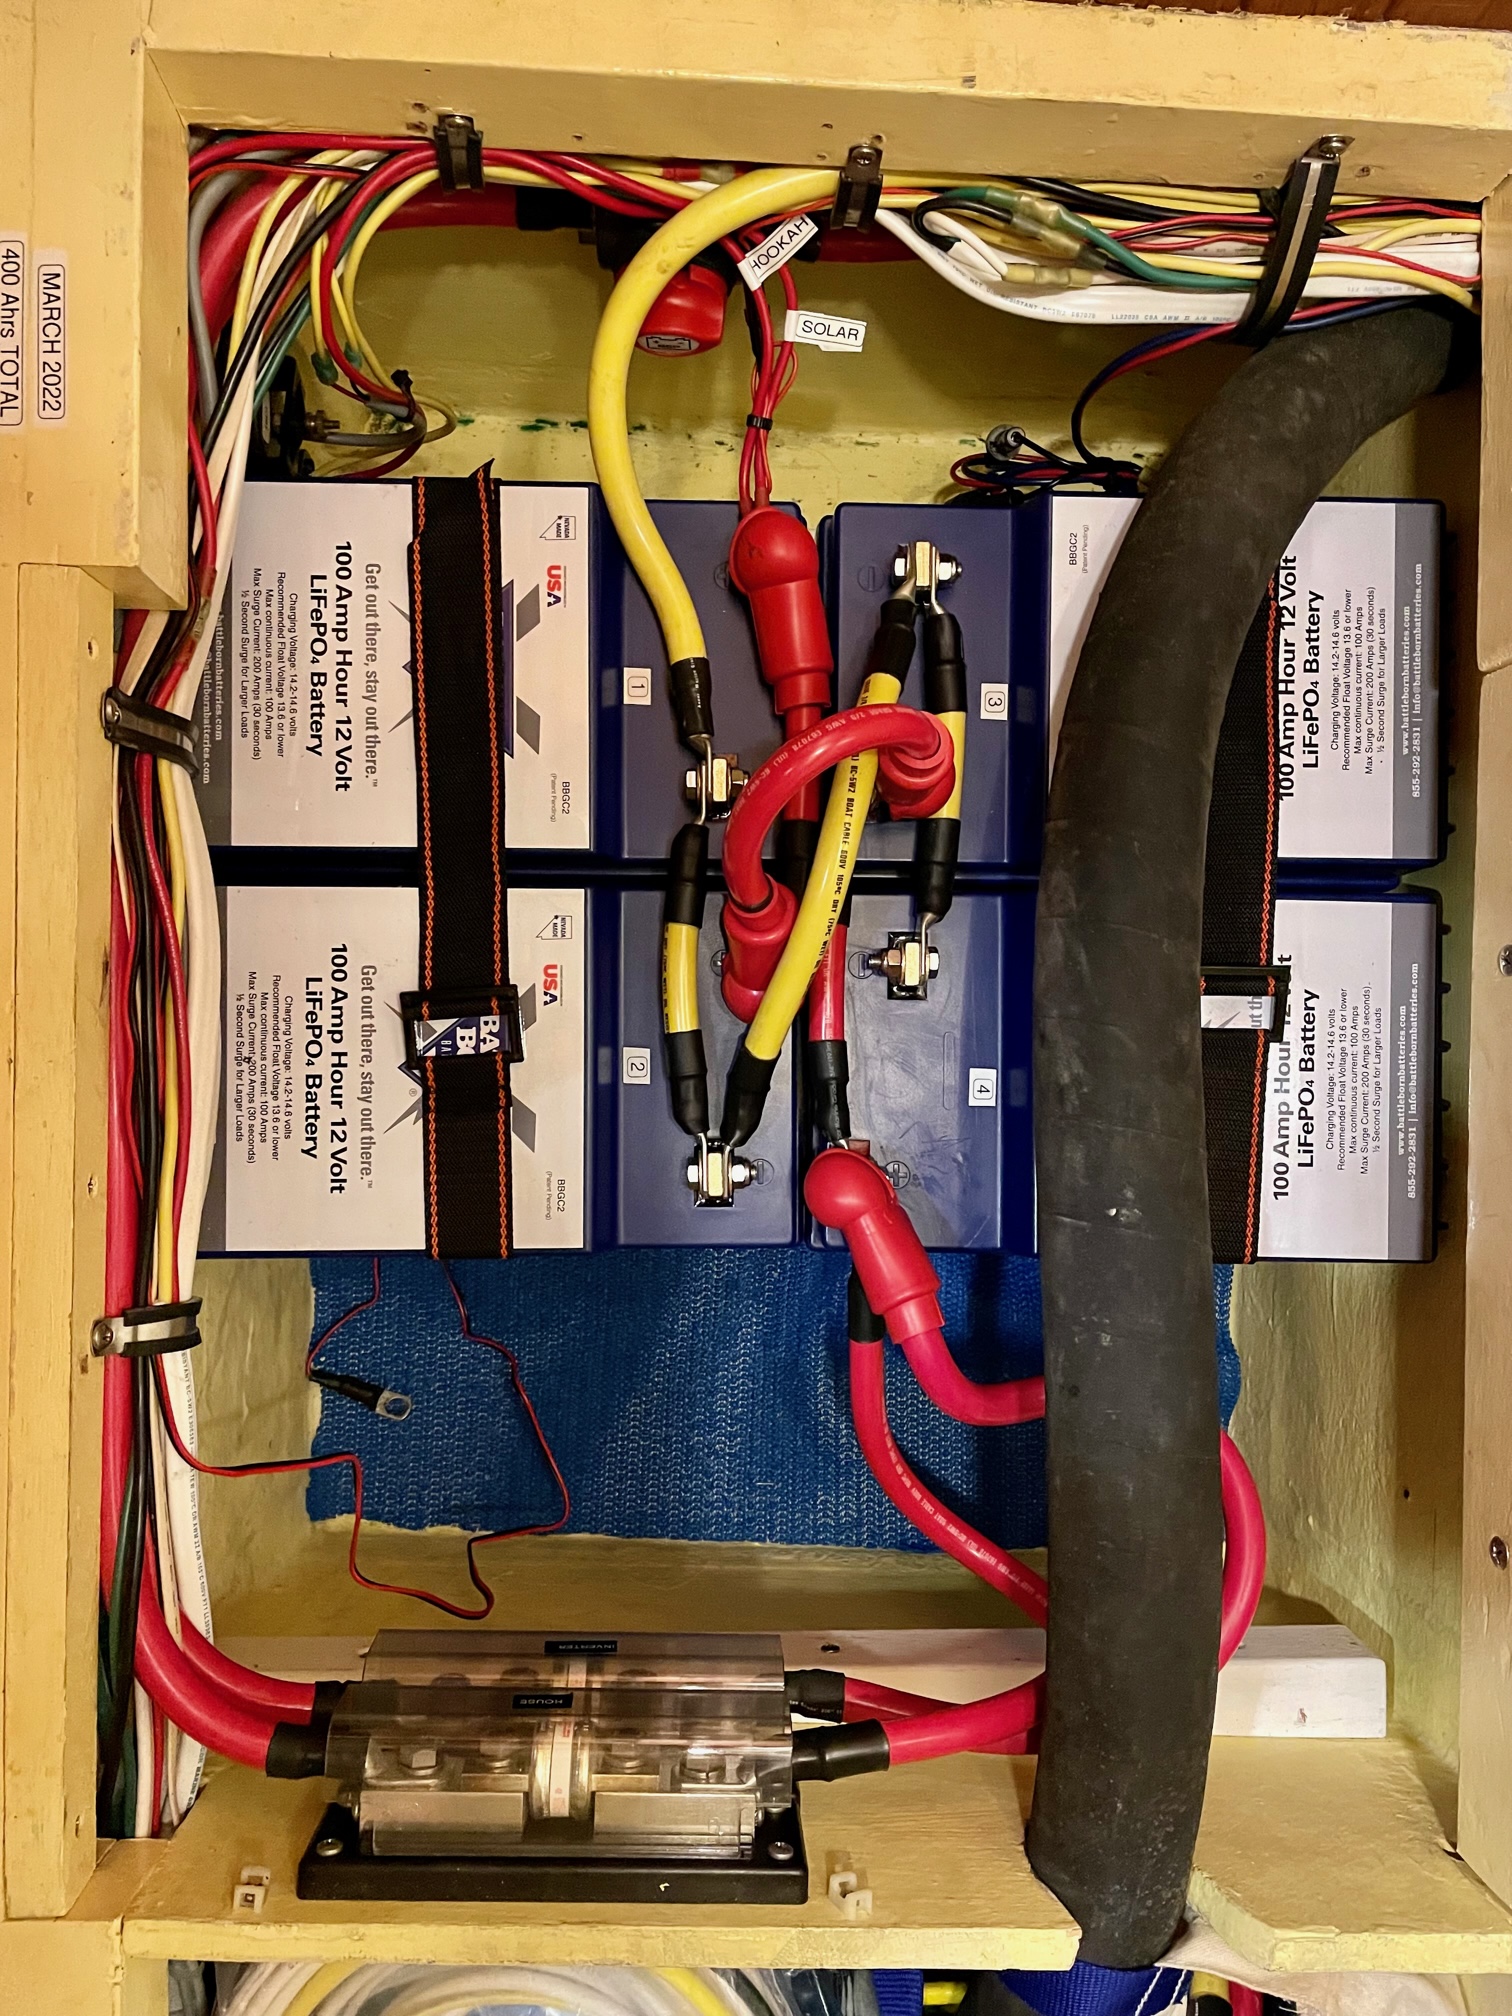
With everything working with the AGM batteries, it was time to swap in the 4 new Lithium batteries. Each of the 6 AGM batteries weigh 78 lbs and each Lithium battery weighs 31 lbs– that’s a difference of 348 lbs! I ordered the GC2 version of the 100AHr BattleBorn and the location of the pos/neg terminals made it easy to connect them in parallel using 2/0 (70mm^2) wire. I bought a good heavy duty hydraulic crimping tool that has die for 10 AWG to 4/0 AWG wire, used high quality lugs, and good heat-shrink tubing to build the 7 connectors I needed.
It’s important to make sure each battery in the bank has the same length of wire from its positive and negative terminals. The 4 short wires that connect battery 1 to battery 2, and battery 3 to battery 4 are all the same length. The 2 wires used to parallel battery 2 and 3 are also equal length (even though the distance for the red positive is half the distance for the yellow negative). Choosing the negative to come off battery 1 and the positive to come off battery 4 ensures each of the 4 batteries have the same length of wire between it and the charger. This is important so that each battery charges and discharges equally and they wear evenly. There is just enough room for 1 more battery in the box (the box is not rectangular and the distance from left to right in the picture gets smaller towards the bottom) so I’m thinking of increasing the bank to 500 AHrs. This should be done within about 6 months while the batteries are still fresh, so I will decide after a few cruises if I want another 100 AHrs.
With the new Lithium batteries in place, the final thing to do was reprogram the system for a 400 AHr LiFePO4 bank and rotate the switch on the Solar controller for LiFePO4.
Programming
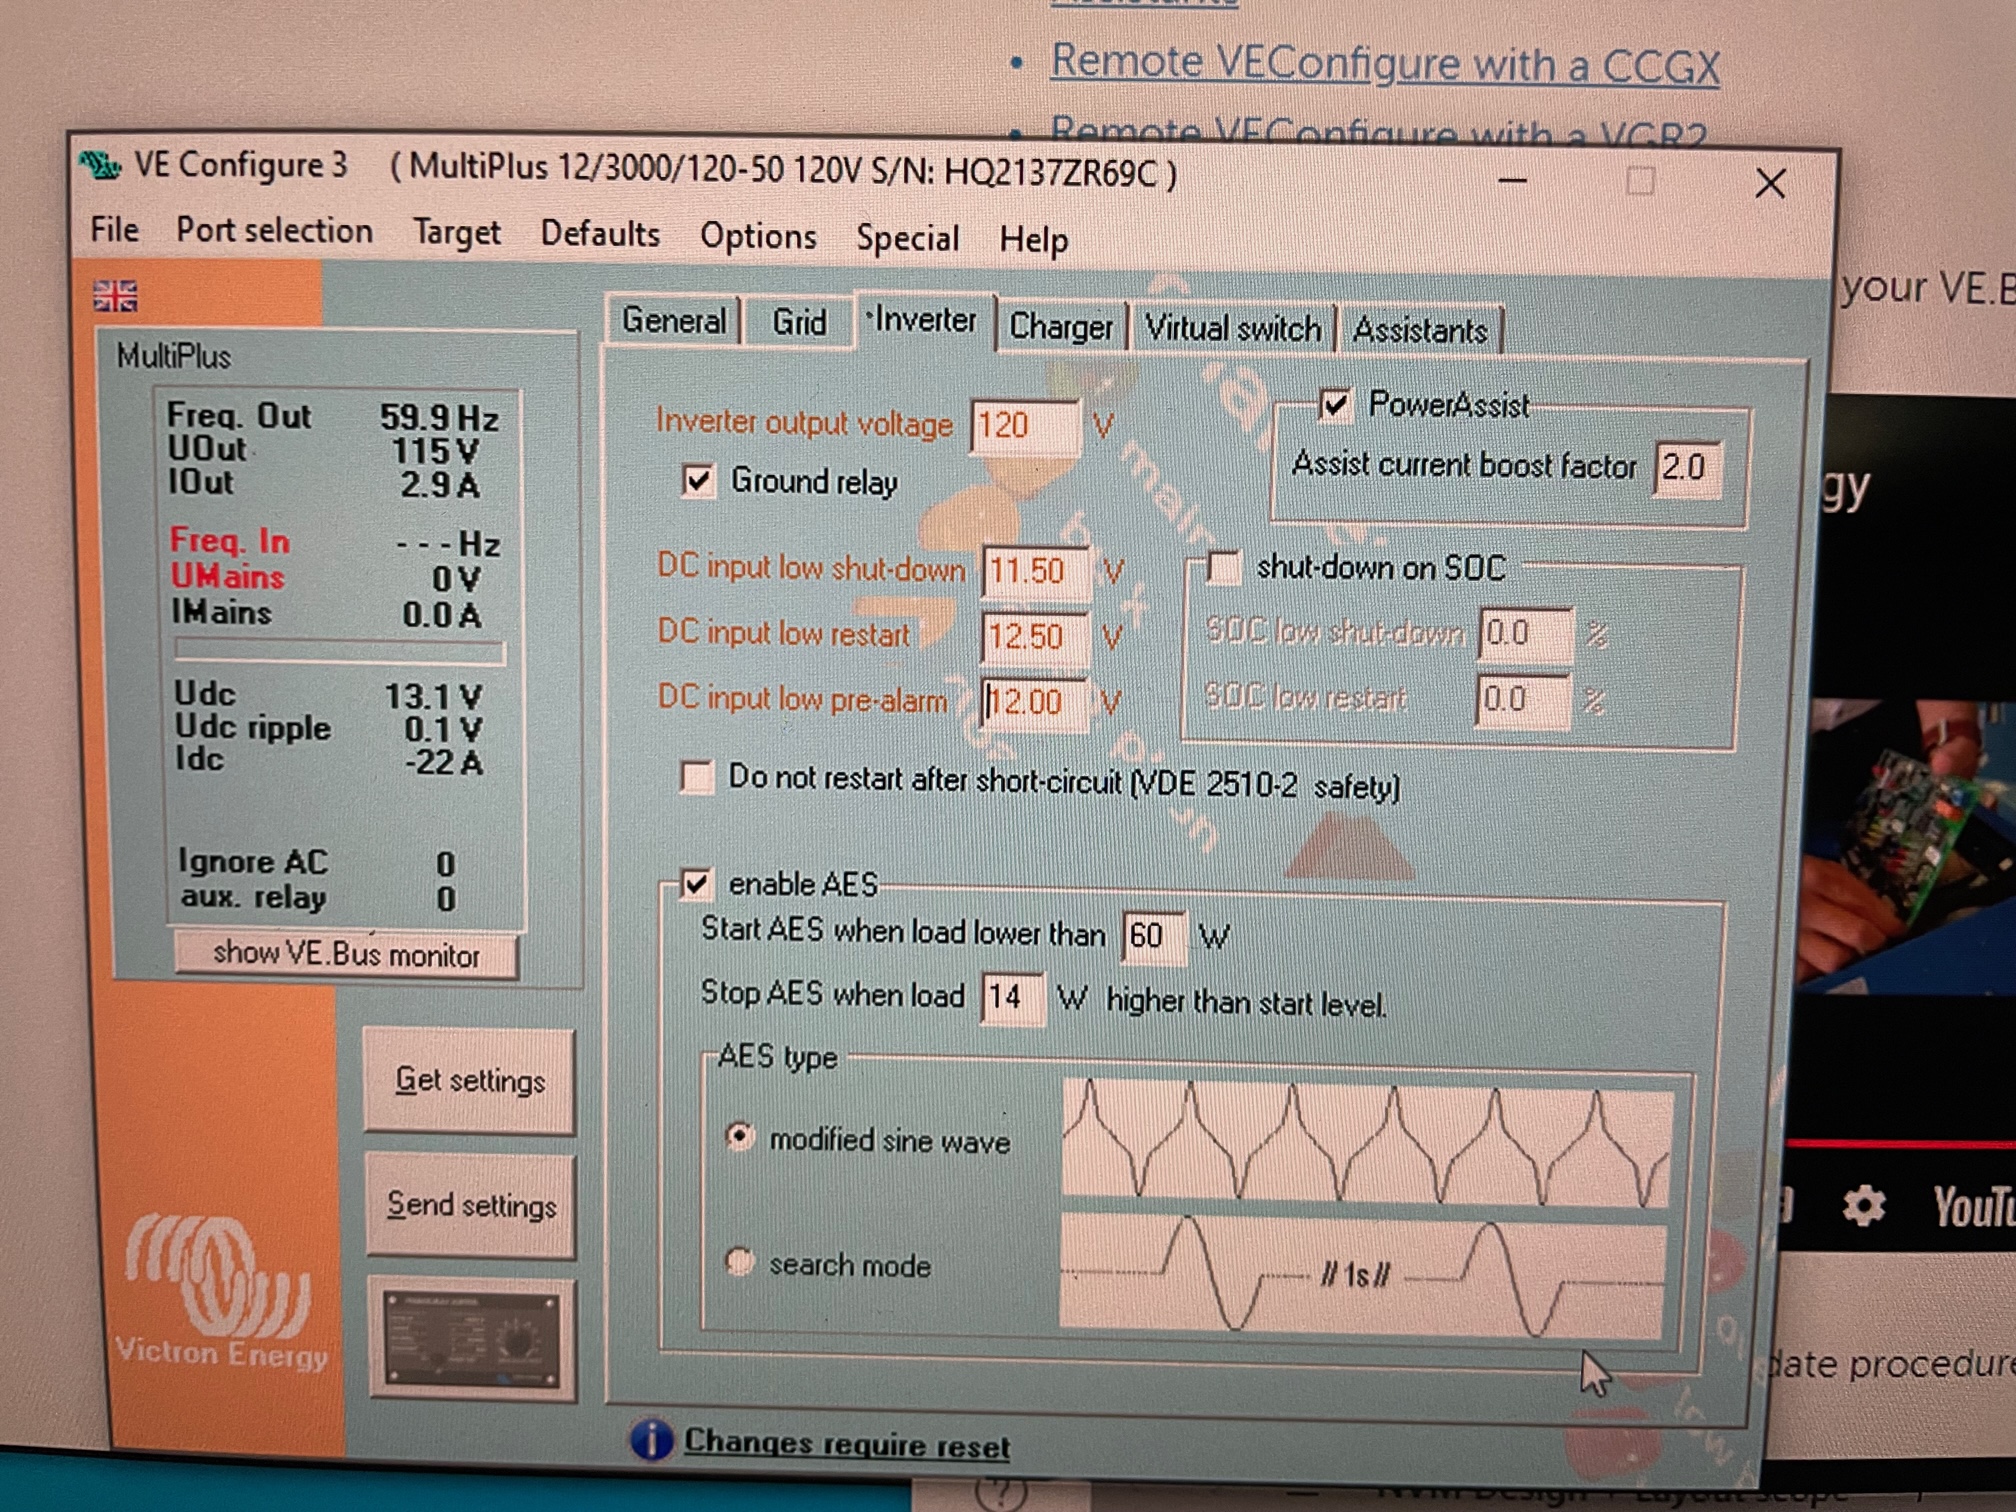
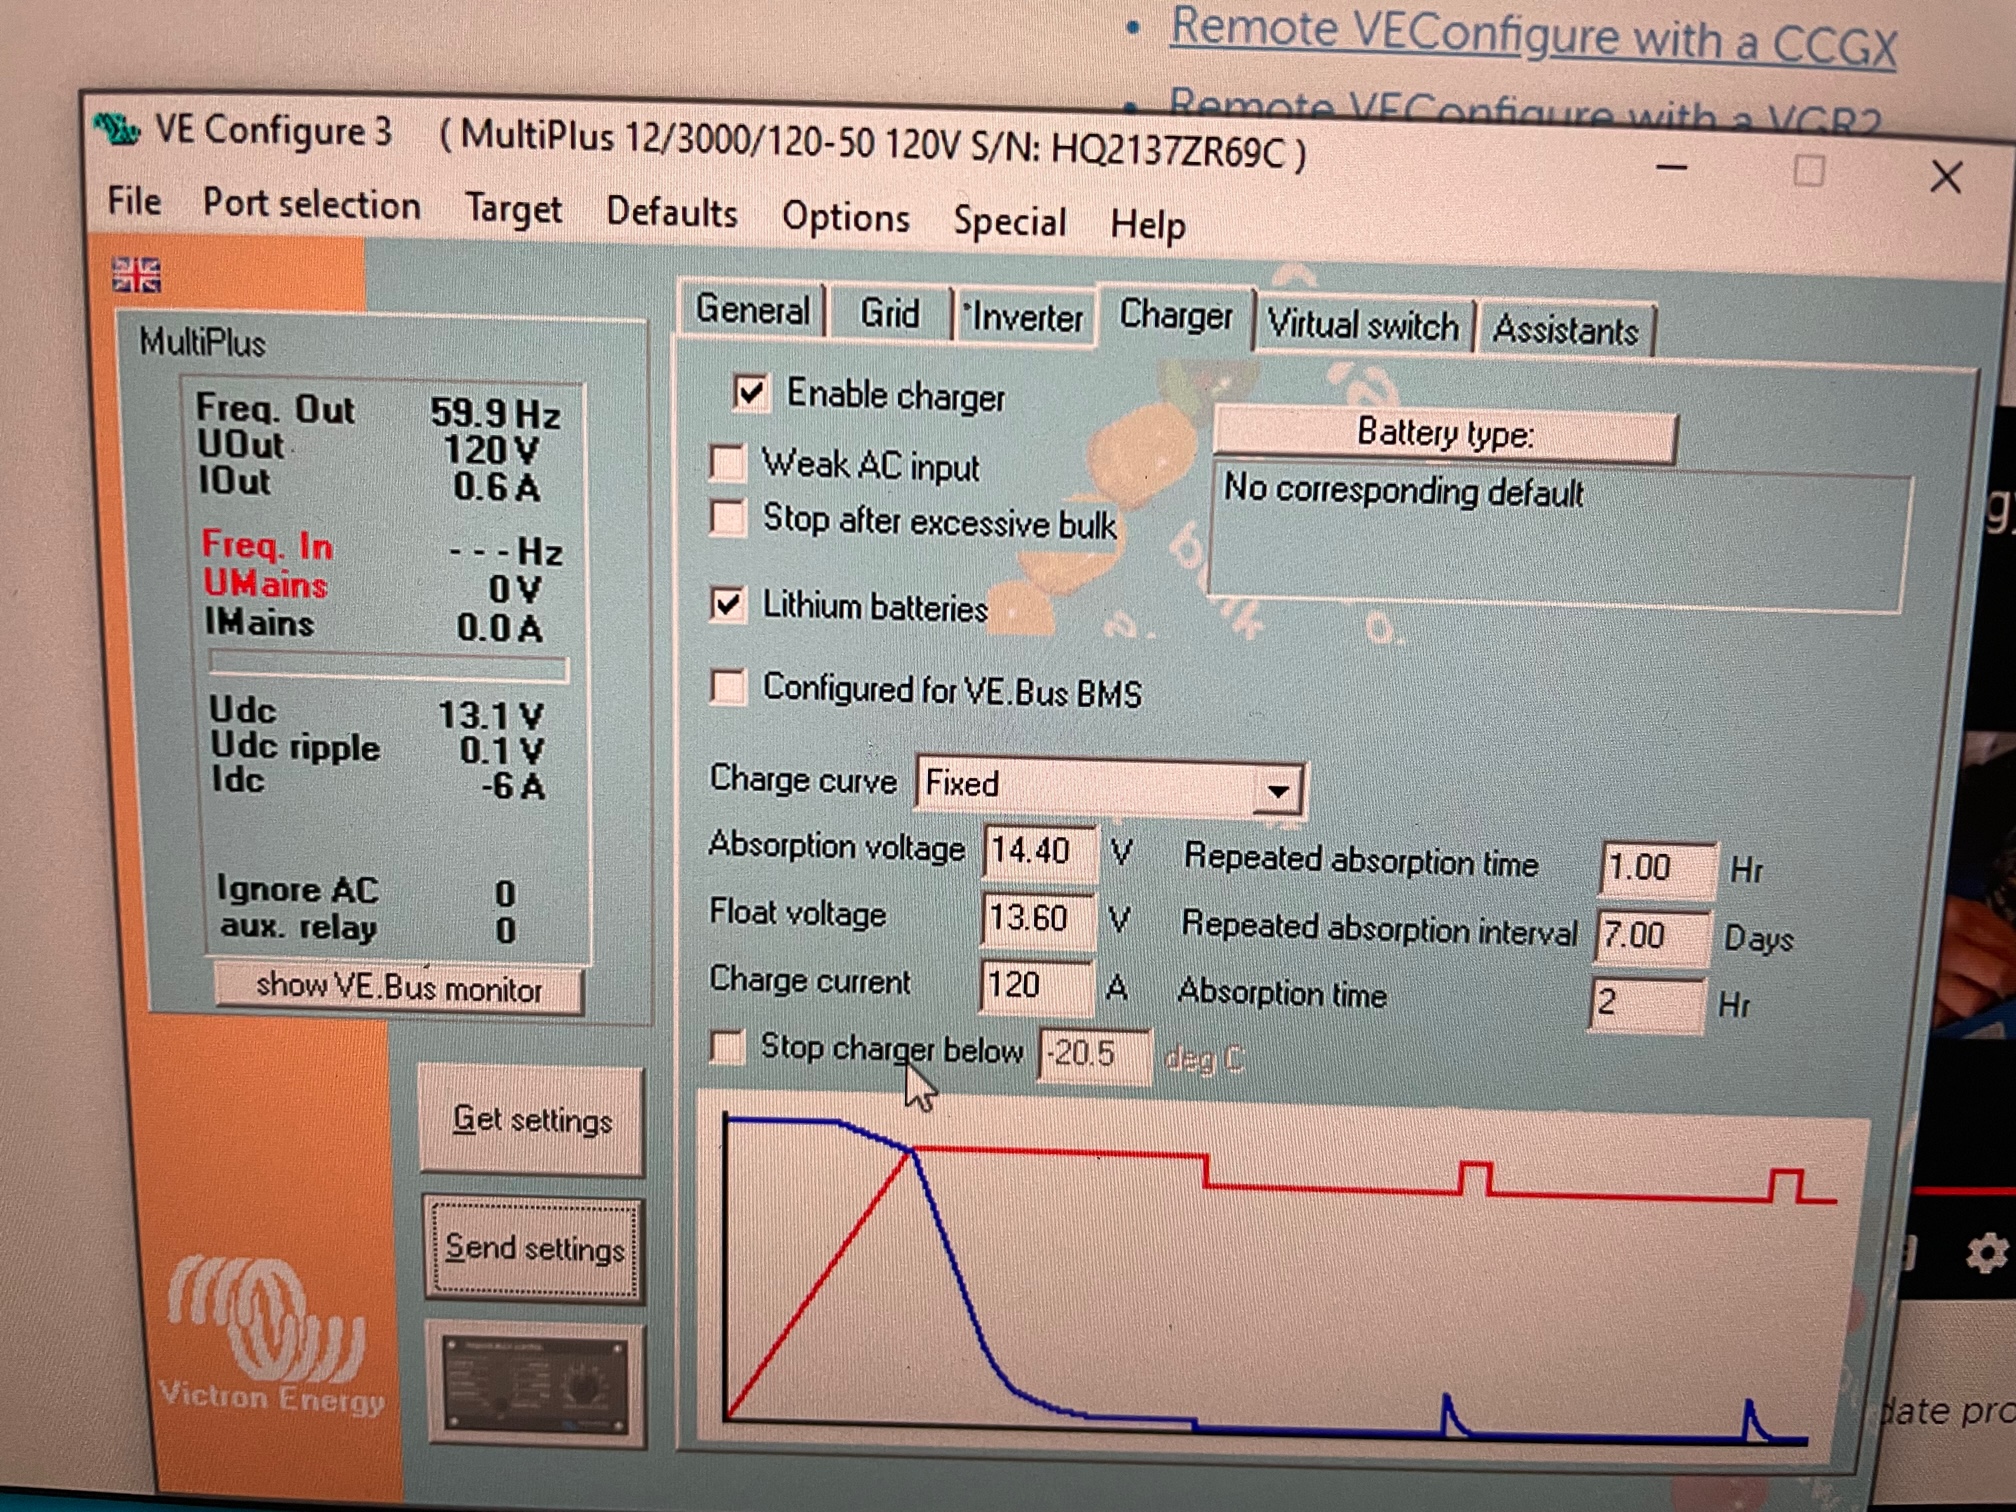
There are a few ways to program the system. For battery type, it requires a Victron program called VE Configure (runs only on a Windows machine) and a special cable called MK3 that connects a PC USB port to an RJ45 Ethernet port on the Inverter/Charger. In the “Charger” tab, I input LiFePO4 as battery type and supplied specific numbers for my BattleBorn batteries. In the “Inverter” tab, I configured the AC output voltage and shutdown/restart numbers and enabled AES mode where it reduces power by outputting a modified sin wave when very little load (less than 60W) is detected. There’s also a “General” tab where I set the max AC shore current allowed to 30A.
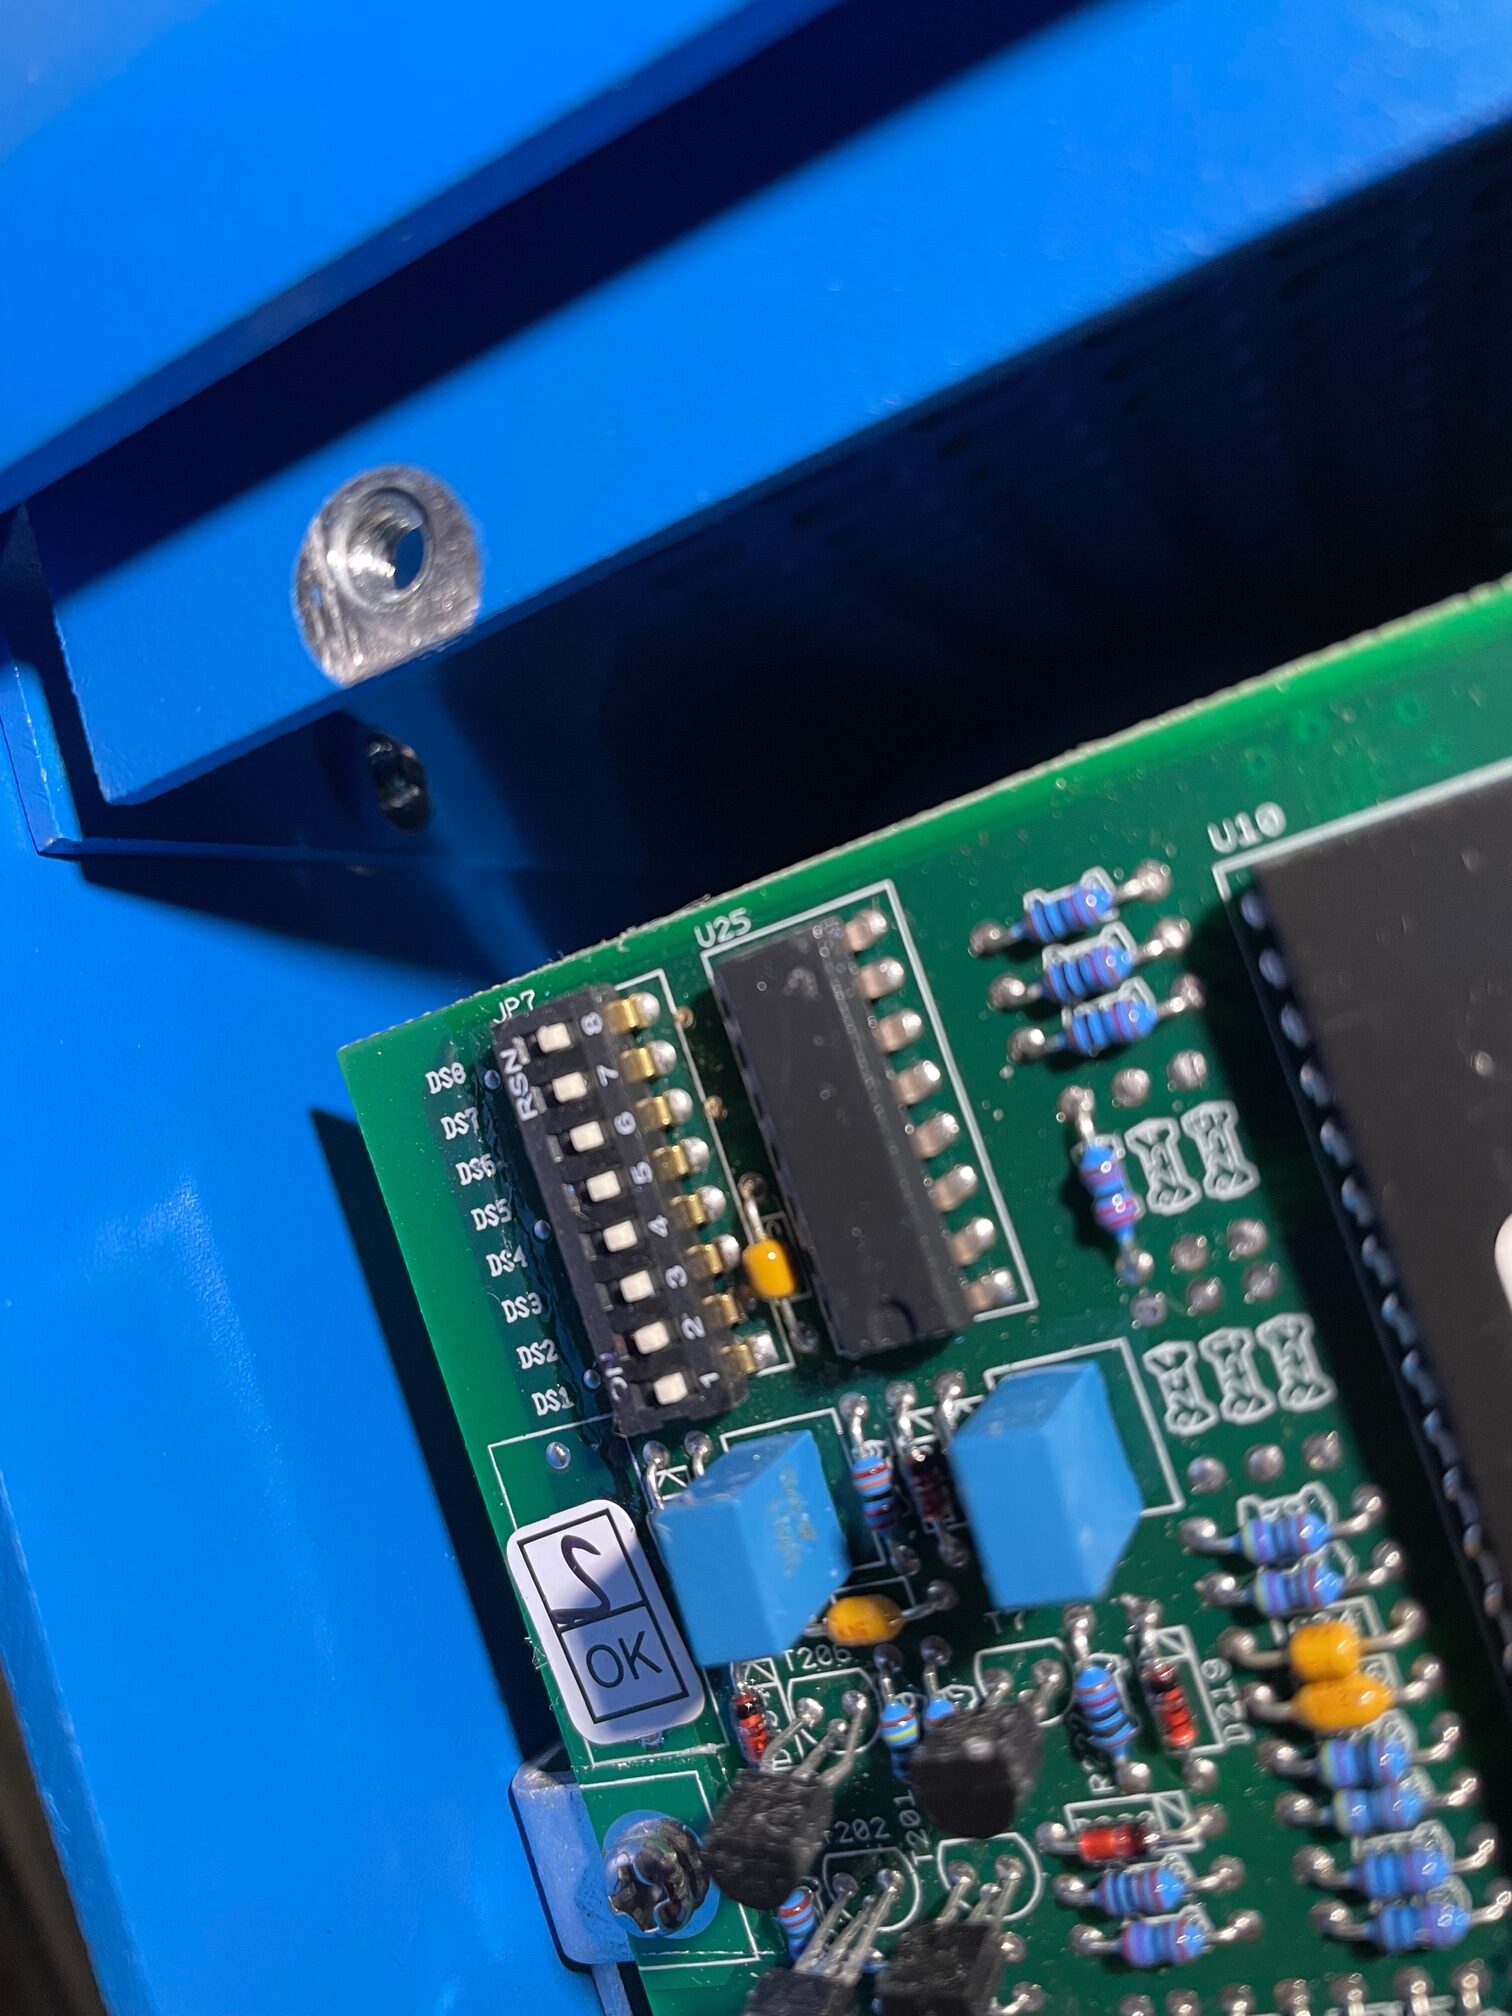
A second way to program certain things for the Inverter/Charger is with DIP switch settings. The DIP switch is located on the main circuit board in the upper left corner. The 8 switches are each used twice. Once set, an UP button programs the first set, which includes things like AC input current limit, AES, and charge level %. Then you set the switches again, and a DOWN button programs the second set without changing the first set. The second switch settings are for things like AC output voltage and frequency choices.
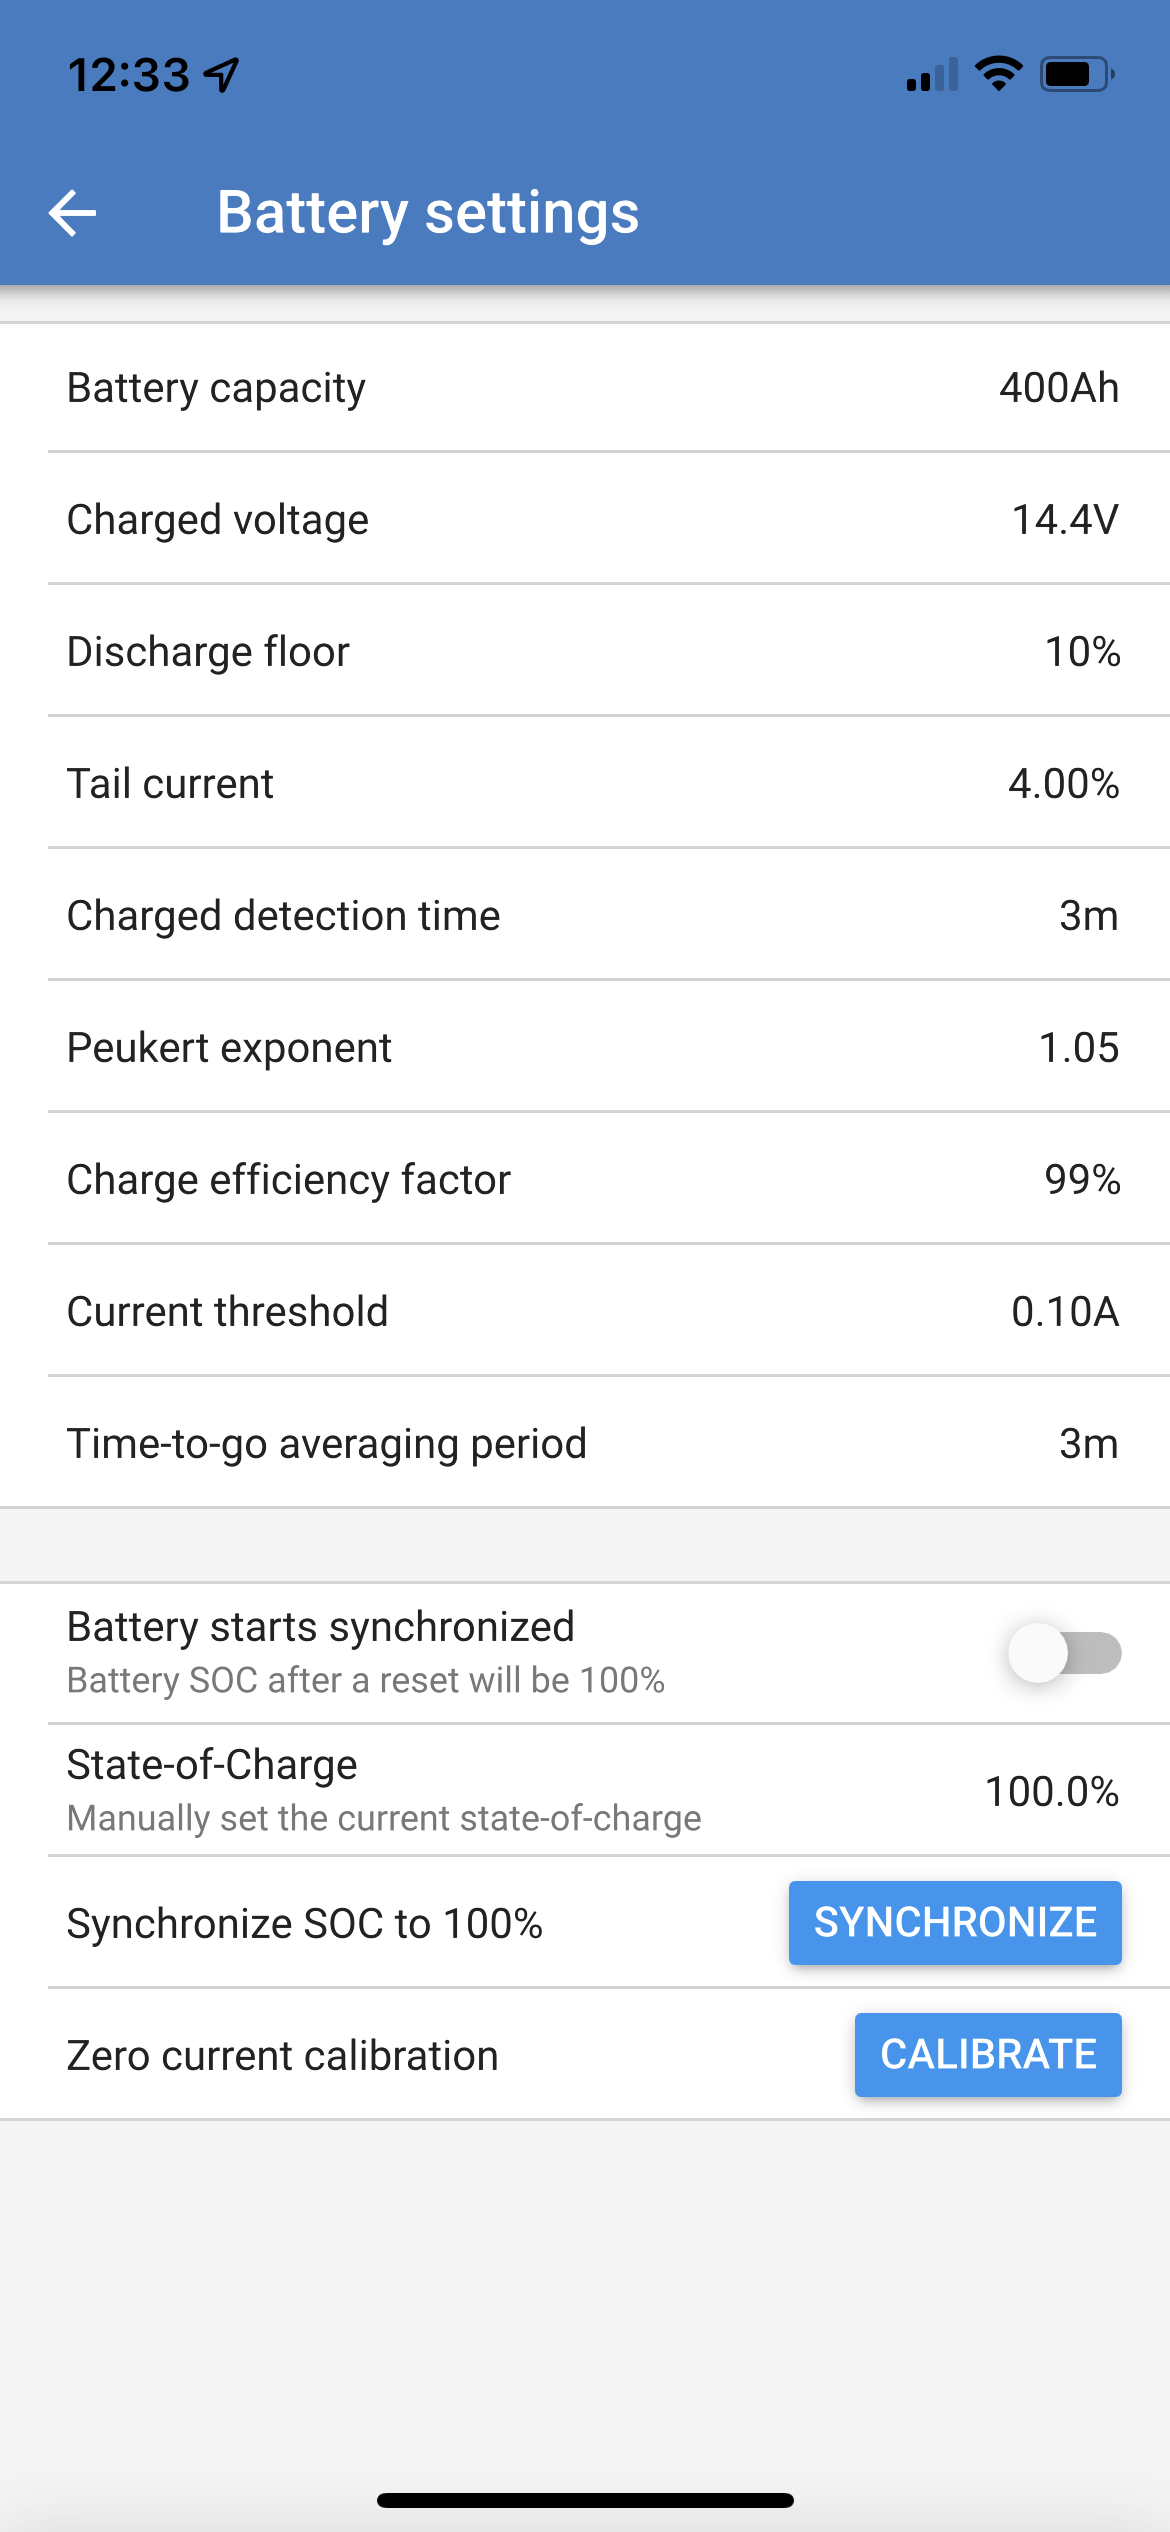
A third way to program the system is using the touch pad that’s connected to the Cerbo GX. This is by far the easiest method for programming since it doesn’t involve a PC or require access to the Inverter/Charger. Here is where I set the batter bank size to 400AHrs. The AC input current limit can also be set here as long as an over-ride setting was set in the VE Configure program.
Here are the program settings for the SmartShunt (these are set in the VictronConnect app):
I had to do a lot of research to figure out the 3 programming methods and understand what each one could do. I’m hoping that Victron will simplify the programming into a single method that doesn’t require the special cable and PC program.
Next Steps
I will try out the system as-is for a few cruises and see how well it performs. Here are some enhancements I’m considering, in order of priority:
- Add another 100 AHr battery for a total of 500 AHrs.
- Move the alternator from charging the starter bank to the Lithium house bank.
- Add a protection device to the alternator to keep diodes from blowing in case the internal BMS shuts off the LiFePO4 batteries while the engine is running.
- Add a DC/DC charger from the house bank to the starter battery.
- Change the alternator from 110A to 170A to take advantage of faster charge times while motoring (will require a serpentine belt conversion kit)
Update
I used the system as described above for a year–the alternator connected to the AGM start battery, DC-DC converter charging the Lithium house batteries at 30A, solar panel controller charging Lithium house batteries, and Inverter/Charger connected to Lithium house batteries for dock charging. This worked well, but the weakness was that when motoring, only 30A was available for charging the house batteries. One of the advantages of switching to Lithium is faster rate of charging away from the dock, but I was limiting that to 30A. Worst case I would need to run the engine longer to charge the house bank, especially on cloudy days when I wasn’t getting much solar charging.
Changes I made for the 2nd season are as follows:
- Rewired alternator output from start battery to Lithium house batteries
- Added an Alternator Protection Module (Balmar ATM) to protect the alternator in case the Lithium batteries shut down
- Reversed the DC-DC converter from start battery–>house battery to house battery–>start battery
- Replaced the Balmar alternator regulator with the newer Balmar MC-618. Programmed it for Lithium profile.
These changes improved the system by allowing the full alternator current to charge the lithiums. To keep the alternator from working too hard, I derated the output by 15% to produce about 95A of current for charging the lithium batteries. Now running the engine for just a short time charges the batteries much quicker. On a 2 week trip to the Gulf Islands where we anchored most of the time, the house bank never dropped below 80% state of charge. Of course it’s a lot of motoring in the PNW during summer. The real advantage will be going offshore where battery management is more crucial.
