All posts by Captain Jim

Running Rigging and Lazy Jacks

Running Rigging–After 10 years, the running rigging on Apropos was looking tired. I replaced the main halyard, mizzen halyard, drifter halyard, main and mizzen topping lifts, and jib halyard. I also added halyard clutches on both masts for line control.
Still to go are the jib sheets, stays’l sheets, and main sheet.

Lazy Jacks–Lazy Jacks help with lowering sails and are invaluable for short-handed crew. The lazy jacks keep the stack from falling all over the deck when flaking is not possible due to emergency situations or when sails need to be lowered quickly. I made my own lazy jacks after reading several articles from sailing magazines. I first made them for the mainsail, then copied the design with minor changes for the mizzen. Both designs use spreader mounted blocks, mast-mounted Spinlock cam cleats, 3/16″ AmSteel-grey line, stainless steel rings and eyestraps. The main was fitted with a 4-leg system and the mizzen a 3-leg system. They are easily deployed and stow against the mast when not in use. The AmSteel line and splicing to the ss rings minimize sail chafe.

Share

Track and Slide System

The new mainsail is being fitted with new slides made from 316 stainless that fit into a UHMW track (ultra-high molecular weight which is very strong and abrasion resistant) that slides into the original mast luff groove. This system by Tides Marine lowers the friction and makes it easier to raise and lower the mainsail. I installed the one-piece track by first cutting a new slot in the aluminum mast groove using a dremel tool with cutting discs. Next, the new track, which came in a big roll, was fed into the slot and slid all the way to the top of the mast. I had to remove the boom so there would be no angle when feeding the track up. This was an easy project that took about 3 hours.

New slot cut into mast groove>20140407-234603.jpg

Feeding new track up mast20140407-234736.jpg

New track in place20140407-234830.jpg

Share

Canvas and Dodger Windows

Canvas–I washed and treated all the boat Sunbrella canvas. I have a ton of canvas–a full boat cover, 2 boom sail covers, a dodger, 2 deck box covers, helm seat cover, binnacle cover, 2 winch covers, 4 grab rail covers, 2 hatch covers, 2 stantion covers, and a BBQ cover. Most of the canvas is 10 years old but in pretty good shape, so they’re worth taking care of. The wash was done using Simple Green diluted to a medium strength and just a small amount of clorox cleanup. A light scrub with a stiff bristle brush helped remove some of the dirt and mildew. After rinsing and letting them dry well in the sun, I sprayed a waterproofing material on them using a small pump type garden sprayer. I used a product by Gold Eagle called 303 Fabric Guard that was given a best rating by Practical Sailor magazine and is endorsed by Sunbrella. It’s not cheap at $75/gal (and I went through 4 gallons!), but the results turned out great. After years in the Seattle rain, the canvas wasn’t repelling water like when it was new. Now the water beads up and runs right off. I’ll have to see how long it stays that way and decide how ofter to repeat the treatment. Shown below are photos of untreated canvas (top) and treated canvas (bottom) that were sprayed with water.

Untreated Canvas20140402-135856.jpg

Treated Canvas20140402-135911.jpg

Dodger Windows–The dodger was brand new when I bought the boat 10 years ago and is still in good shape. But the vinyl windows have become scratched and are not nearly as clear as they were 10 years ago, so I decided to replace them. I used double polished 40 mil vinyl by Regalite, which is the same as the original. The procedure was to first cut the new vinyl the same shape as the old. Next remove the outside stitching and trim back the old vinyl to the inside stitching. Then sew in the new vinyl with the outside stitch. Next remove the inside stitch which will allow the old vinyl to be completely removed. Finally sew the inside stitch and you’re done. This procedure ensures the dodger will keep the same shape when all done (removing the old vinyl first would make it nearly impossible to keep the dodger shape the same). The dodger consisted of 3 large forward facing windows and 2 small side windows. This project turned out to be very time consuming but we’re pleased with the results. Here’s a picture of the old and new vinyl:
.

20140403-165017.jpg

20140407-231310.jpg
I also replaced the vinyl on the butterfly hatch cover. Here’s when it was half done showing the difference between the new (bottom) and old (top).

20140413-234741.jpg

Share

New Bimini and Cockpit Enclosure

We decided to add a bimini for sun protection in the tropics and rain protection in the Pacific Northwest. Since we were able to see 2 of these installed on other Hans Christians and they were both Iverson designs, it was an easy decision to go with them. We also chose to have mesh-screen panels added to give the cockpit a full-enclosure. This also provides more shade from the sun while still allowing good visibility as well as air flow. The enclosure comes as 6 zip-on panels so various combinations can be used. A connector panel ties the bimini into our dodger. We made our own snap-on vinyl panels for keeping out the rain and wind. With the full enclosure and vinyl panels in place, the cockpit becomes an additional “room” during the winter months in Seattle. Even on a cold winter day, the sun warms the cockpit with the full enclosure in place.

Installation–I met the Iverson crew at the boat to go over the design. The biggest decision was the height of the bimini. The mizzen boom would need to be raised to allow clearance above the bimini AND I wanted the bimini high enough for me to be able to stand at the helm without ducking. This required me to move the boom up by about 13″. We also added a zipper onto the front edge of the dodger for the connector panel. This was all done before Iverson came back to begin building the bimini. They first built the custom stainless steel frame which they cut/bent/adjusted/installed on-site. Then they took measurements and returned a few weeks later with the canvas and mesh panels and everything fit perfectly.

Vinyl Panels–We decided to make our own vinyl panels. Instead of making separate panels to take the place of the mesh panels, we built the vinyl panes slightly small than the mesh panels and added snaps to make them easy to put on and take off. We used 30 mil vinyl and trimmed the edges with canvas. I did all the prep work (measuring, cutting, taping on the canvas binding) and Karen did all the sewing, using the “Beast”
(our Sailrite industrial-grade sewing machine). Then I took the 6 panels to the boat, removed the mesh panels, and hammered on the snaps. It was time consuming work but we were pleased with the results. Now I can sit in the cockpit playing guitar during a downpour!

Bimini and Full Enclosure w/ Vinyl Panels
20140330-231543.jpg

20140330-231558.jpg

20140330-231611.jpg

Share

Single Side Band Radio

I bought the ICOM IC-802 SSB radio at the 2012 Seattle Boat show. The package came with an auto-tuner AT-140, a GAM split lead antenna, a KISS counterpoise, and an SCS Pactor III modem.

Installation–Figuring out where to place the components was an important first step. Since the radio itself could be tucked away, I built a shelf for it under the nav station chart table. The remote display fit along side the chartplotter at an angle for easy viewing and tuning. I mounted the speaker higher up in against the bulkhead. Since the tuner wants to be as close to the antenna as possible, I found a place inside the transom that would be only a few feet from the antenna. The GAM split lead antenna has a split tubing that was easy to slide up a long side-stay with zip ties used every few feet. Lastly, the KISS counterpoise was run from the tuner under the starboard bunk. The Pactor modem easily fit atop the radio making it easy to connect to a laptop at the nav station. This installation kept everything relatively close together on the starboard side. Power to the radio was run from the DC panel using #8 AWG wire and a 30A breaker.

Testing–It’s hard to really test the SSB on a lake in the middle of the city. Interference, weather, and atmospheric conditions come into play with transmitting and receiving signals. At the marina, I was able to receive signals from far away (different languages) but couldn’t really test my transmitting capability. I did notice strange things happened when I keyed the mic to transmit–lights dimmed and some breaker panel lights turned on. I read this is normal and signifies you are sending some high power signals out. More experimentation is needed when I’m outside the city in more open water.

Sailmail–Sailmail

Radio and Modem Under Nav Station20140310-095719.jpg

SSB Remote at Nav Station20140310-095540.jpg

GAM Split Lead Antenna20140407-231406.jpg

Share

Flags

Another one of Karen’s side projects is making flags. My only job was to hammer on the grommets.

I used flagcloth polyester material, flagtape on the sides and fabric pens for the designs.

Here are some we hope to use on our trip (click on flag to identify):

Mexico

French Polynesia

Tahiti

Hans Christian Owners Association

Q flag


I have to say that I had the most fun designing the French Polynesia Flag, which I found out is not a courtesy flag in French Polynesia. The official courtesy flag is the French Tricolour. To get the design on the white portion of the flag I printed out a copy of the design and traced and coloured in the design using fabric pens directly.

For the Mexican Flag, which was my first attempt, I traced two designs onto white fabric patches and sewed them onto the flag. This design was so intricate I was afraid of making a permanent mistake if I traced it directly onto the fabric.

Share

Spectra Watermaker

I bought a Spectra Cape Horn watermaker at the 2014 Seattle Boat Show. I chose the Cape Horn because of its simplicity (manual control) and built-in redundancy (can run off 1 of the 2 pumps). With both pumps running, it can produce 14GPH at 18A (or 1.3 Ahrs/gal).

Installation–The Cape Horn is a modular system. The 3 largest components are the Clark pump/membrane, filter/pump1, and filter/pump 2. There’s also an accumulator tank, remote monitoring panel, product water valve, and test port to install. I had only a few options for the install location. Under the V-berth or under the port-side settee. Since accessibility is important for changing filters and throwing manual valves, I decided under the port-side settee would be the best location. The largest module (Clark pump) just fit after relocating a deck wash pump. The two filter/pump modules were slightly too tall so I modified a few hose fittings to allow them to fit within the available height and mounted them securely on starboard. I ran about 30′ of #4 AWG wire from the watermaker to a 30A breaker on my DC panel. I installed a brass spout at the galley sink for testing the product water and filling drinking bottles. Also in the galley is a valve for selecting the sink spout or the forward 60 gallon tank for product water. I installed a Tee in the sea water input hose for the head and piped the brine water output to the head sink drain. I also Tee’d into the pressure fresh water for the flush cleaning input. For filling the water tank, I drilled and tapped a hole in the top of the SS tank and installed a Parker fitting. The Parker fittings and 1/4″ tubing used on the product water side were easy to work with. The most difficult was running the 5/8″ tubing to the head and tying it into the 1-1/2″ sink drain. Since I couldn’t find an ideal place to mount the remote monitoring panel that didn’t require cutting into teak, I decided to mount it inside the galley engine access door. This was a convenient place since the valve was also mounted in that area. The panel has a flow rate gauge and a pressure gauge that should be monitored from time to time.

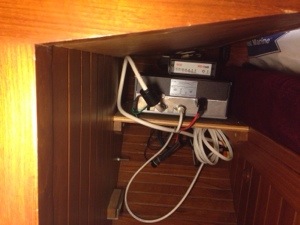
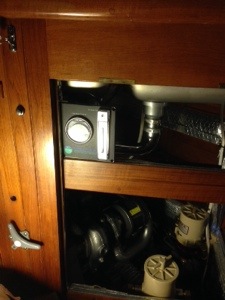
Completed Installation20140306-213515.jpg

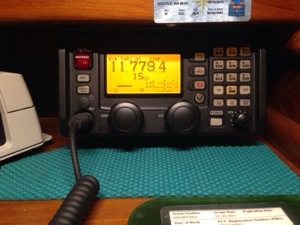
Monitor Gauge and Manual Valve
20140306-213529.jpg

Monitor Gauge20140306-213538.jpg

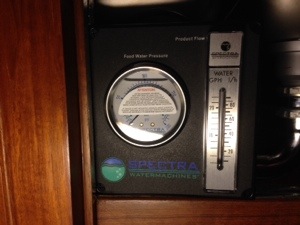
Watermaker Output to SS Water Tank20140306-213545.jpg

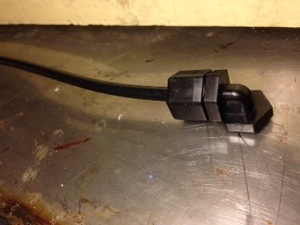
Brine Discharge to Head Sink Drain20140307-171226.jpg

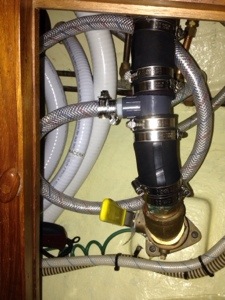
Video Showing Clark Pump Operating

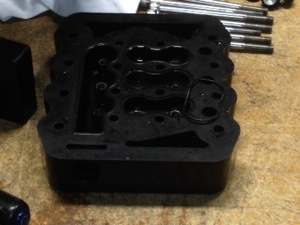
Hands-On Taking Apart a Clark Pump20140407-232722.jpg

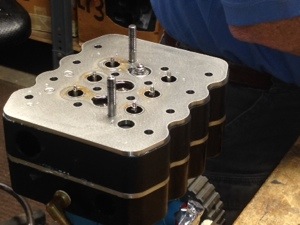
Lots of Seals and Gaskets20140407-232733.jpg

Share

Changing zincs using a Hookah System

We tried out our new Brownies Hookah diving system at the dock.  A Hookah system is a surface supplied air or “tankless” diving system.  Our Hookah system consists of a .75HP variable speed sealed DC motor driving an oilless compressor.  The system runs off 12VDC so we can use the boat house battery bank.  It comes with a 40′ downline and another 20′ extension with the 2nd stage regulator attached.  It supports 2 divers by putting a Y valve at the end of the downline and using two extensions with regulators.  We want this for our cruise to the south pacific for recreational diving, so figured it would be good to buy it now to get used to it.  Also, about a year ago we got a line wrapped around the prop and I had to free dive (sans mask, fins, weights) to cut it, which took many dives to accomplish.

Our immediate use will be for hull cleaning and maintenance.  It’s been 3 years since the boat was hauled out for bottom paint and zincs.  Since the boat is moored in fresh water, the bottom paint has held up well but we noticed when we were in the San Juans recently that the prop zinc was missing.  For my first Hookah dive, I wore a wetsuit and used the dive gear I had from when I was doing SCUBA diving about 15 years ago.  The Hookah worked great and I was able to replace all 6 zincs and clean the algae off the bottom in about an hour.

Here are some images from the Brownies website:

Share

Submarine spotted

During a recent crossing of the Strait of Juan de Fuca, we noticed something heading towards us from about a mile away.  From that distance we could see 2 large vessels with something smaller between them.  There also was a medium size vessel in front of and behind them.  None of these 5 vessels showed up on our AIS system.  As we got closer, we realized it was a US Navy Submarine flanked by Navy ships and a coast guard vessel in front. The sub’s tower and only about 10′ of the hull were visible.  They were headed west and we passed at a distance of about 1/2 mile going east.  The picture on the left was taken as they passed us and you can see the sub tower just in front of nearest flank vessel.  The one on the right was taken about a half mile after they passed us, but still within torpedo range!


Share