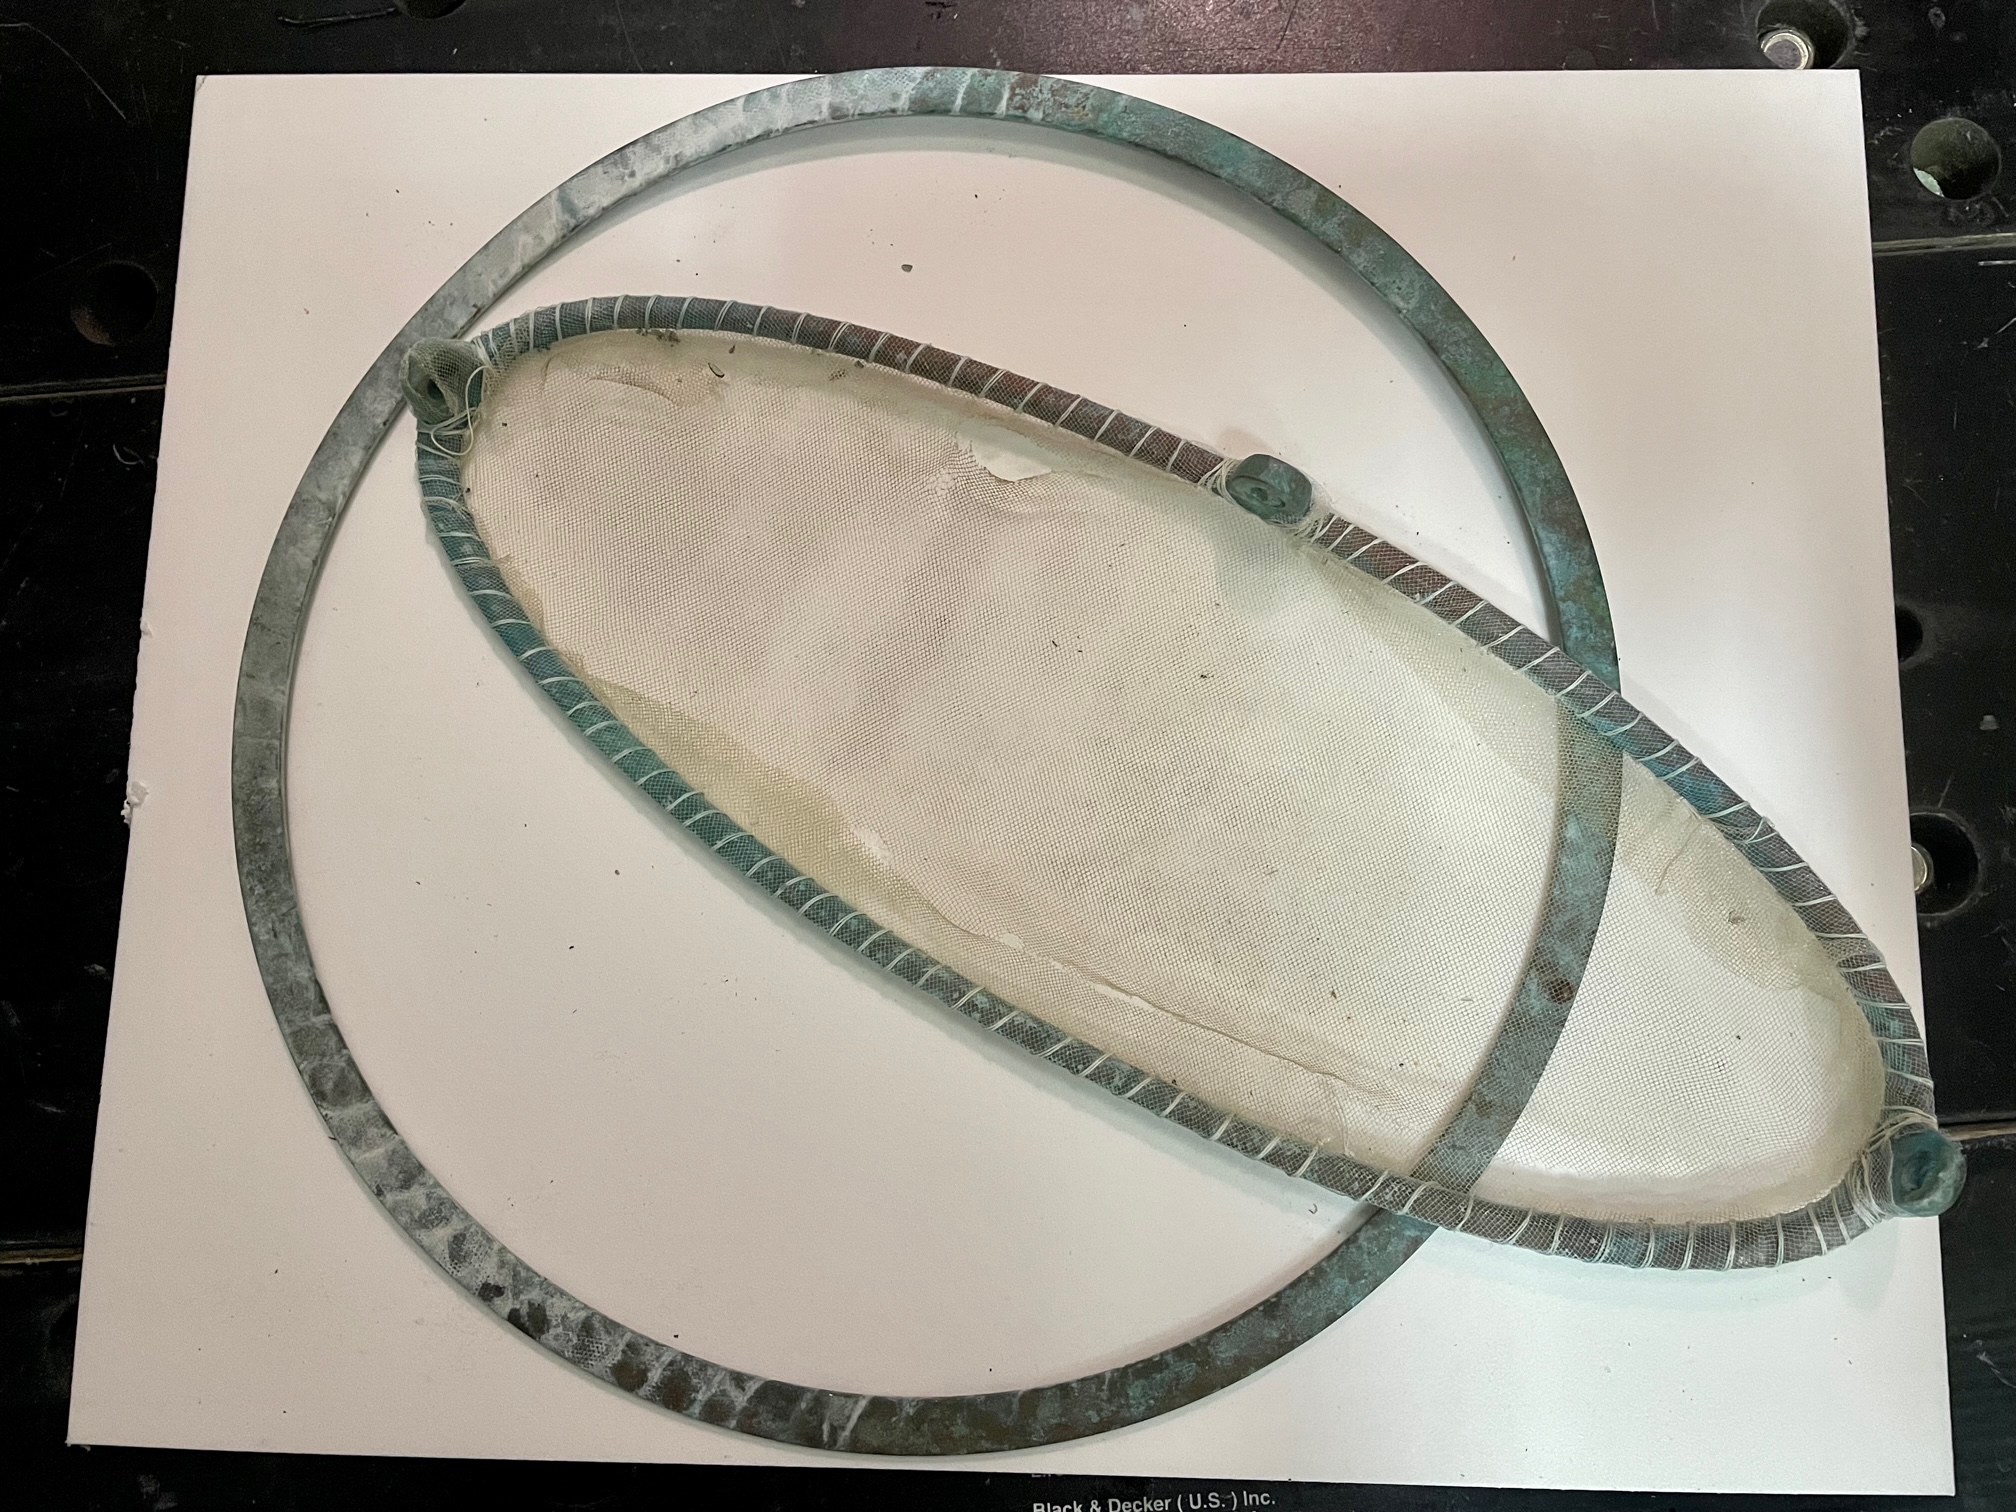
Apropos came with 8 oval, 3 small round, and 1 large round bronze port screen rings. After arriving in Mexico, we realized we needed them to keep out bugs, mosquitos, and no-see-ums (tiny flies that bite) since we had to keep the ports open for ventilation. The problem was that the frames had no screens, so we hastily added some fine mesh fabric by wrapping polyester thread (same as used for sails) around the edges of the rings. This worked well for the year it was needed, but eventually the mesh fabric became brittle and easily torn.
Frames with old fabric mesh
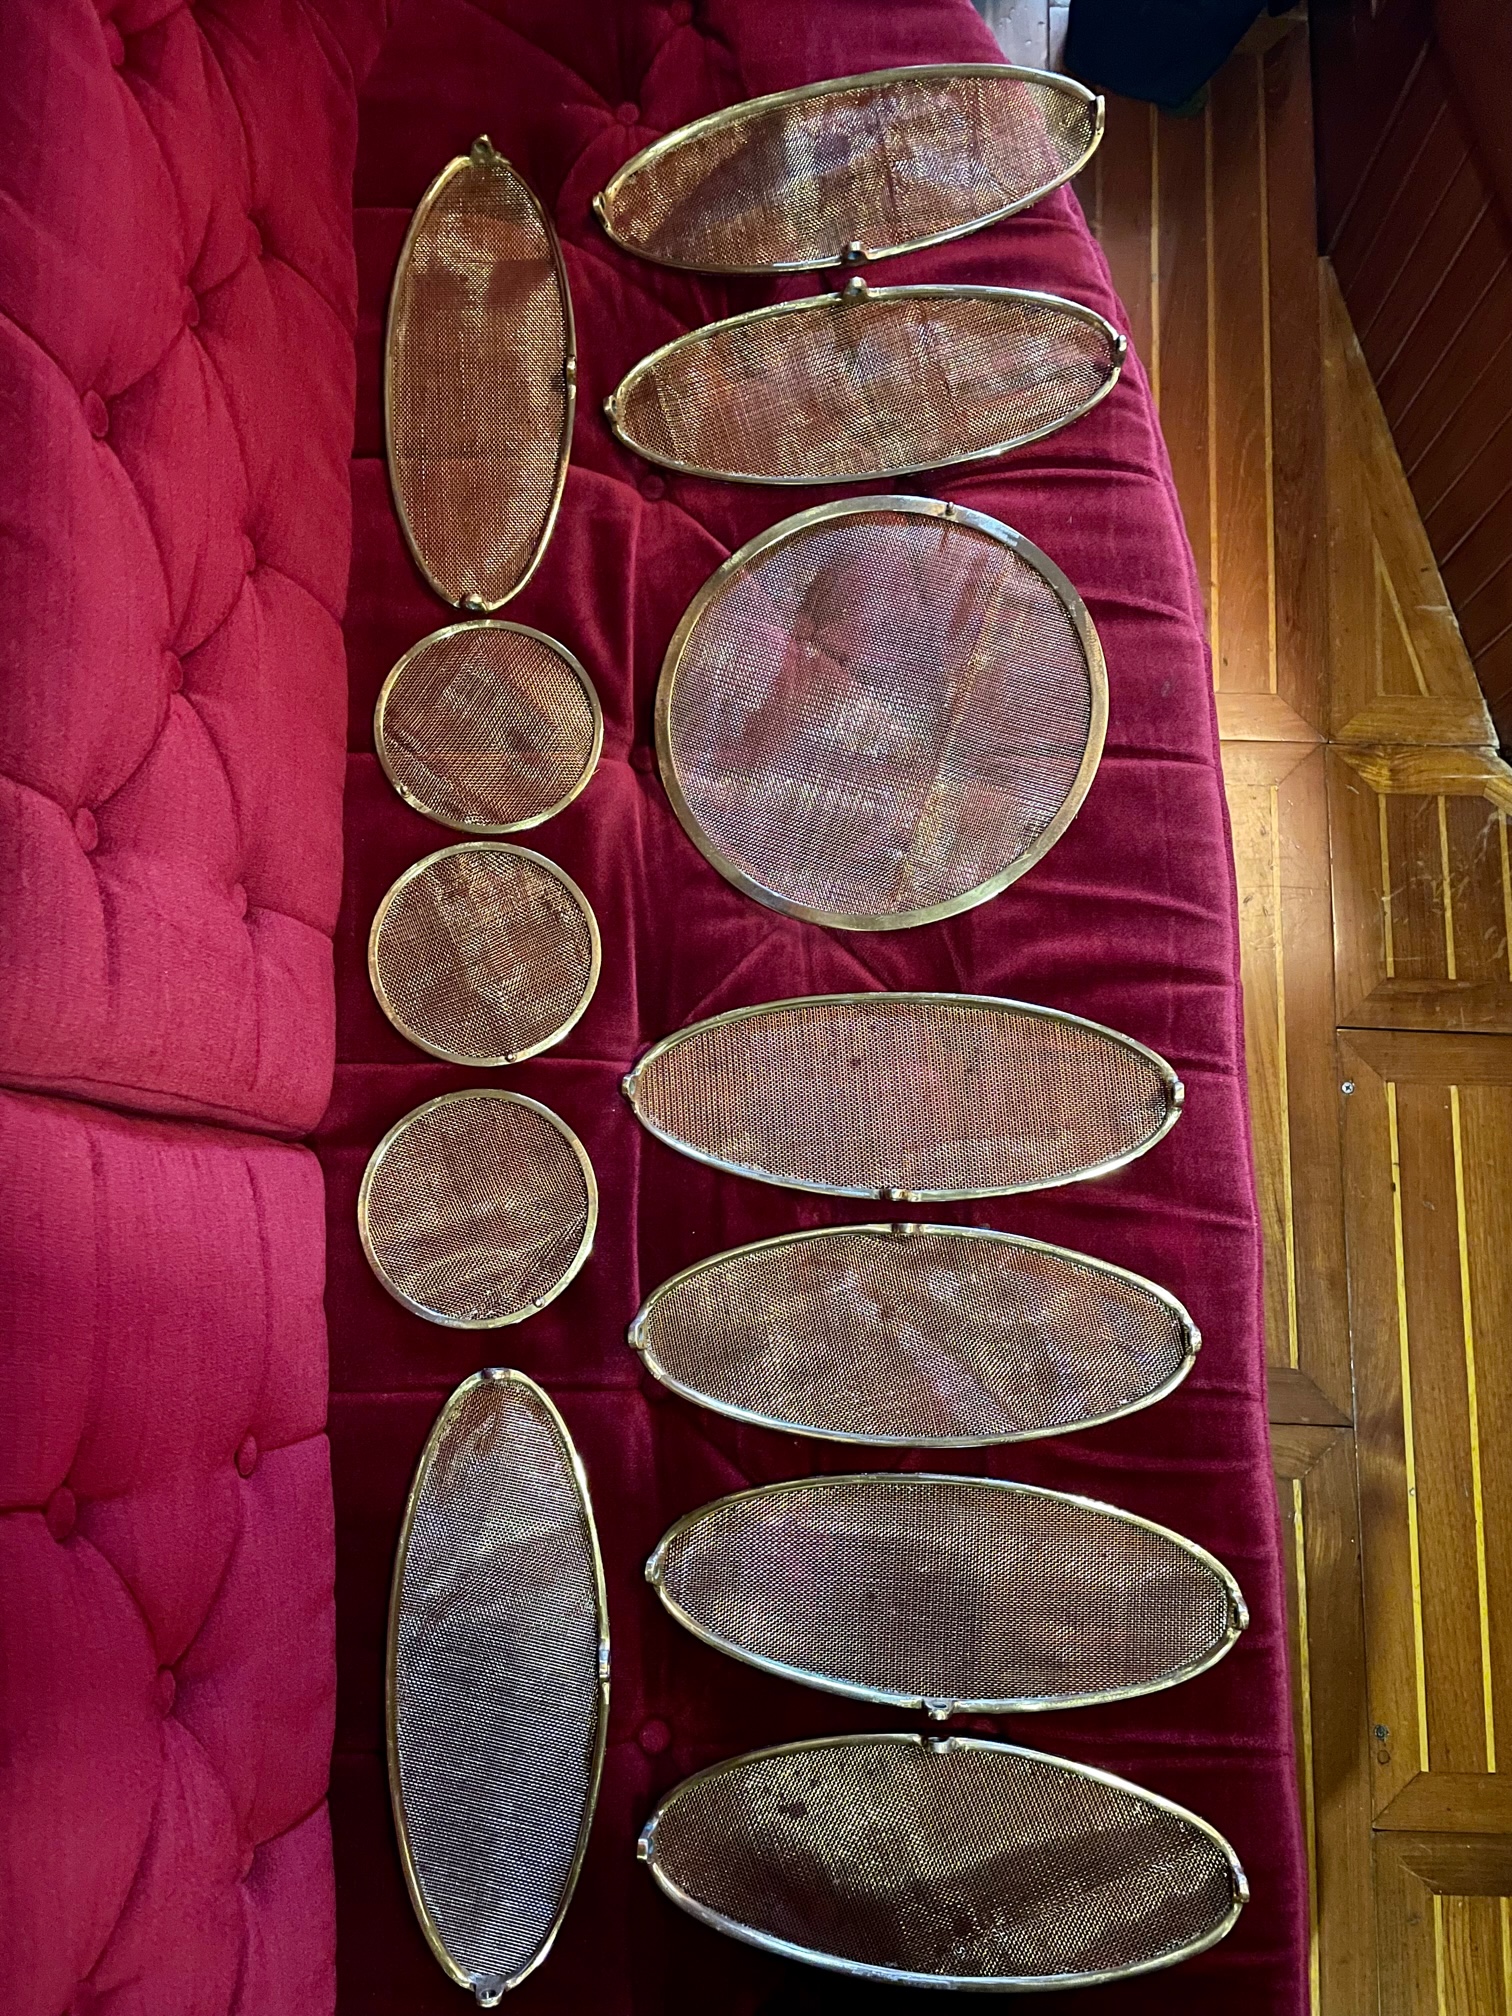
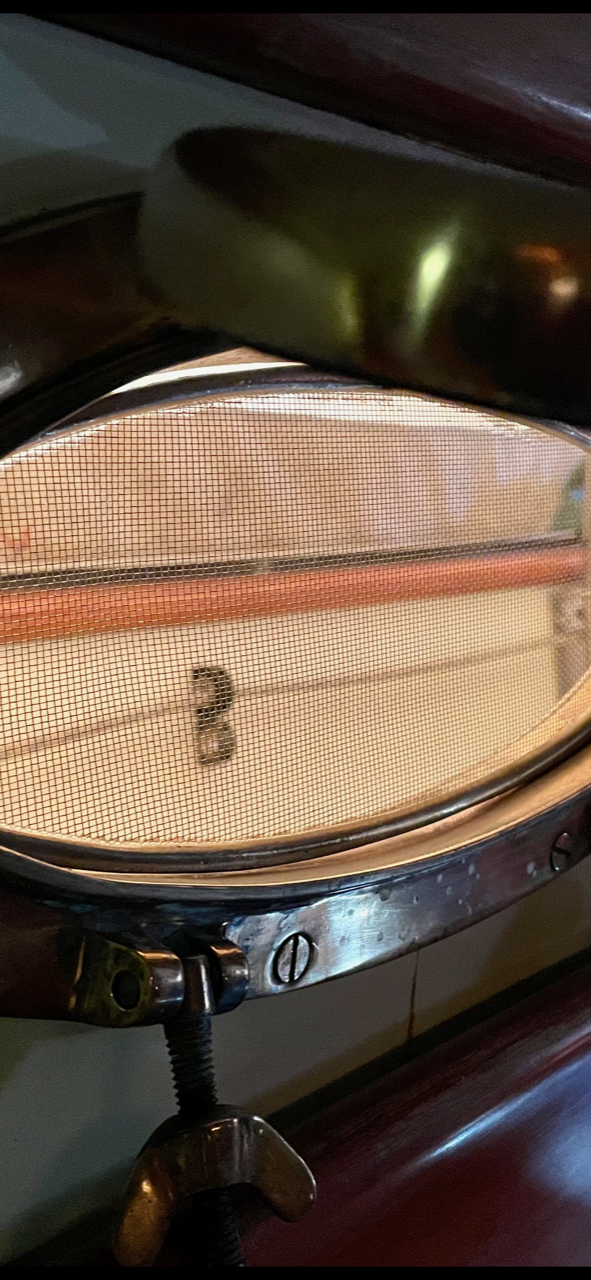
After removing the fabric and thread, I soaked the frames in a metal cleaner, then used a dremel tool to polish them. Next I coated them with Protecta-Clear. I had about a yard of bronze screen that came with the boat, so I cut pieces slightly bigger than each frame. I ran a bead of Gorilla glue on the frame, placed the screen on wax paper and the frame on top the screen, then a 5 gallon bucket of water to apply pressure for 2 hours while the glue cured. The final step was to trim the screen along the edges with a pair of scissors. Here are all 12 finished rings and a picture of one of the oval port rings in place.
Finished adding screens to port ringsOval screen in port opening
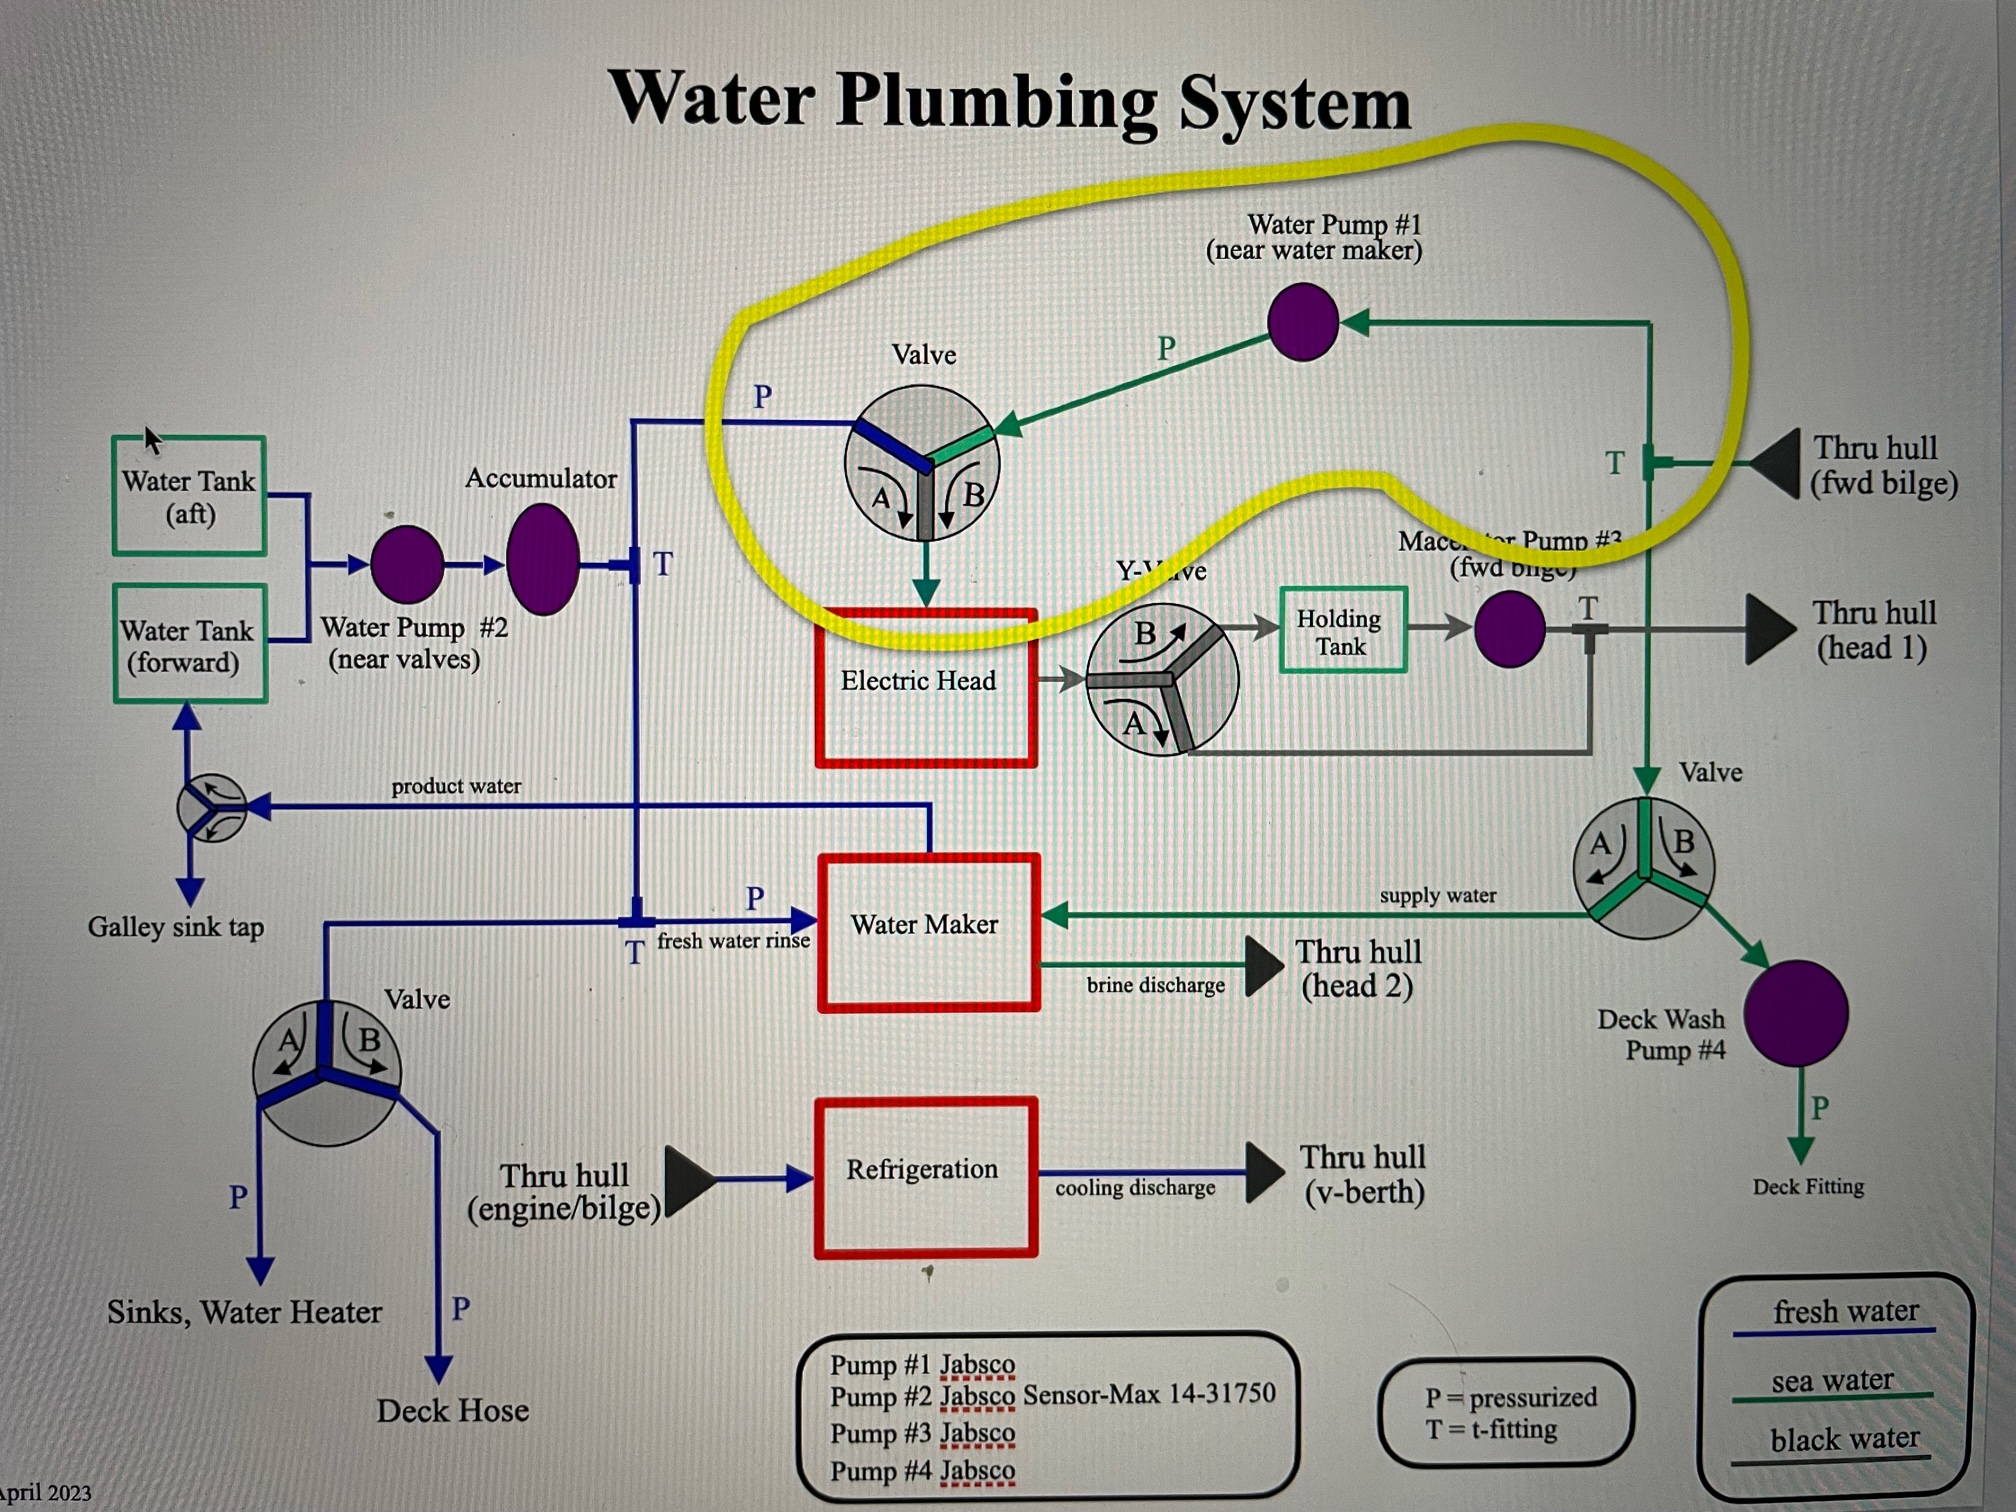
About a year ago I replaced the old manual head with a new electric head. I plumbed it with fresh water fill/flush but wanted to add a sea water option. The fresh water option will be used whenever there is easy access and abundant water. When sailing offshore or cruising in areas where fresh water isn’t easily available, the head would be switched over to using sea water.
I added a 1:2 valve, a Jabsco pump (taken from the old refrigeration system), and T’d into the sea water input for an easy project that was accomplished in a weekend. Here is a drawing of the project showing the new plumbing inside the yellow boundary. The green lines represent sea water and the blue lines fresh water. The sea water pump is wired to the electric head control board so when the fill button is pressed, the pump will activate. A disconnect switch was added to open the wiring to the sea water pump when the system is in fresh water mode.
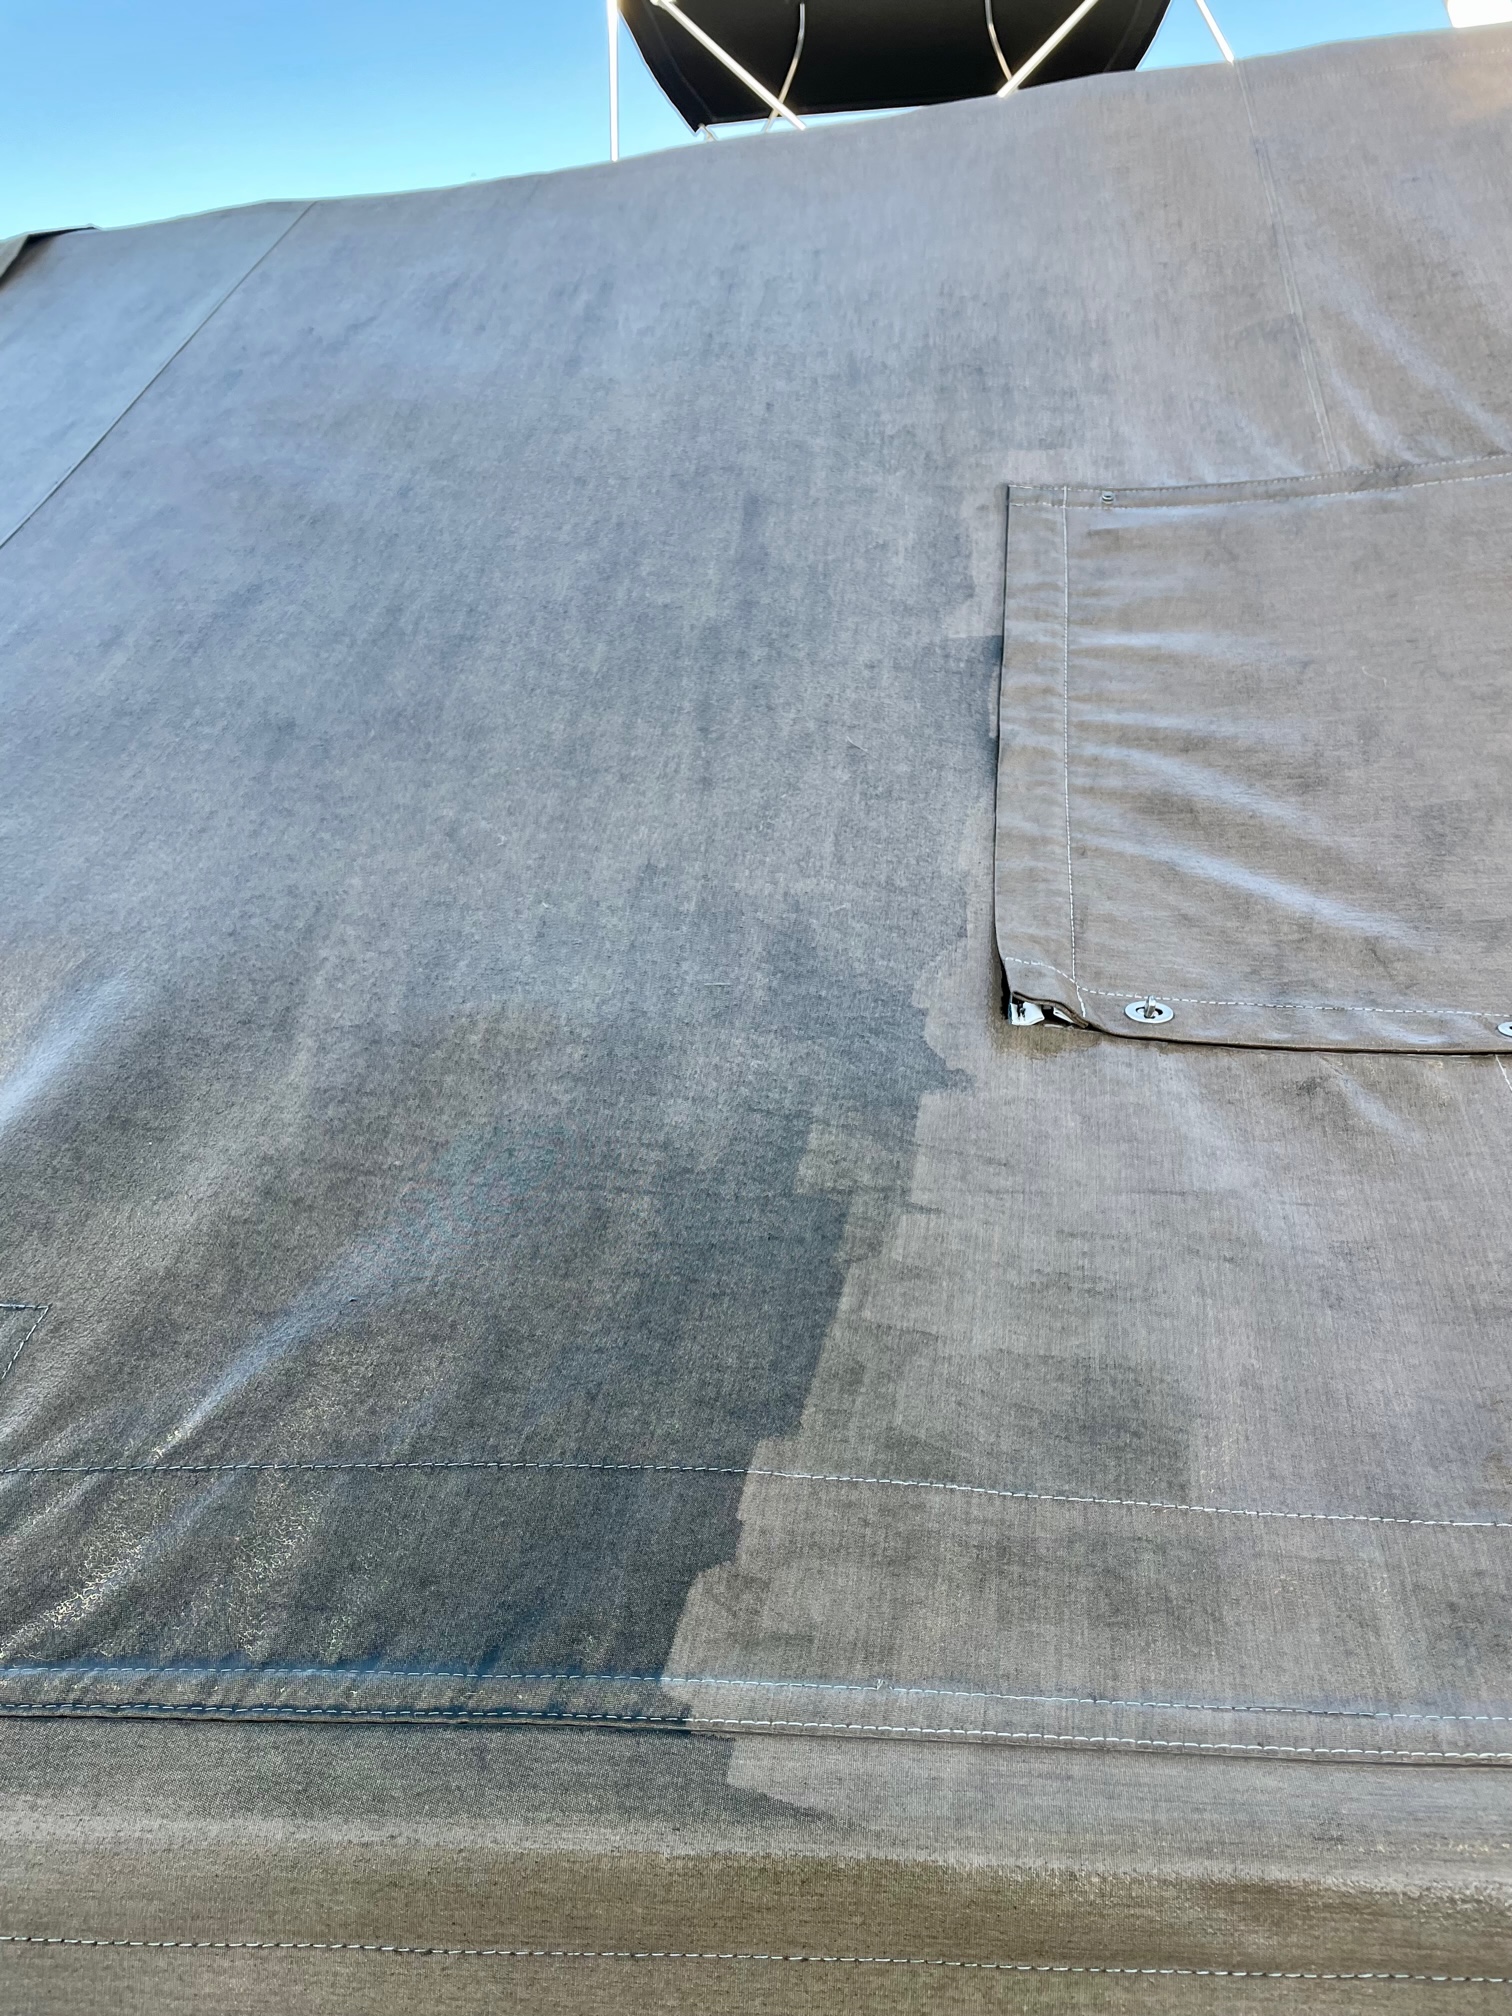
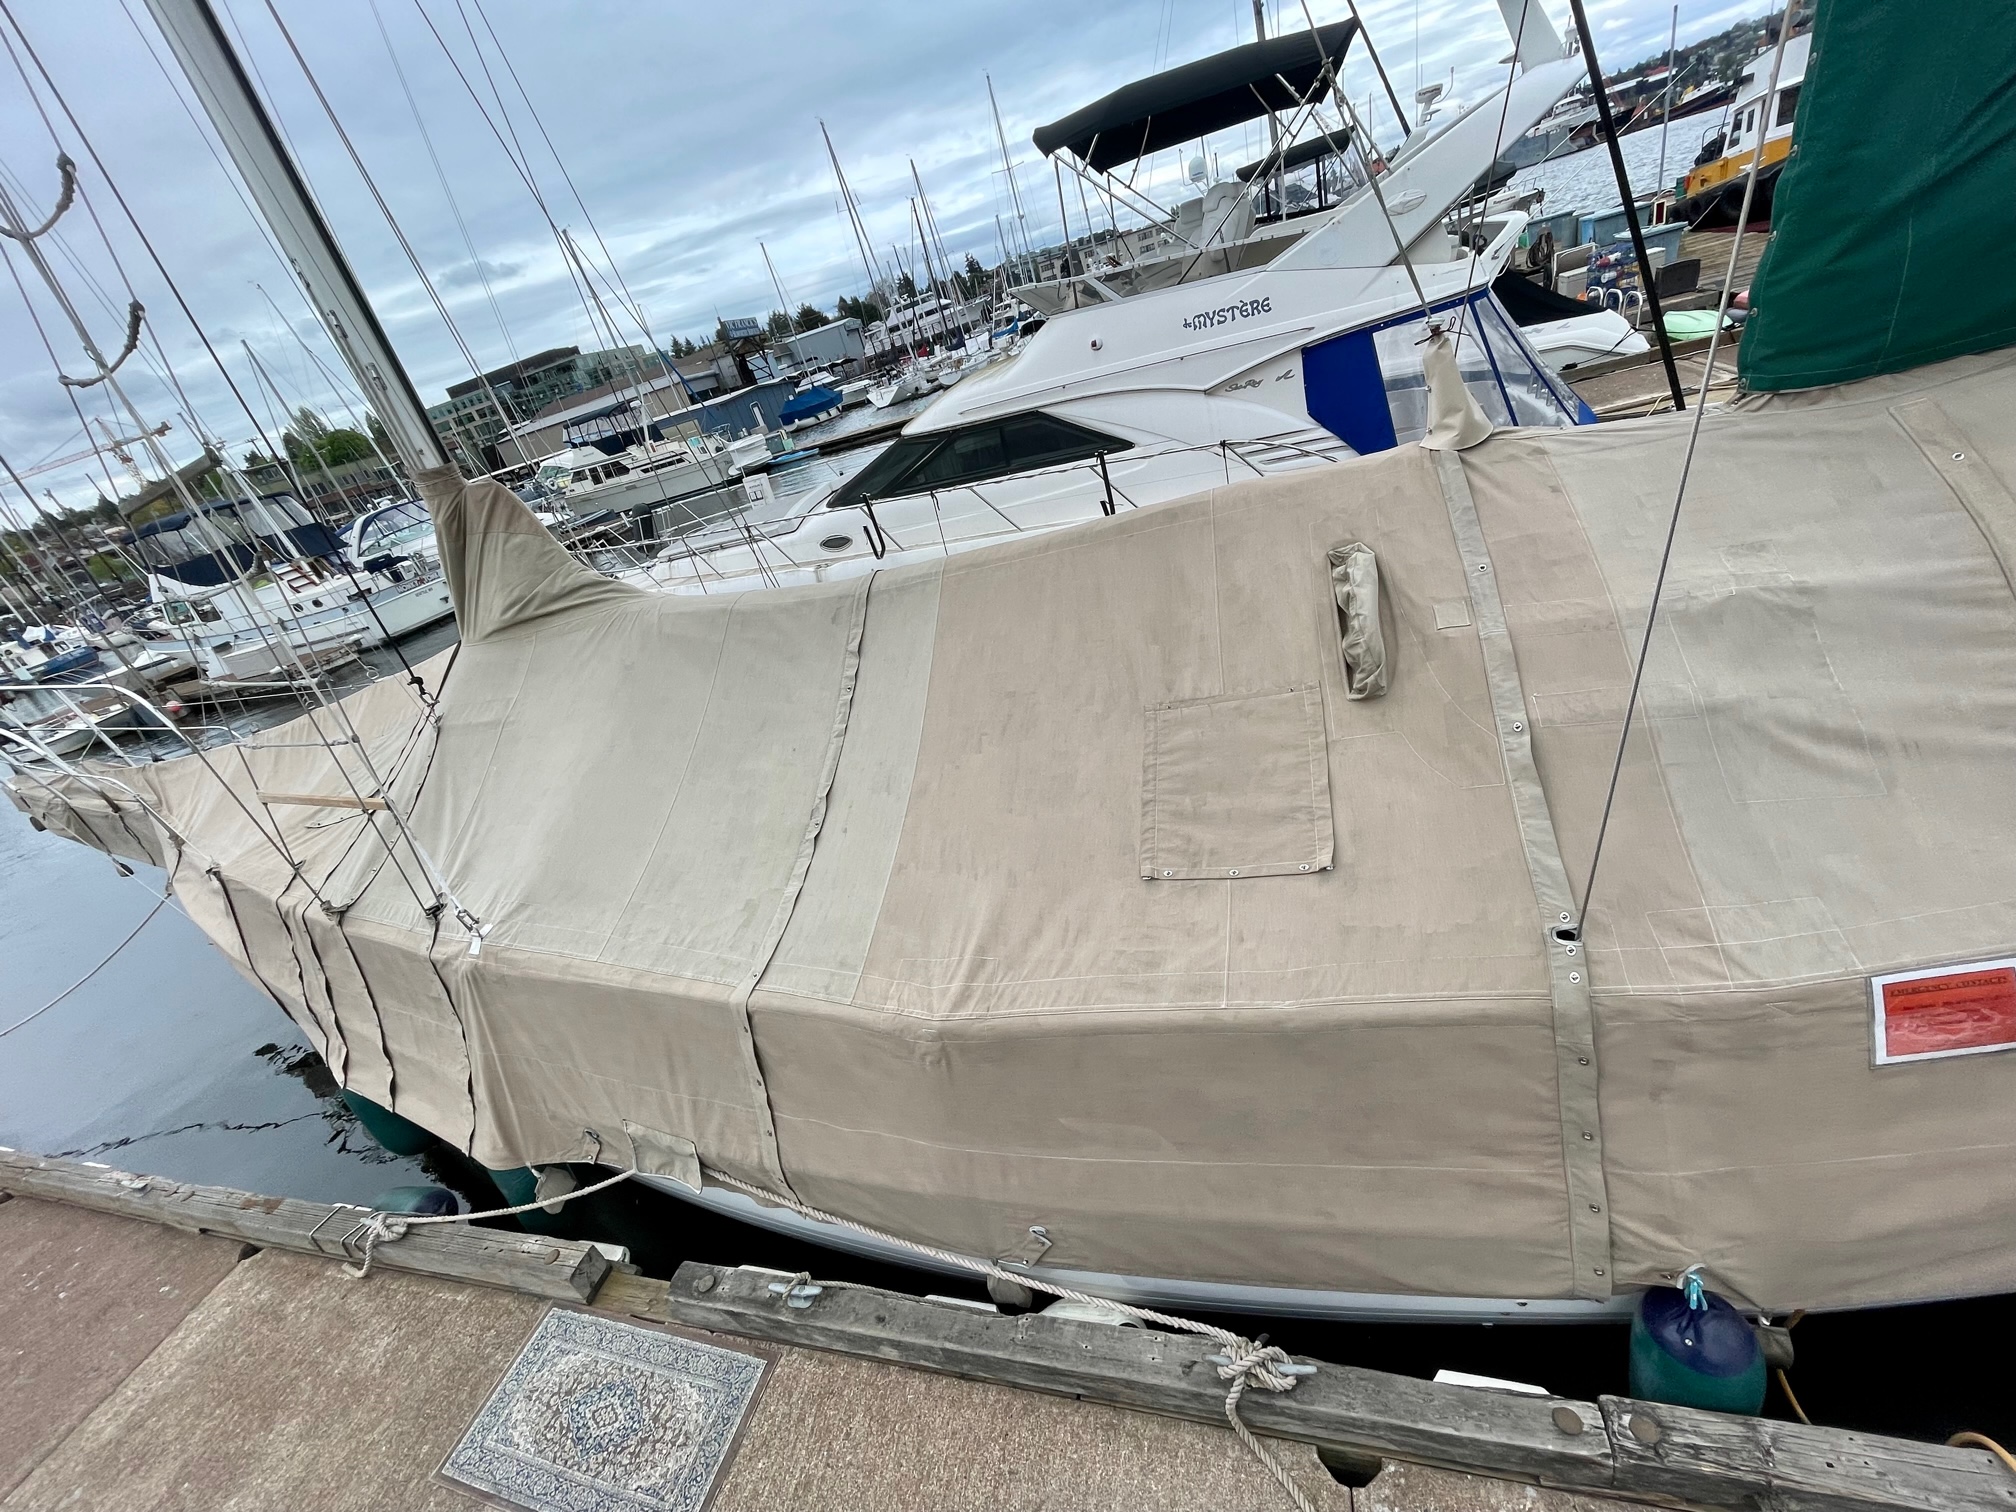
The boat cover has been used for 15 years worth of Seattle rainy winters. It goes on around November 1 and comes off by mid to late April. The cover was custom made using marine canvas (Sunbrella) with zippers and twist locks connecting 4 large sections. I usually rinse it with a hose, allow it to dry, and pack it inside 2 huge duffel bags, then store it in a garage until bringing it back out for the winter. Over the years it has accumulated quite a bit of dirt and mildew, so this year I decided to clean it well. I started with a hose and a canvas cleaning product, lightly scrubbing it with a soft brush and then rinsing. This did very little in the way of making it look any cleaner. So I decided to bring out pressure washer and that made a huge difference. It took a few hours of spraying at close range to remove most of the grime, but it came out looking almost new. After drying well, I applied 3 gallons of 303 Marine/Aerospace protectant using a garden sprayer. This gives it UV protection, and makes it water repellent and stain resistant. I also cleaned and treated the 18 canvas bags that hold sand used as weights that clip on along the bottom of the cover.
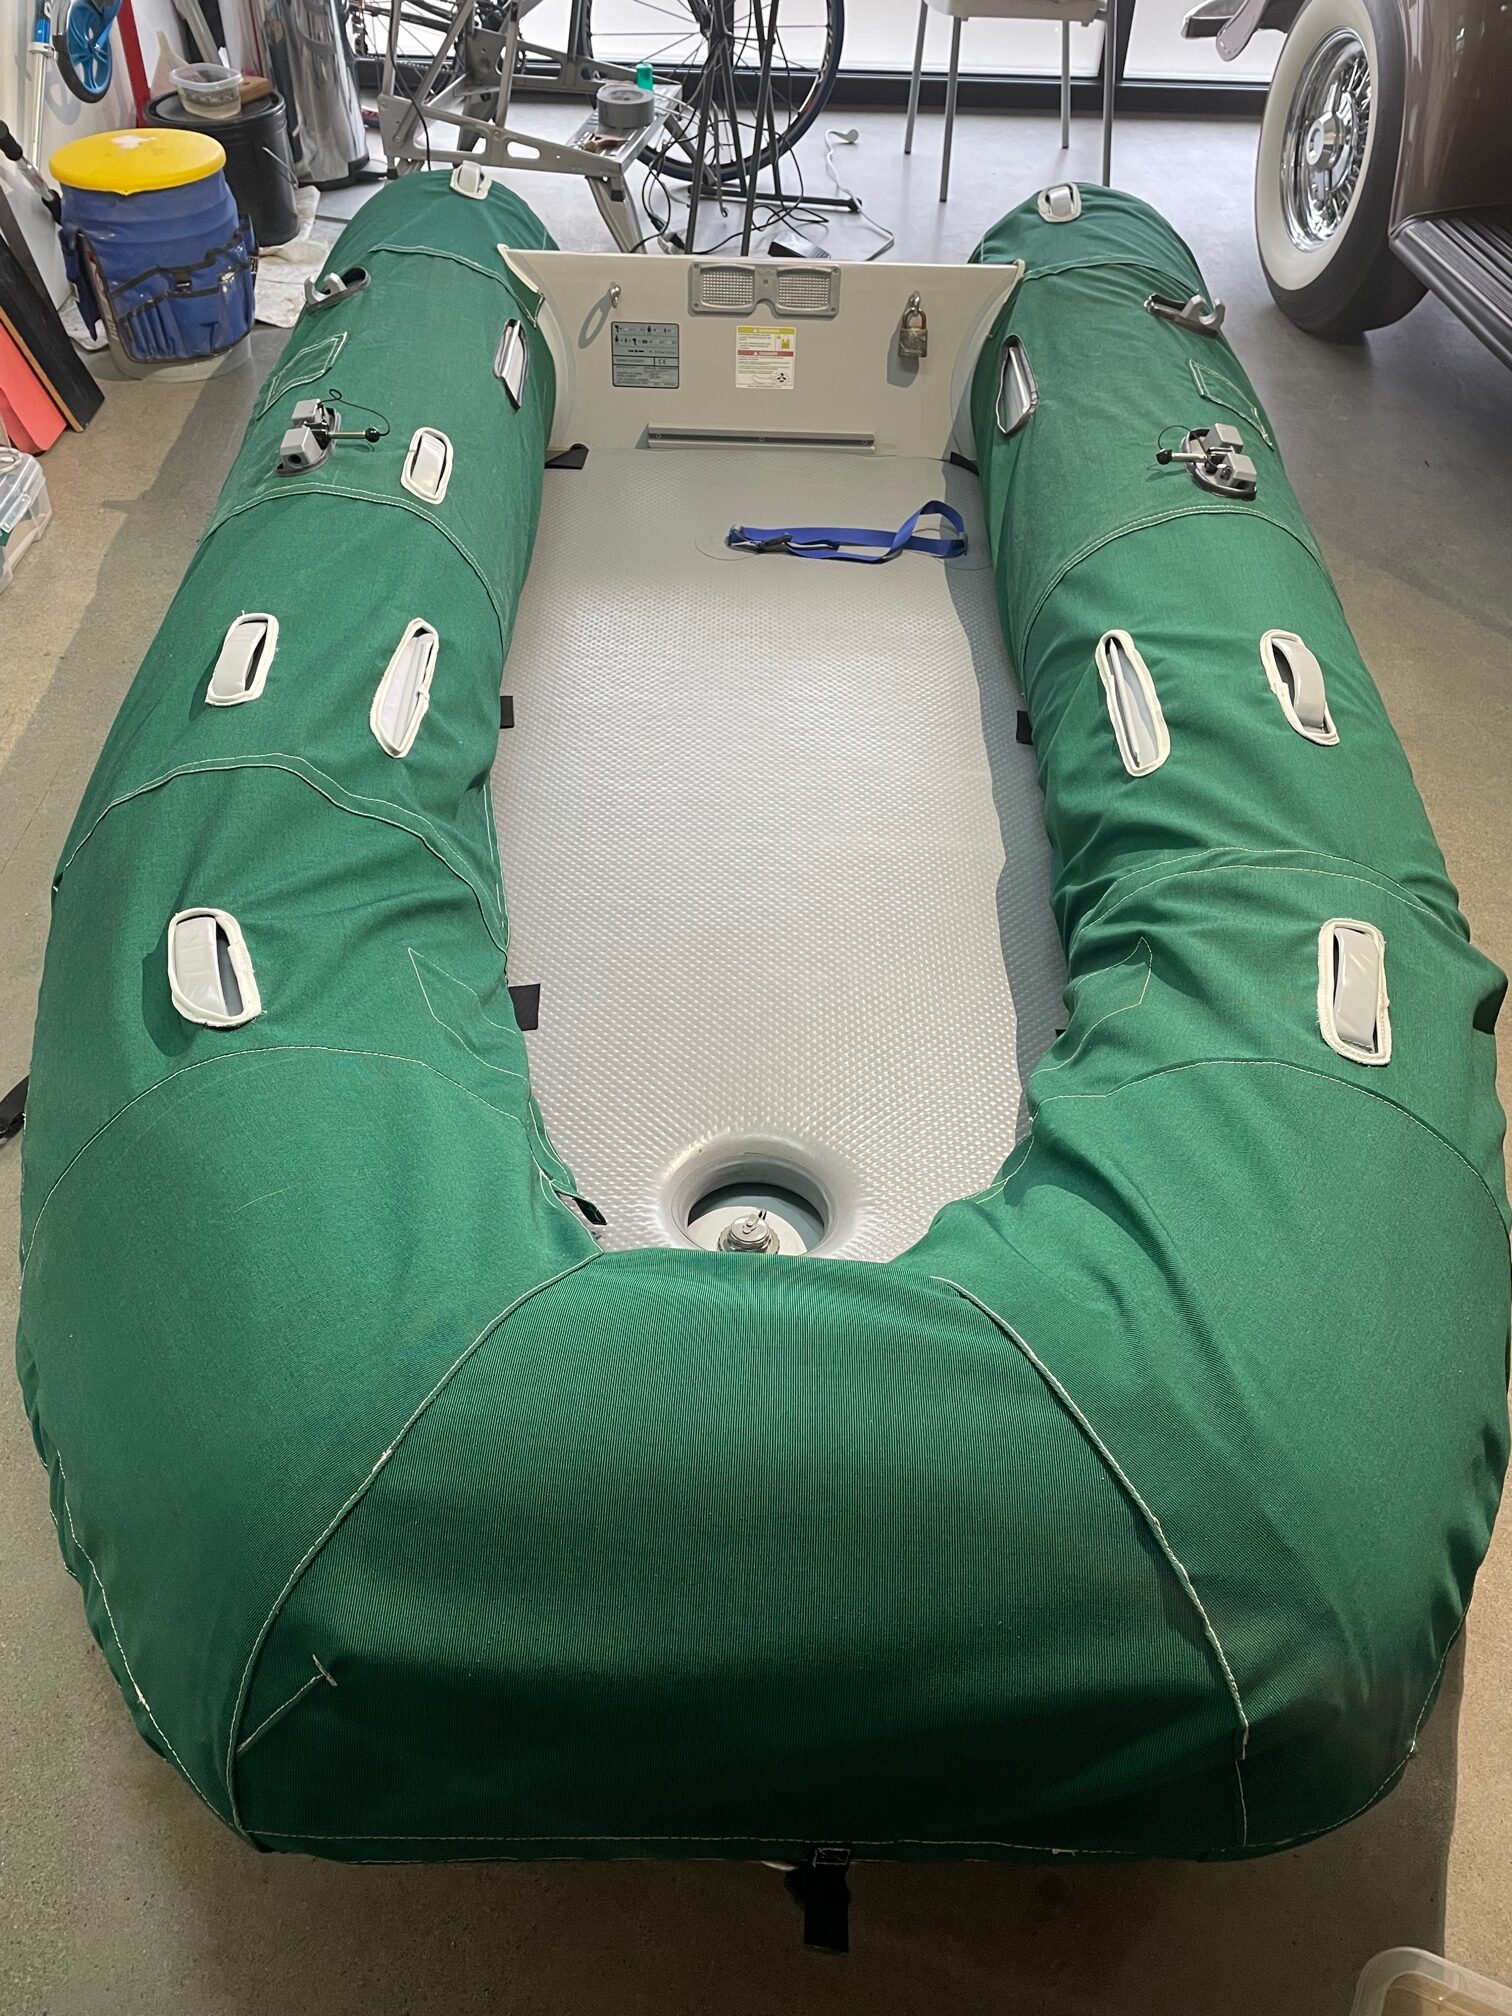
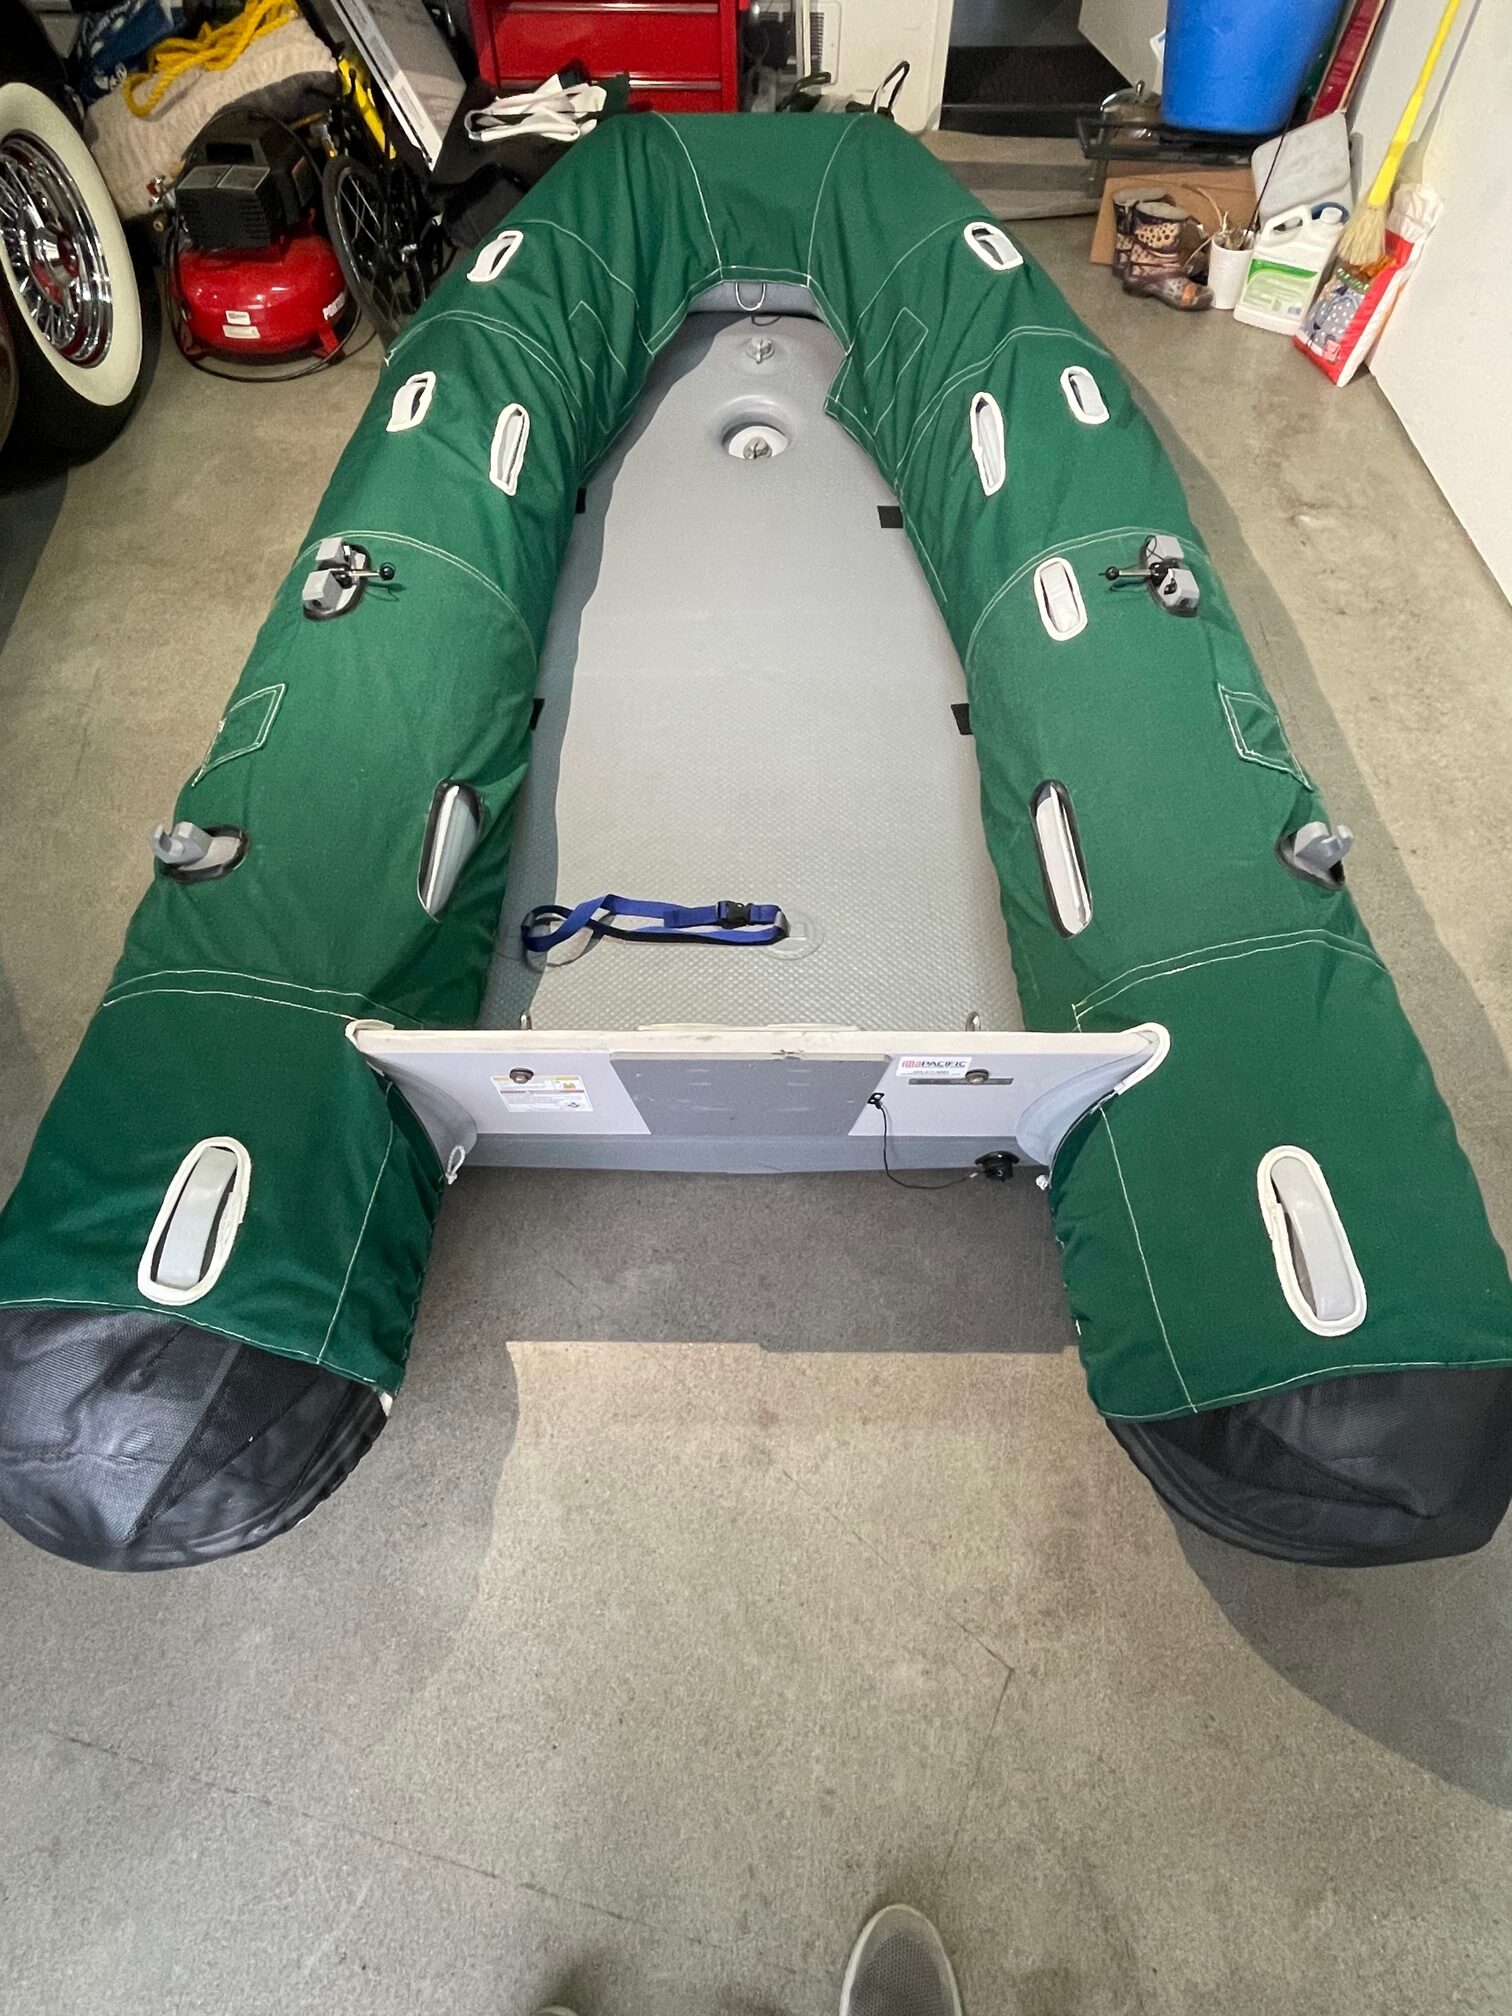
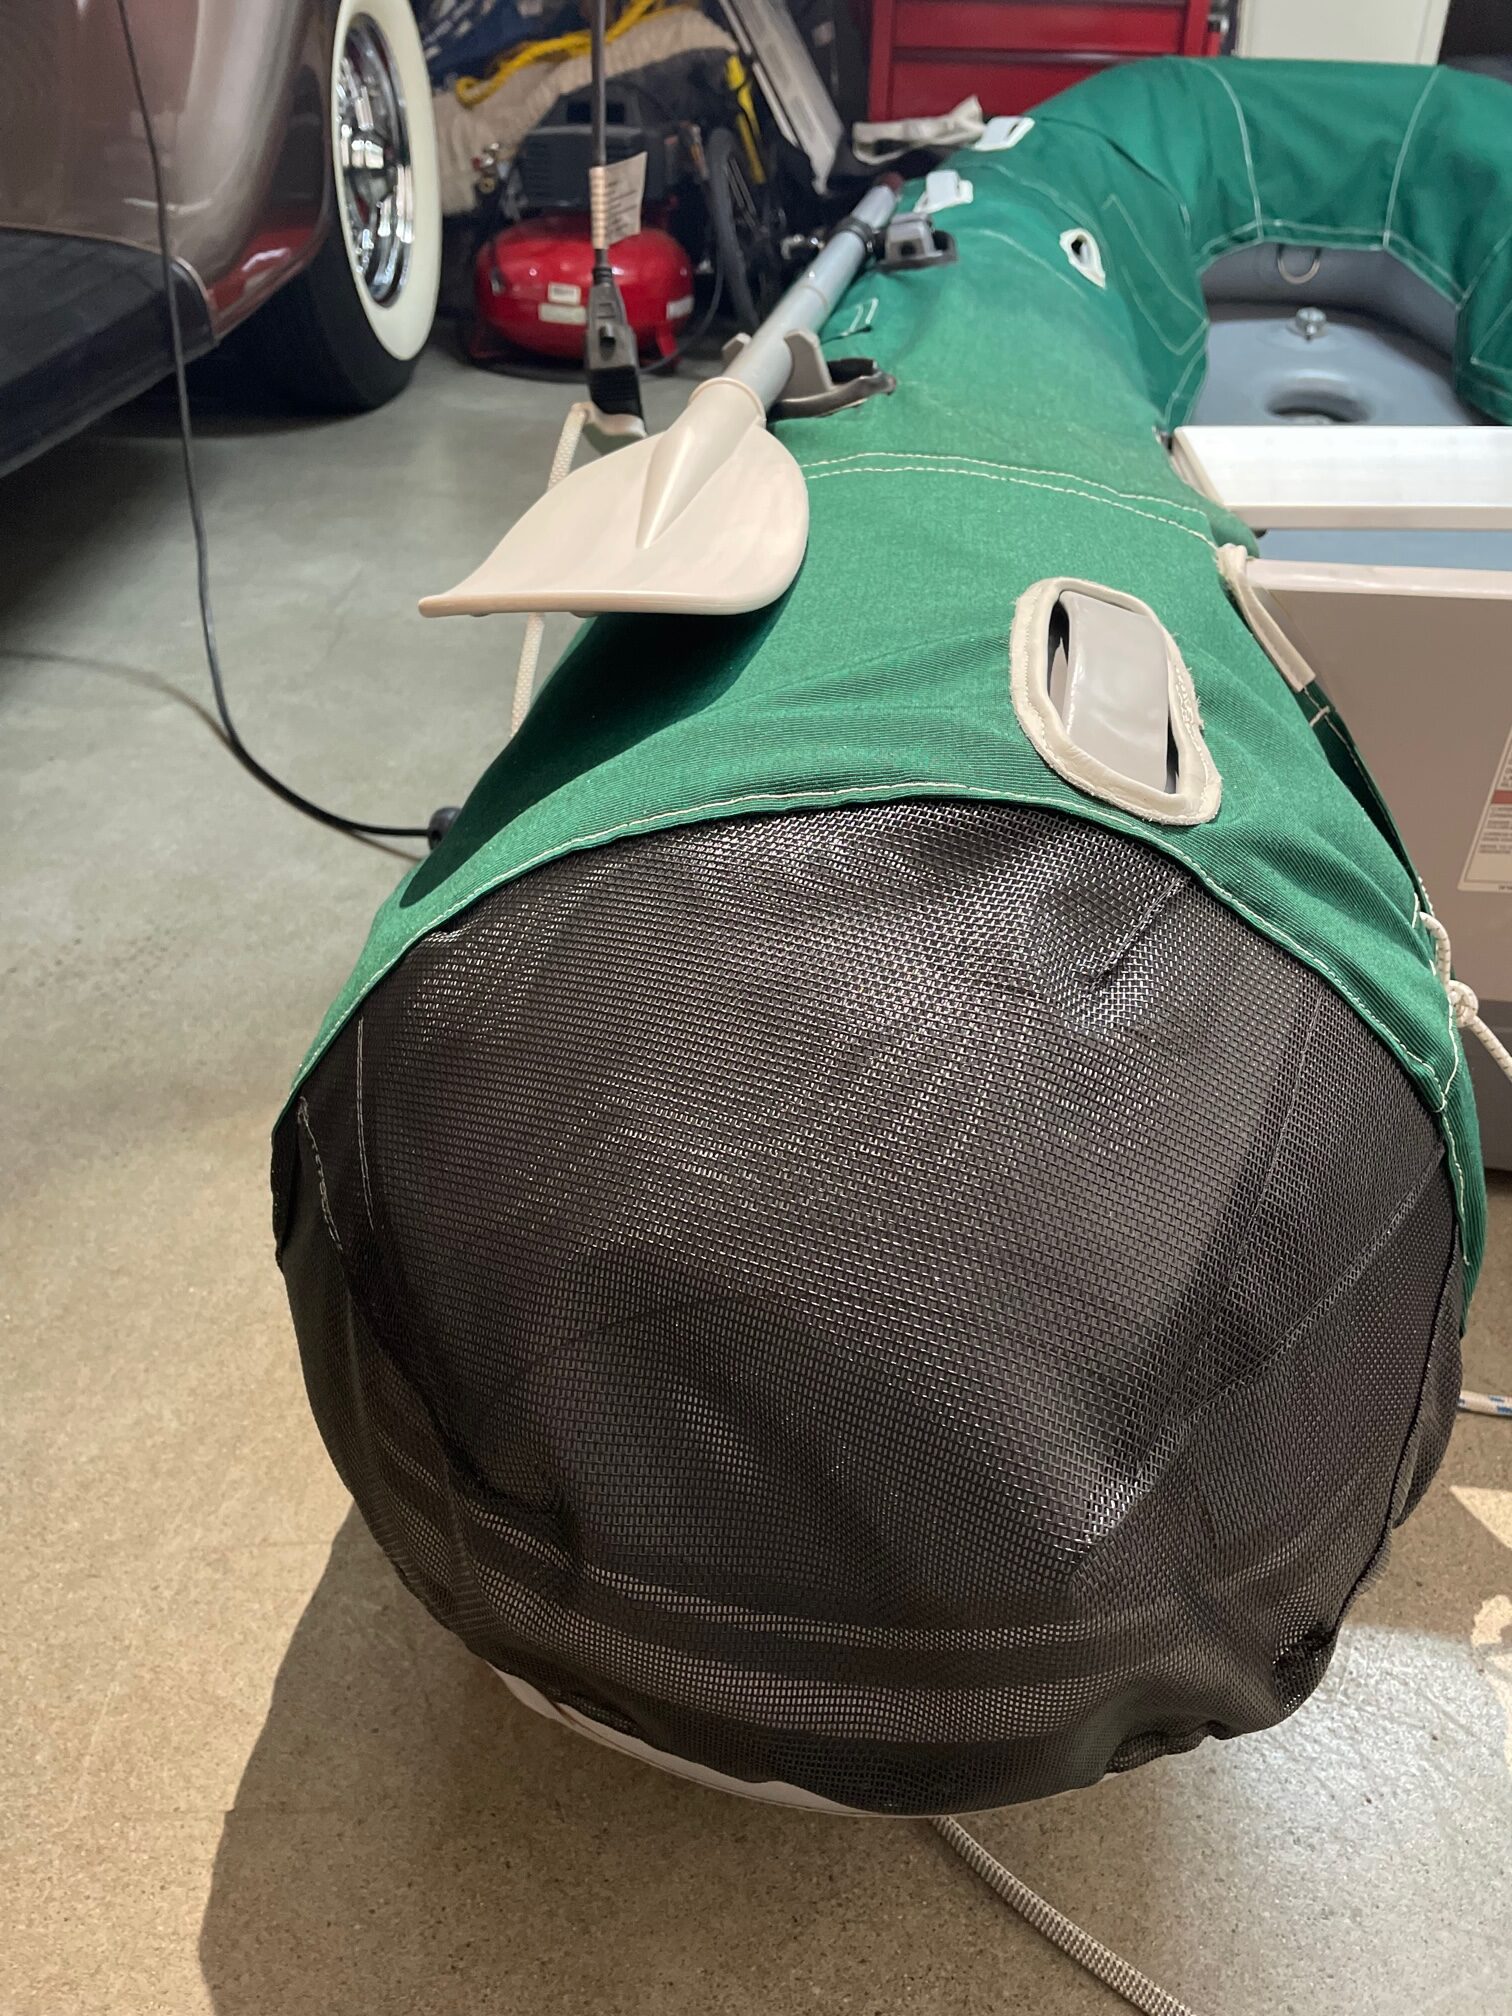
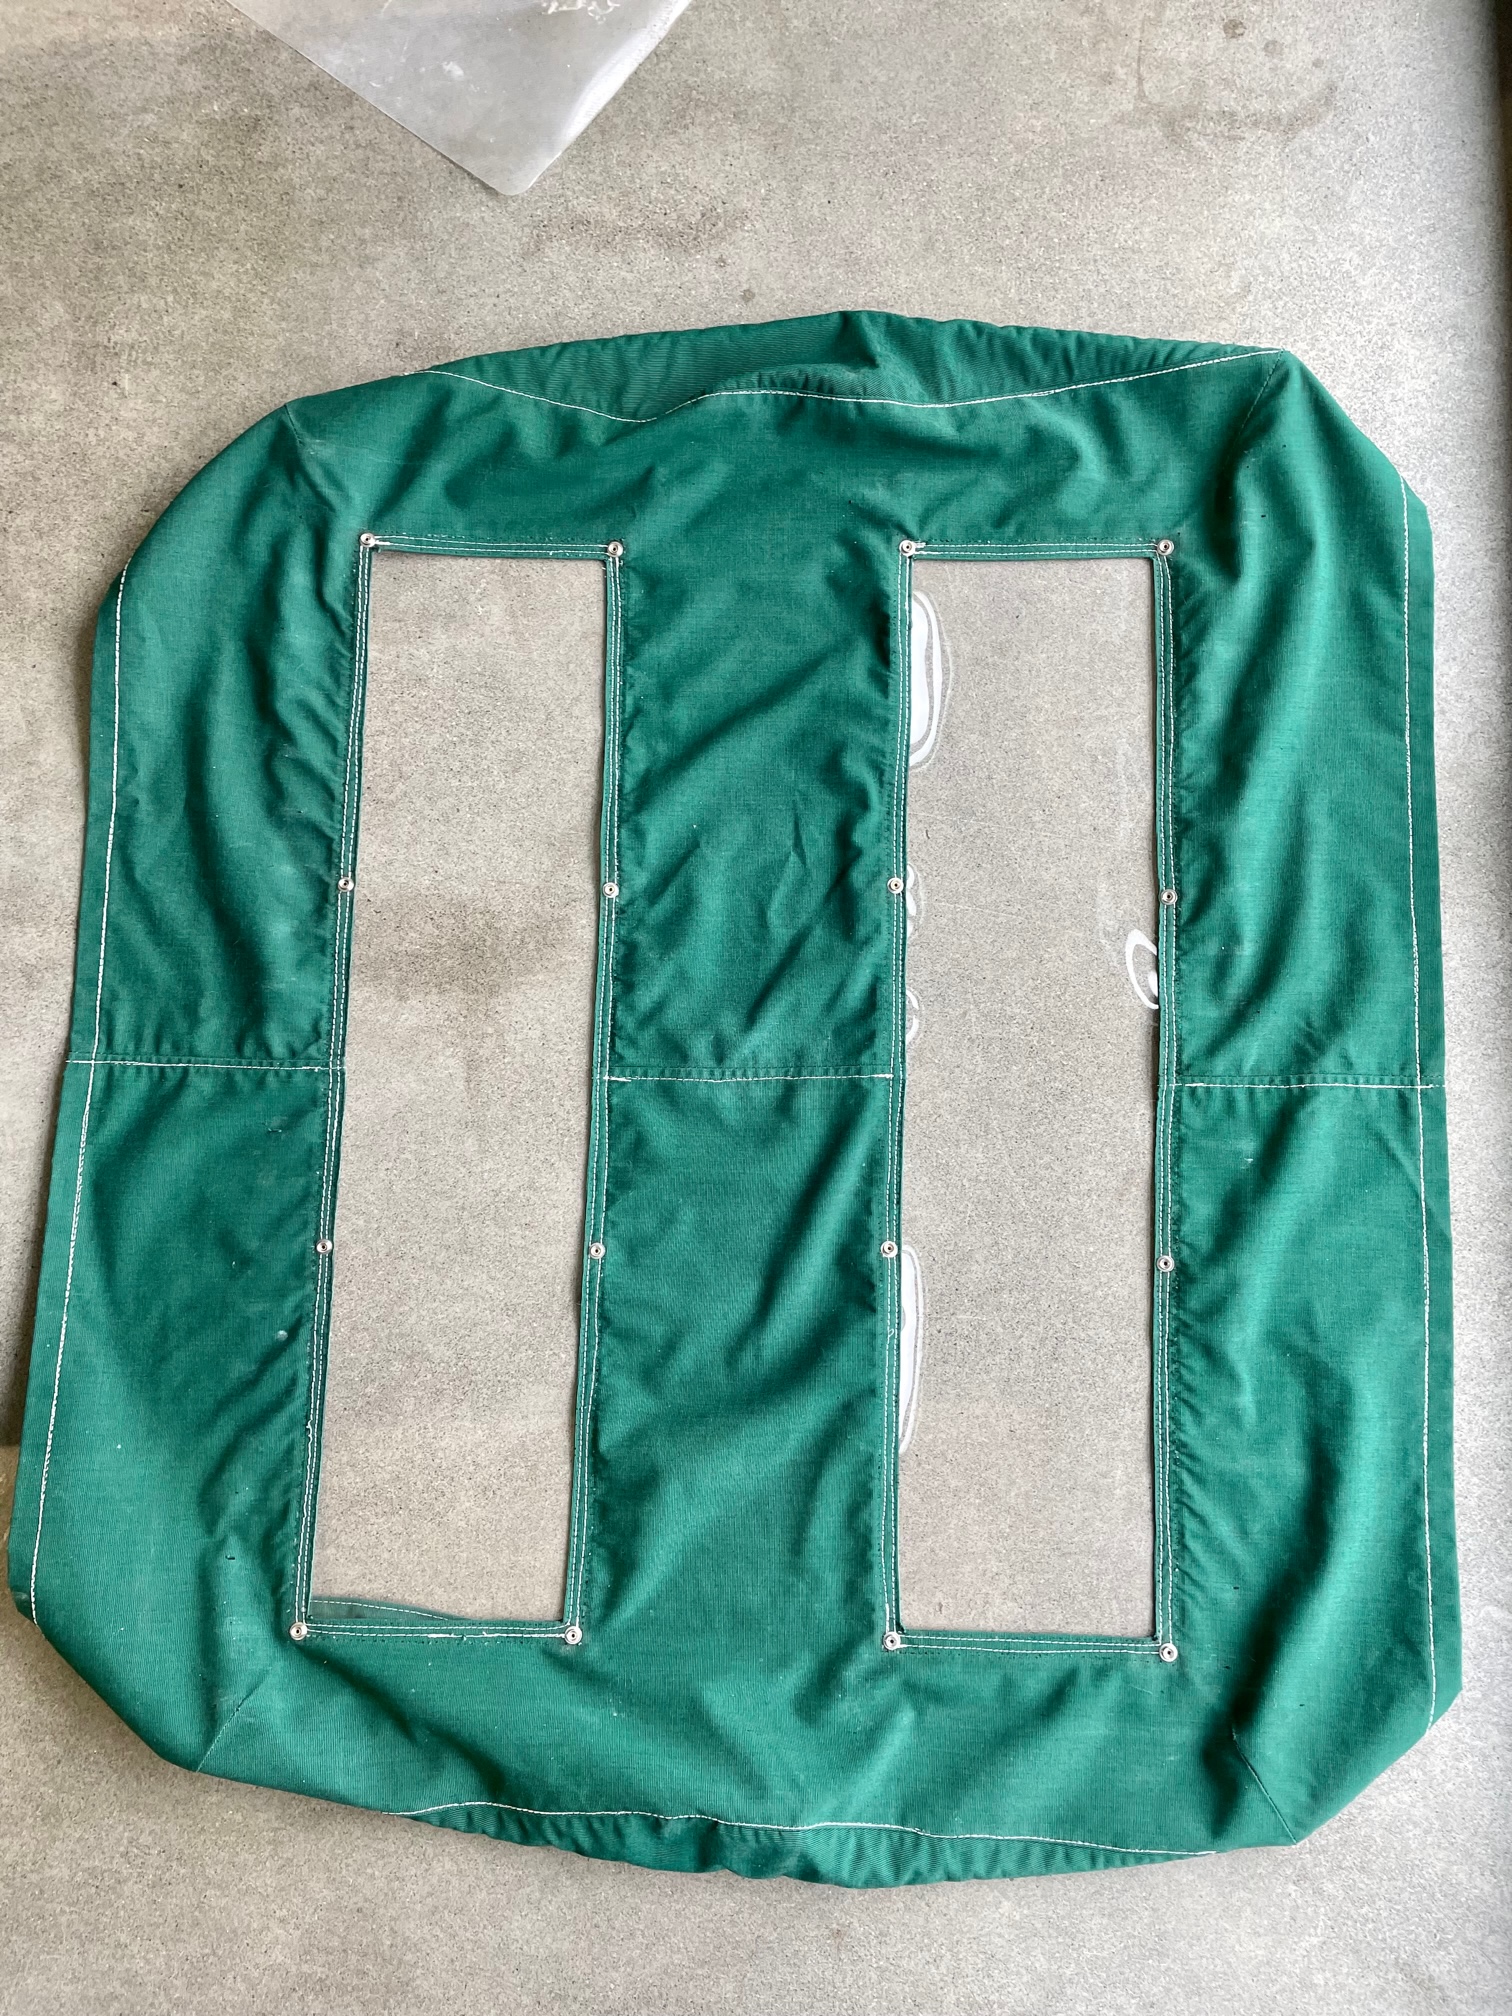
We had canvas dinghy chaps made when we were in Mexico to help protect the dinghy from UV exposure. It was custom made for the dinghy, so 9 years later when we got a new dinghy, it no longer fit. I tried modifying the chaps, but wound up replacing most of the Sunbrella canvas to get a better fit. It’s my biggest sewing project using a Sailrite machine and I got pretty good with it. I also re-stitched some of the other canvas covers for the boat, and replaced the vinyl in the butterfly hatch cover and the forward hatch cover since both were over 10 years old.
Handle Cutouts Lined With LeatherMesh Phifertex Butterfly Hatch Cover New Vinyl
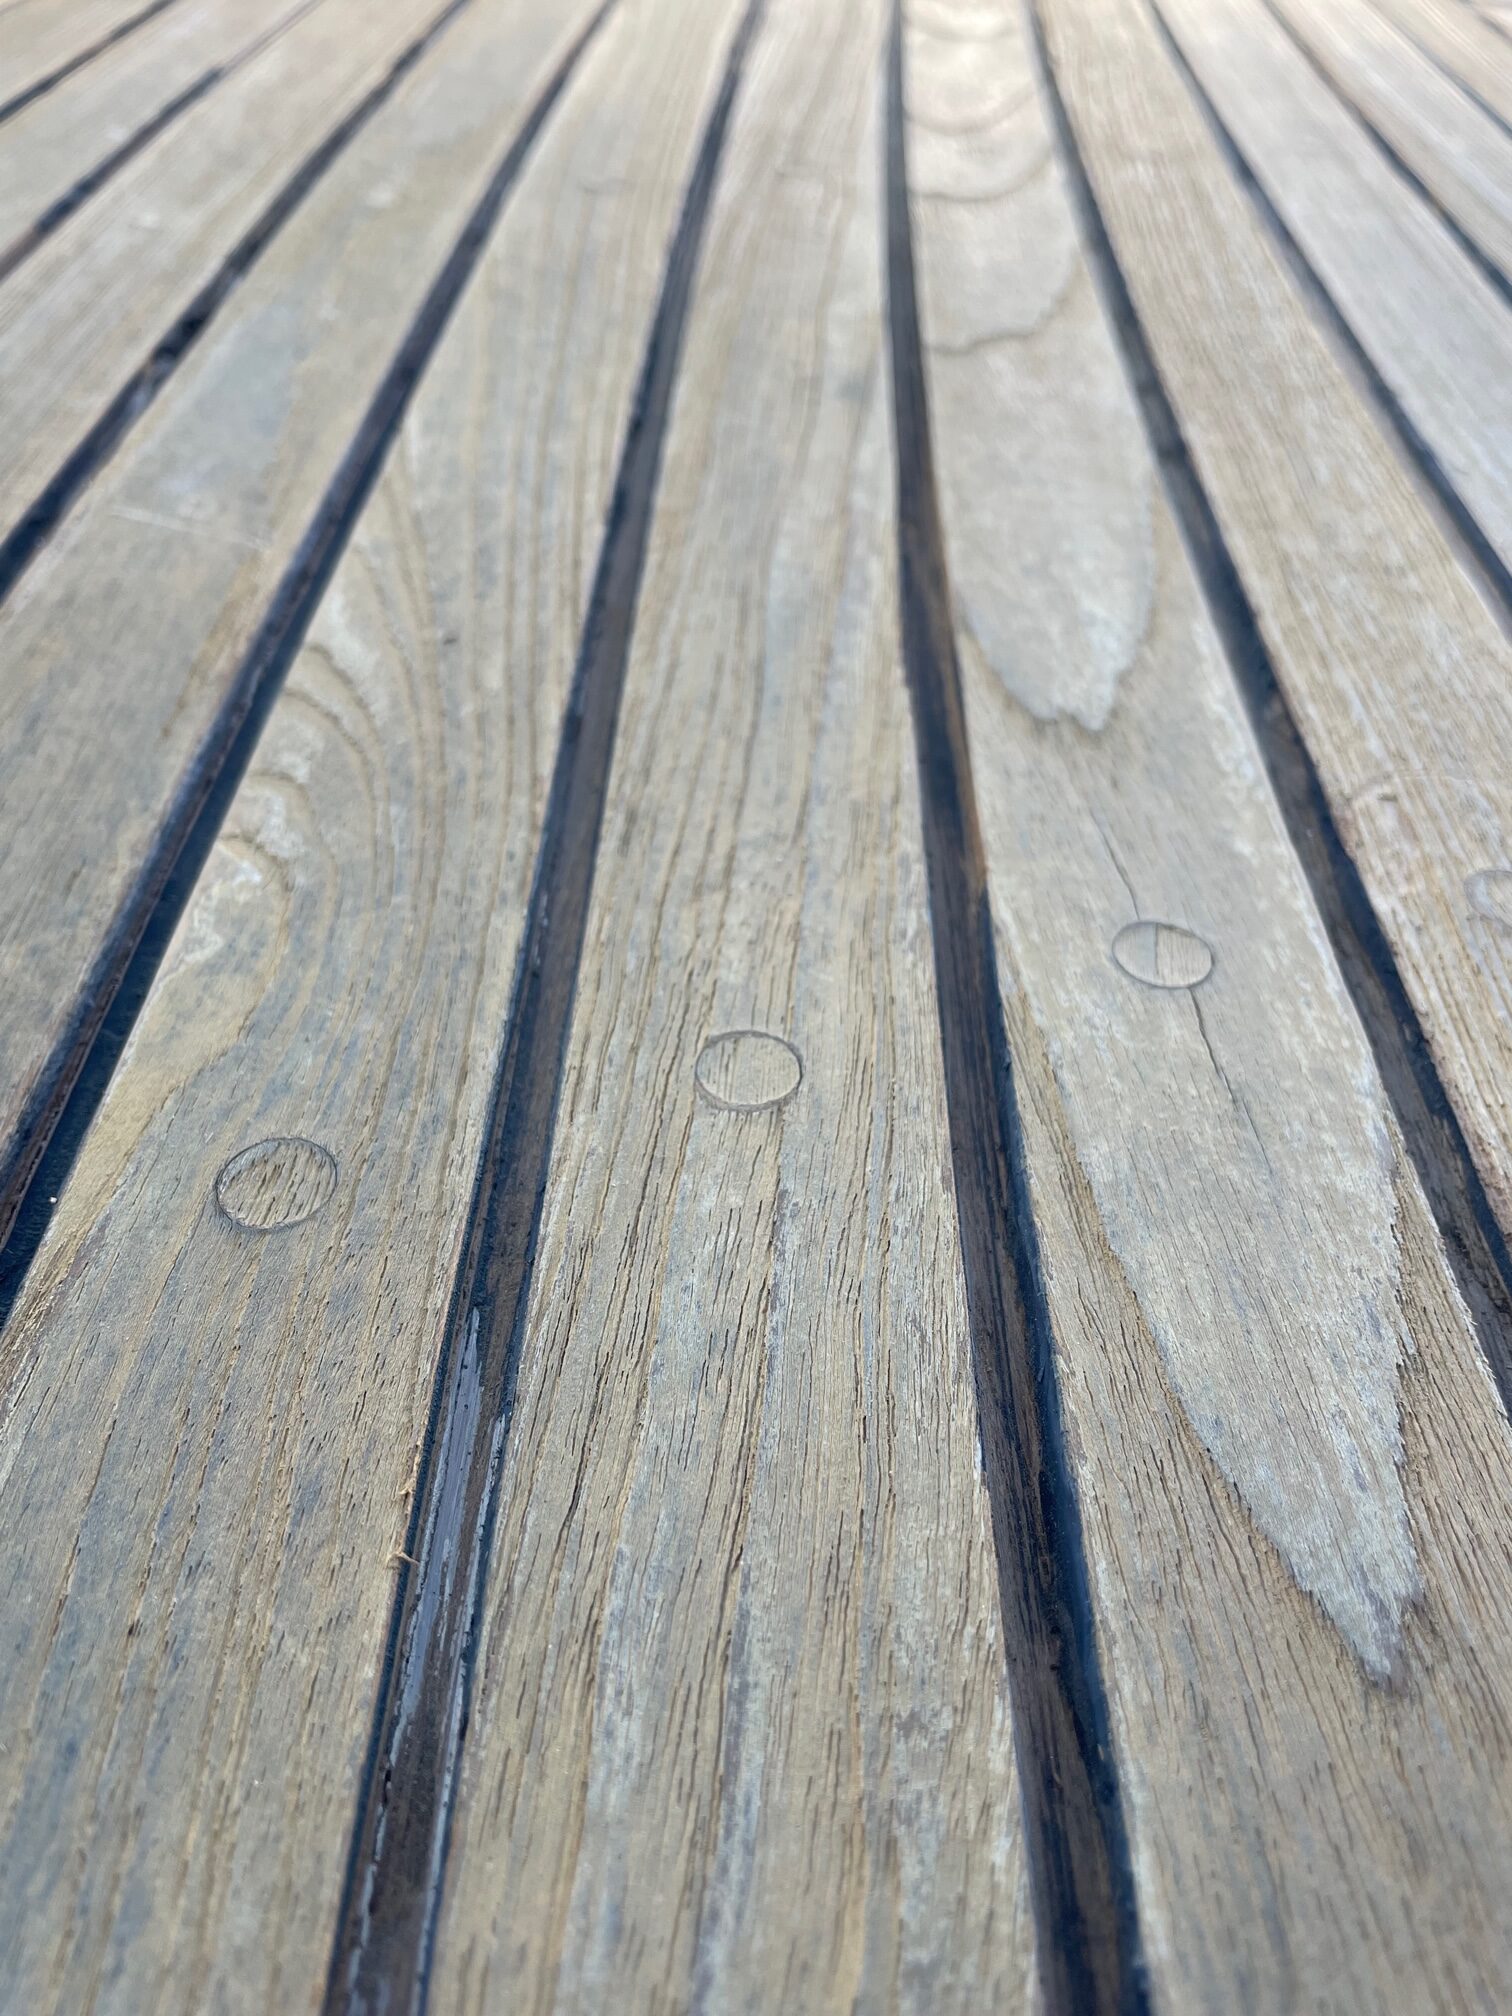
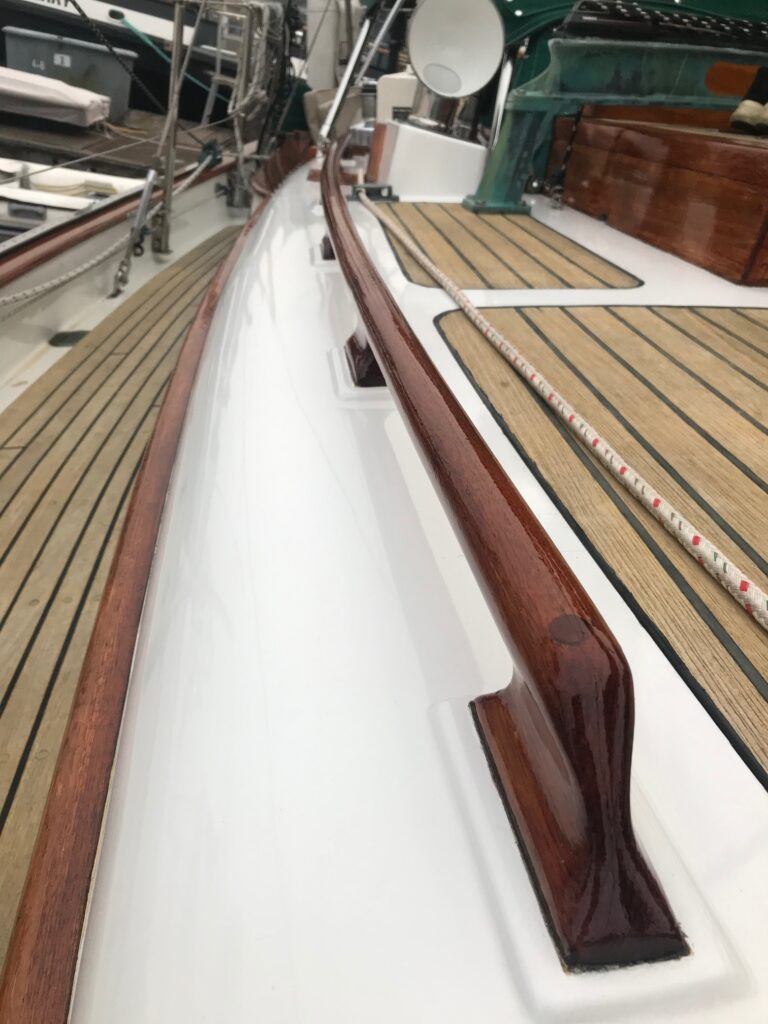
The teak decks on Apropos are 40 years old and still in pretty good shape. Much of the caulking is also in decent shape but there are places where it has separated from the teak. This allows water to sit between the teak and caulking. These areas can be seen when a wet deck is drying since they are the last to dry.
Gap between caulking and teak
The fore-deck teak had a lot of these caulking gaps so I decided to start there. Using a utility knife to score both sides of the caulk, and a Teakdecking Systems Reefing Hook, I removed all the old caulking. Next I sanded the U-shaped channels, vacuumed, and cleaned with Acetone.
Caulking removed and channels cleaned
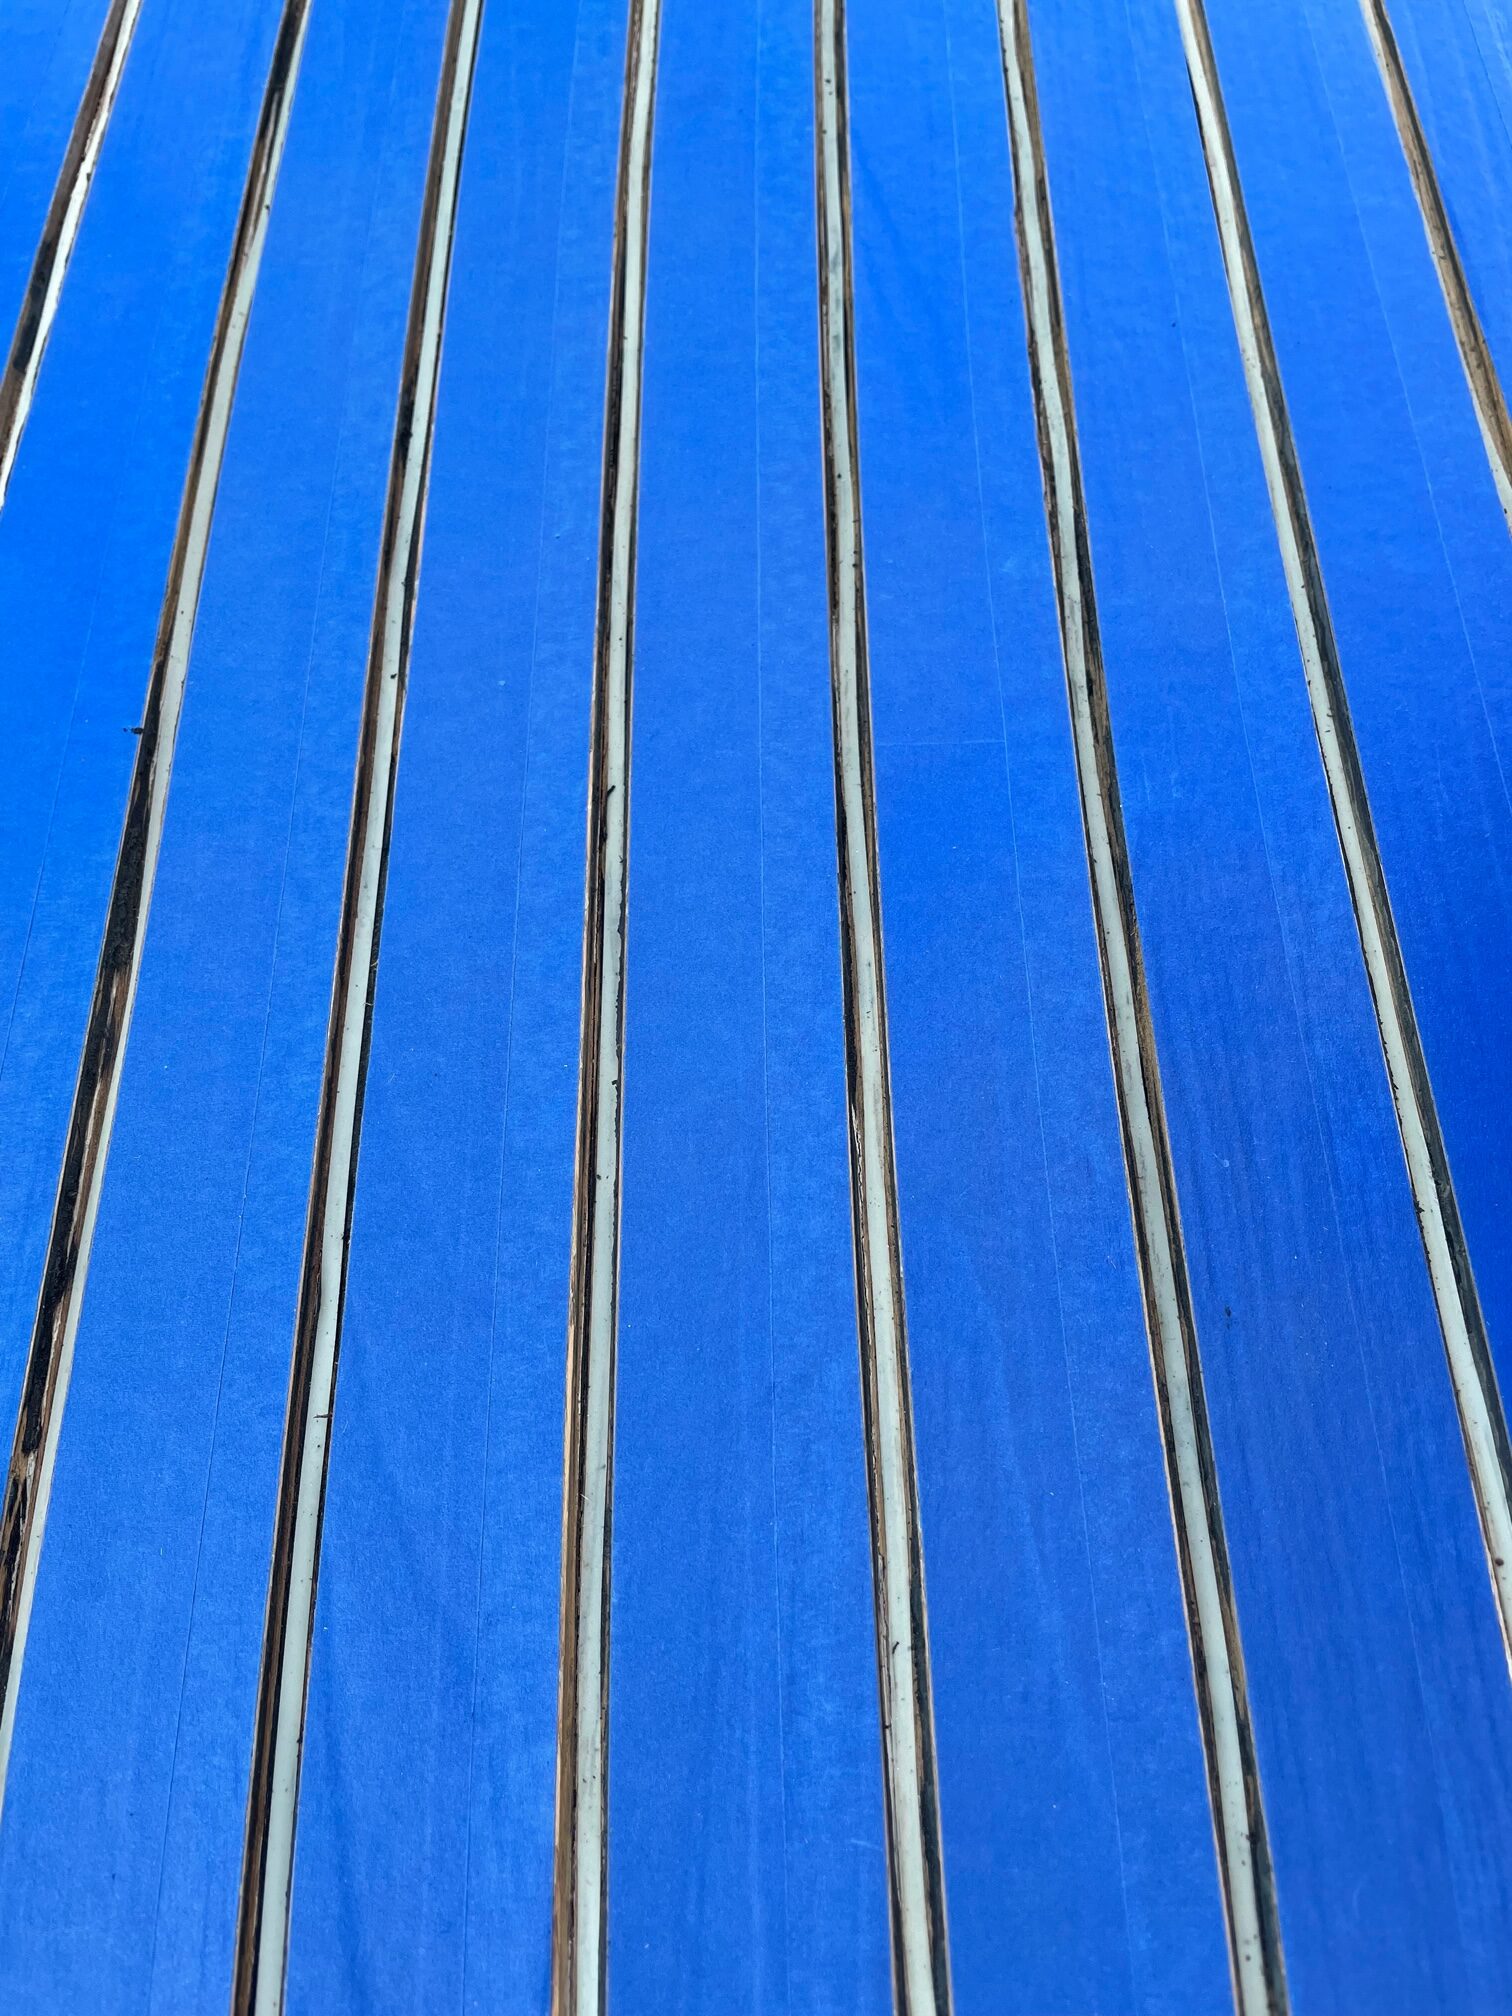
Next was the tedious job of taping the teak. I used Scotch brand blue painters tape. This method requires much less sanding which is important with 40 year old decks. I used 3/16″ fine-line tape to line the bottom of the channels, as recommended by Teakdecking Systems. This prevents the caulking from bonding to the bottom of the channel and allows it to expand and contract with the constant movement of the boat deck.
Taped Decking
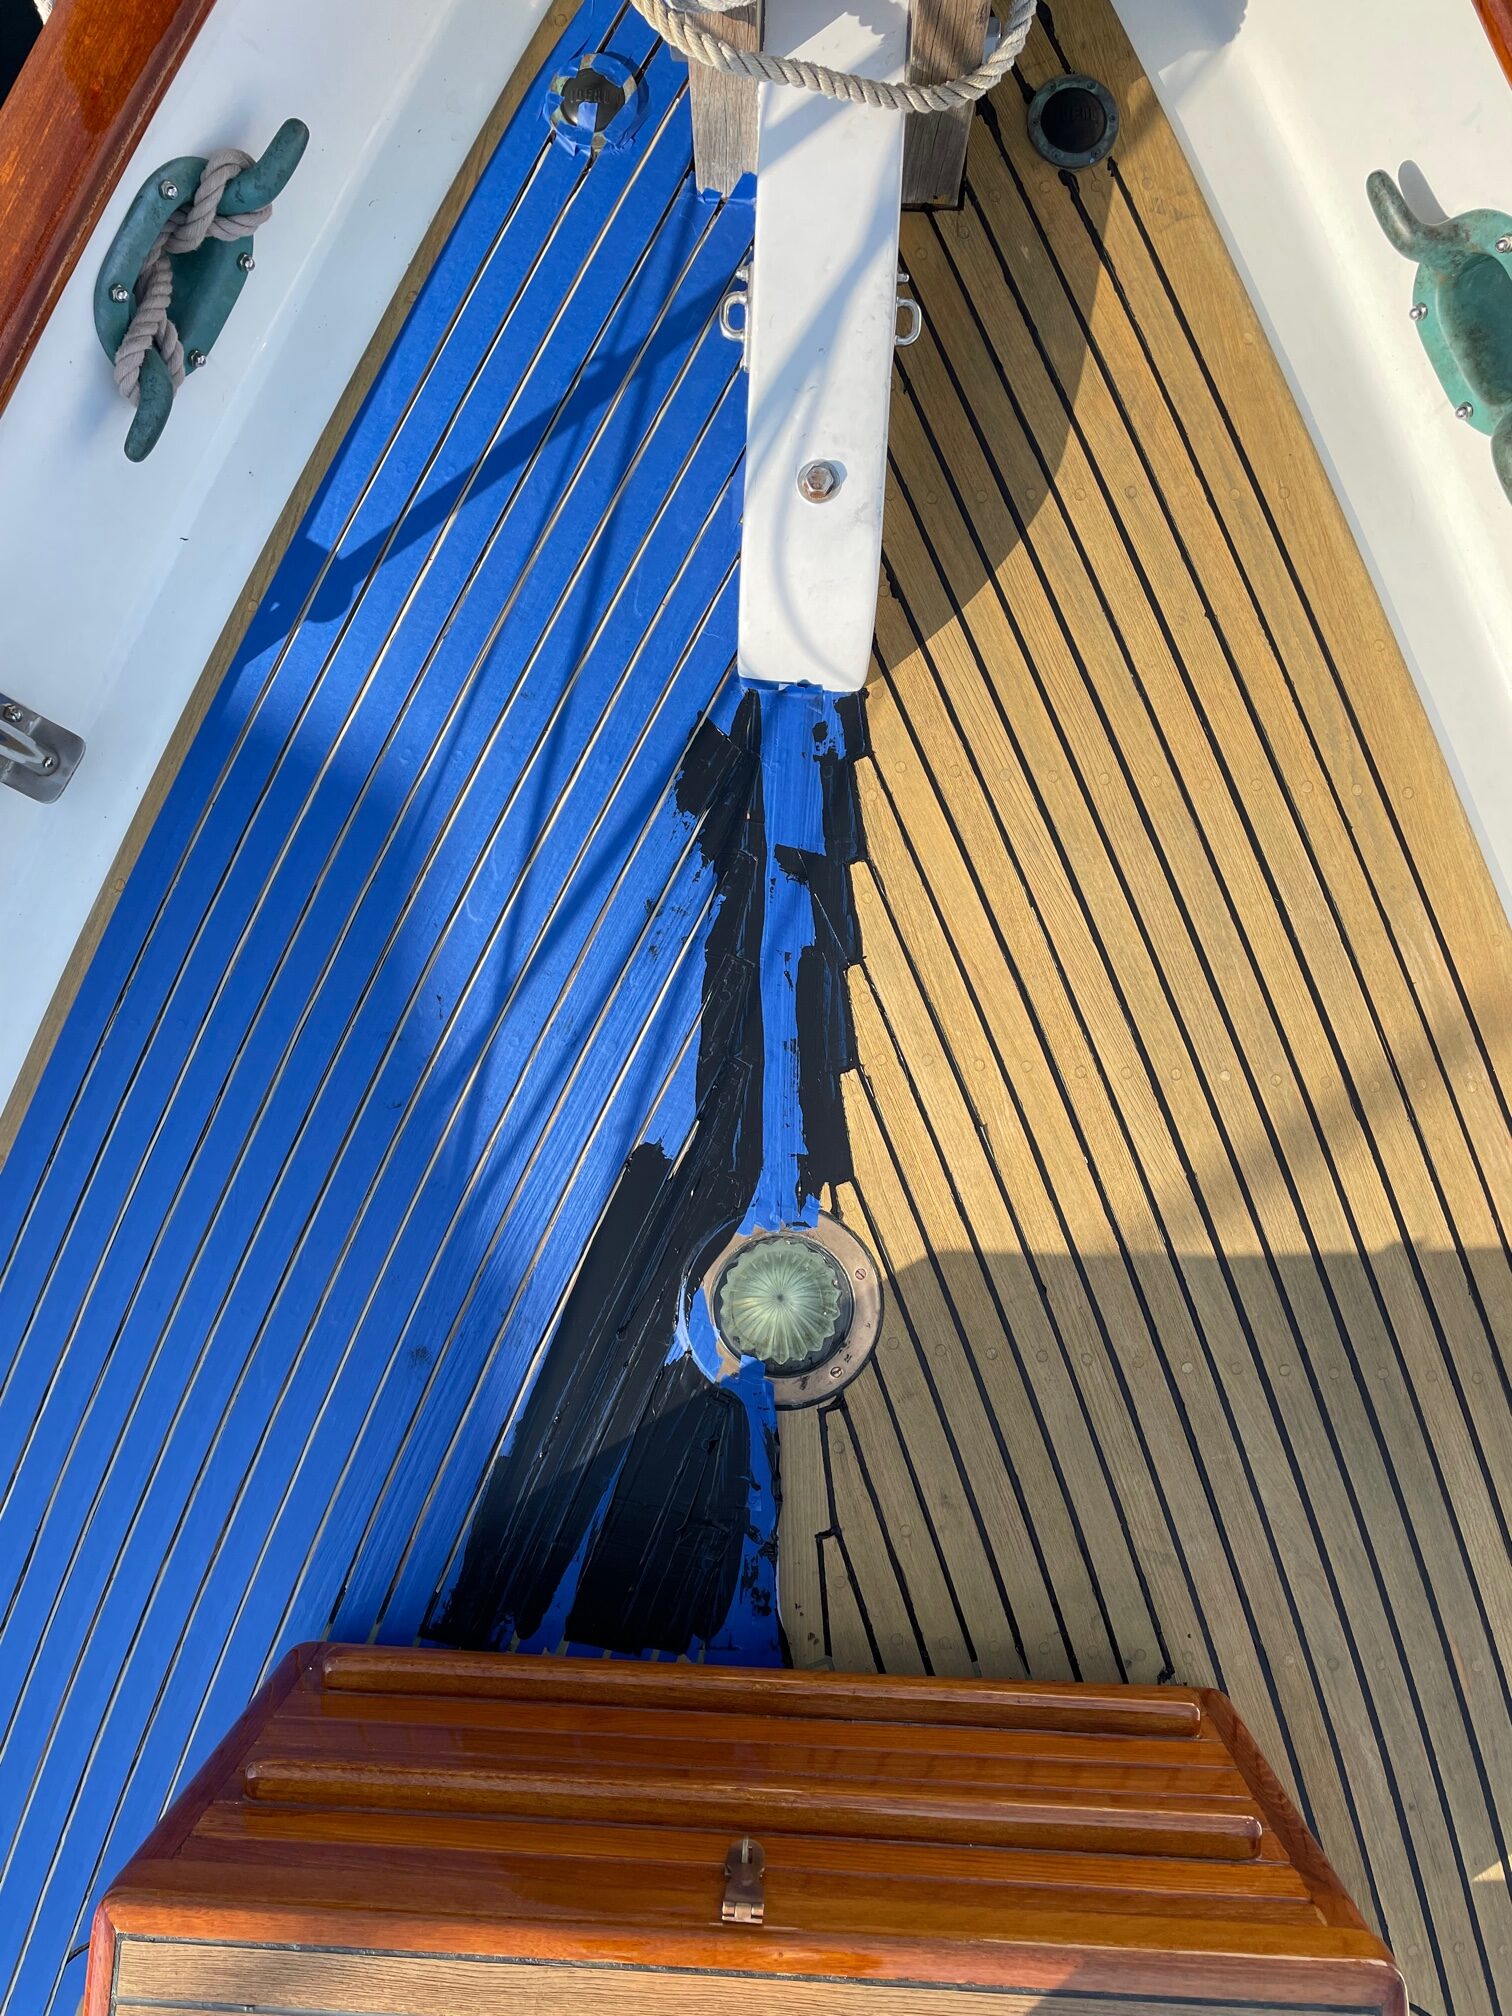
Finally, I applied the Teakdecking Systems SIS 440 caulk. The method I used was to over-fill the channel, then use a metal putty knife to apply pressure to remove any air gaps and remove excess caulk. After sitting for 5 minutes, I peeled off the blue tape. The entire fore-deck took 6-10oz tubes of caulk.
Half Way Done
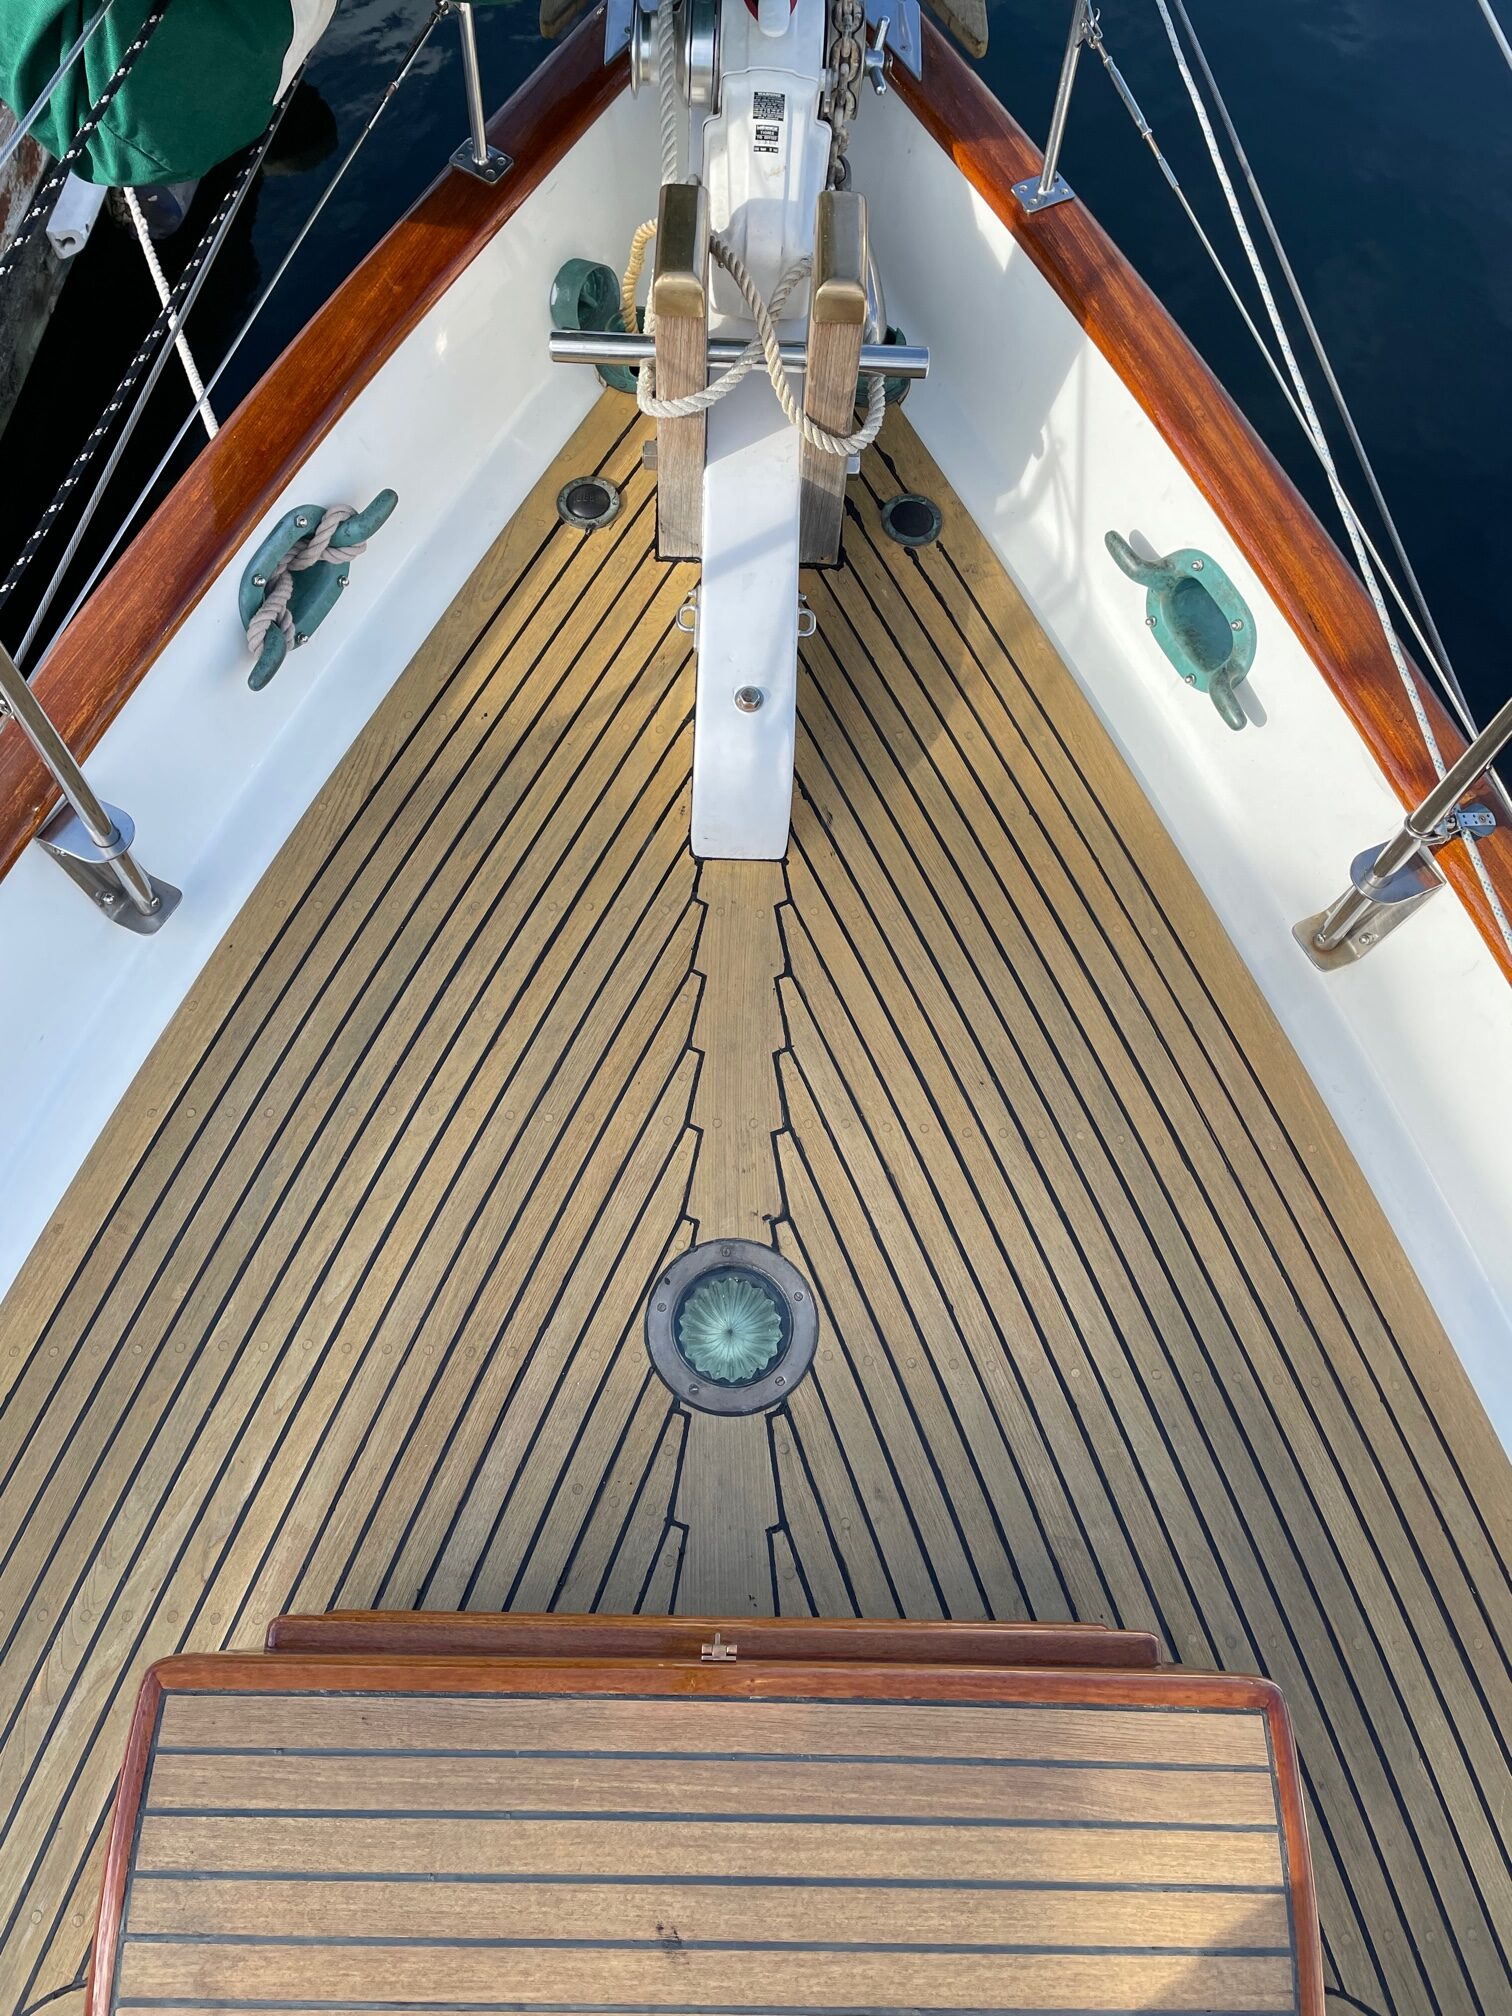
After the caulk cured for 5 days, I sanded with 80-grit paper to smooth out the caulk and make it flush with the teak. Here’s the final result.
Re-Caulked Teak Decking
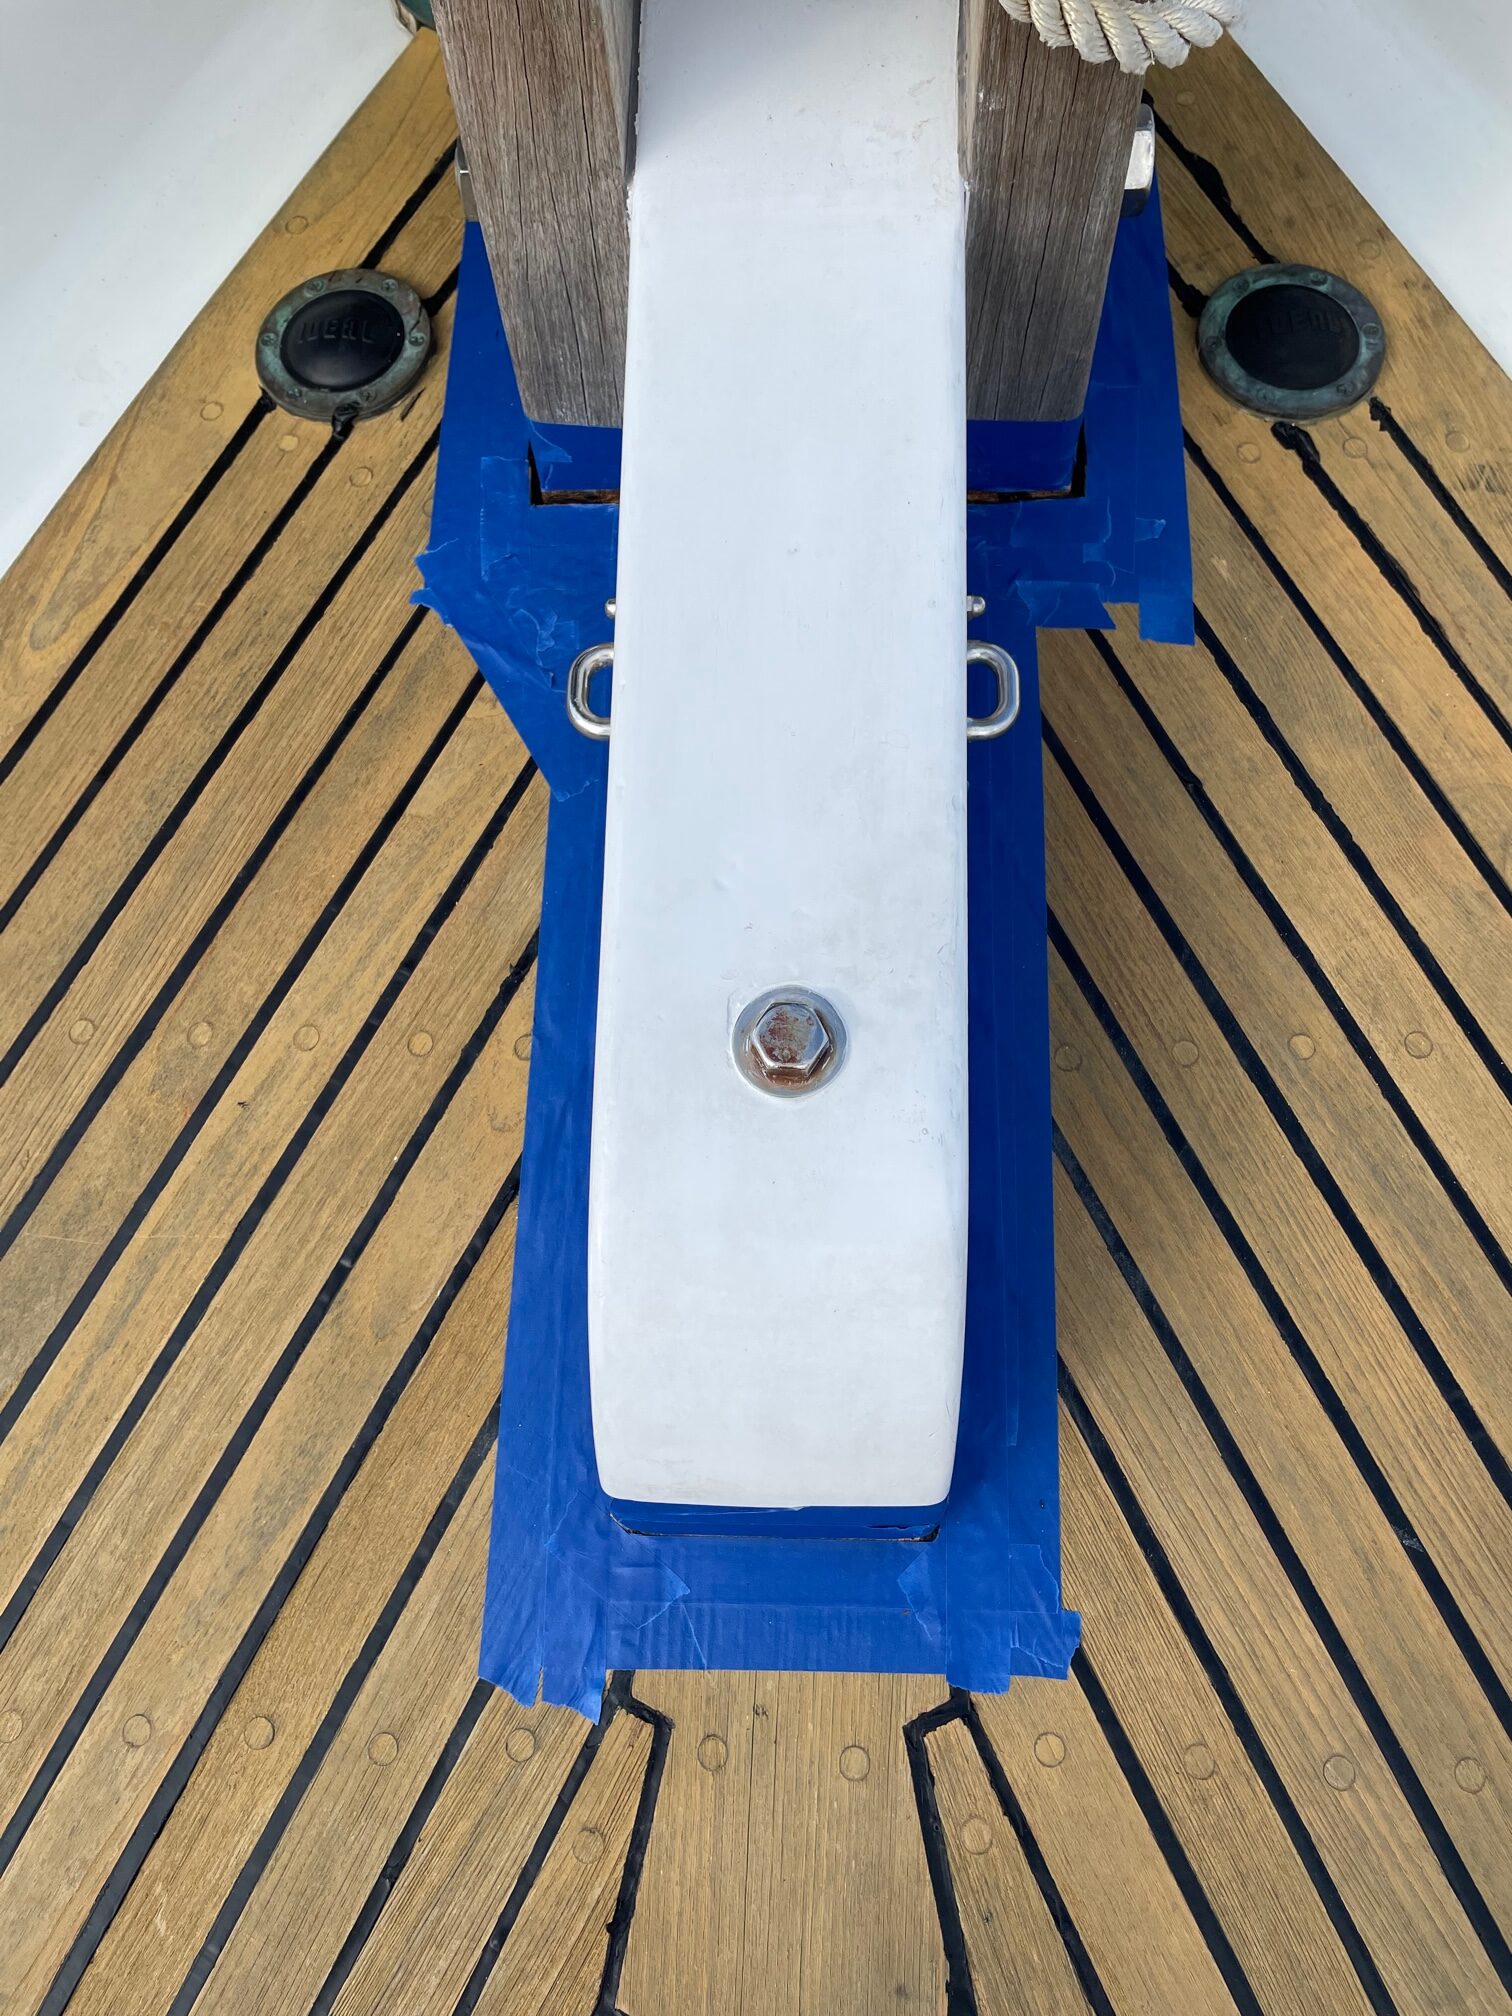
About half a tube of caulk was used to fill the deep gaps between the decking and aft bowsprit and chocks shown here. It’s important to keep water from leaking around the bowsprit and chocks.
The refrigeration on Apropos has been inoperable for a long time. During our South Pacific trip, we shut the freezer down after departing Mexico for French Polynesia–it was consuming too much power for our solar to keep up with and we knew there would be no docks to plug into for the rest of the trip. We replaced it with a portable Dometic refrigeration box that found a place on the cabin floor in the v-berth. It eventually got moved closer to the batteries on the aft port-side cabin floor. It worked well but took up valuable floor space (24″ x 16″). After returning to Seattle, it was a low-priority project until now.
The Old System
The old system was very complex. It was a Glacier Bay 12VDC water-cooled, cold-plate system. It was installed in 2004 and was run continuously for about 10 years, but Glacier Bay went out of business so parts were no longer available. It had 3 zones–a refrigeration box, a freezer box, and an air conditioning zone (we never really used the air conditioning zone except to try it out a few times). There was a solenoid valve for each zone and only one zone could be active at a time. There were many feet of refrigerant carrying copper tubing that ran from the compressor to each of the 3 zones. It had 2 remote display/control panels for setting and reading temperatures in the freezer and refrigerator boxes. We discovered soon after arriving in Mexico that the refrigeration system was running too often, most likely due to the lack of good insulation of the boxes. While in Mexico, I bought a sheet of 1″ foam closed-cell insulation from a hardware store and lined both boxes, but it was a sloppy job trying to fit the insulation around the cold plates. Soon after, we gave up on it and began using the Dometic portable refrigerator.
The New System
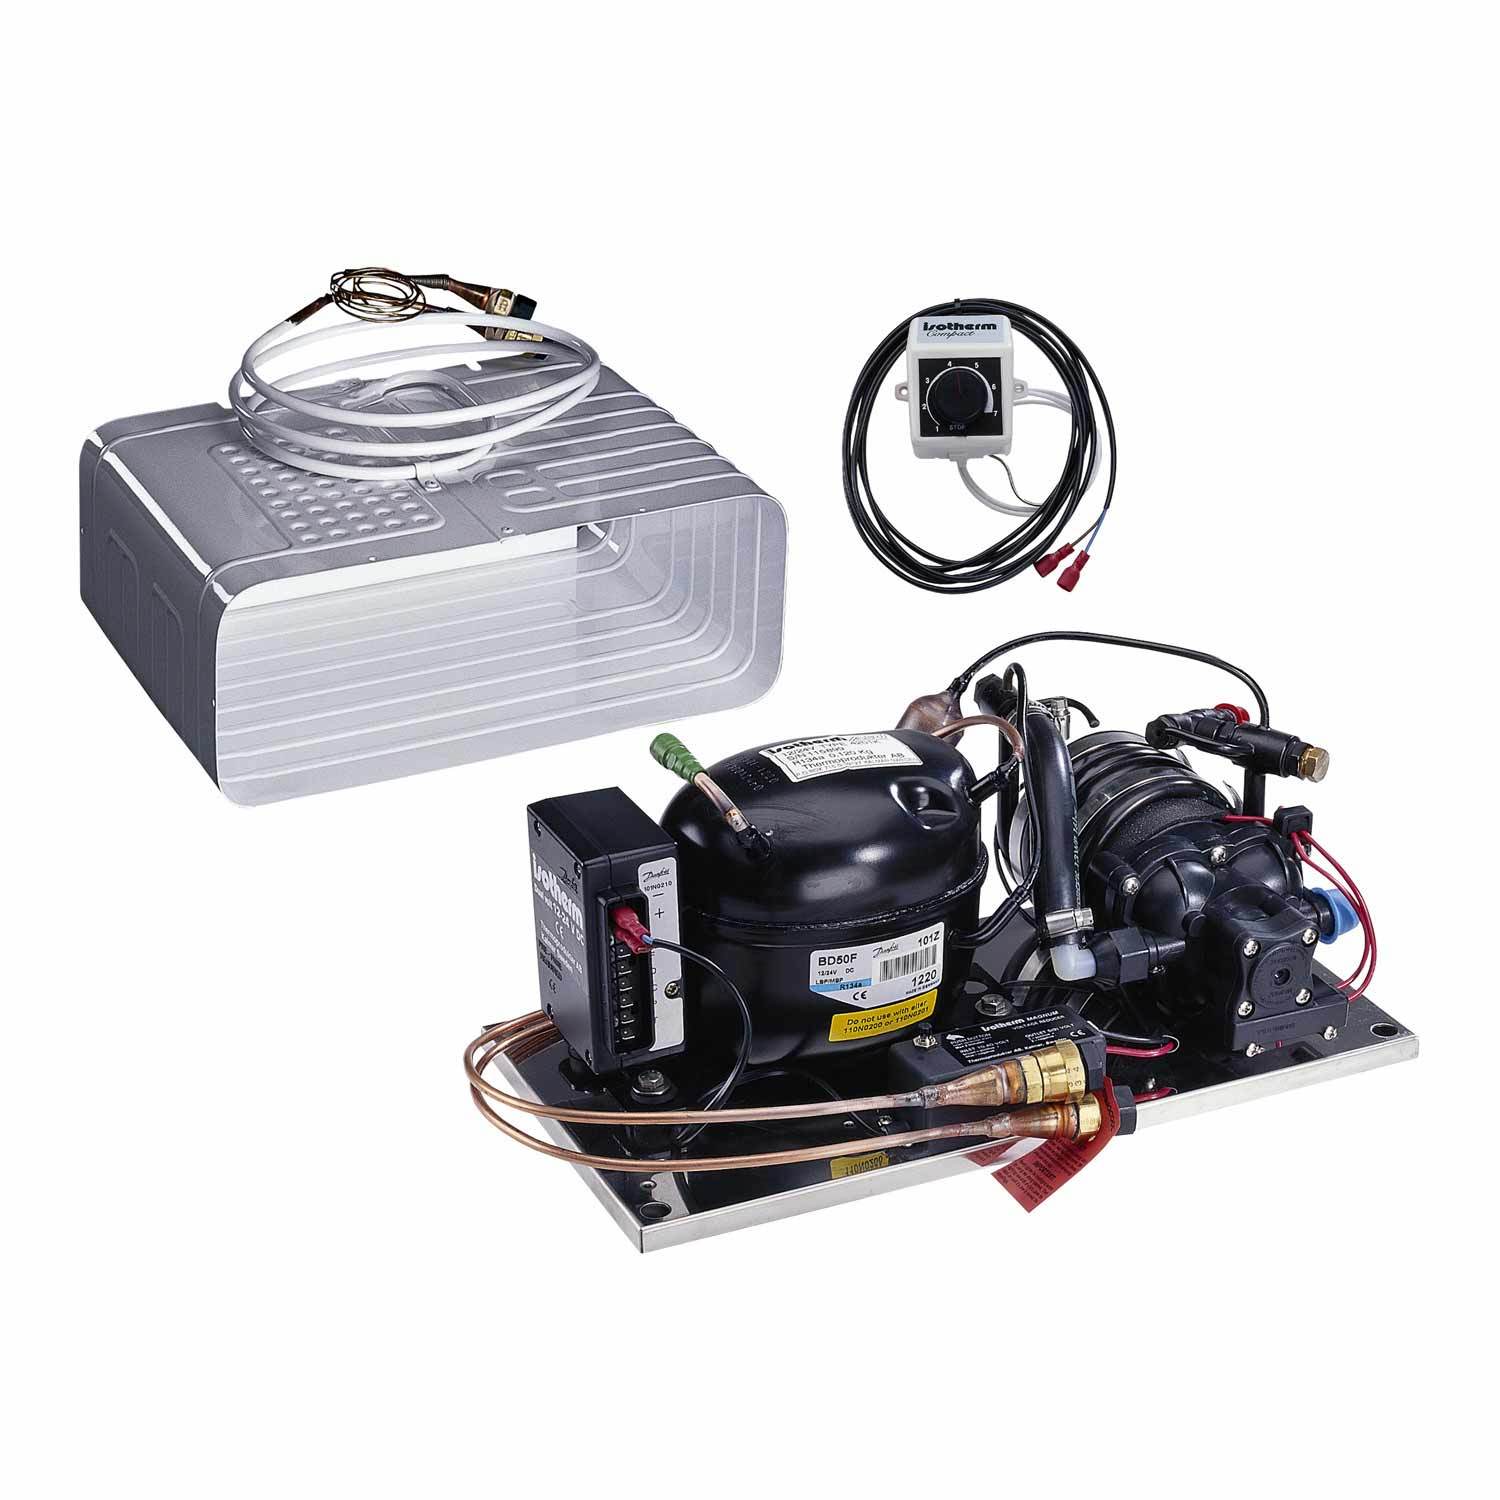
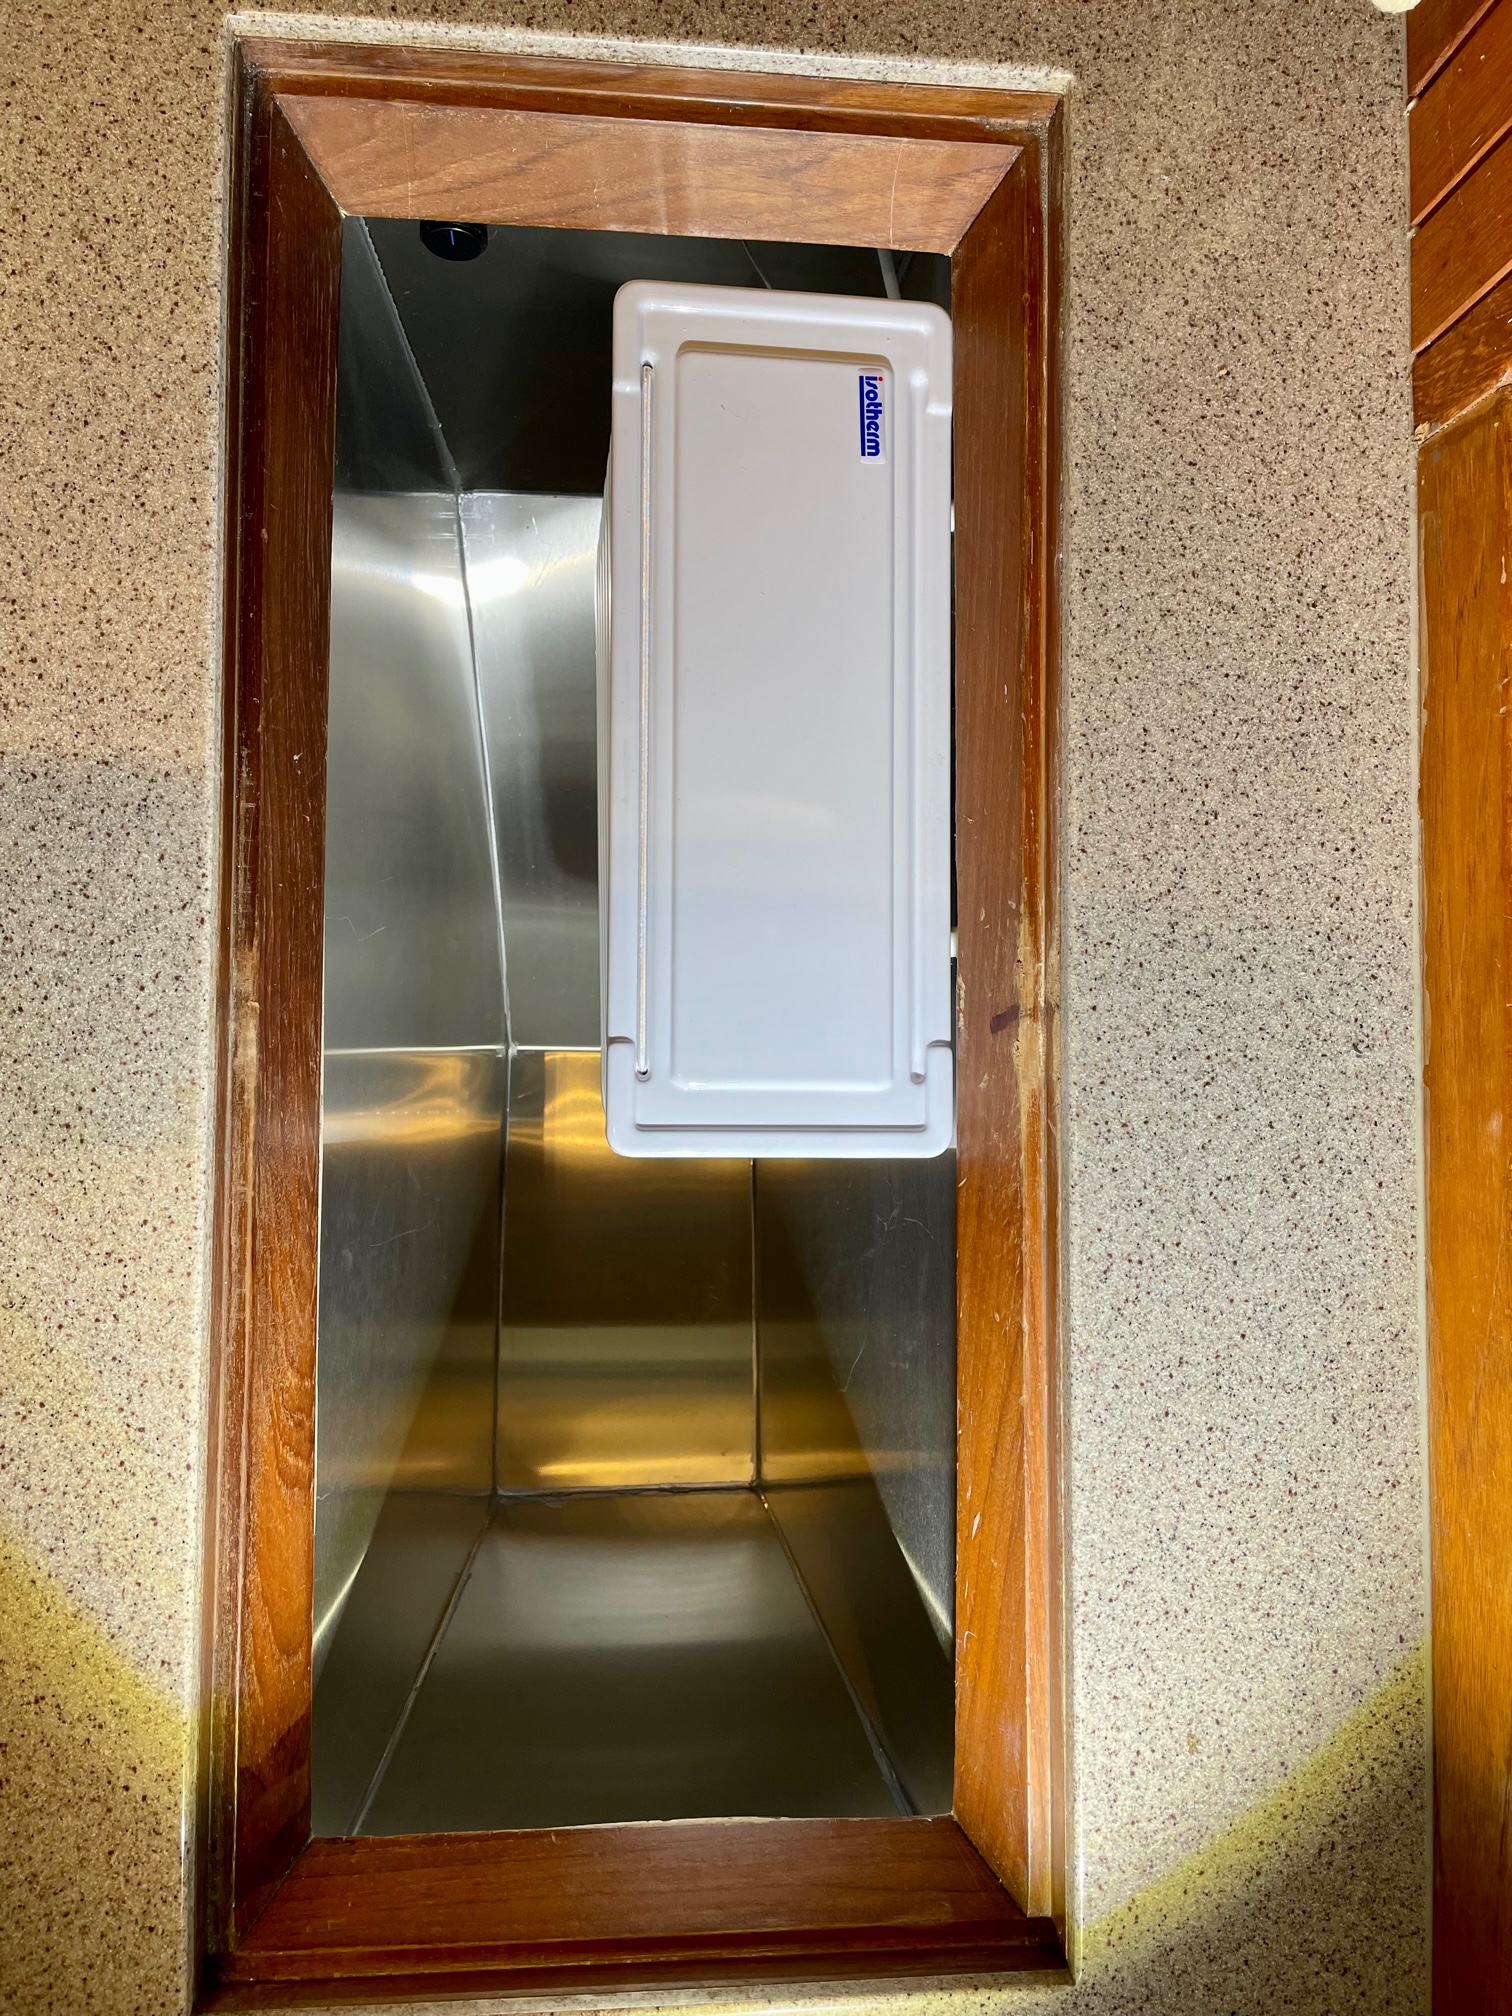
I chose an Isotherm Magnum 2505. It’s a 12VDC sea-water cooled system with an O-evaporator and built-in pump. I decided to keep it simpler by only having a refrigerator box, and convert the old freezer box to dry storage. The freezer box was very small and top-loading, and being tucked into a corner of the countertop, it was hard to access especially the lower half. For the amount of food it held, it wasn’t worth the energy it took to keep things frozen. The O-evaporator is like having a mini freezer within the refrigerator–with just enough volume to freeze a few items. The system comes fully charged with quick-connect self-sealing valves for easy installation–no refrigerant technicians needed. The compressor is industry standard Danfoss/SeCOP and is designed for volumes up to 7 cubic feet.
Isotherm Magnum 2505
Installation
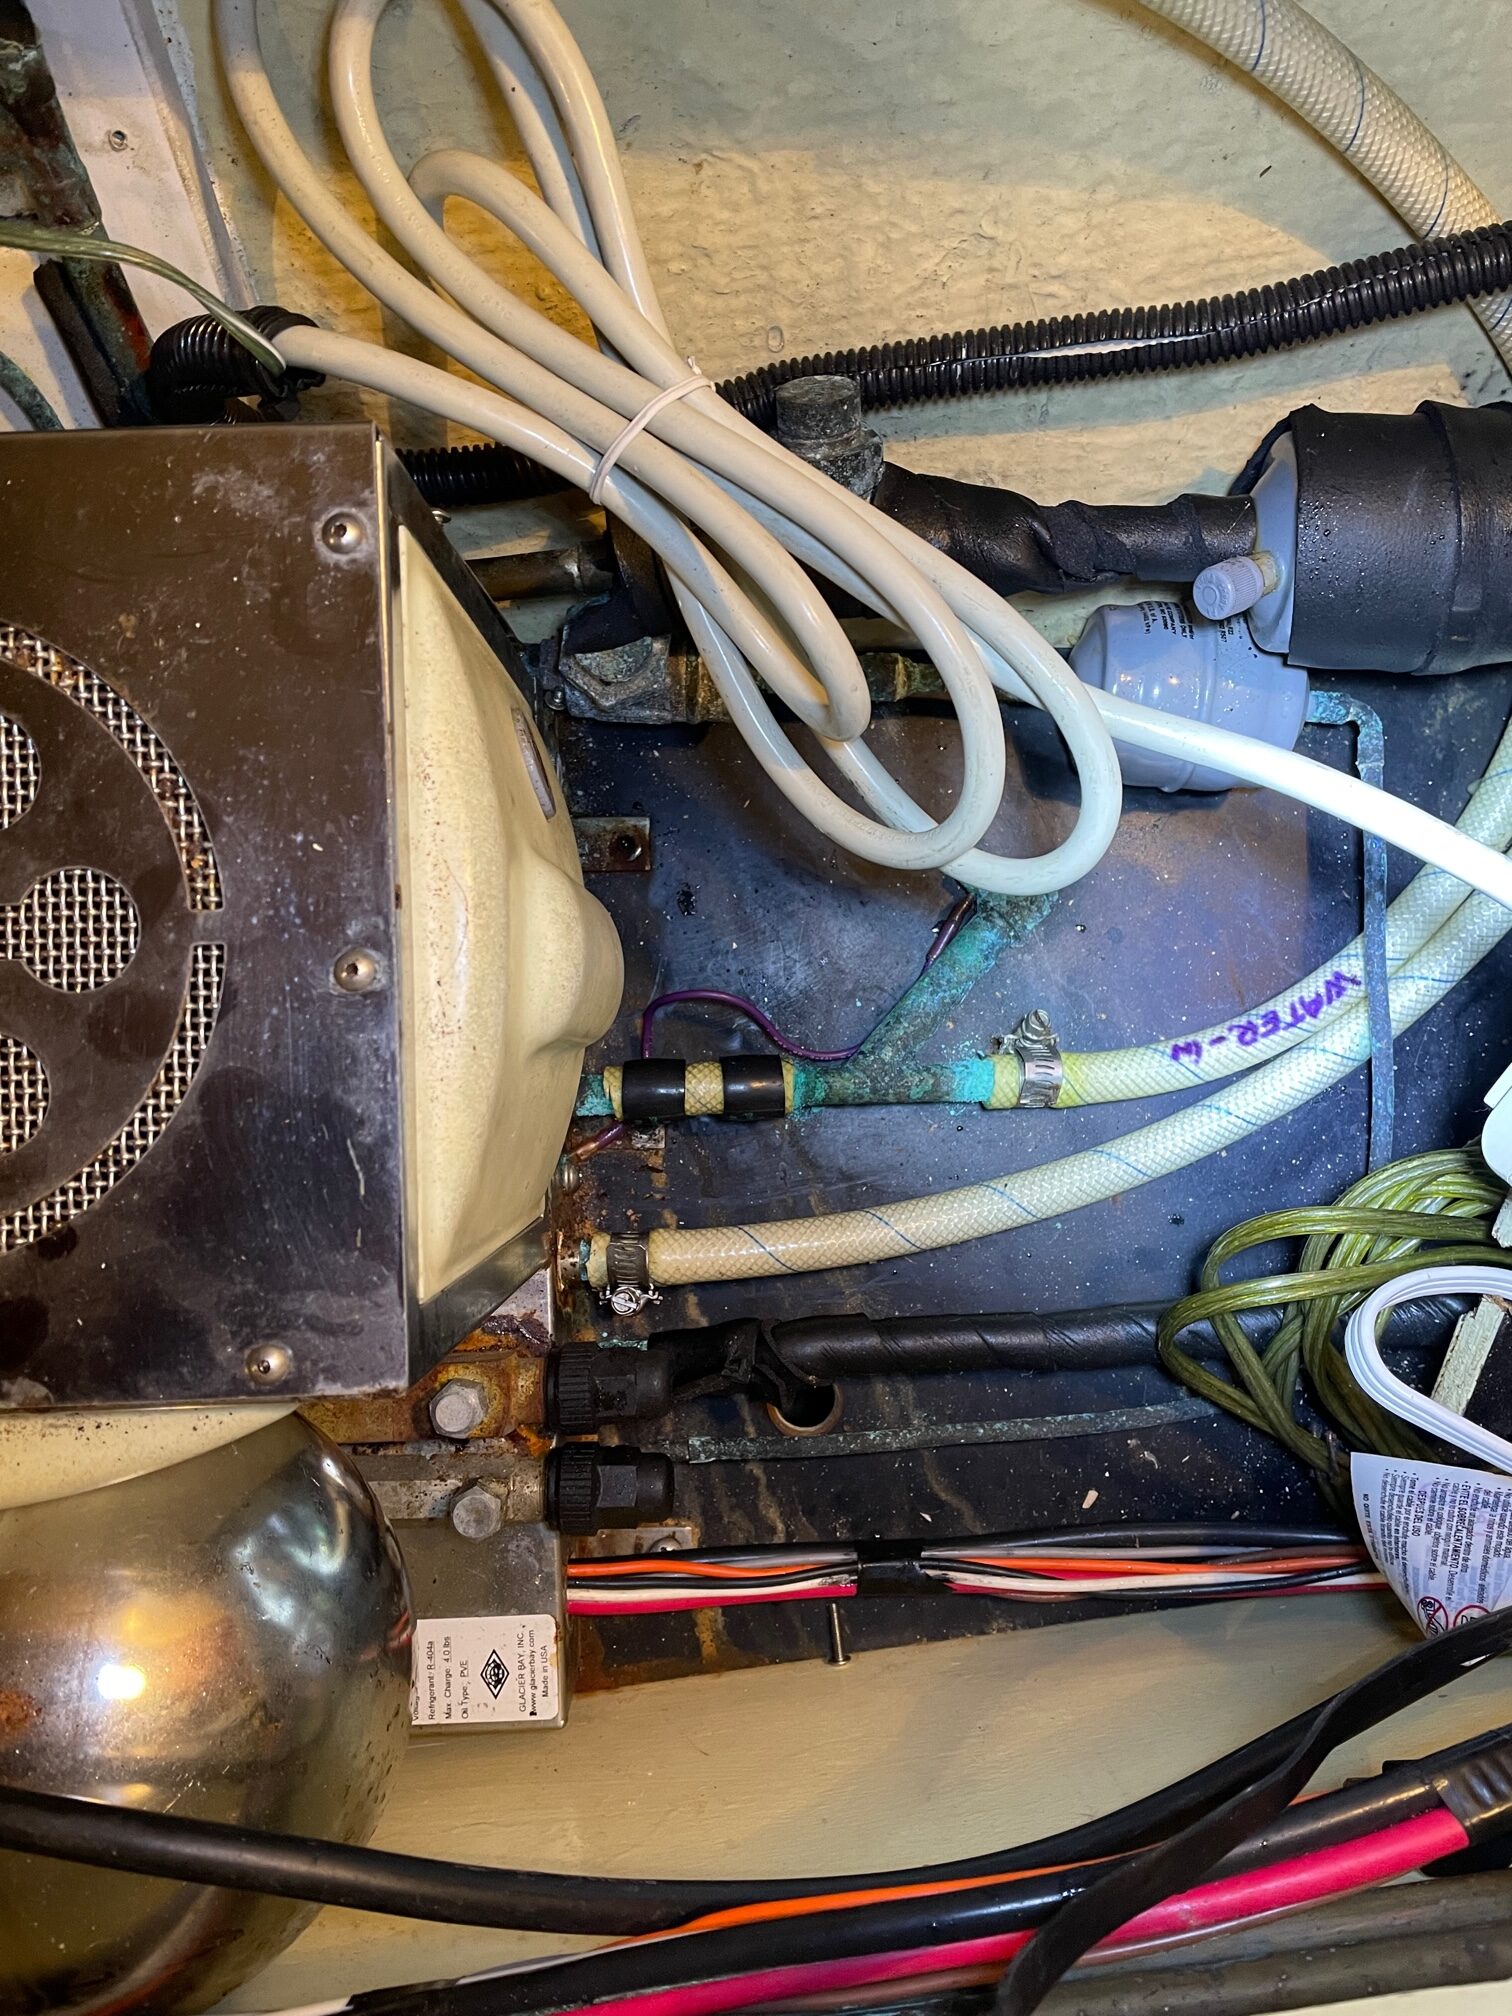
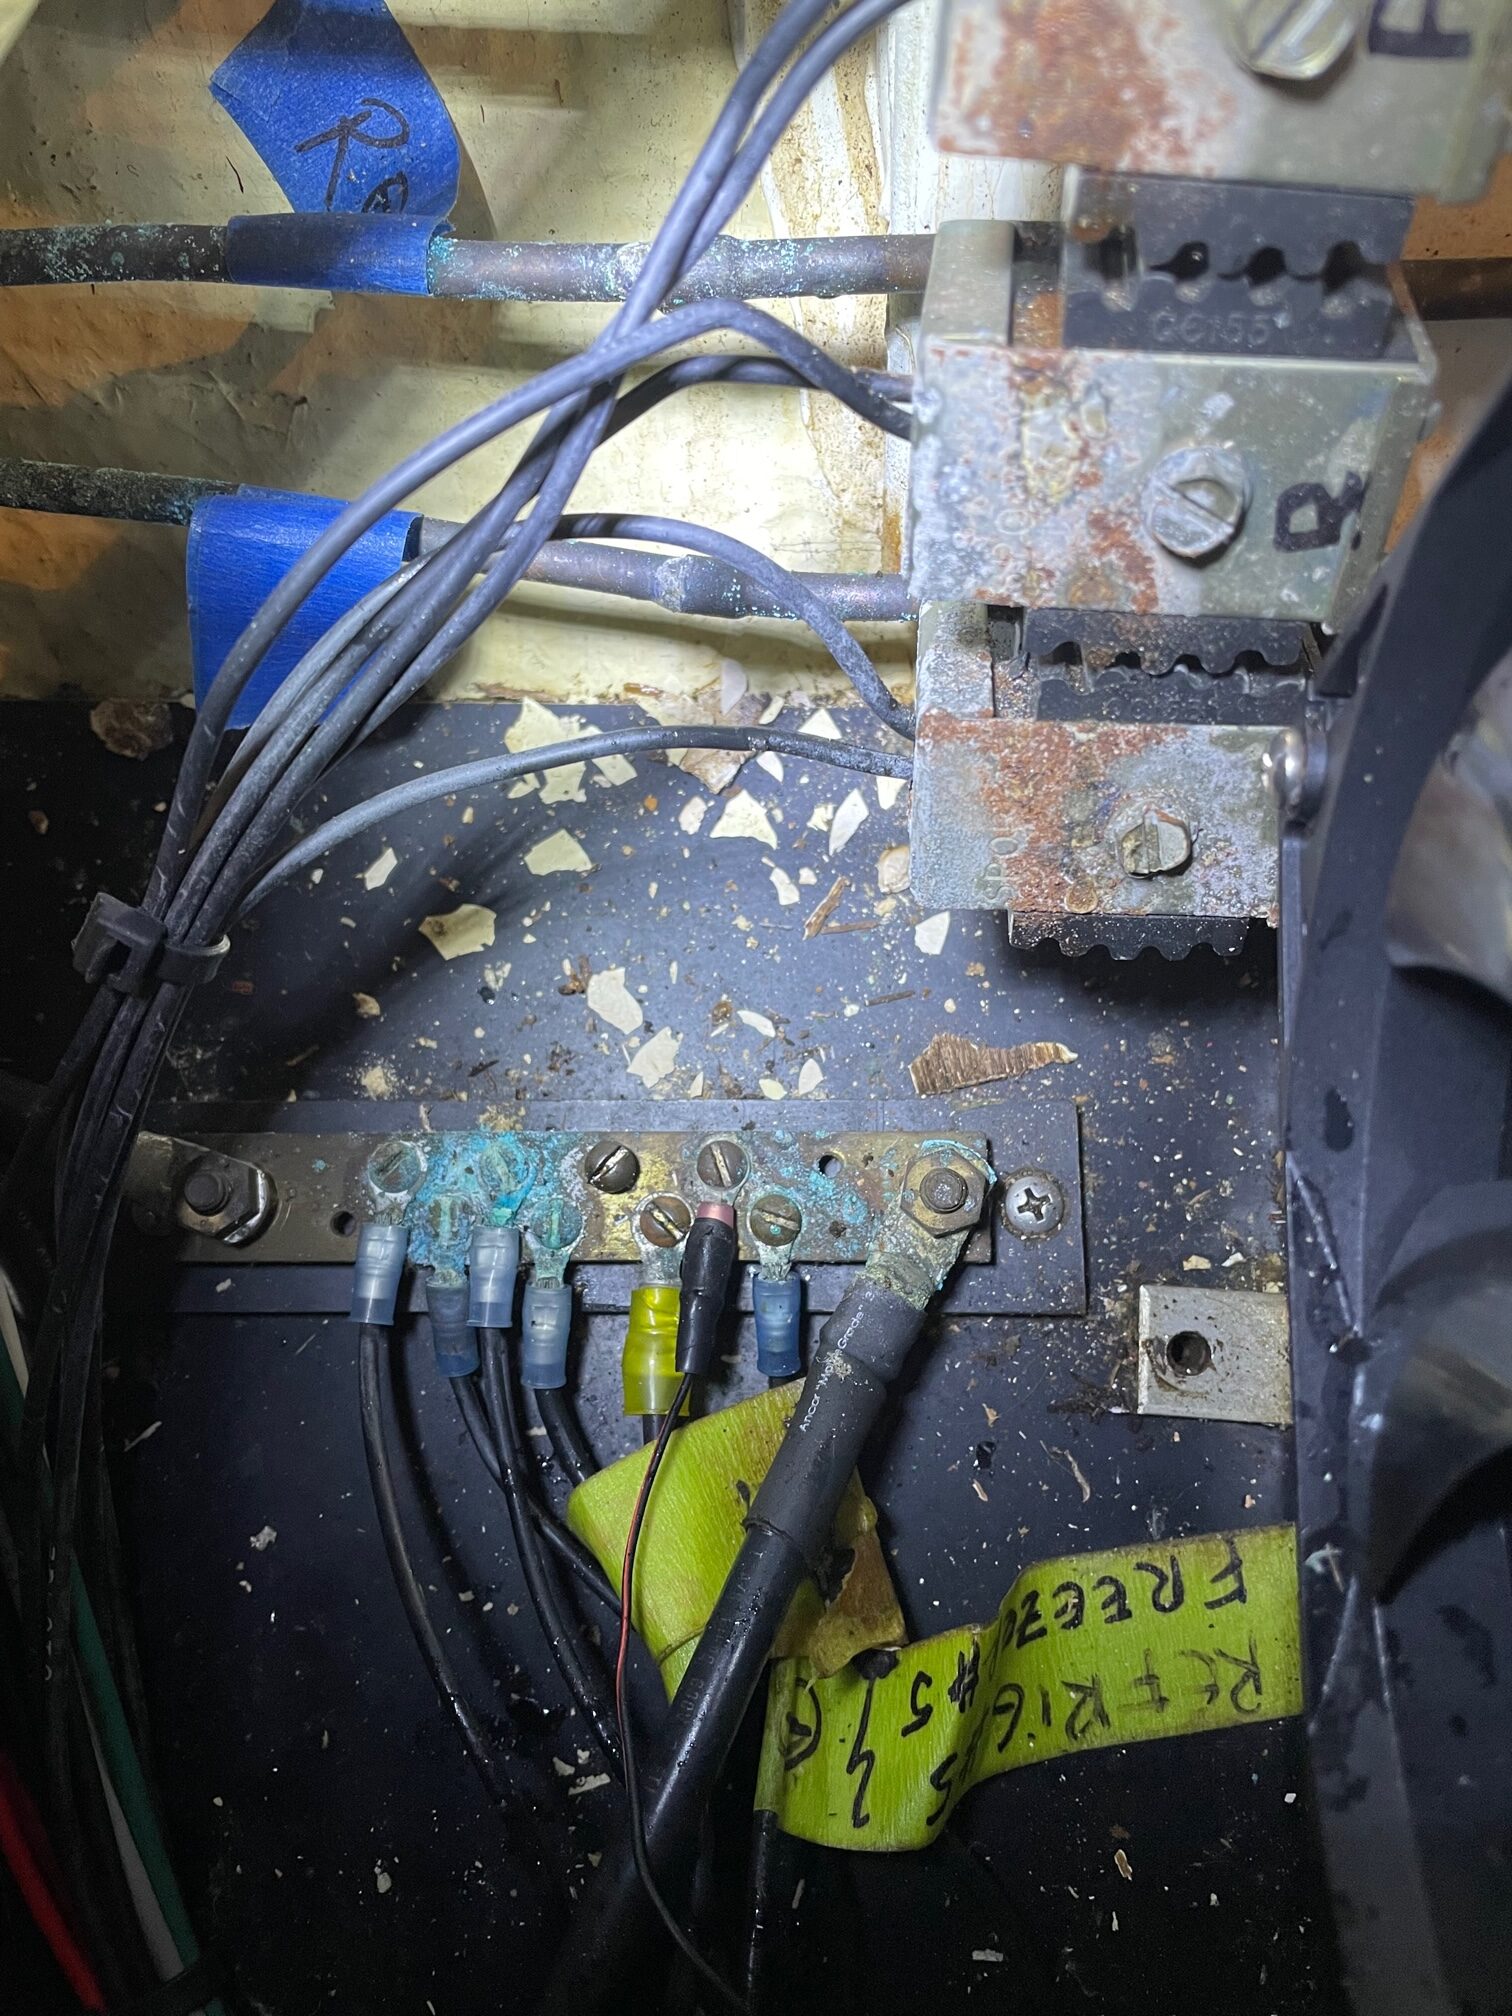
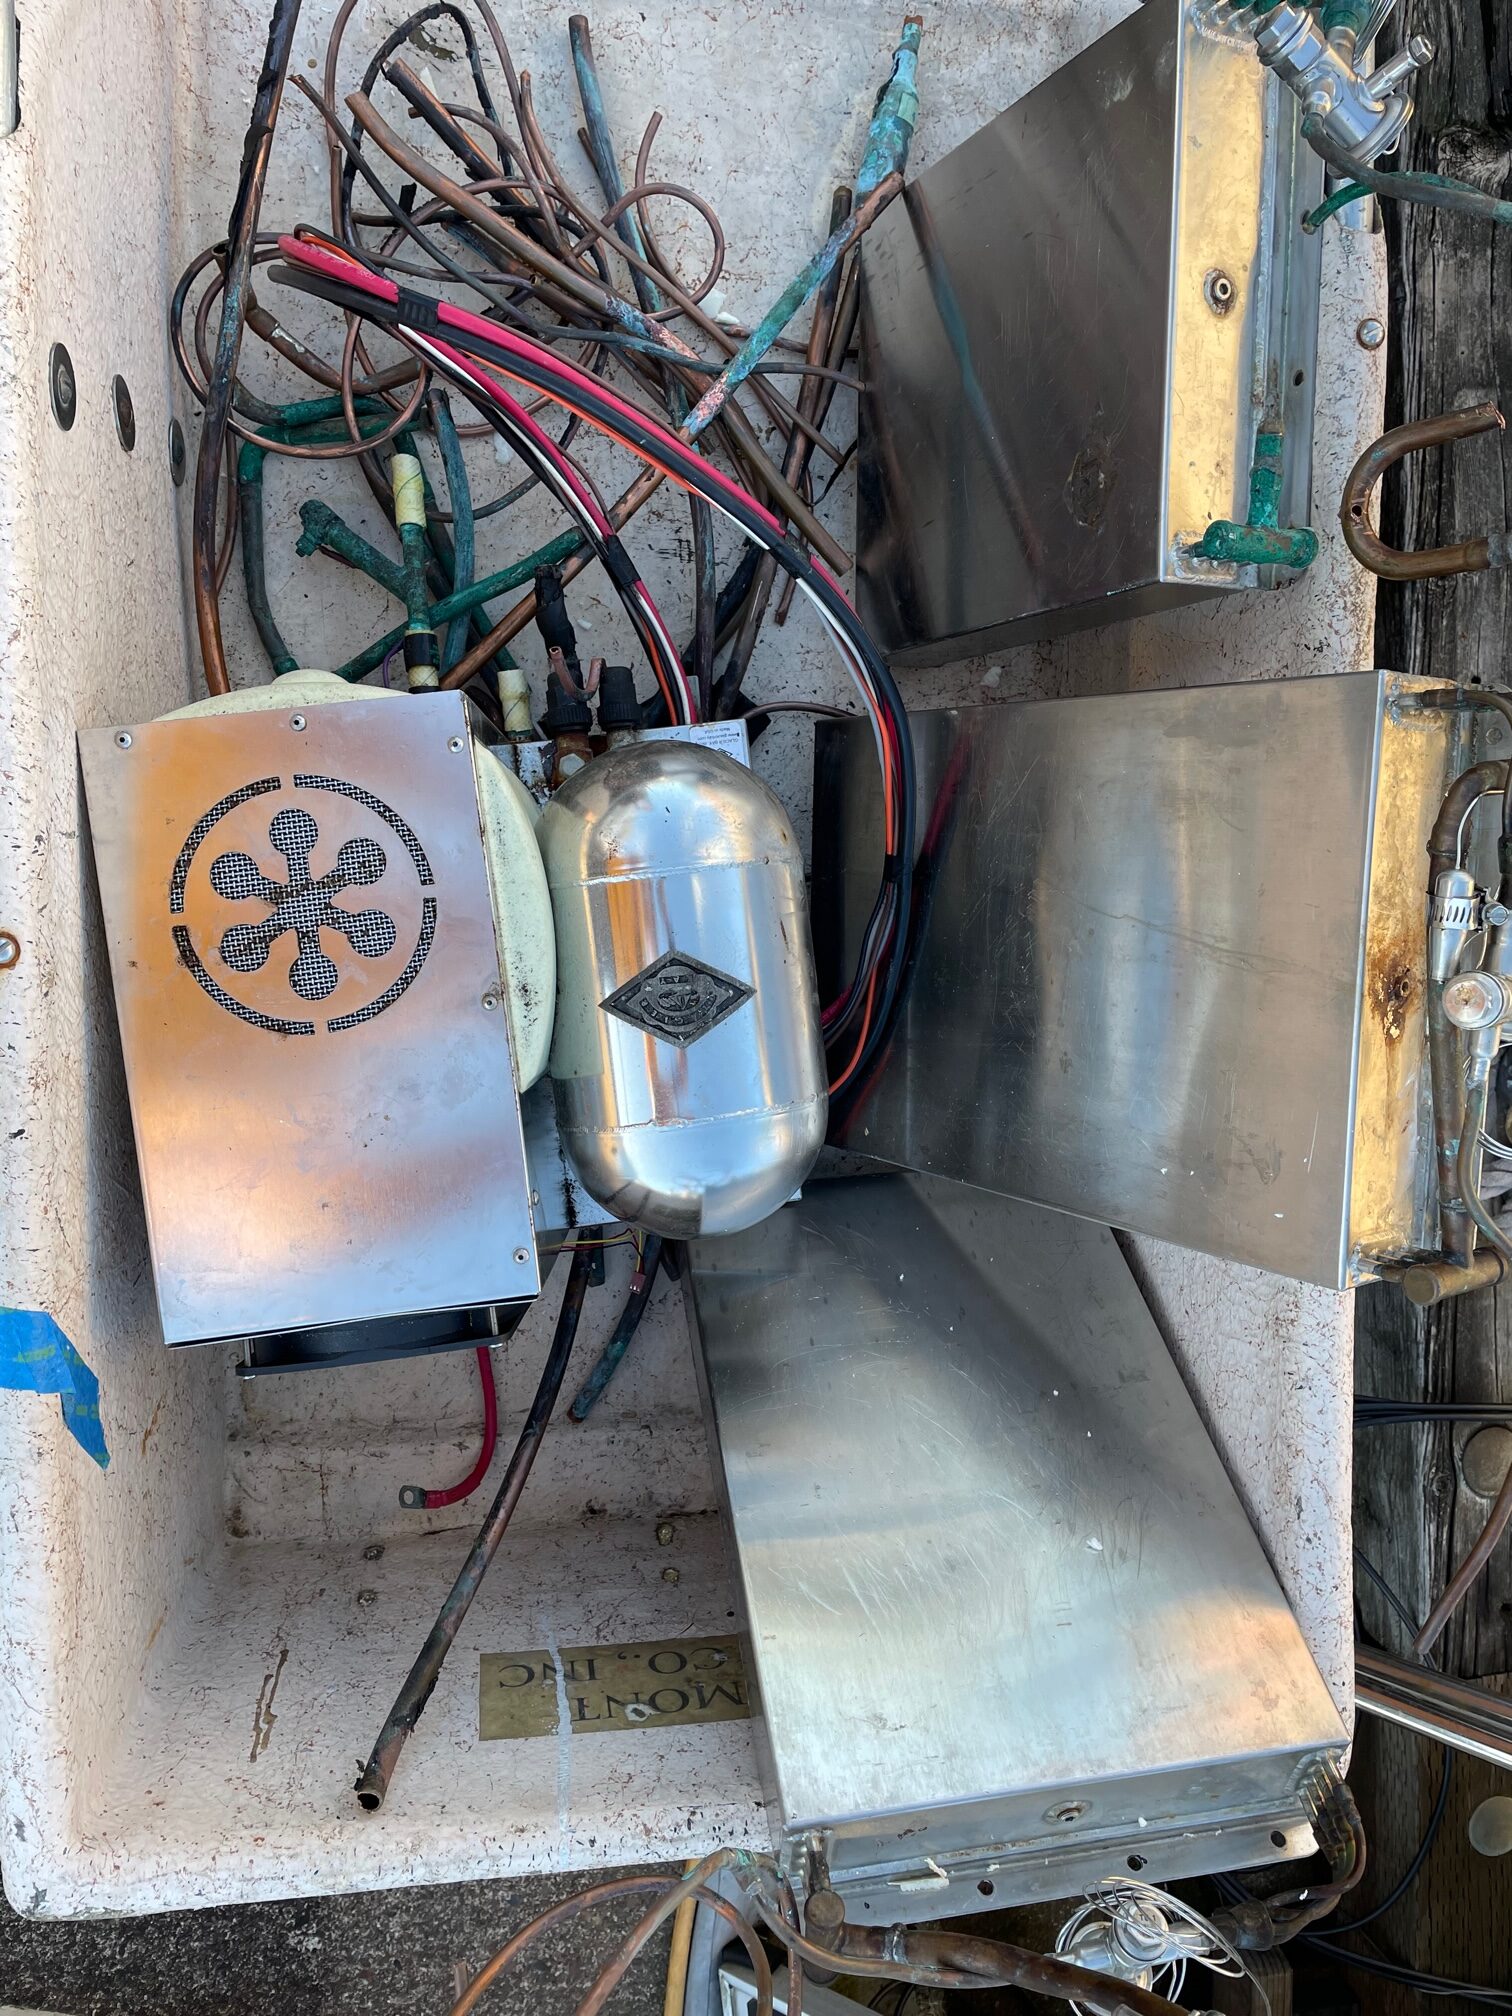
First I had to remove the old system. The holding plates came out easily and I was surprised how little refrigerant came out when I cut the copper tubing on the holding plates. I had always suspected a leak in the system so either it leaked out or settled in the tank or holding plates. The compressor unit was mounted under the pilot berth in a “dry” bay, but signs of moisture and corrosion were obvious.
Refrigeration CompressorGround Bus and Solenoid ValvesDock Cart Full of Old Refrigeration Equipment
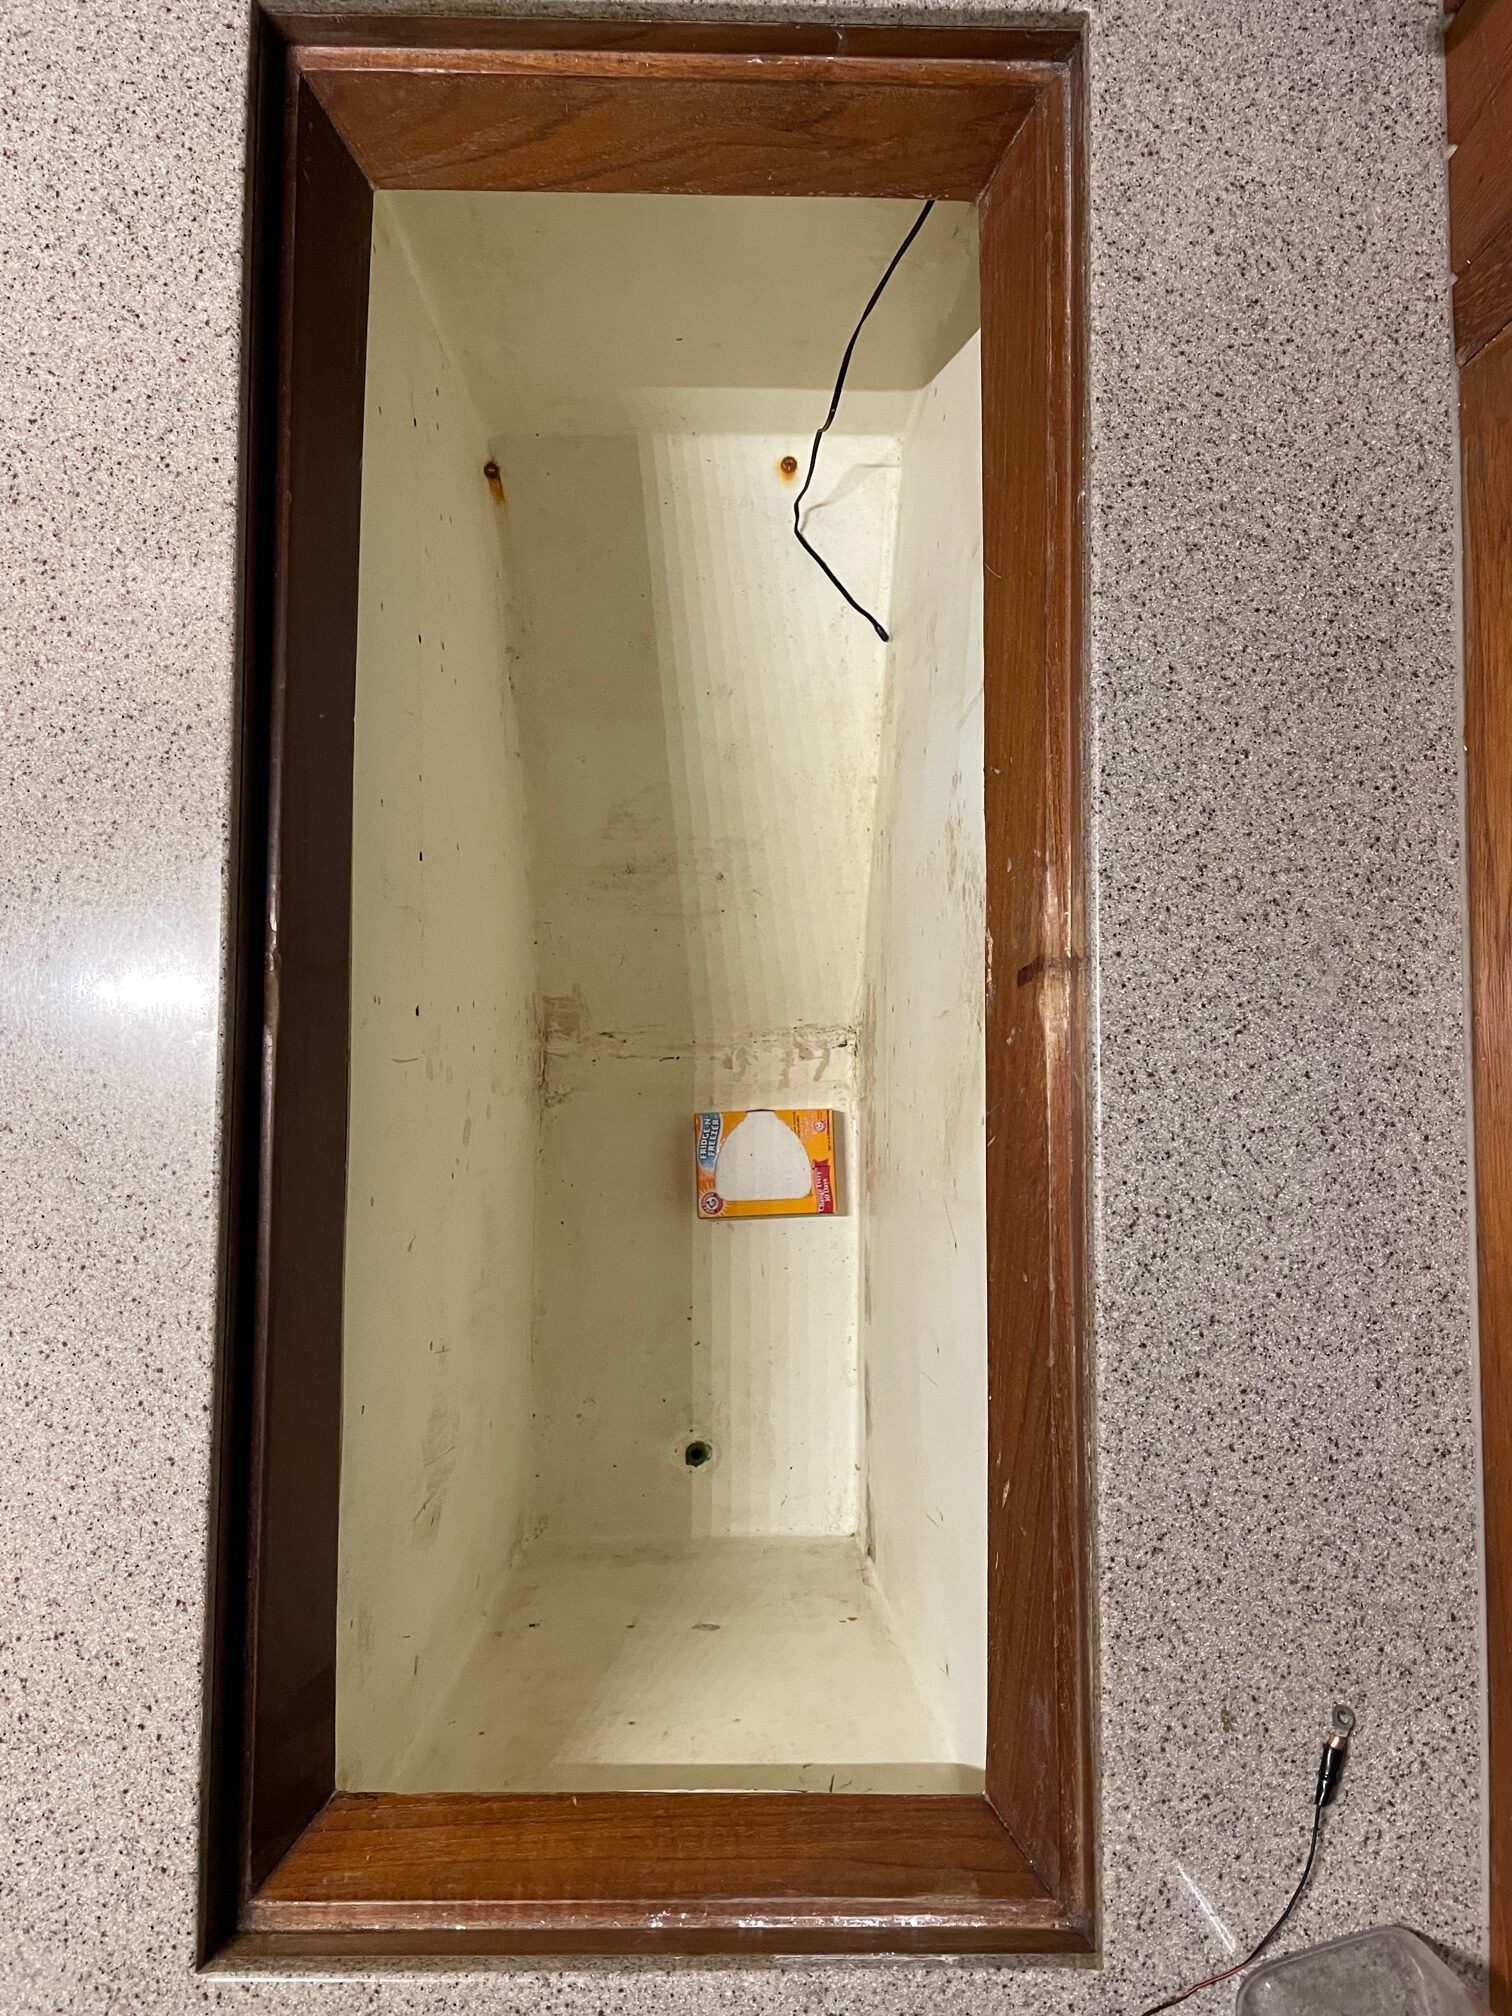
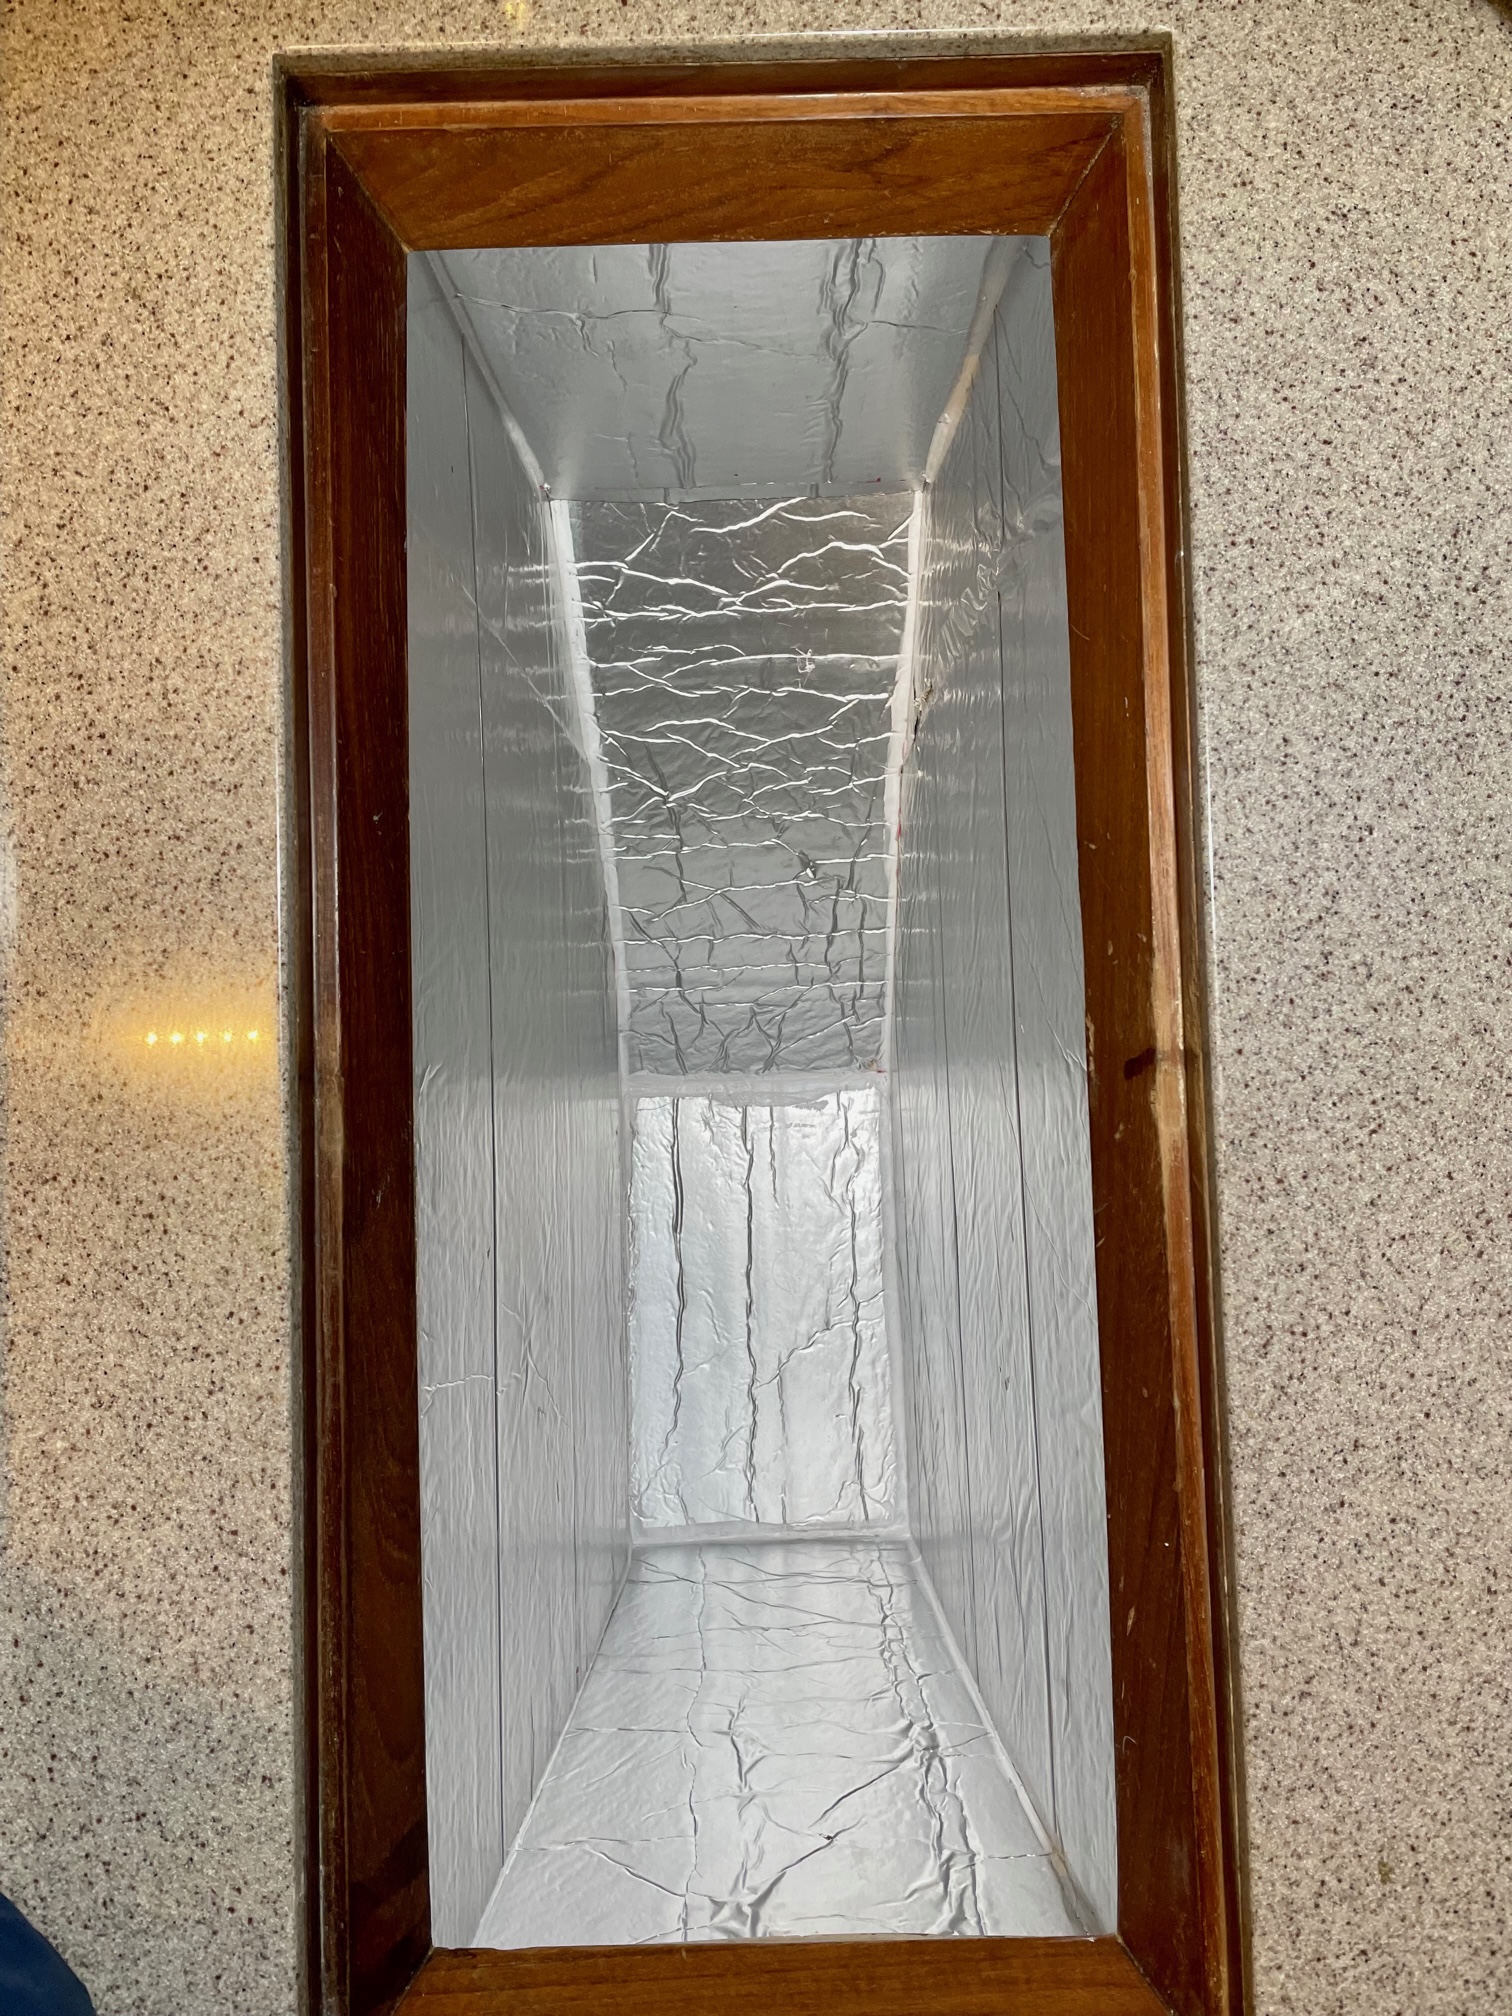
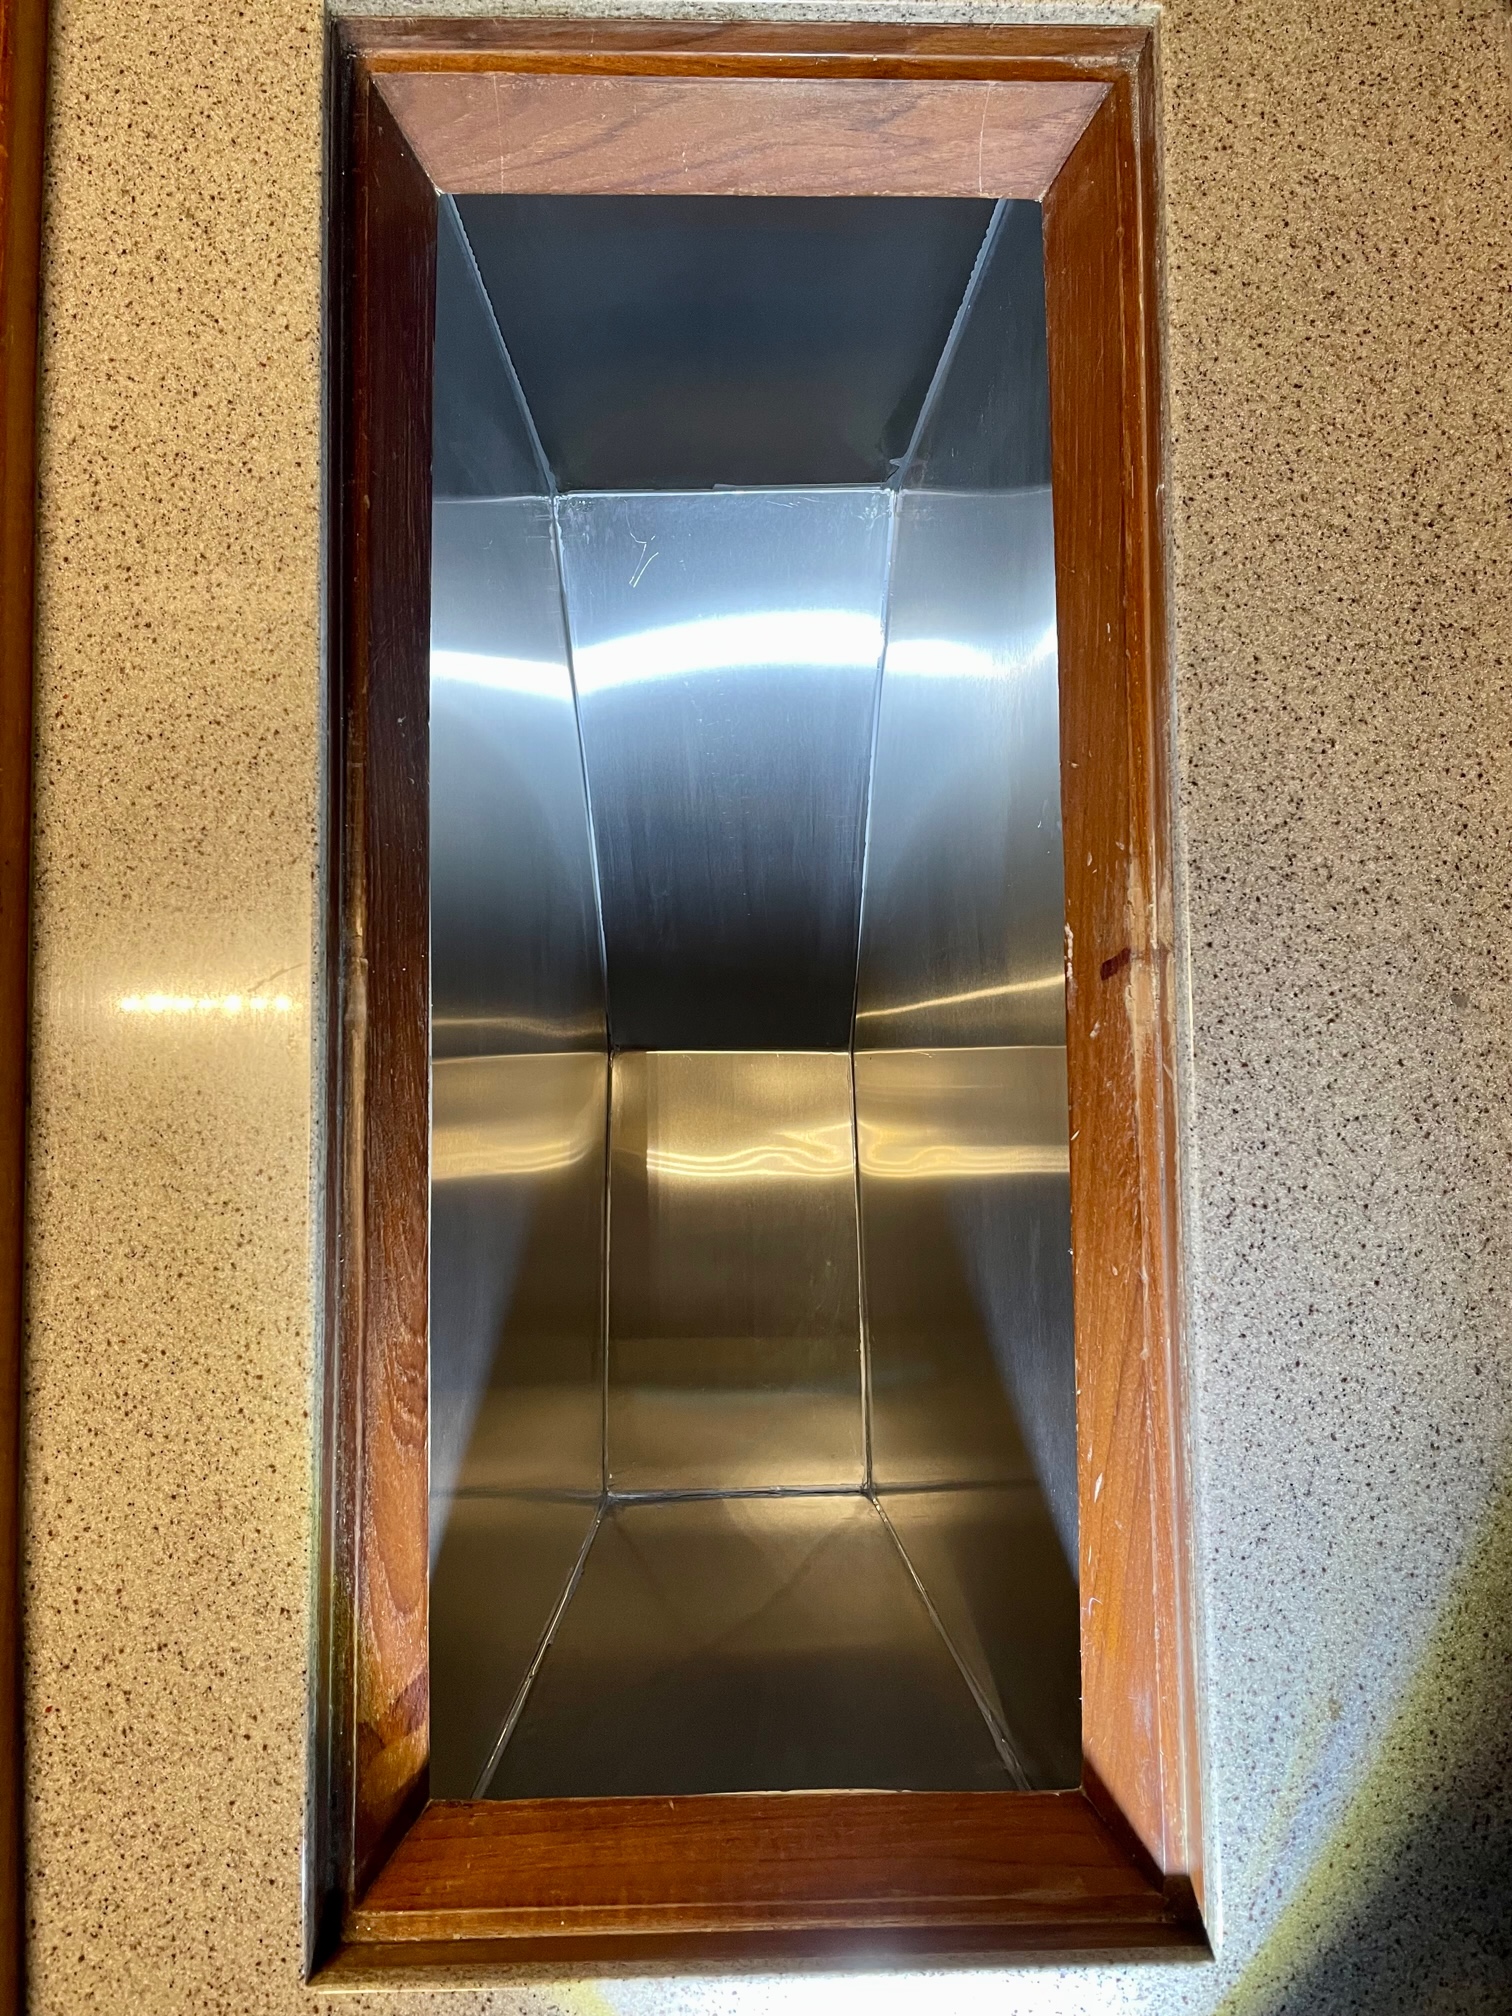
After removing all the old equipment and cleaning, the next step was to insulate the box. Without insulation, the box measured about 7 cubic feet. I used 2″ thick closed cell insulation (R factor of 12.5) for the bottom and 2 sides (hull side and engine side). For the large sides (fore and aft) I intended to use 2″ but after seeing how much smaller it made the box, I compromised with 1″. Since the box is top loading, we stack lock-n-lock boxes to organize the food (one for meat & cheeses, one for soda cans, one for condiments, etc), and they fit perfectly with the 1″ insulation on the sides (the box would have been too narrow if I had used the 2″). After fitting the insulation, I caulked all the seams to fill in any air gaps. Next I covered the insulation with 20 gauge stainless steel to protect it and make it easy to clean the inside of the box. For this, I made a cardboard template of all the sides and took them to Ballard Sheetmetal for cutting. It fit perfectly so I used adhesive to hold them in place, then caulked all the seams with grey silicone caulking. The final refrigerator box measurements came to 5.9 cubic feet, so I lost about 1.1 cubic feet from the insulation, but this should be a big improvement since the system won’t be cycling on as much.
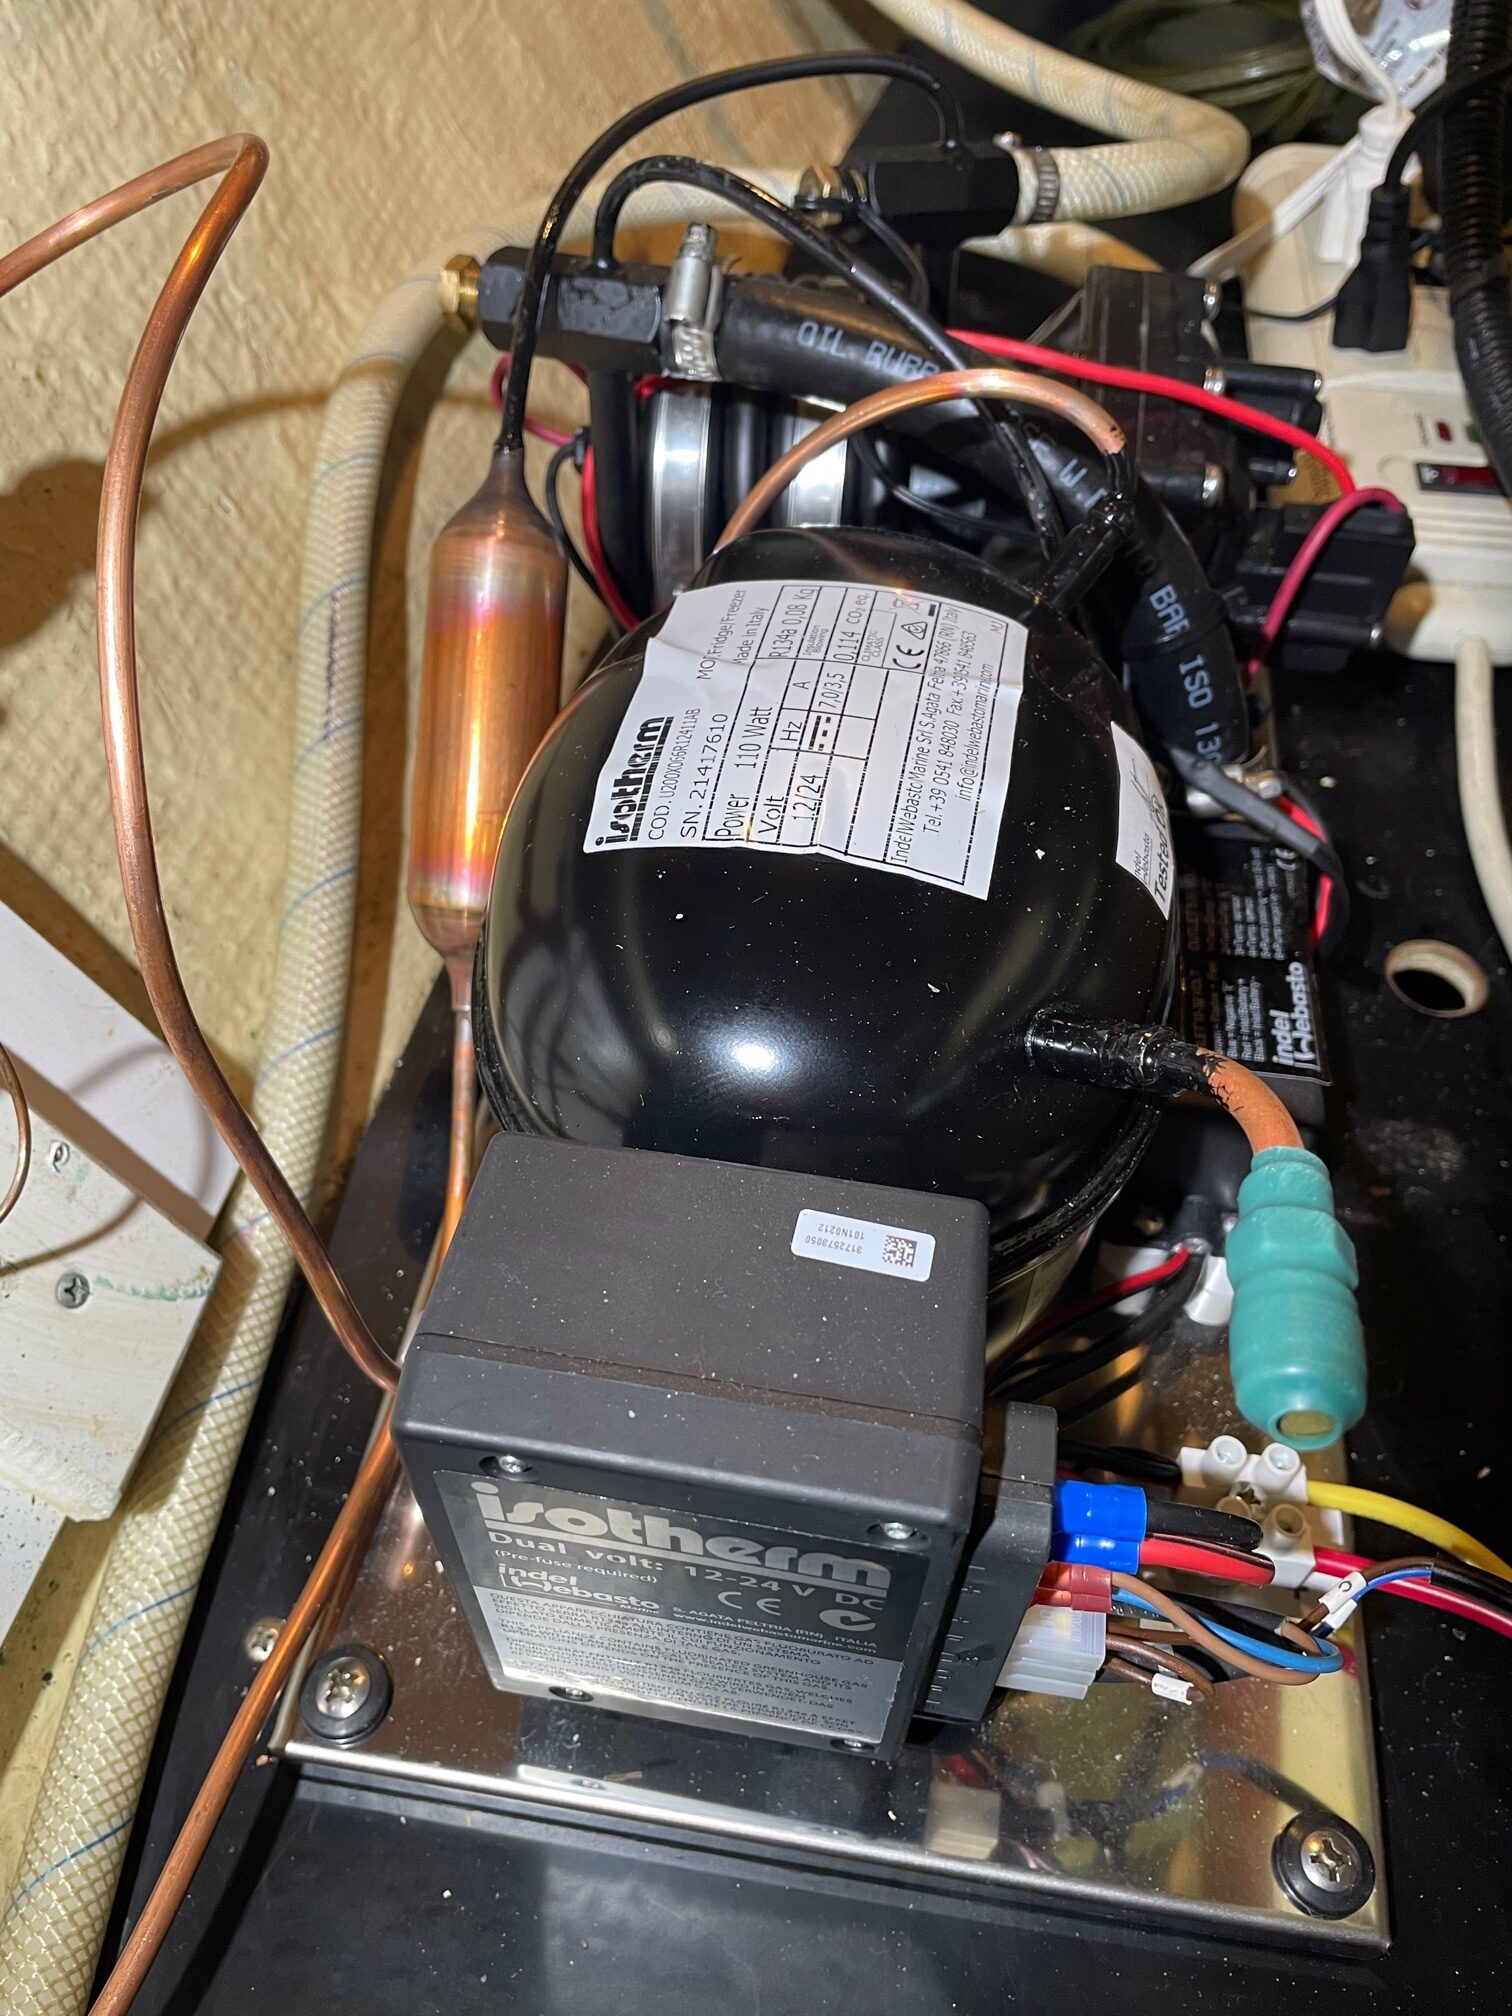
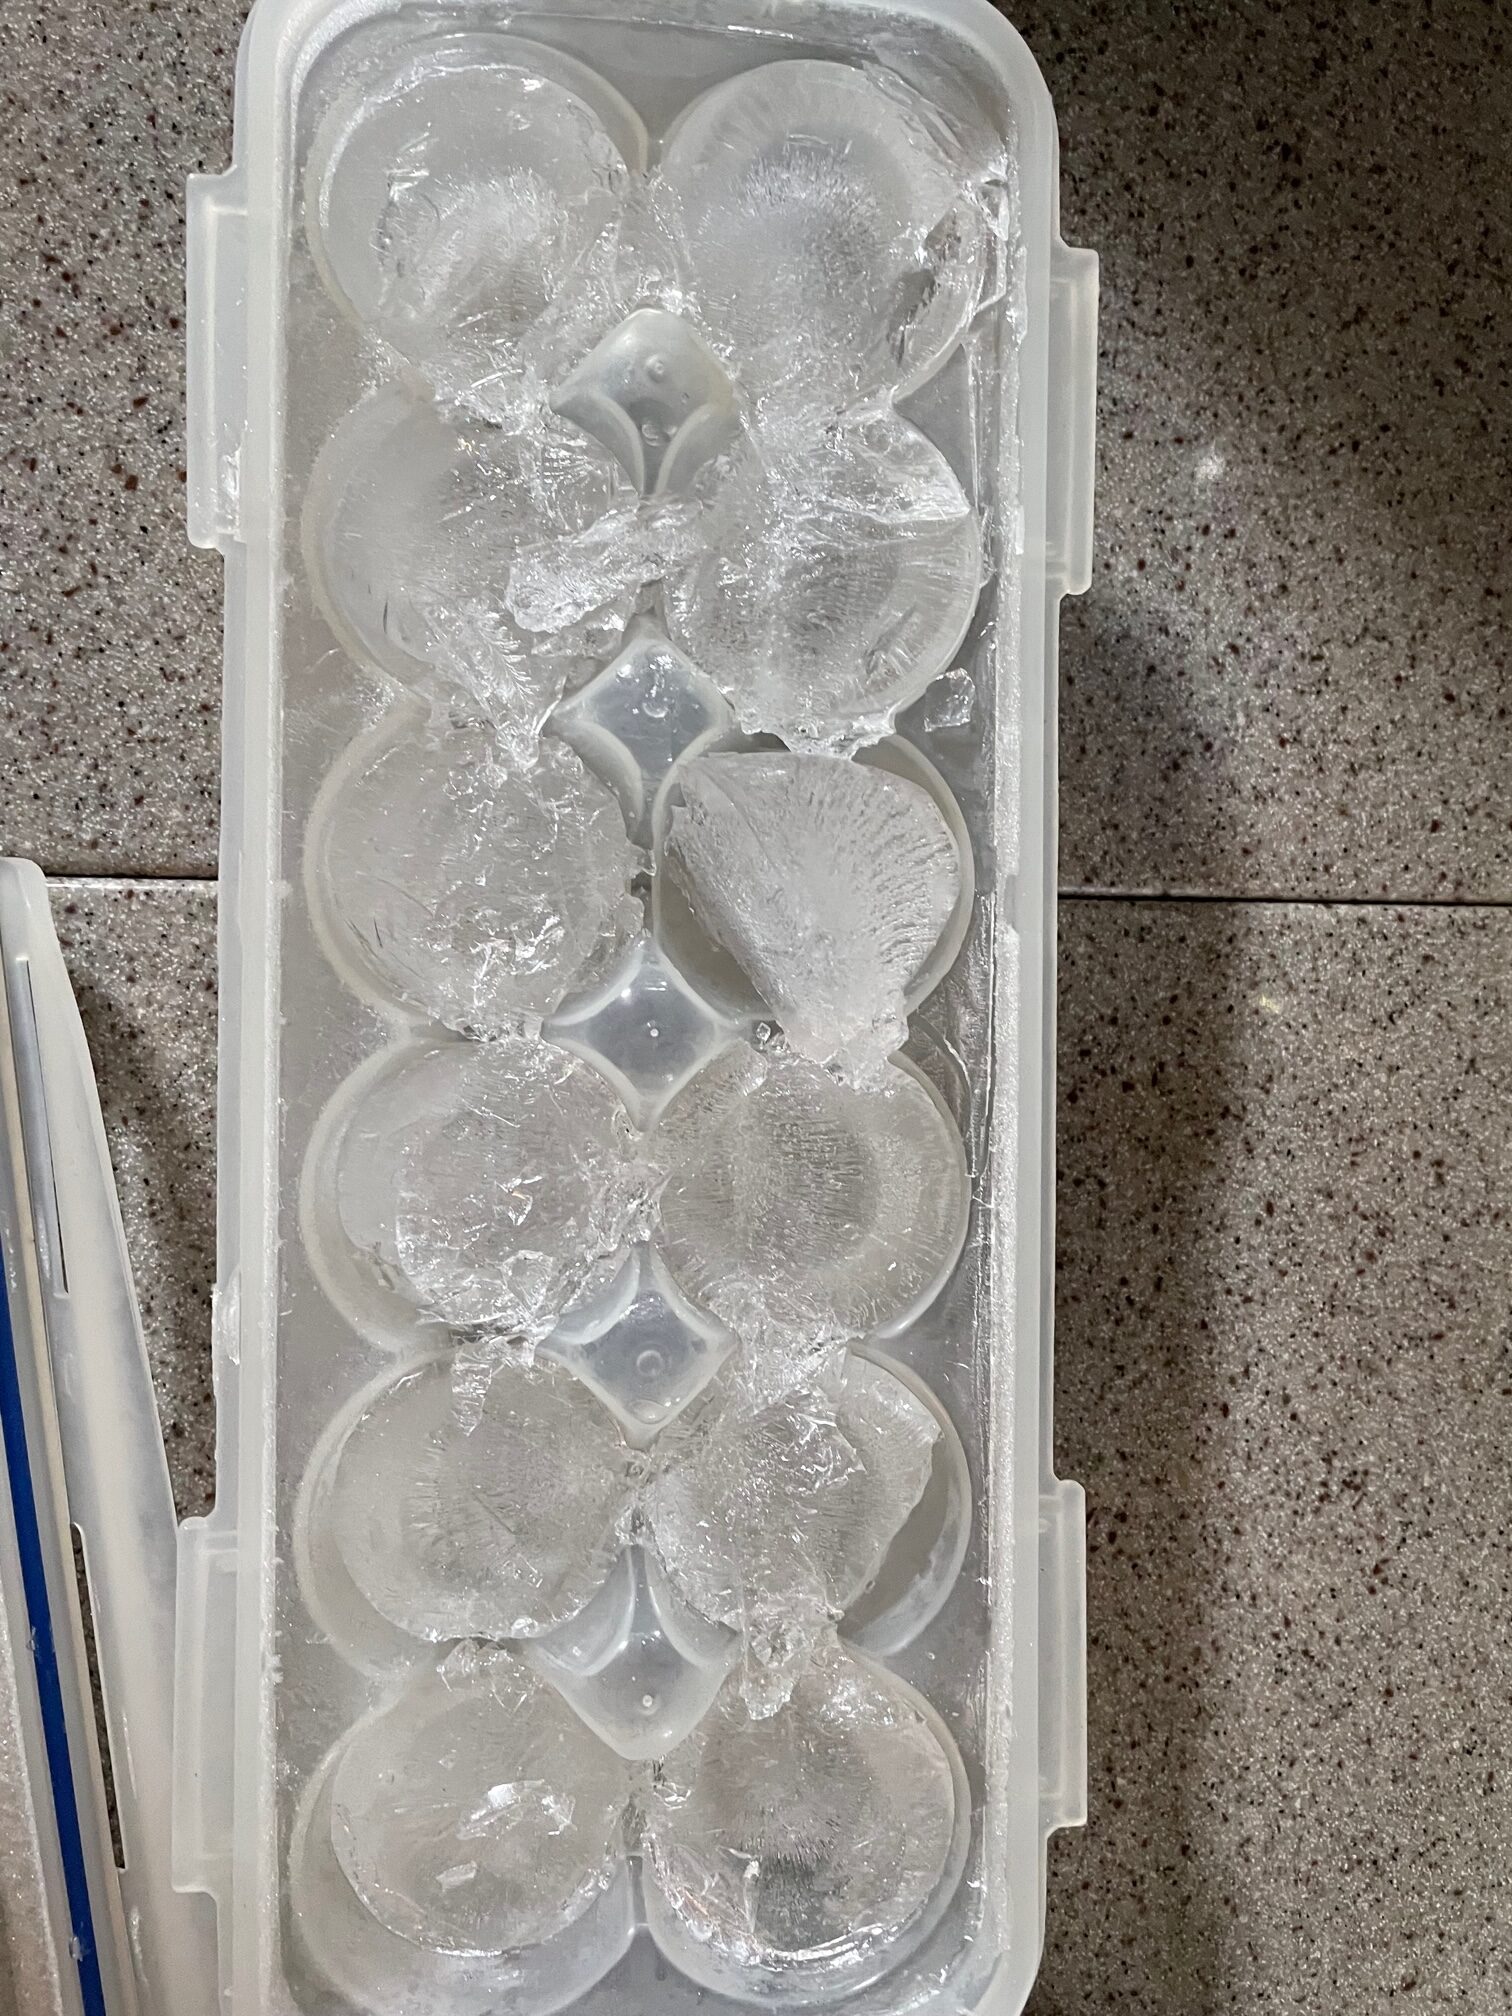
Installing the compressor was easy. I ran the refrigerant lines from the evaporator box and connected them with quick-connect couplers, then ran the input and output seawater hoses for cooling, and connected a fused 12V supply. These were already in place from the old system. The old system required an external water pump, so I bypassed the old pump to feed seawater directly from an existing thru-hull. I used the old temperature probe and digital display from the old system so I can monitor the temperature inside the box. Everything worked when I turned it on and the O-evaporator box easily freezes water so we’ll have ice cubes now!
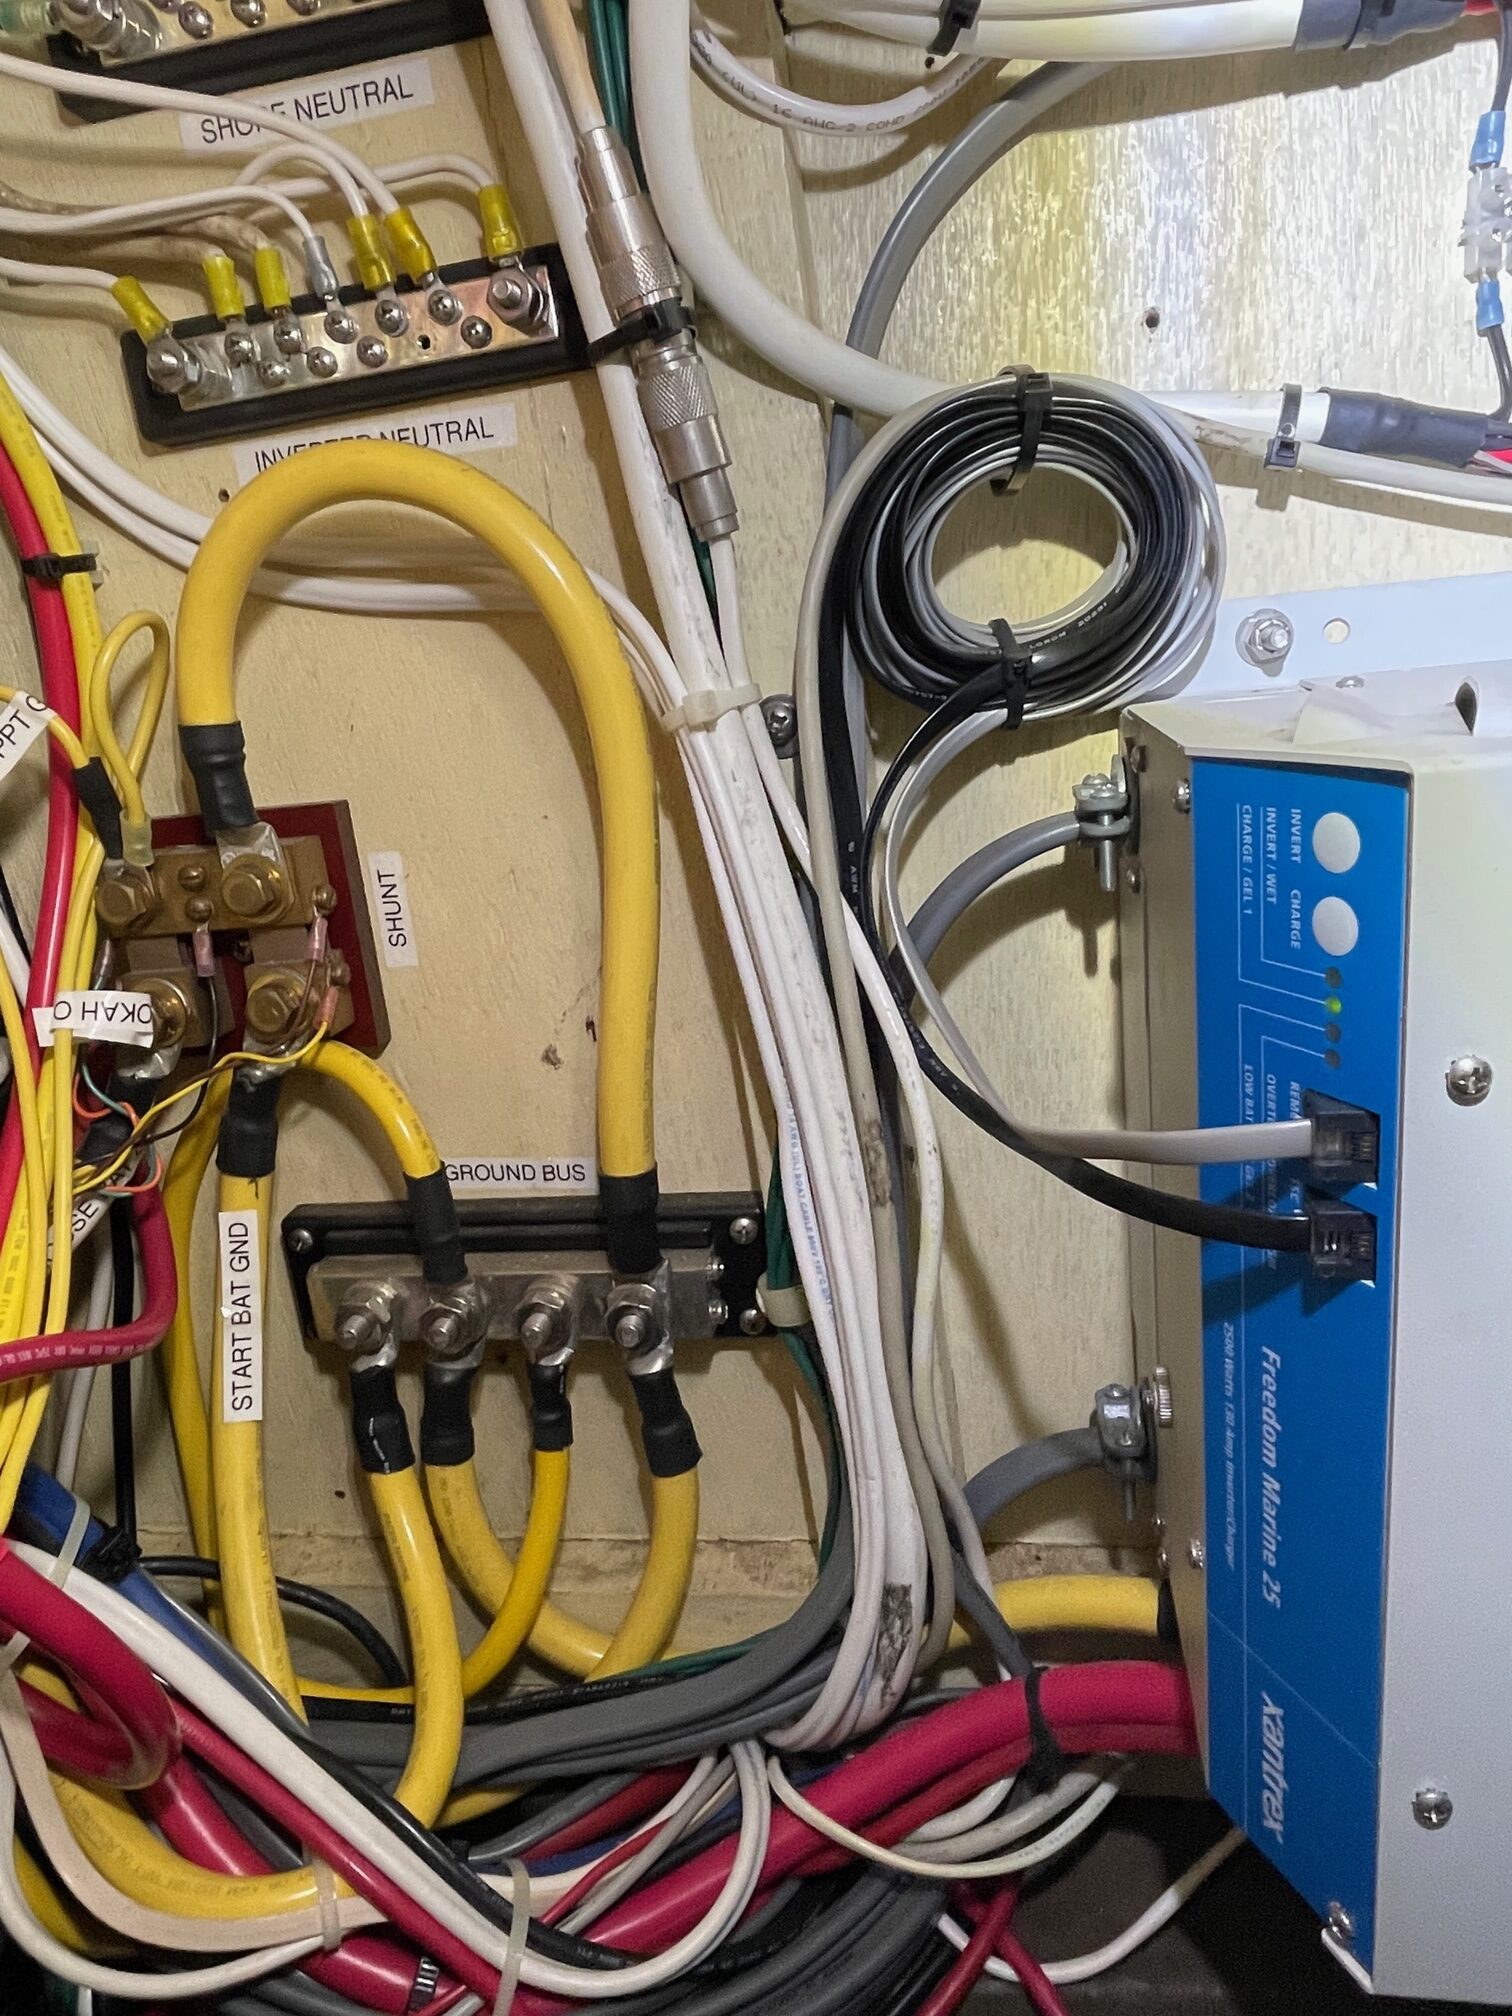
The battery and charging system on Apropos was as follows: an AGM 12V Group 8D Starter Battery, 6 AGM 6V series/parallel combo House bank (672 AHrs), and 2 AGM 12V parallel combo Windlass & Thruster bank. A Xantrex Charger/Inverter (Freedom 25) that outputs a modified sine wave for AC and a 130A max 12VDC charging current. An Automatic Charge Relay (ACR) used to combine the House and Starter batteries whenever a charging source is present (solar, shore power, alternator). A Xantrex Link 2000 that monitors and controls the charging of the House and Starter batteries. A solenoid parallels the House bank with the Windlass bank whenever the Windlass breaker is turned on. The charging of the Windlass battery bank is handled by a Balmar Digital Duo Charge (30A DC/DC converter) from the House bank. A 110A Balmar alternator with external Balmar MC-16 regulator is connected to the Starter battery.
This system was well thought out and worked well for 17 years. The only components I changed were battery replacement as needed, and the higher amp Alternator with external regulator. I also removed the manual battery ‘1-2-both’ switch and replaced it with an ACR.
Charger/Inverter, Shunt
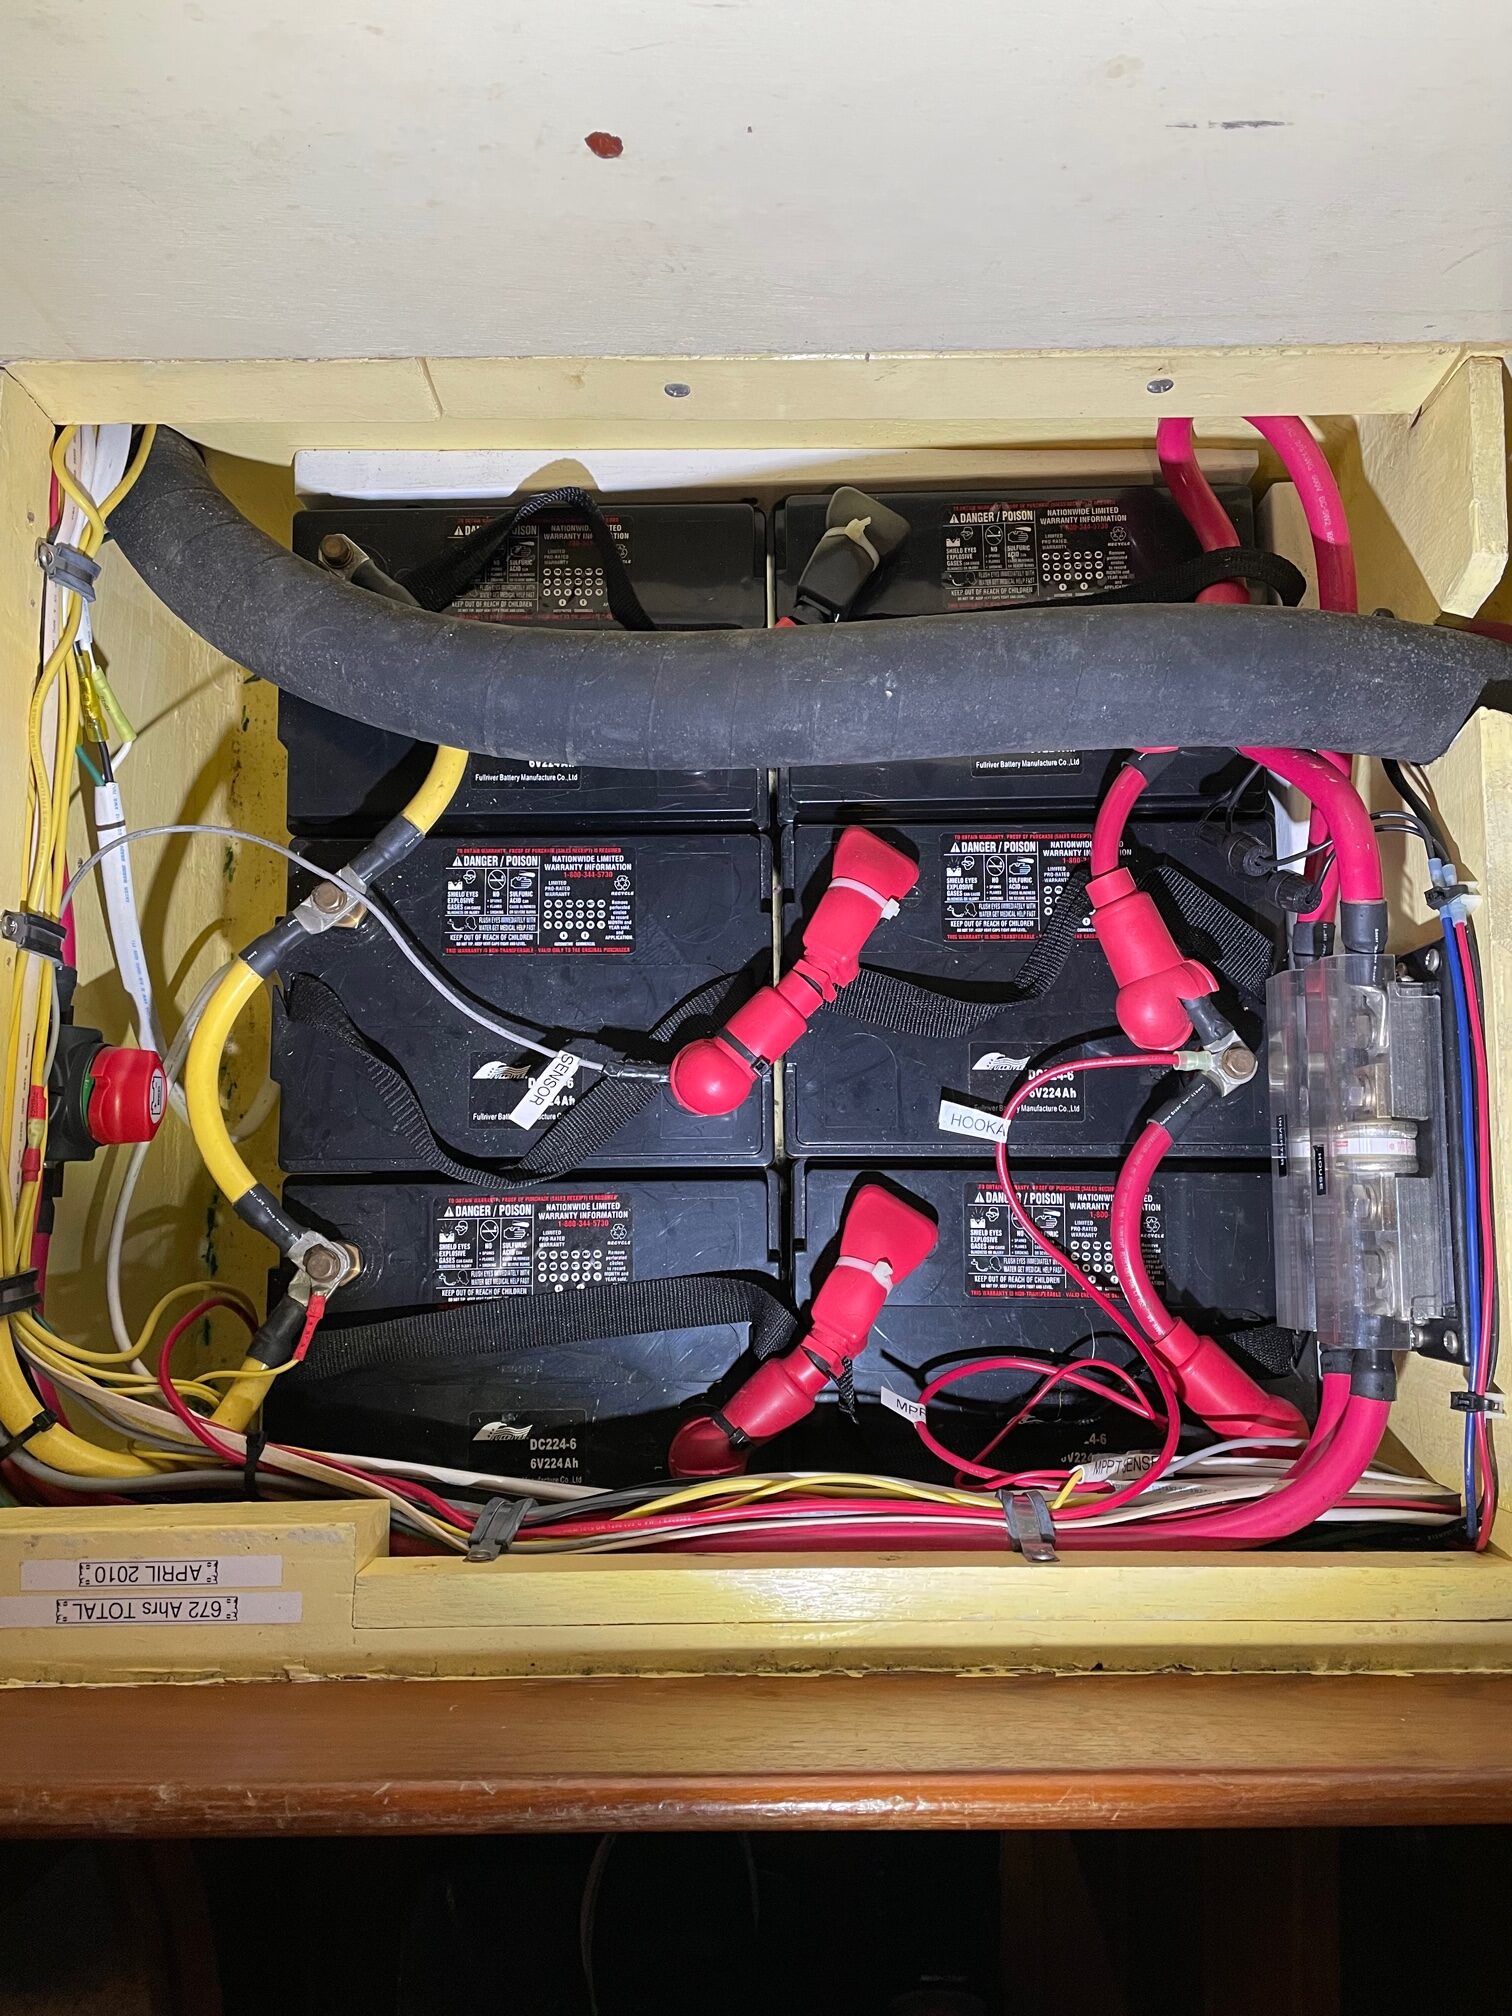
House Bank AGM Batteries, Fuses
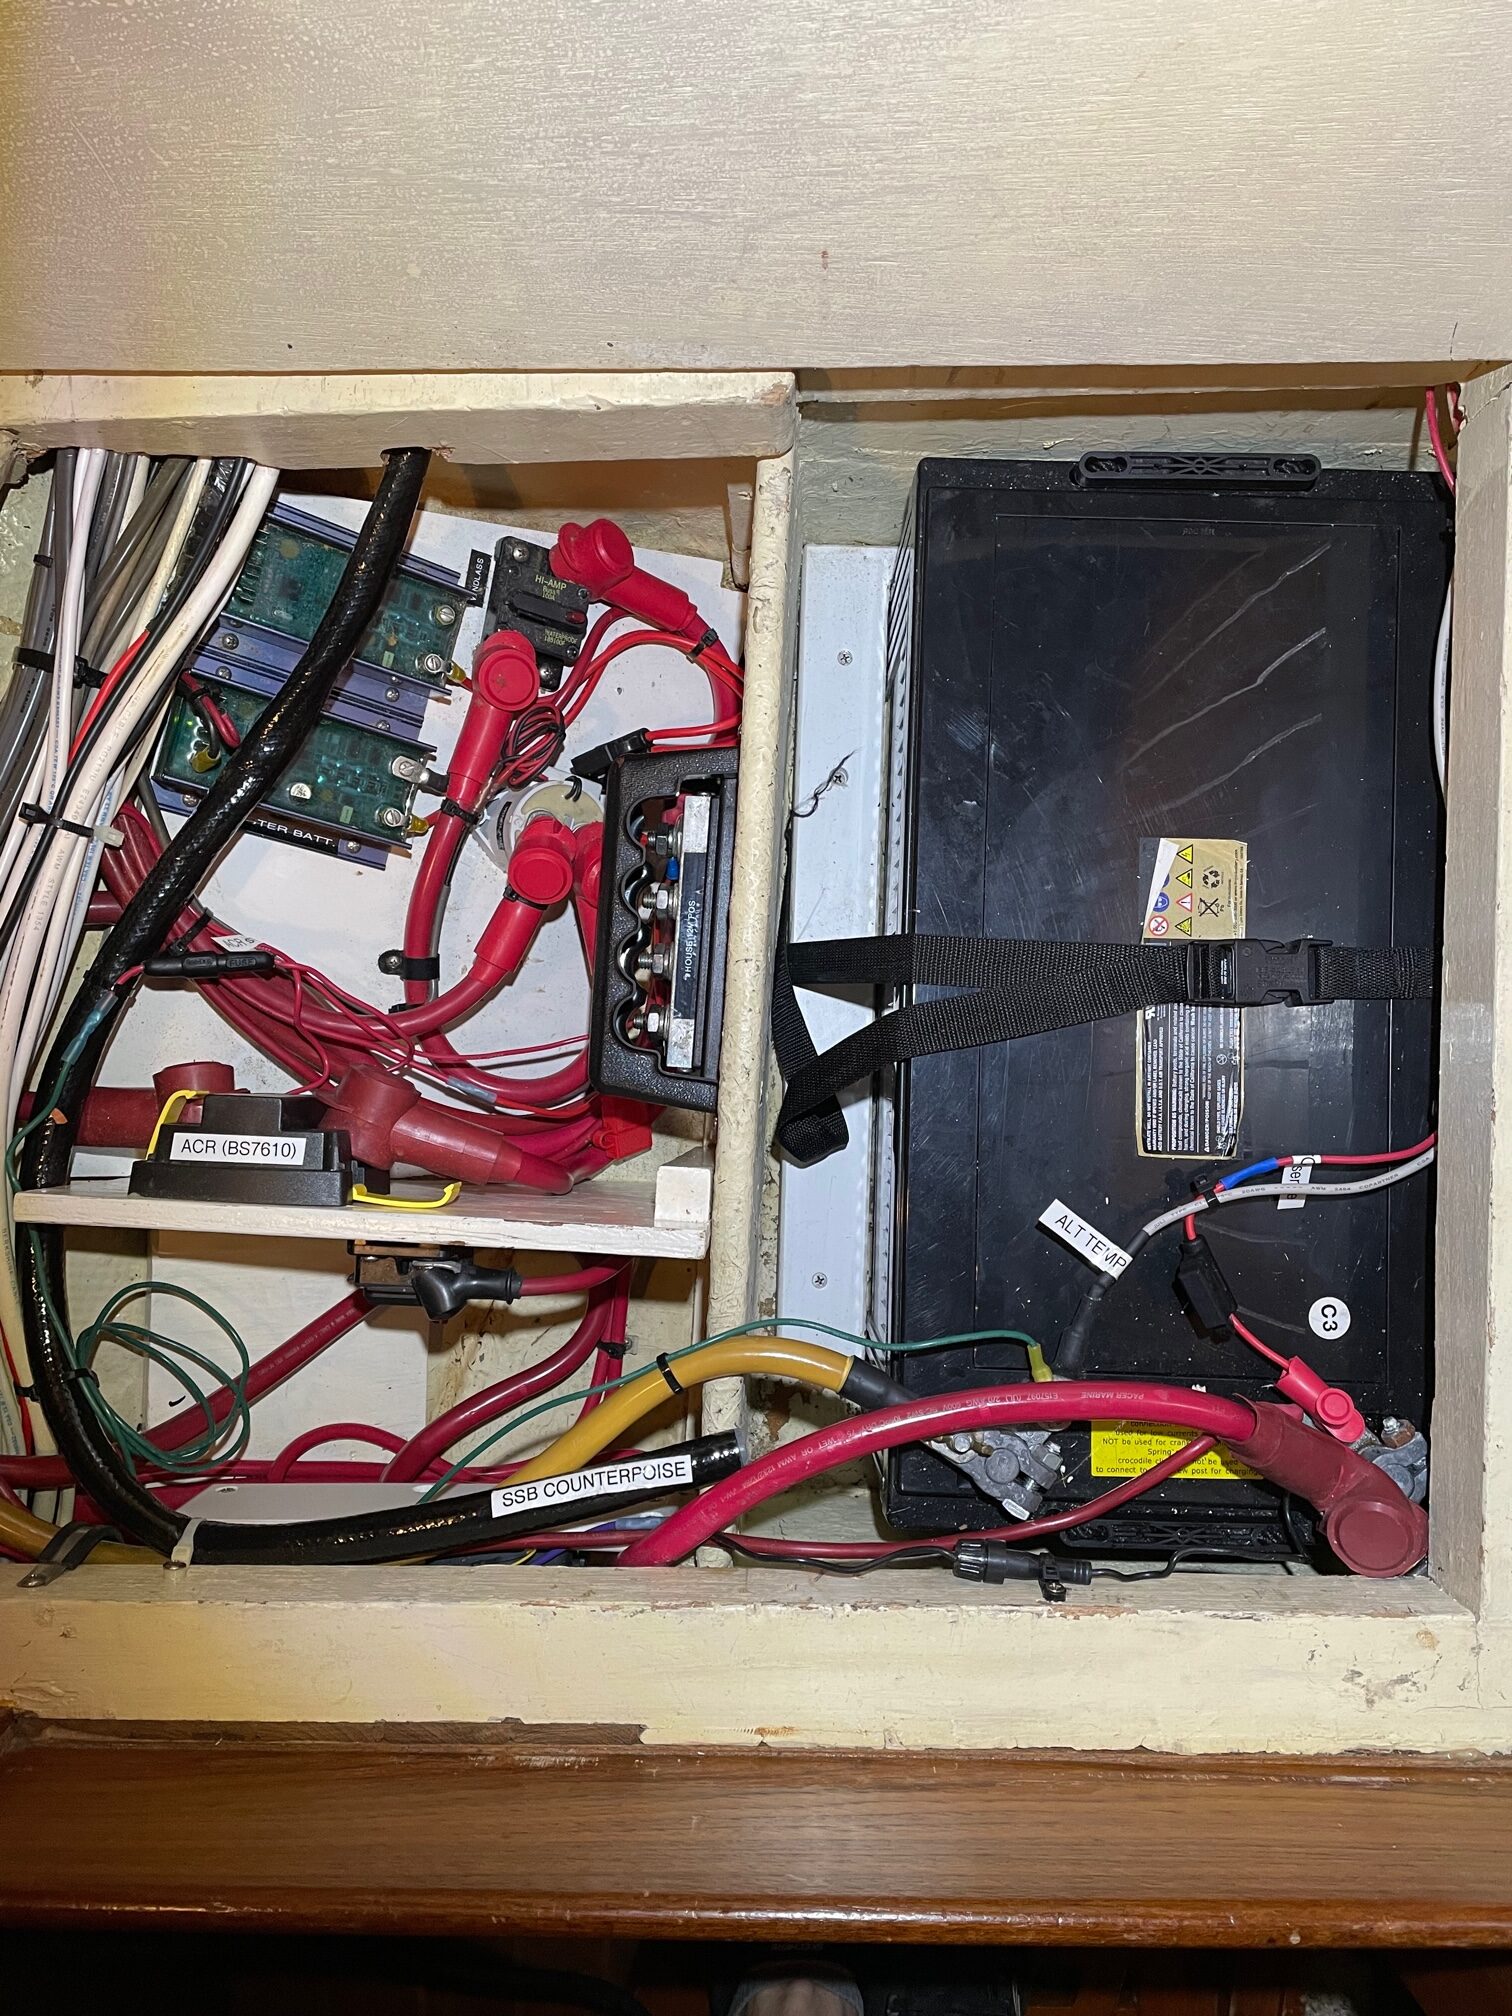
Starter AGM Battery, DC/DC, ACR
The Good:
Very reliable system
Fully automated charging
The Bad:
Long charge times, especially the last 10% of the battery
50% DOD (depth of discharge) for lead acid batteries
Heavy lead acid batteries (468 lbs for house bank)
Modified sin wave inverter not compatible with some electronics (Nespresso machine doesn’t work at all and Microwave struggles)
Most components 17 years old
Performance issues during year-long cruise with no shore power
No remote monitoring/control of the system
In 2021 I noticed my House batteries were getting weak. They were fine for day sailing, but a week-long trip to the San Juan Islands where we mostly anchored really exposed their weakness. By mornings our battery voltage was below 12.0V until the sun came out and the solar panels brought them back to a normal voltage. I installed these AGM batteries way back in 2010, so they definitely exceeded their expected life.
This left me with a big decision–do I replace the 6-6V, 672AHr AGM batteries with the same (a 1-day project costing $2,500) OR switch to Lithium technology (a multi-week project and 3X cost)? I did a lot of research on Lithium-based systems and decided to update to Lithium Iron Phosphate (LiFePO4) house batteries, a new Inverter/Charger that could handle Lithium charge profiles and a new solar controller with LiFePO settings.
Goals:
Safe and reliable system
Higher overall amp hour capacity for house bank
Faster charging rates especially while away from the dock
Have capability to remotely monitor and control the system
New System
Batteries
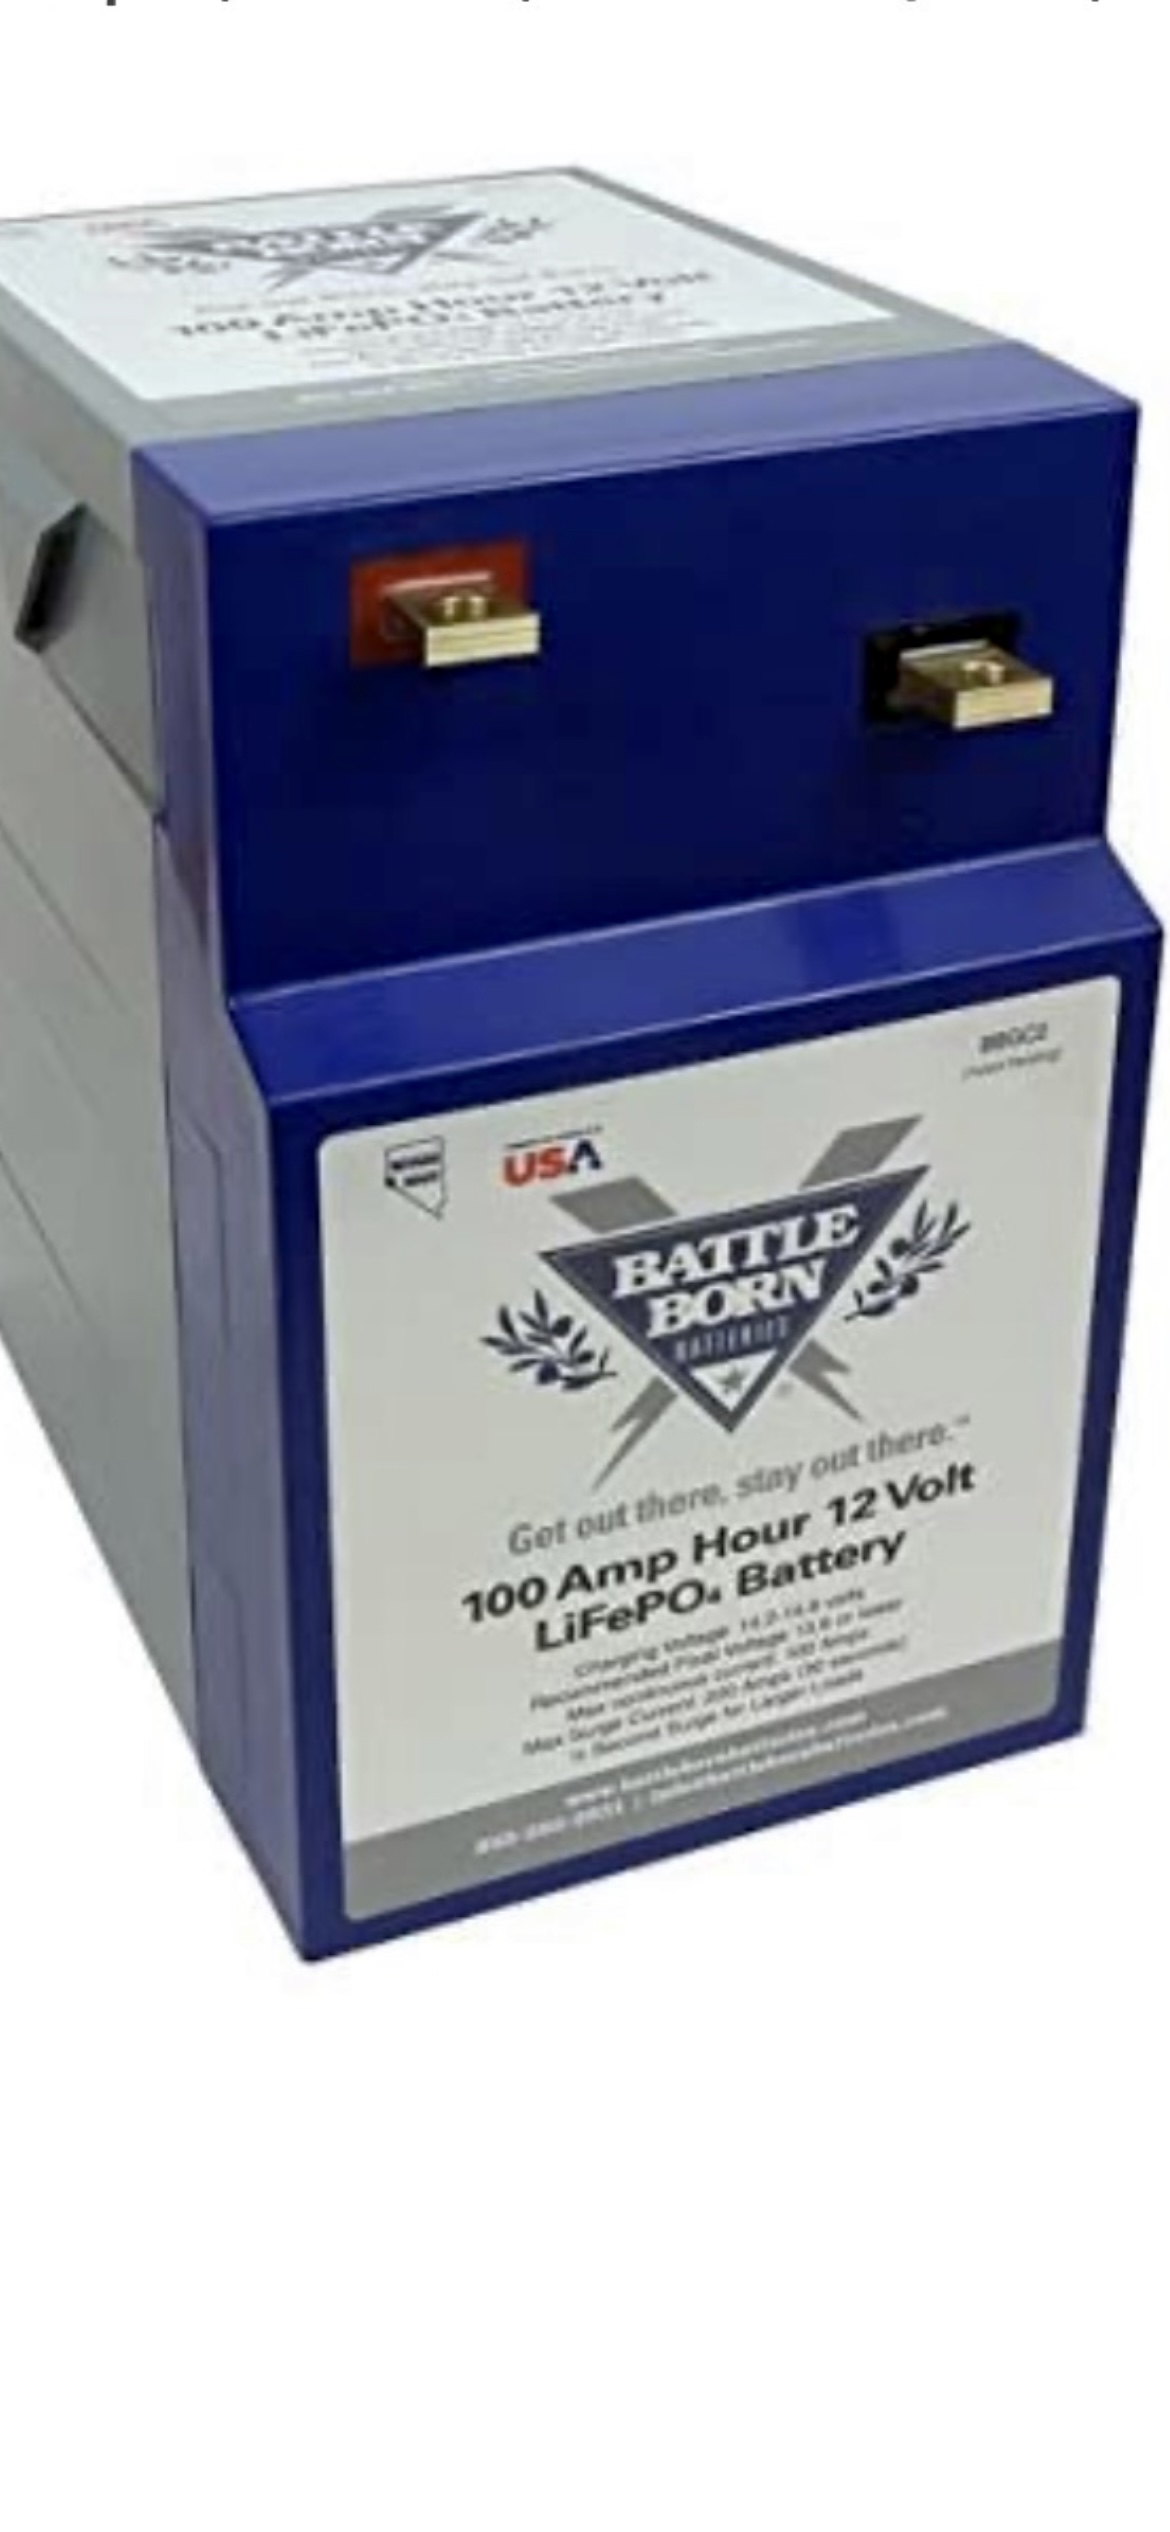
One of the biggest choices in the design was what type of battery to use. Lithium Iron Phosphate (LiFePO4) batteries have been around awhile and seem to be the choice for many boats converting over to Lithium. There are plenty of manufacturers with BattleBorn, Victron, VPR, Lithionics, and Relion being some that I looked into. I narrowed my choice to 100AHr “Drop-In” LiFePO4 with built-in BMS (battery management system). They are designed to drop-in nearly the same footprint as 6V lead acid batteries, making installation easier. The internal BMS built into each battery removes it from the bank when an unsafe condition is detected. This could happen to a single battery (eg a bad cell) or all batteries (eg faulty charging conditions).
Sizing:
My AGM house bank was made up of 3 parallel sets of 2 series-connected 6V batteries (total of 6 batteries equaling 672 AHrs). Lead acid batteries are limited to 50% DOD for long life, meaning you should avoid discharging the bank more than 50%. In other words, my 672 AHr AGMs really only had 336 AHr of usable charge. And unless you’re plugged into shore power, it takes a very long time to charge the last 10% of a lead acid battery, making the usable AHrs even less. The reason is due to the charging profile of lead acid where the charge current is significantly reduced for that last 10%.
My design requirement was to at least match the usable AHrs when I switched to Lithium. But that doesn’t mean that I need 672 AHrs since Lithiums have nearly 100% DOD. So a 100AHr Lithium battery would be approximately the equivalent of a 200AHr AGM battery. I chose 4-100AHr BattleBorn LiFePO4 GC2 batteries for a 400AHr house bank.
Inverter/Charger
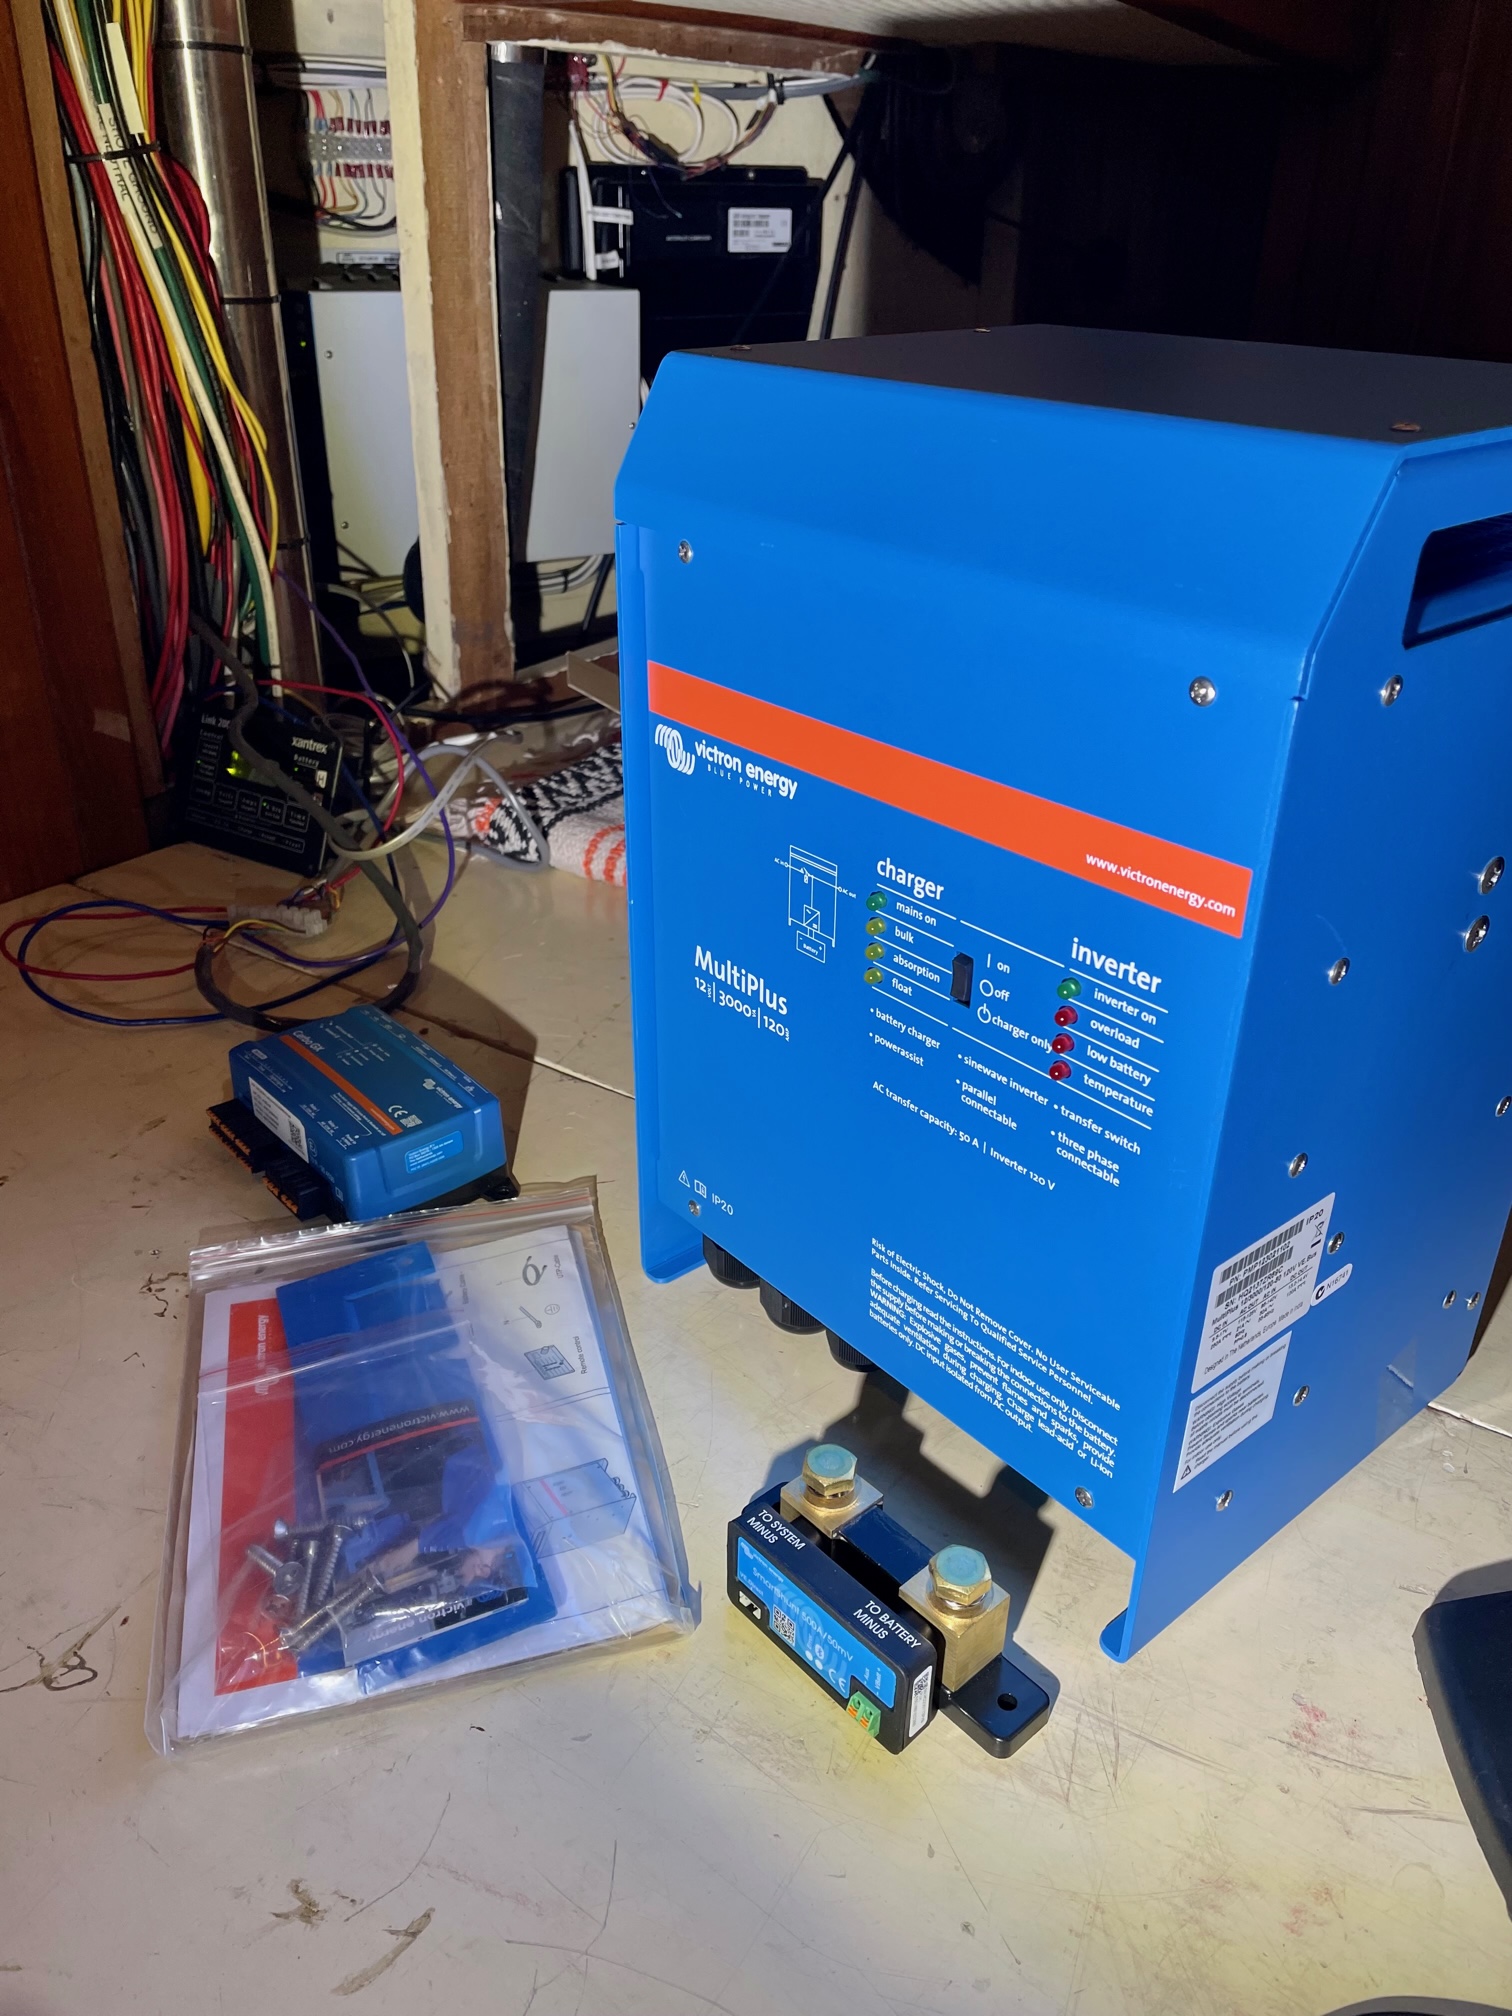
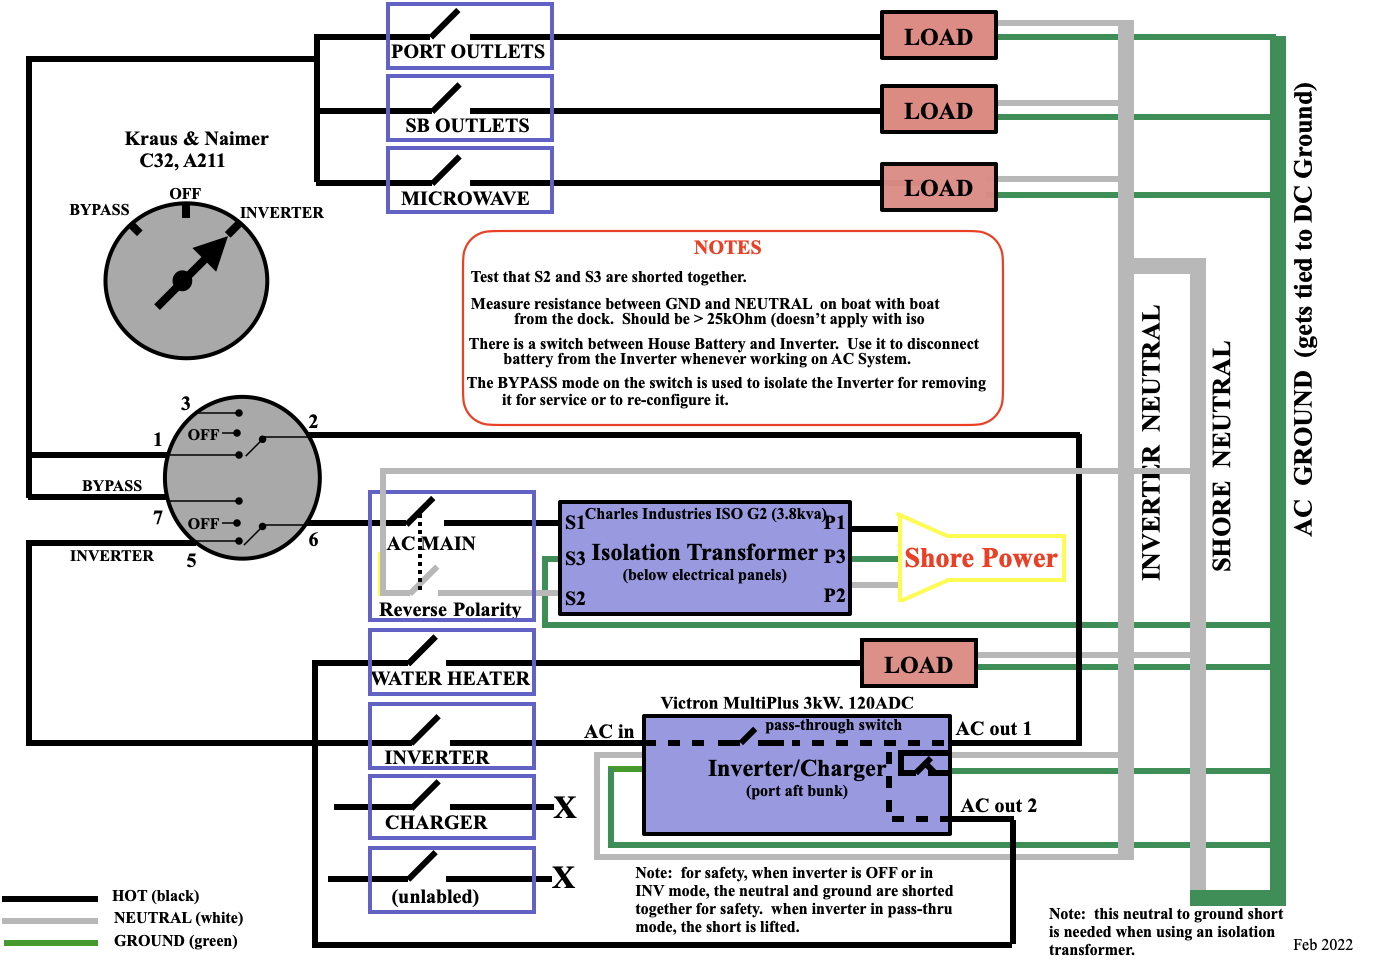
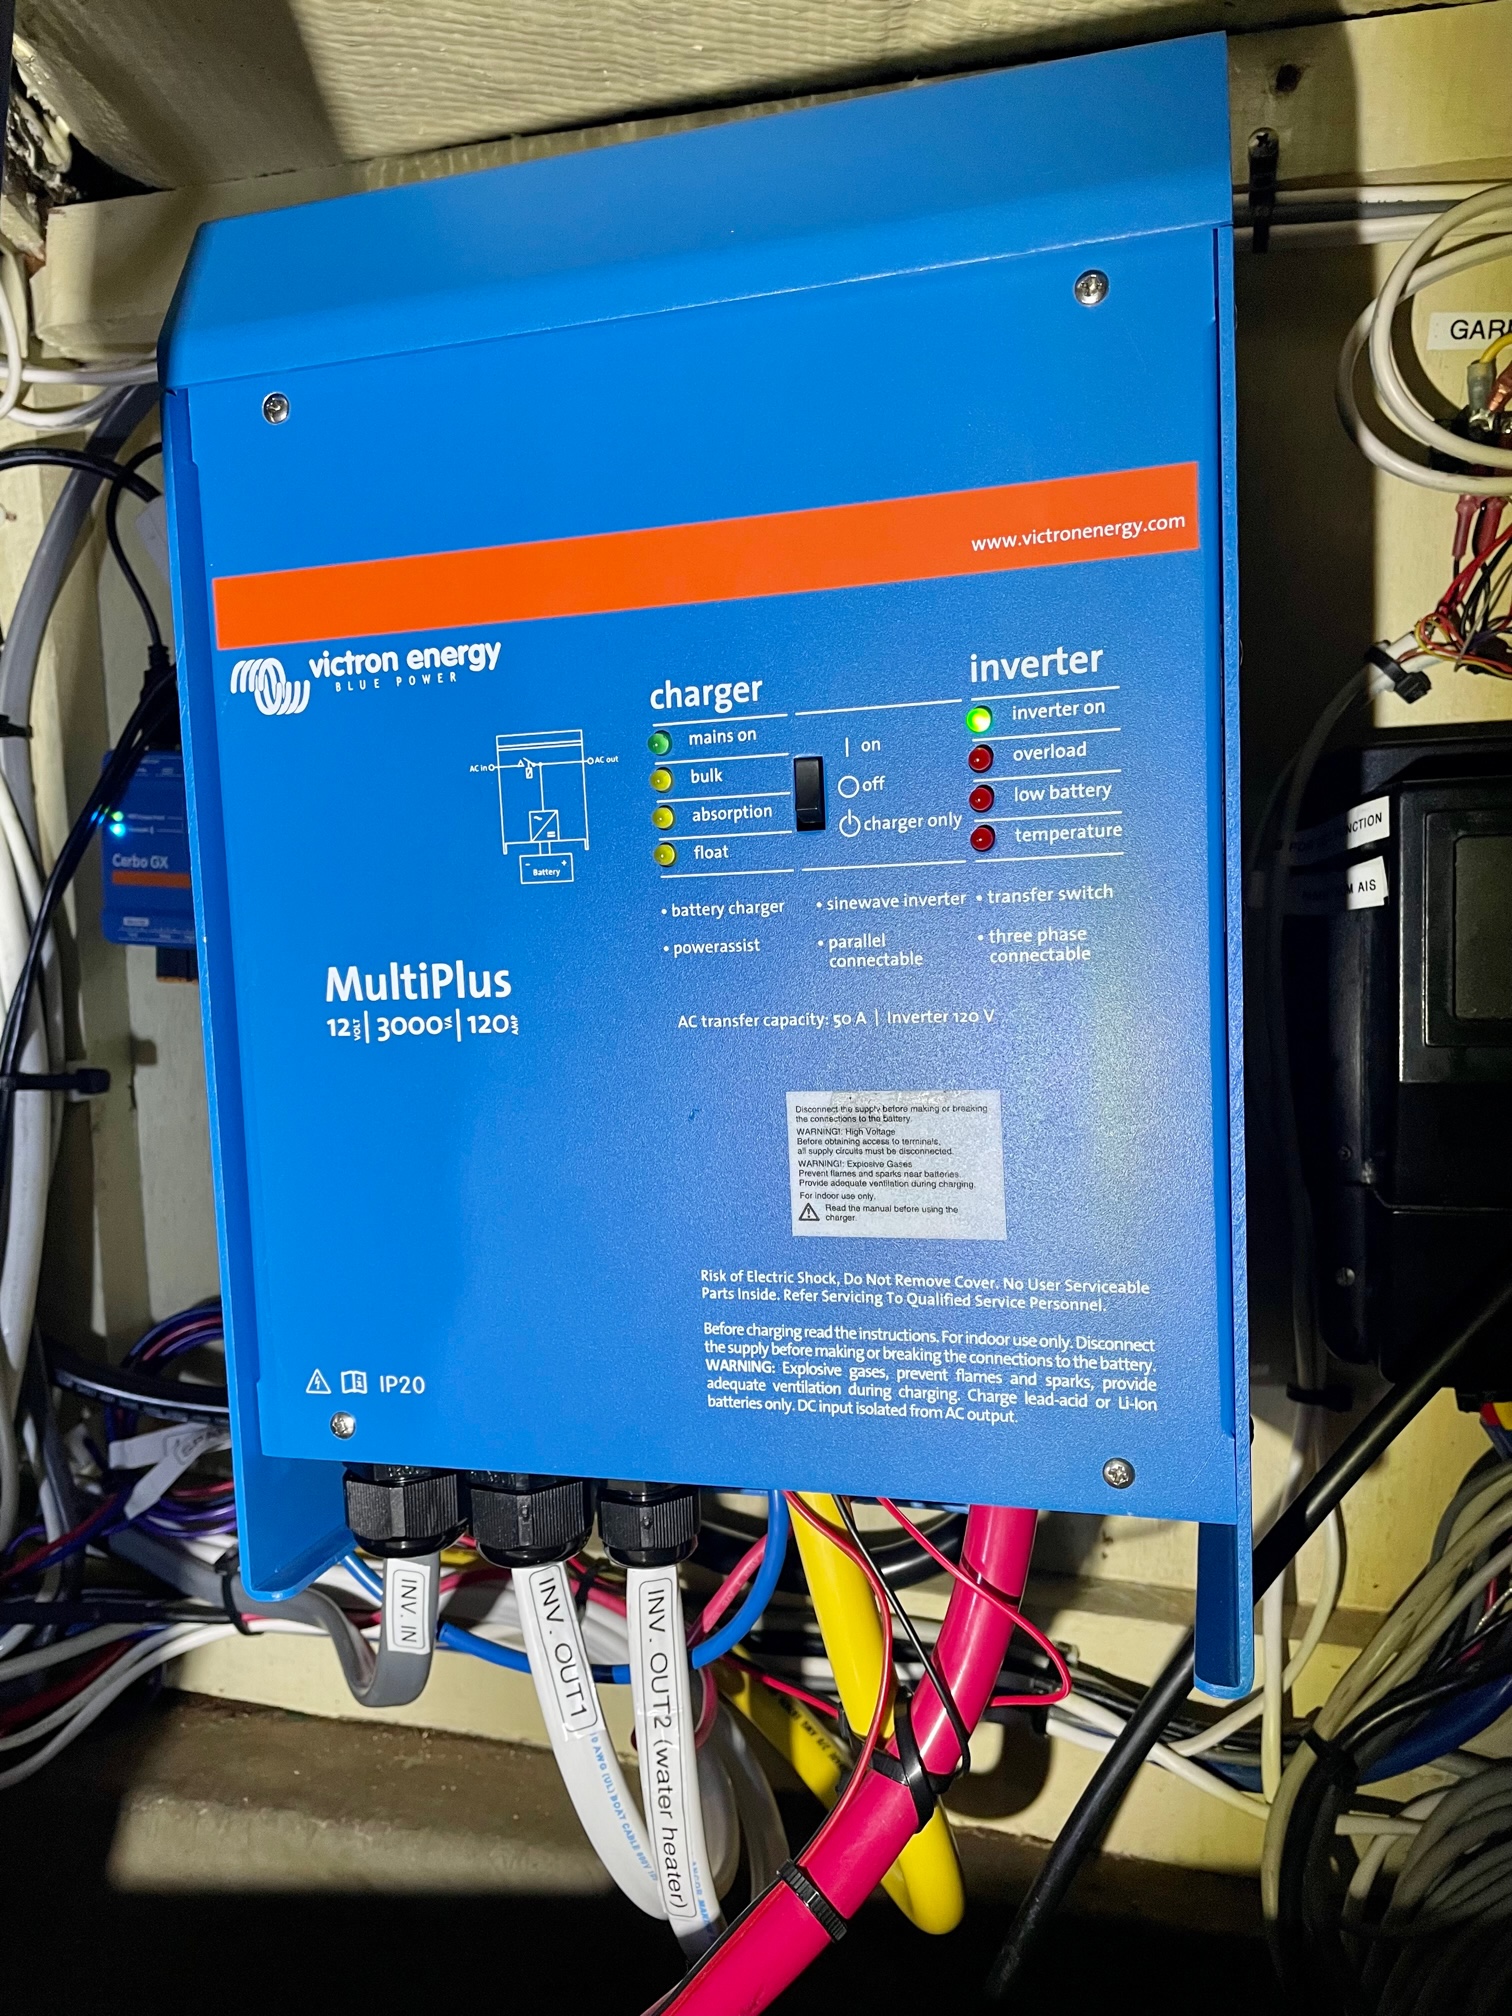
I installed a Victron MultiPlus 12/3000/120 Inverter/Charger. Due to the location of inputs/outputs on the MultiPlus, as well as the orientation, I had to replace some of the heavy 2/0 gauge wire on the DC side, and the 10 AWG on the AC side. The previous setup was not wired with the AC main going through the inverter before any loads, so I had some re-wiring to do at the AC panel. I used both AC outputs–AC1 supplies the AC outlets and the microwave, AC2 supplies the water heater. The MultiPlus passes the AC input through to both AC outputs when it detects an AC source coming in. When there is no AC source, it switches on the Inverter. Only AC1 output receives the Inverter output. This prevents overloading the Inverter and draining the batteries that would occur by trying to run the water heater with inverted power. I rewired the AC switch to be able to disconnect the MultiPlus AC input and output (bypass mode) in case it has to be removed for service. Here’s a picture of the new equipment and a diagram of my AC system.
Victron MultiPlus 3000, Shunt, Cerbo GXAC System Diagram
Monitor/Control
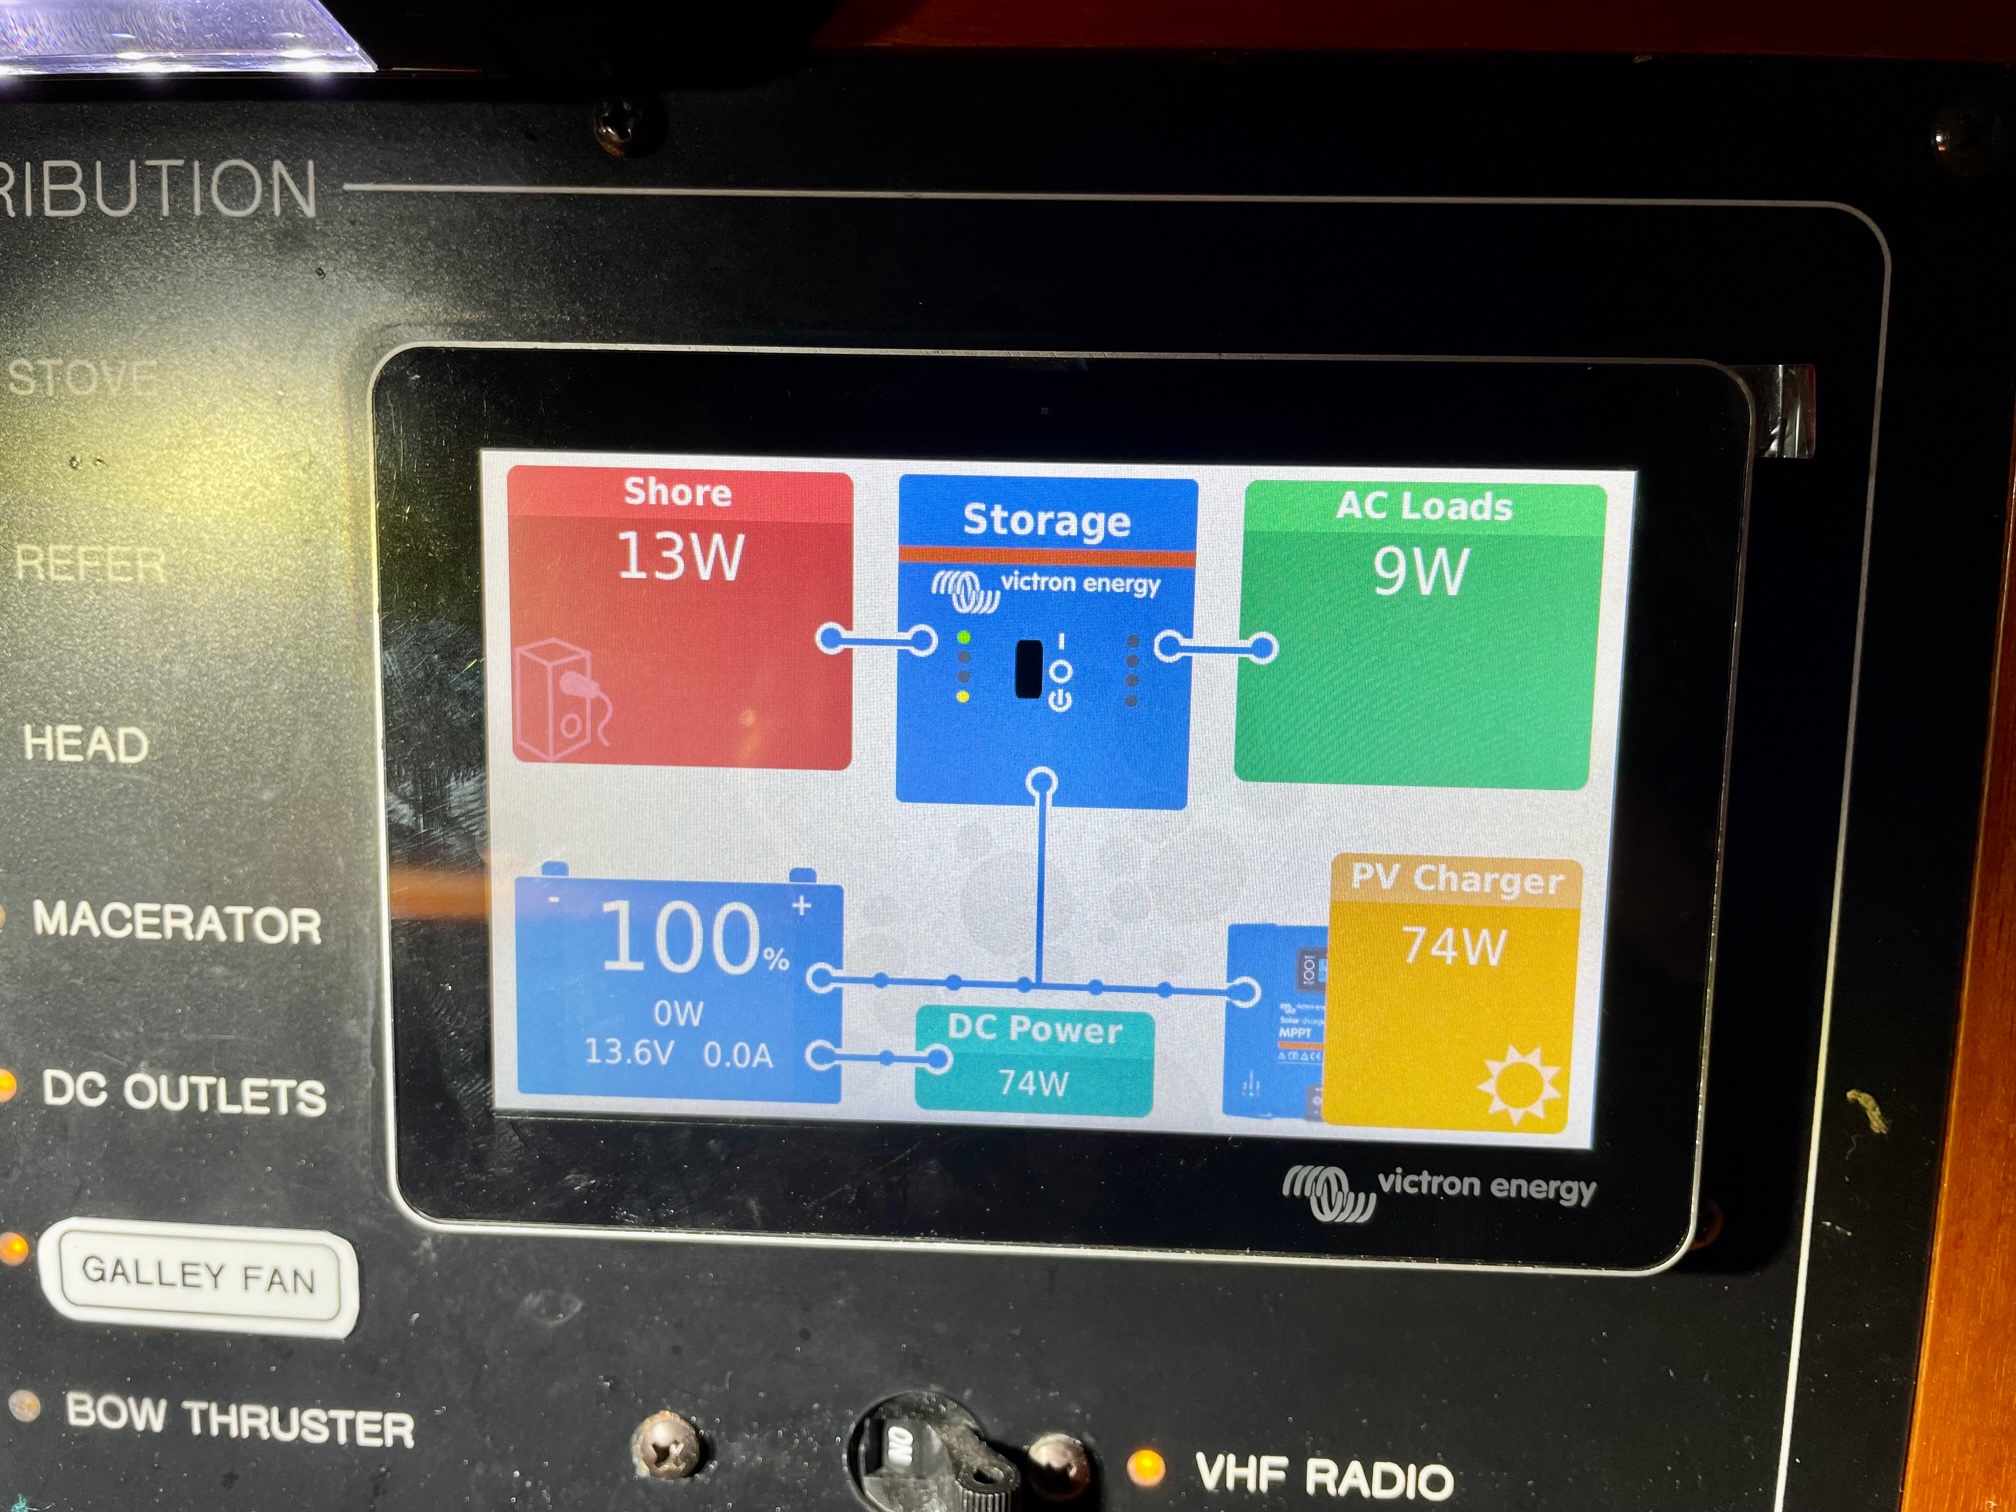
For the Monitor/Control, I installed a Victron Cerbo GX with a GX Touch display, and a SmartShunt. This allowed me to do most of the wiring near the MultiPlus while running a single wire to the touchscreen display. The 5″ display took the place of the old Link 2000 with minor changes to the DC distribution panel. The touchscreen has lots of info and menus for setup and making changes.
GX Touch
Solar PV MPPT Controller
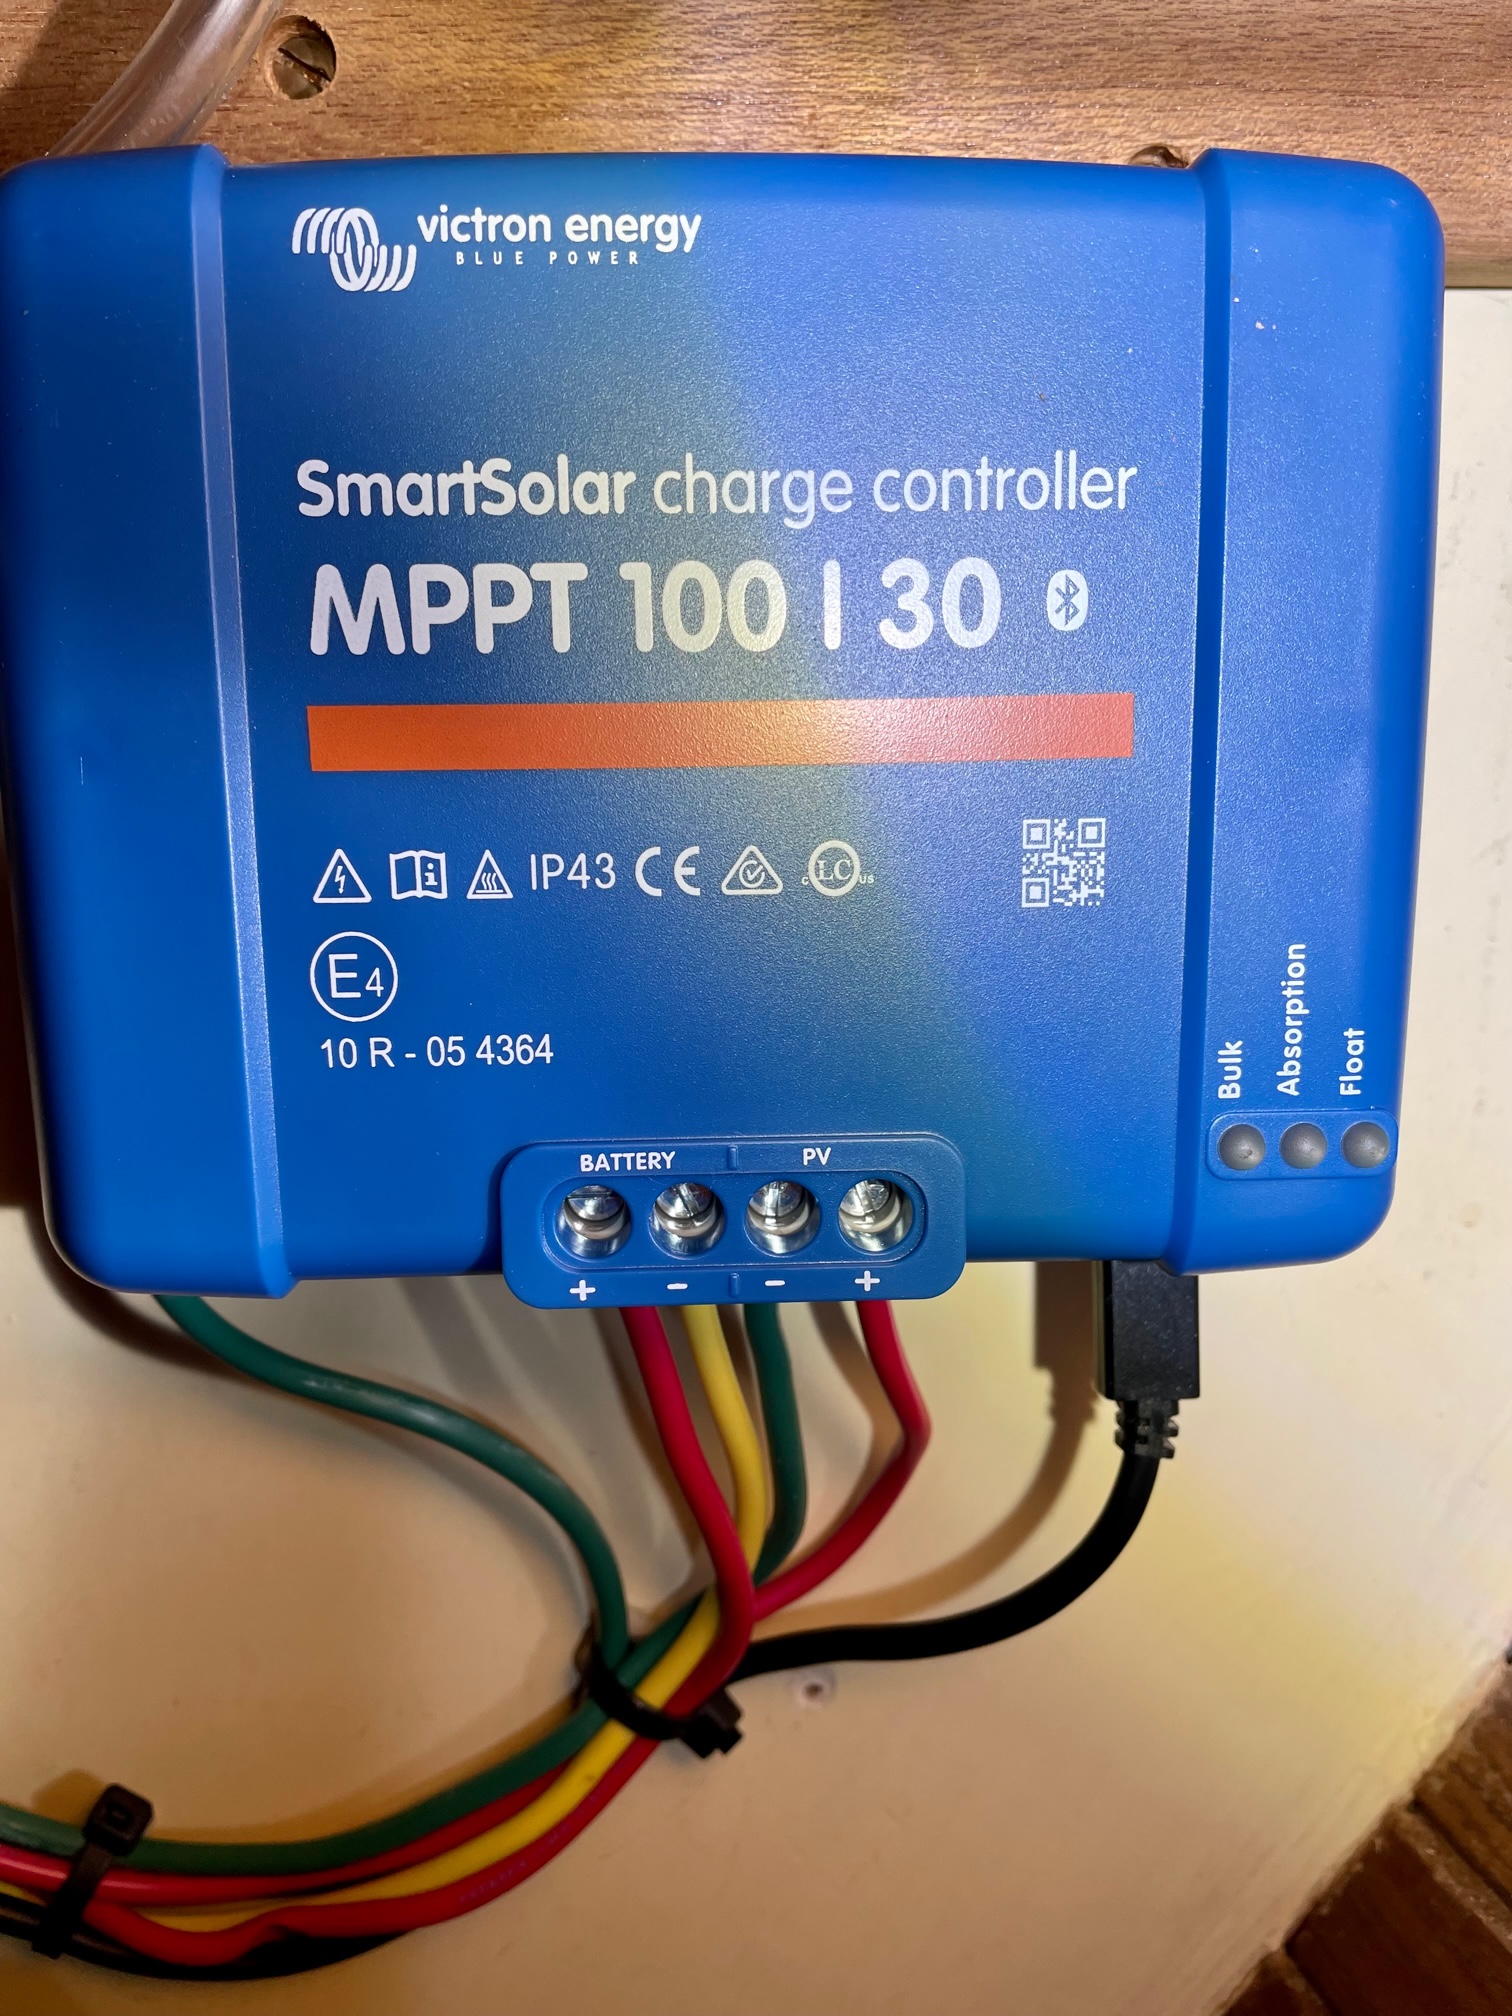
I decided to replace my older Outback Solar Controller with a new Victron SmartSolar 100/30. This integrates well with the Cerbo GX with a VE-direct cable and when connected, solar charging information appeared on the touchscreen as seen in the above picture (PV Charger). The controller can provide as much as 30A of solar charging to the Lithium batteries. On my boat, even in the tropics, the most output I ever saw from my 5 solar panels was about 20A since there’s almost always some amount of panel shading from the rigging. The built-in Bluetooth allows it to be controlled from anywhere by pairing it with a smartphone via Victron Connect.
SmartSolar 100/30
Remote Monitoring
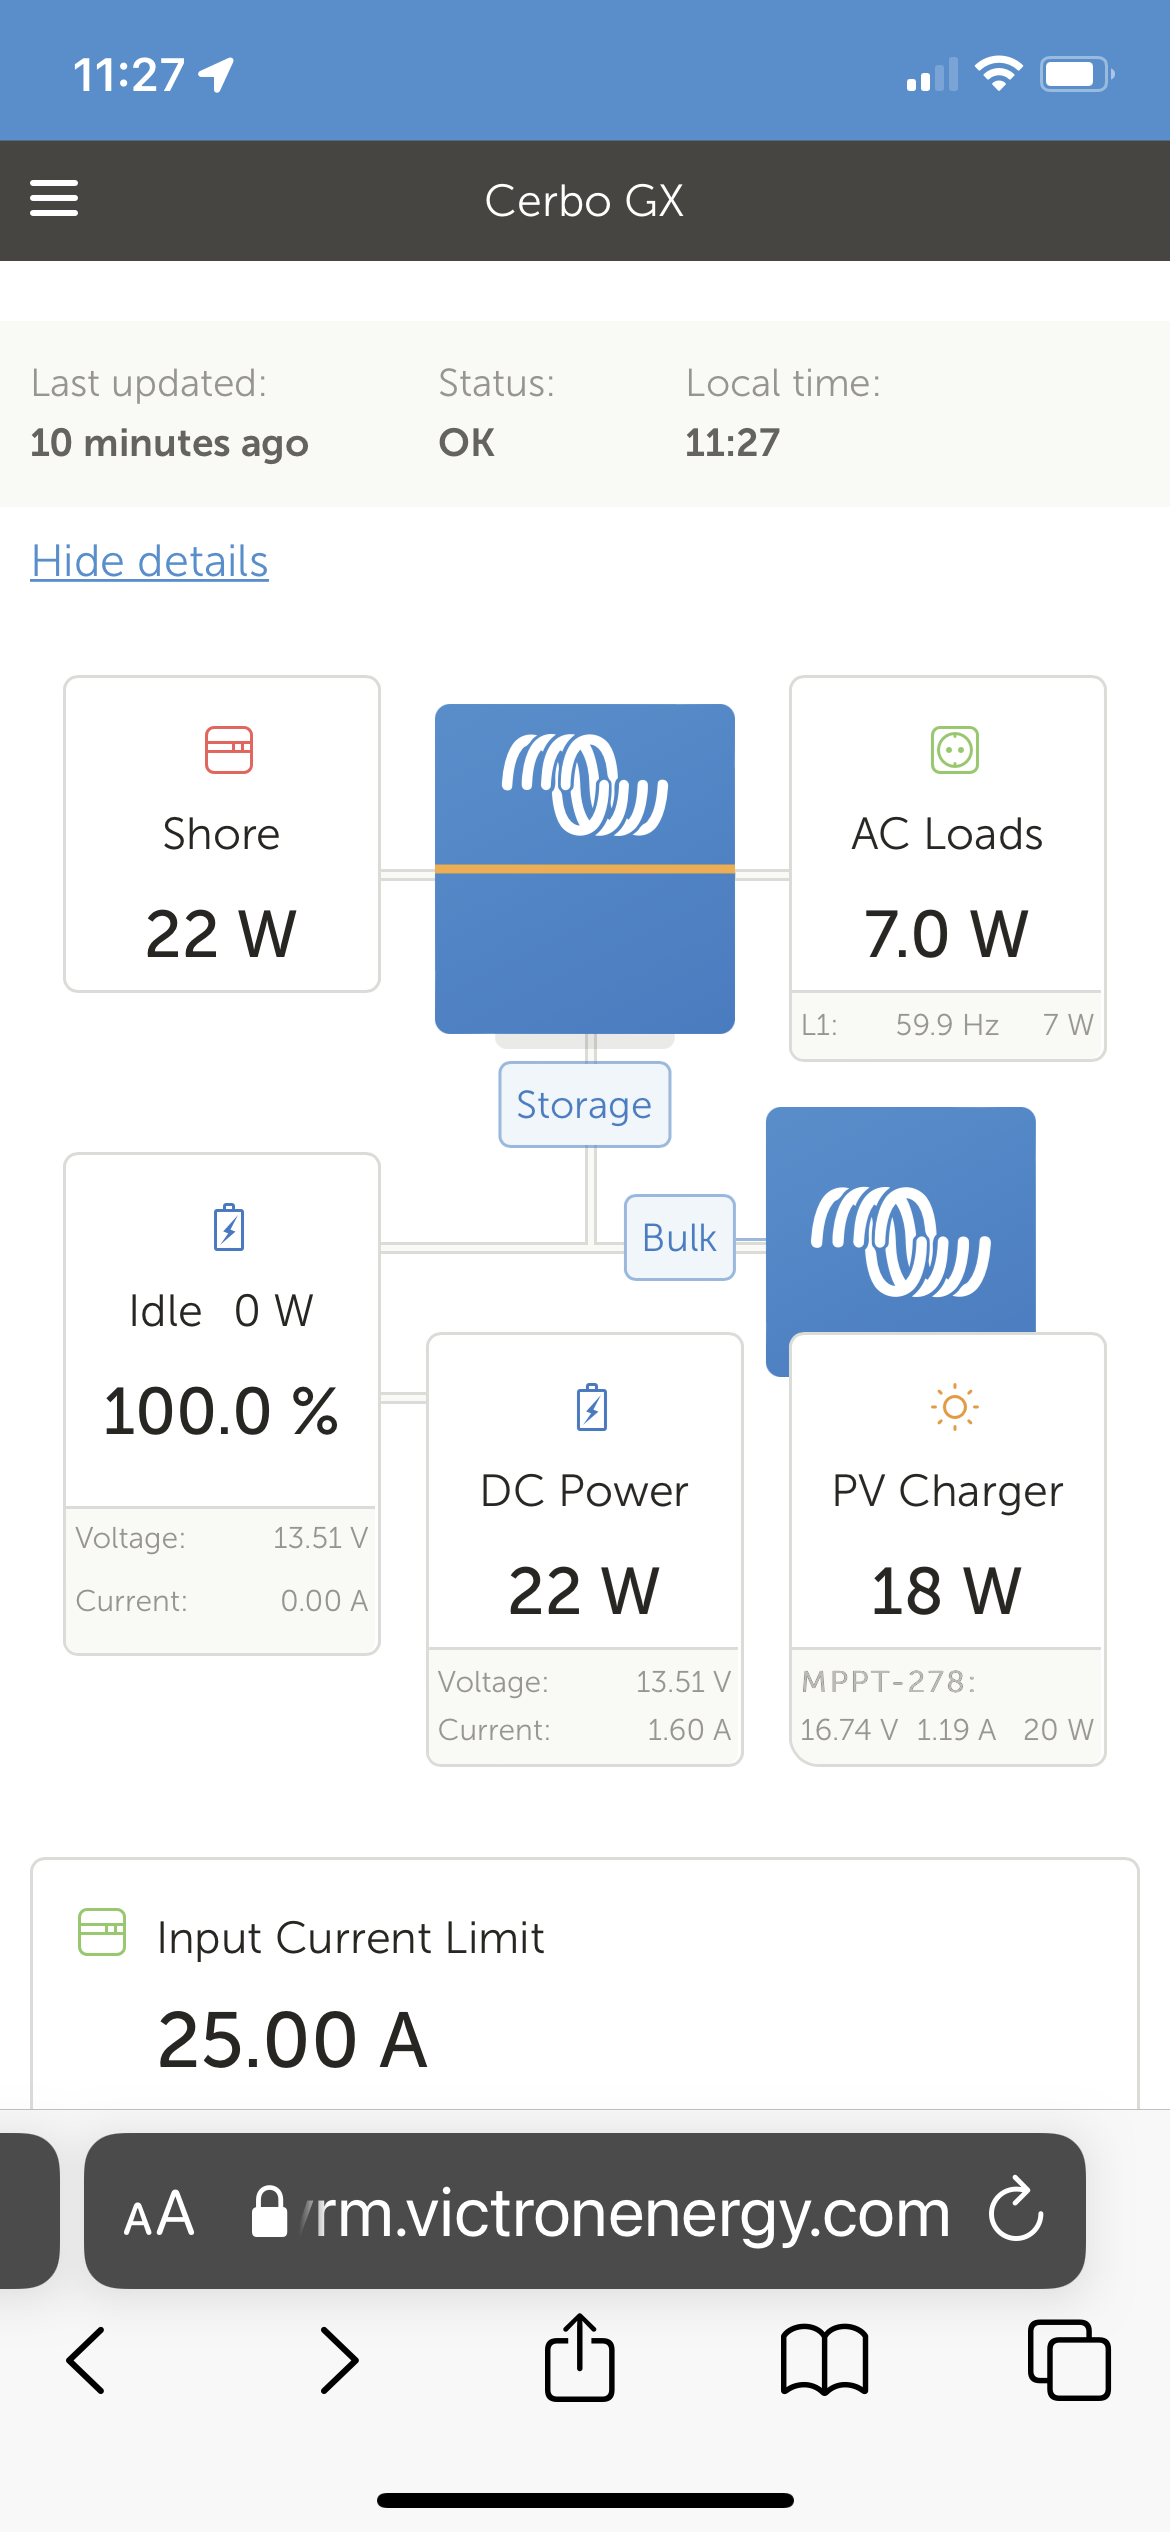
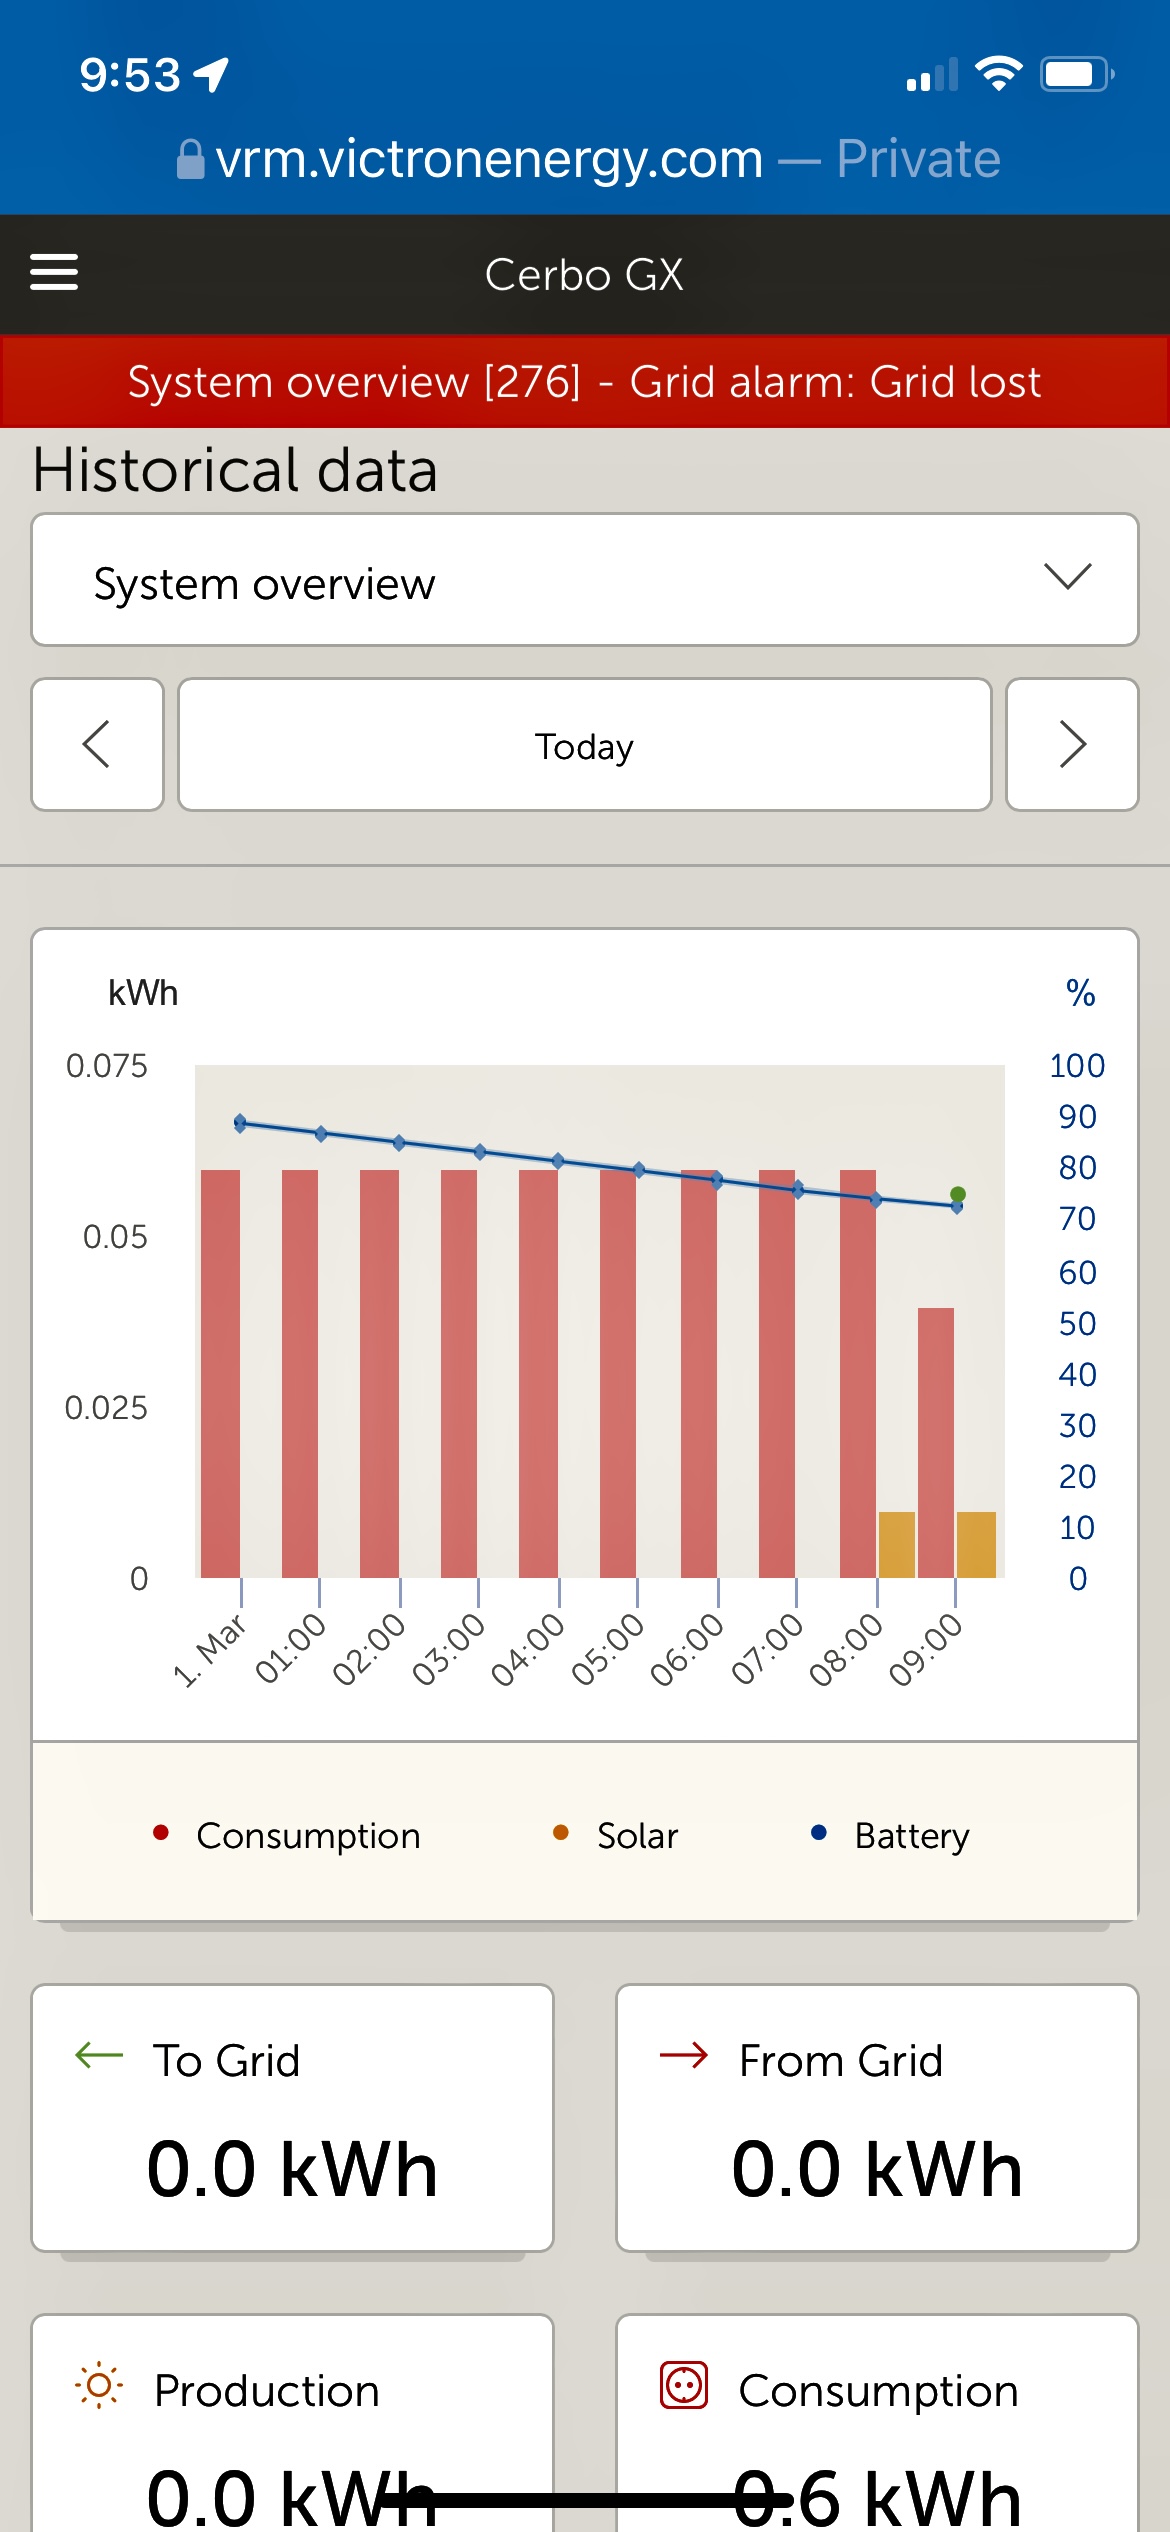
The Victron System (Charger/Inverter, SmartShunt, Cerbo GX, SmartSolar) is able to be monitored remotely as long there is WiFi on the boat. The VRM Portal is free and allows me to observe the following from anywhere in the world:
the battery state of charge
amount of AC shore power being drawn
solar charger output
amount of AC and DC loads are being consumed
“time to go” before charging is needed (based on current consumption)
historical data for power consumption, solar charging, and battery level
Main Screen in VRM PortalScreenshots from VRM remote monitoring
Installation
I decided to break the installation into 2 parts–first change out the Inverter/Charger, Controller & Monitor, Shunt, and Solar Controller and get that all working with my AGM house batteries. Then part 2 was to swap in the LiFePO batteries.
The first step of part 1 was to remove all the old equipment. As I was doing this, I realized that most of the AC and DC wiring to the Inverter would need to be replaced since it wouldn’t reach the location/orientation of the new Inverter. I also had to move the autopilot controller, radar wiring bus and a few other things to make room for the larger inverter. Most of the wiring was in hard to reach places, which is typical on boats. With the old equipment gone, I laid out the locations of the shunt and Cerbo GX, then mounted the touchscreen on the DC panel, and finally the Inverter/Charger. Everything tested out fine when I powered it up. Next I swapped the old solar controller for the Victron SmartSolar. I programmed the Inverter/Charger for AGM batteries, and also set the switch on the solar controller to AGM.
Installed Inverter/Charger and Cerbo GX
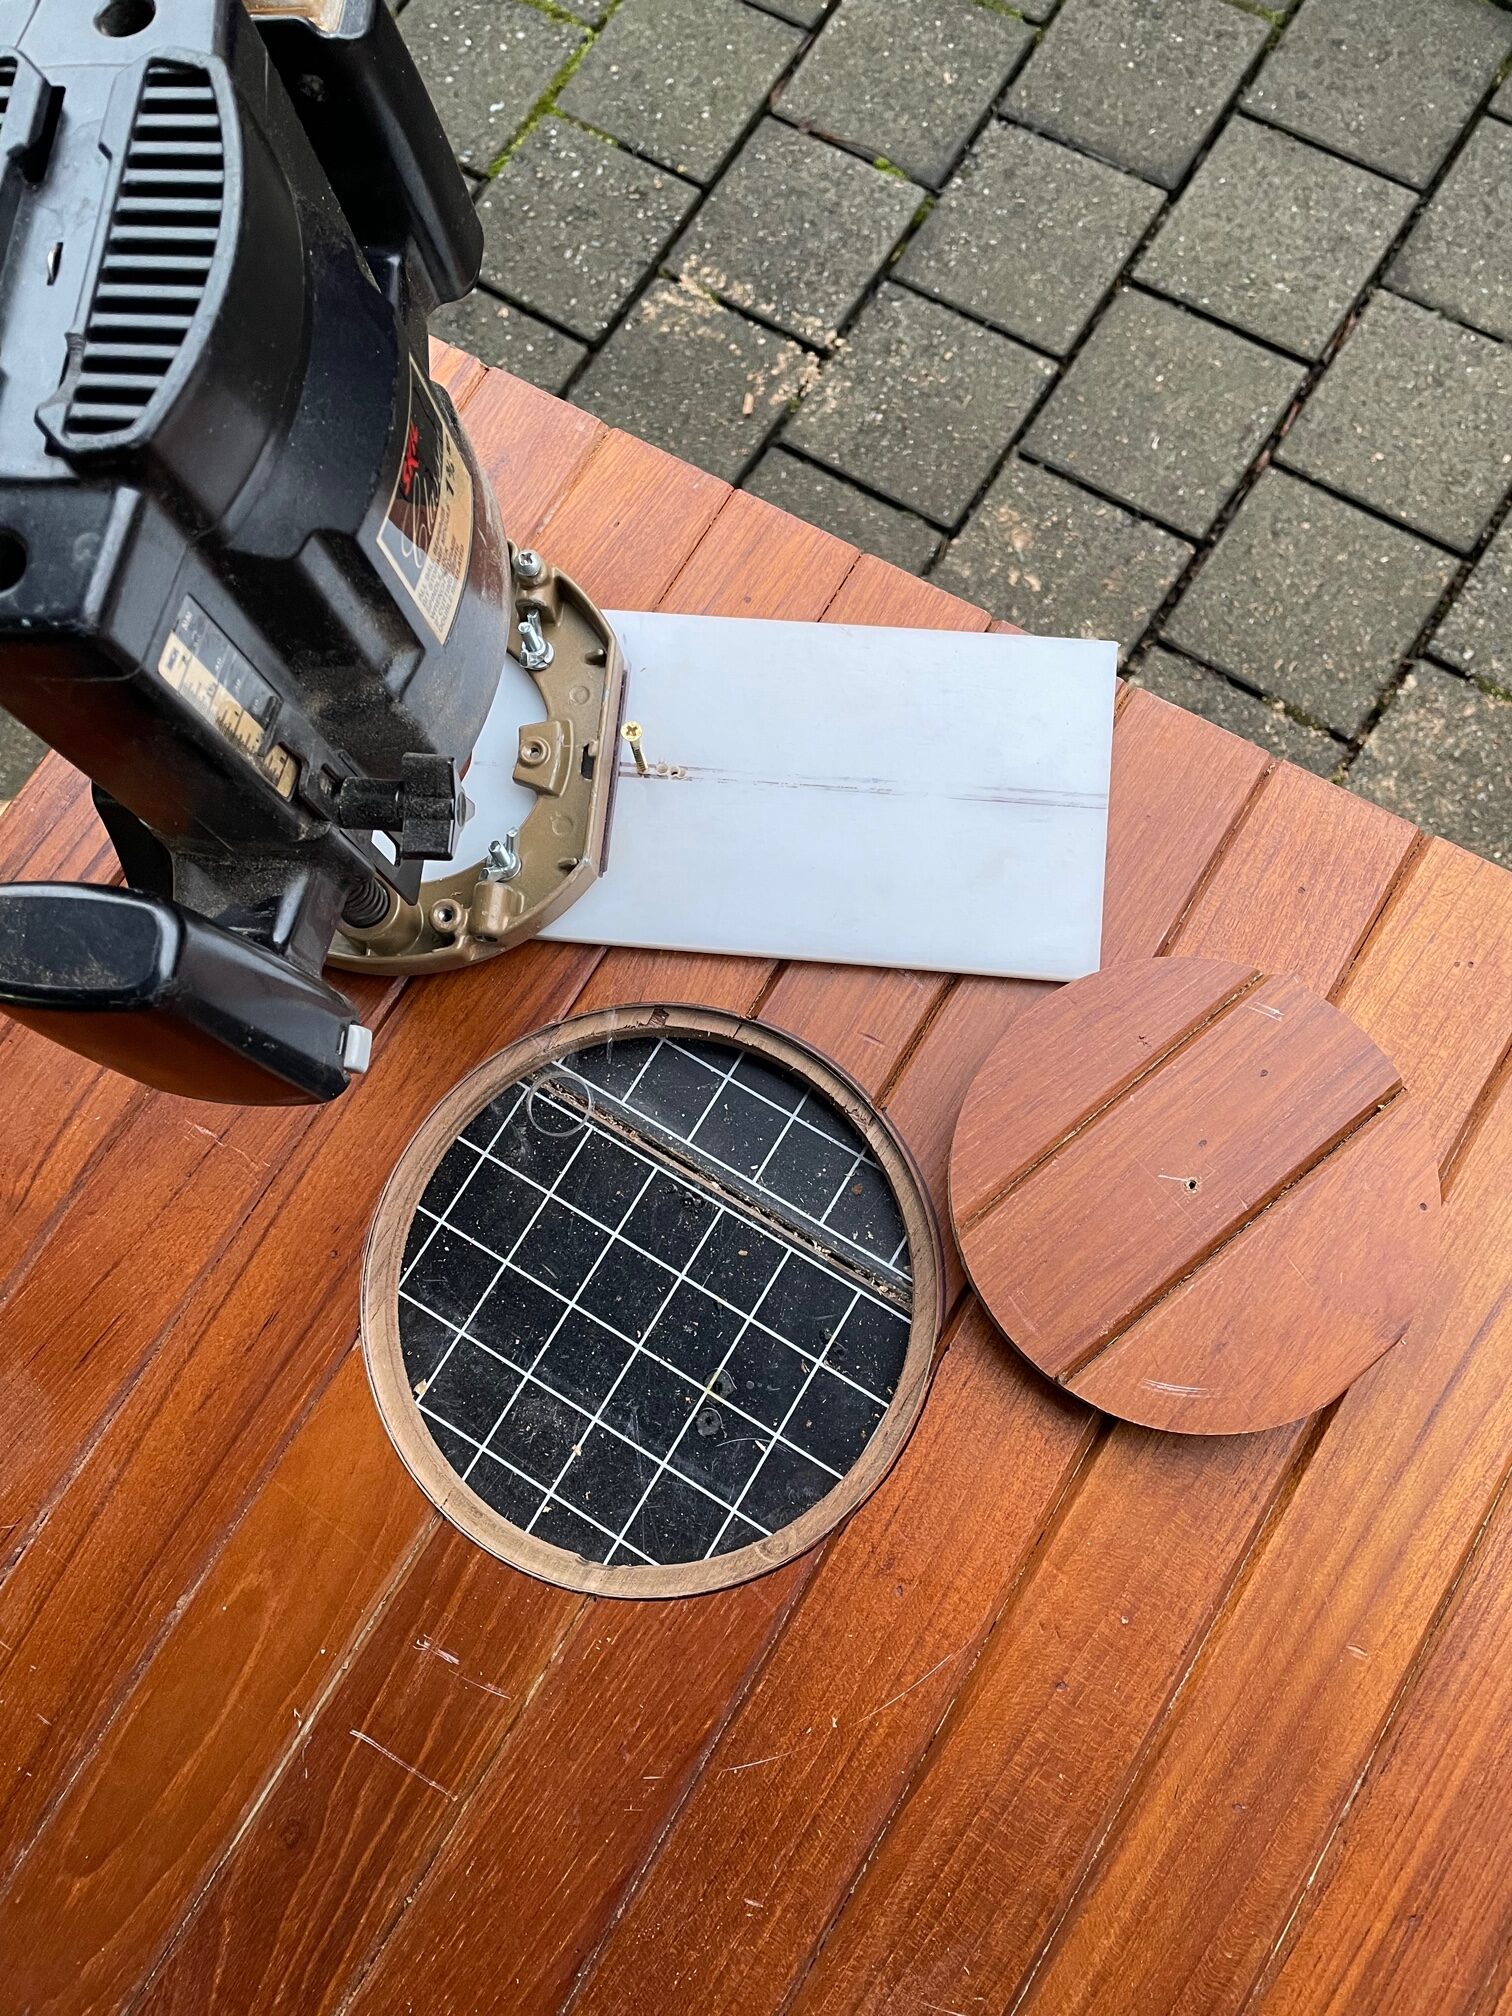
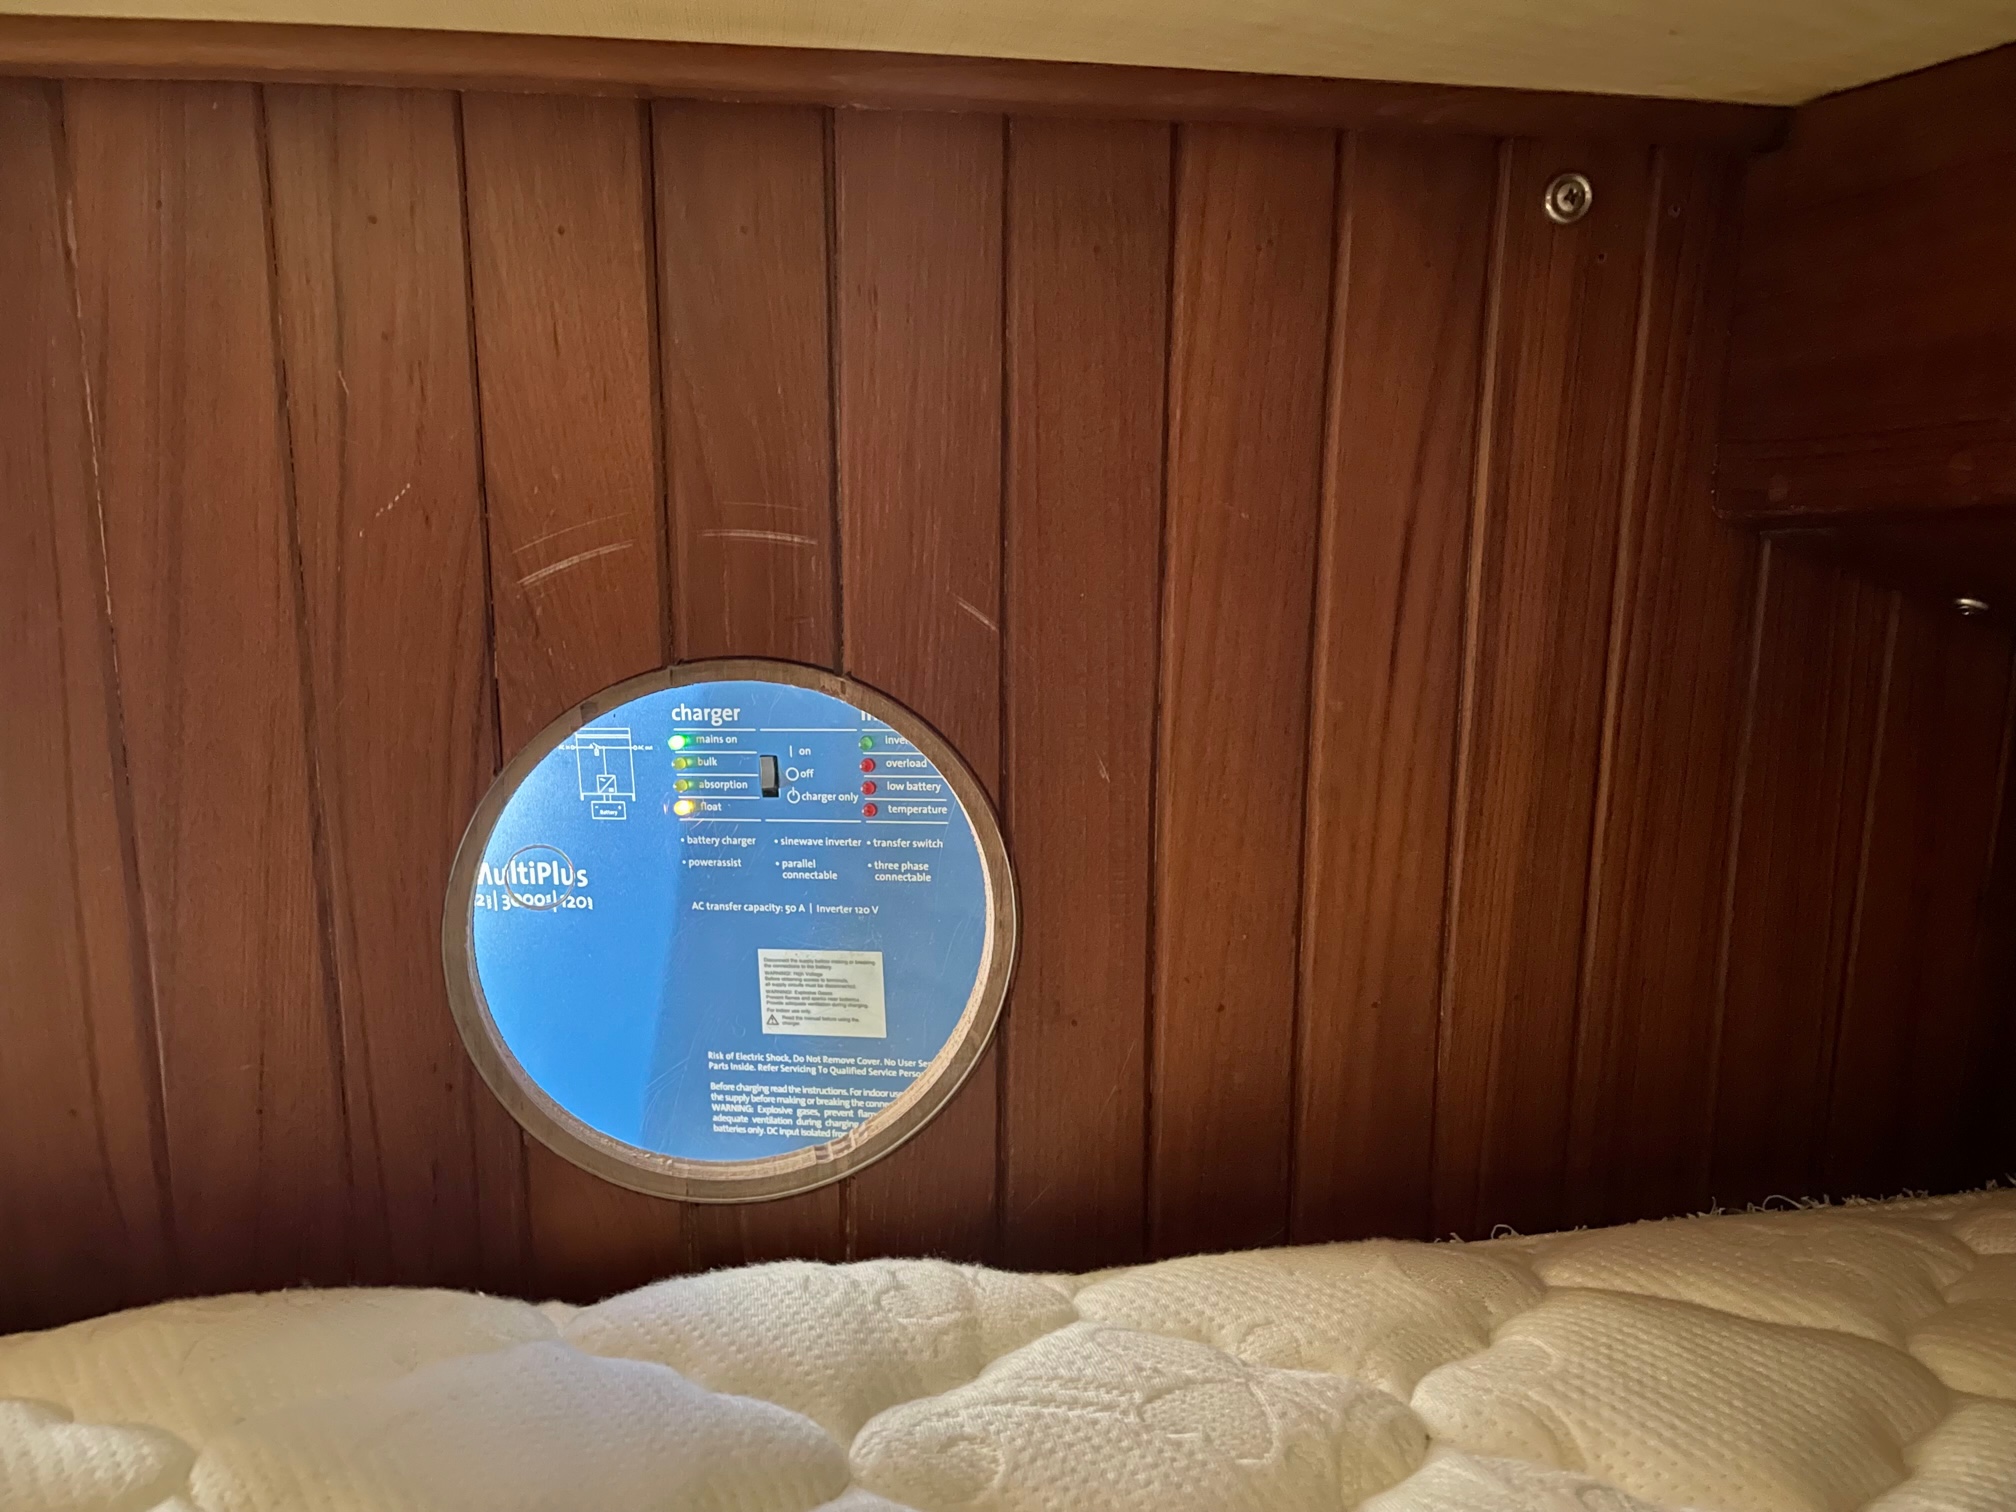
Since the Inverter/Charger and Cerbo GX are behind a panel in the aft berth, I wanted a way to observe and access them quickly without removing the entire panel, so I used a router to cut a 6-3/4″ circle with a 1/4″ lip for a 7″ acrylic port.
Access Port
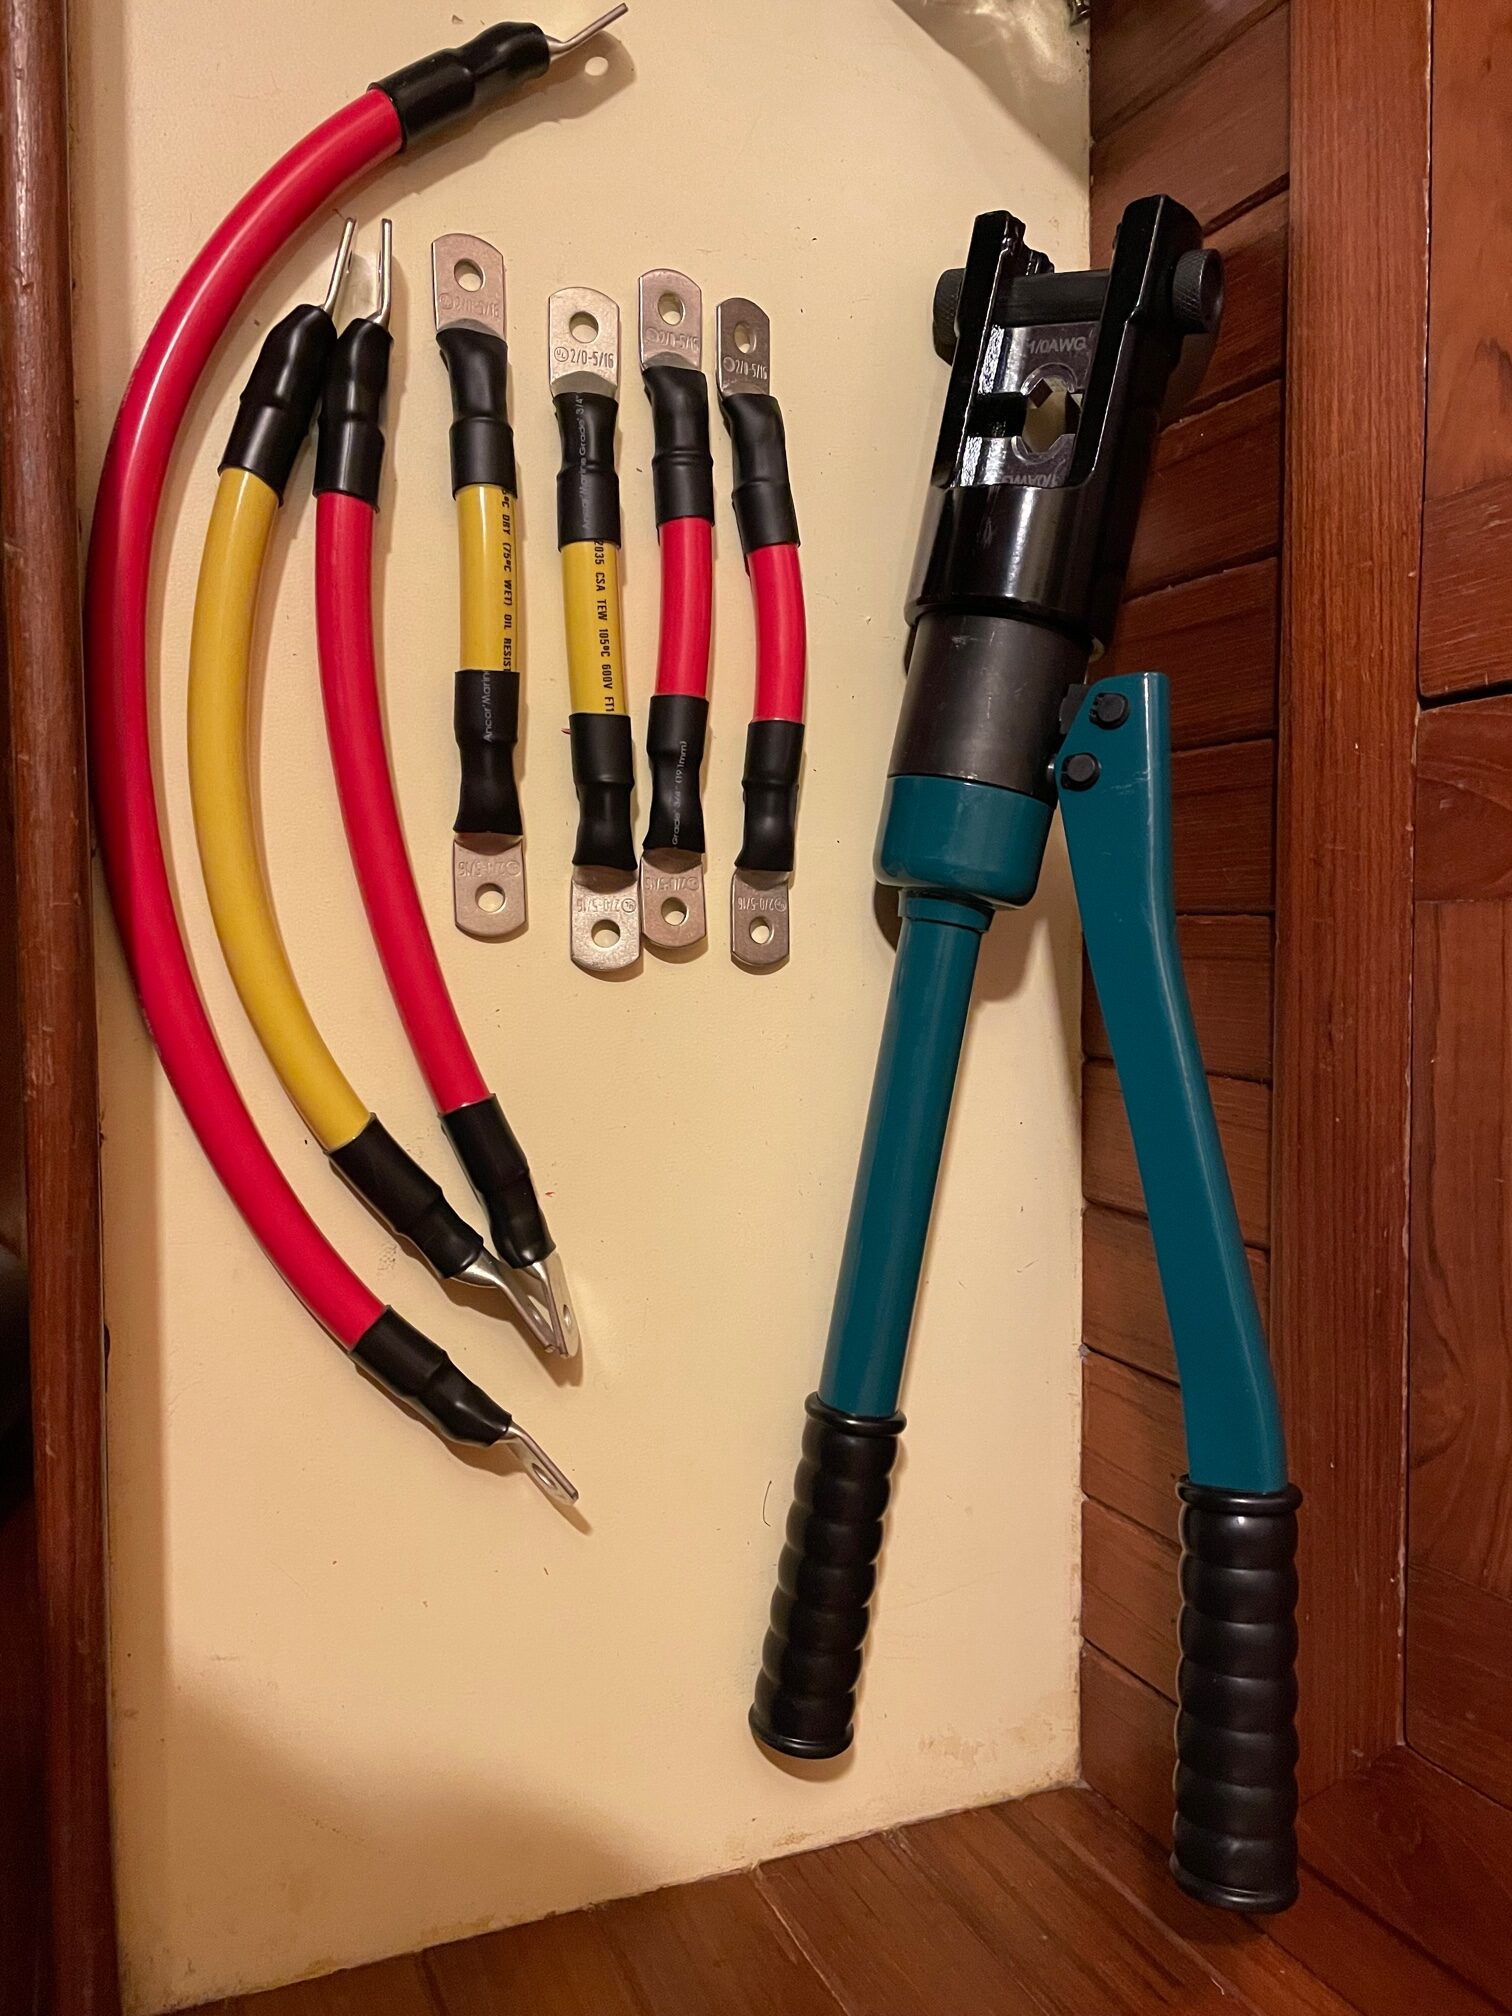
With everything working with the AGM batteries, it was time to swap in the 4 new Lithium batteries. Each of the 6 AGM batteries weigh 78 lbs and each Lithium battery weighs 31 lbs– that’s a difference of 348 lbs! I ordered the GC2 version of the 100AHr BattleBorn and the location of the pos/neg terminals made it easy to connect them in parallel using 2/0 (70mm^2) wire. I bought a good heavy duty hydraulic crimping tool that has die for 10 AWG to 4/0 AWG wire, used high quality lugs, and good heat-shrink tubing to build the 7 connectors I needed.
Hydraulic Crimping Tool & 2/0 (70mm^2) Connectors
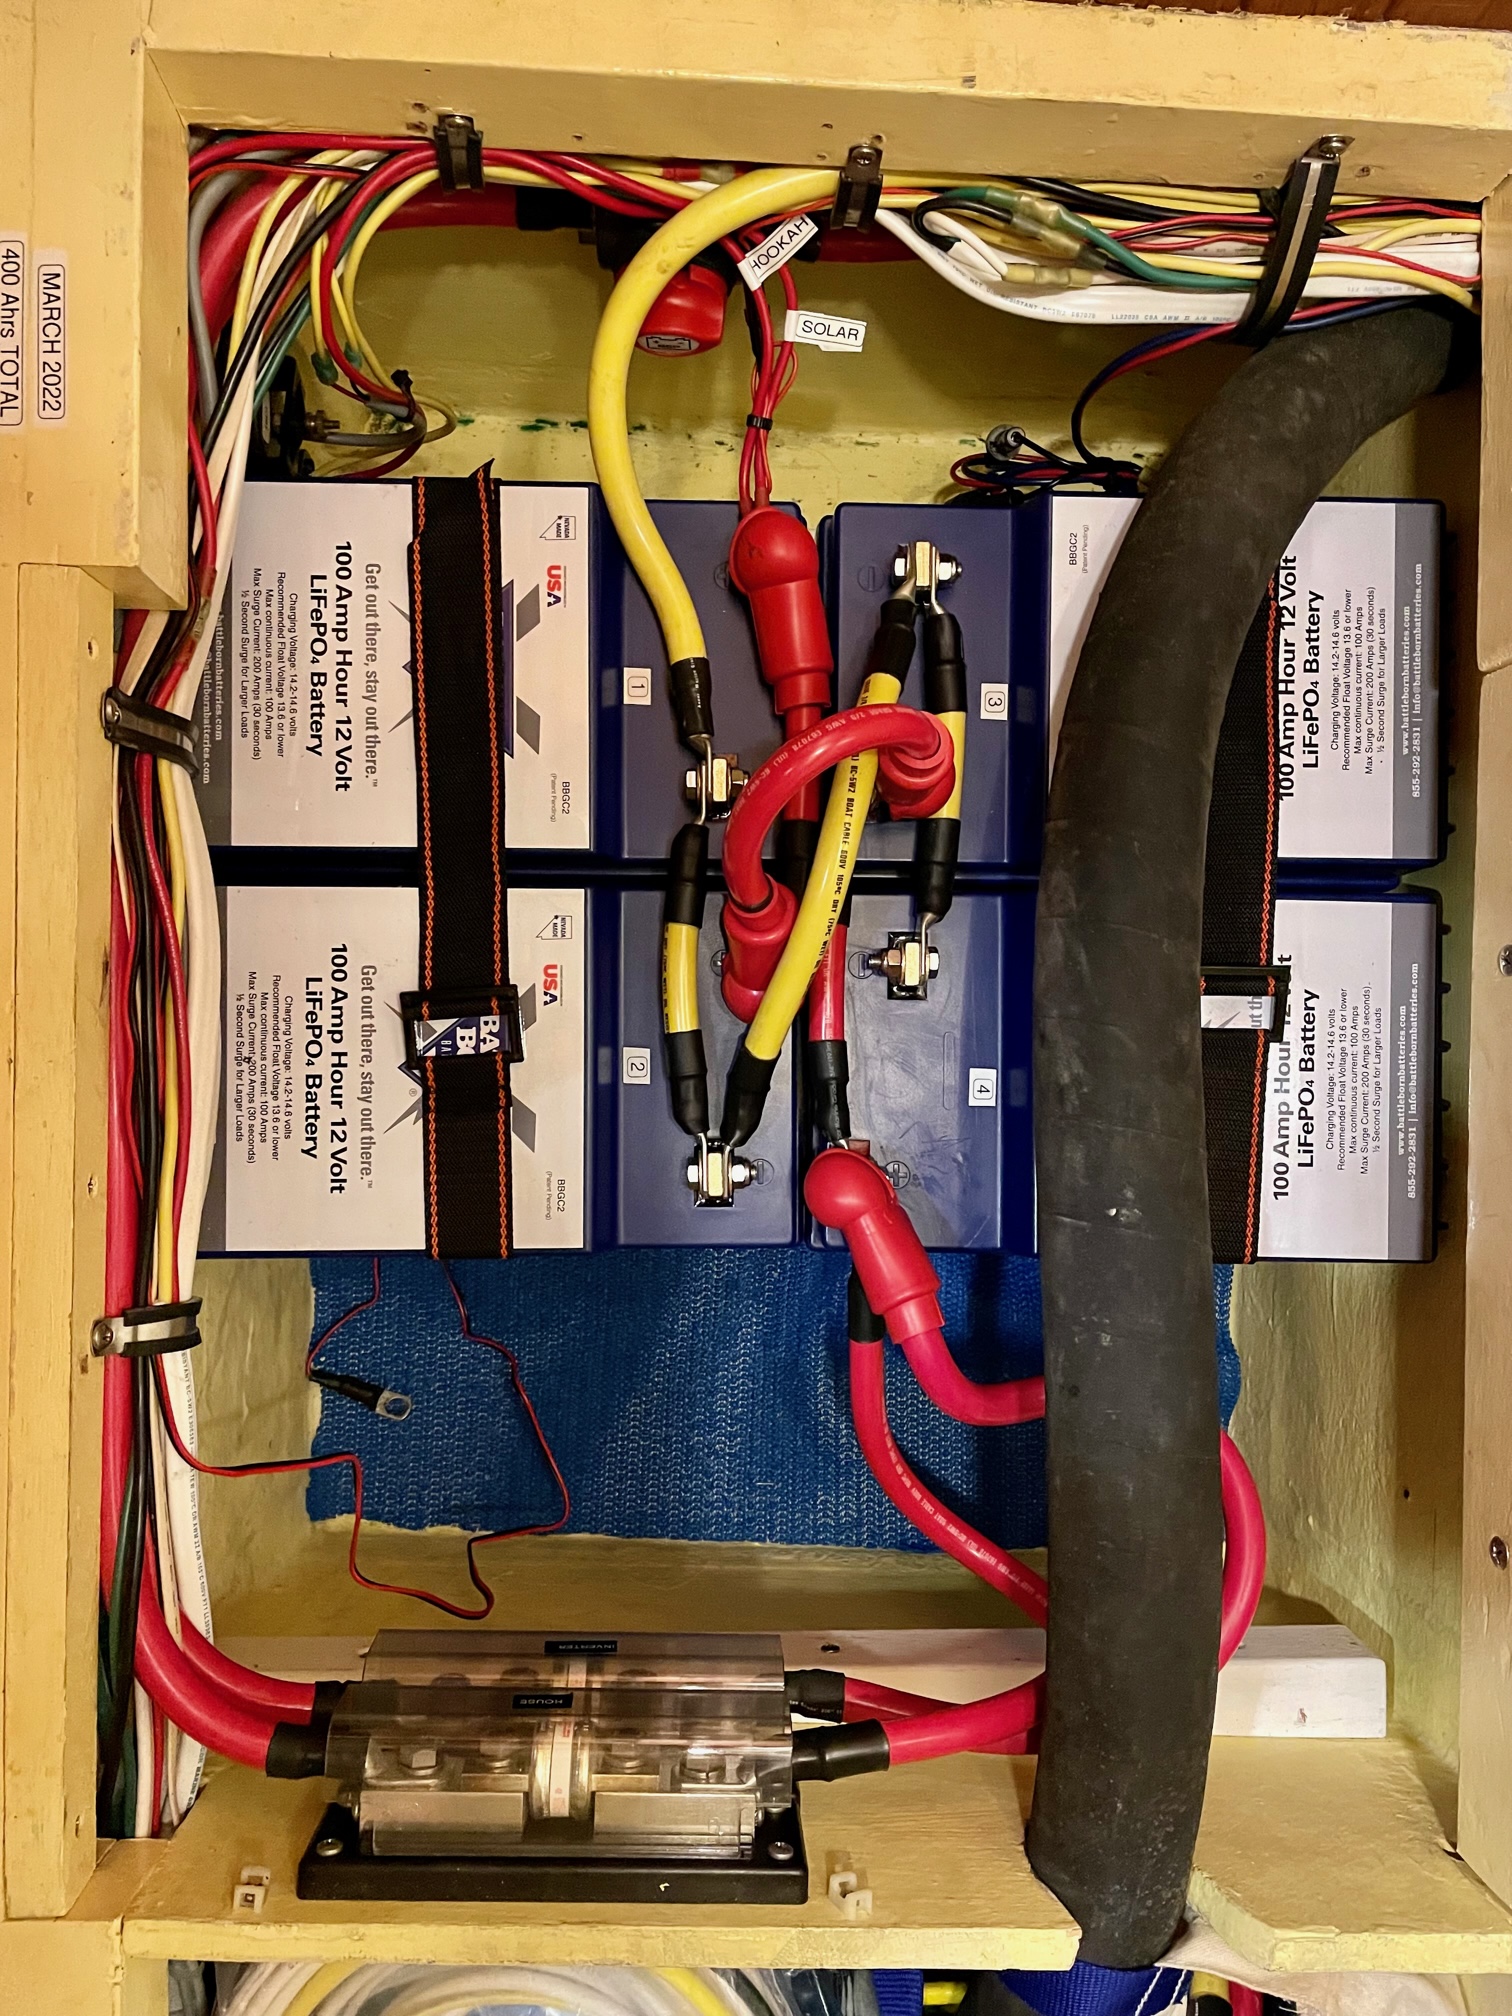
It’s important to make sure each battery in the bank has the same length of wire from its positive and negative terminals. The 4 short wires that connect battery 1 to battery 2, and battery 3 to battery 4 are all the same length. The 2 wires used to parallel battery 2 and 3 are also equal length (even though the distance for the red positive is half the distance for the yellow negative). Choosing the negative to come off battery 1 and the positive to come off battery 4 ensures each of the 4 batteries have the same length of wire between it and the charger. This is important so that each battery charges and discharges equally and they wear evenly. There is just enough room for 1 more battery in the box (the box is not rectangular and the distance from left to right in the picture gets smaller towards the bottom) so I’m thinking of increasing the bank to 500 AHrs. This should be done within about 6 months while the batteries are still fresh, so I will decide after a few cruises if I want another 100 AHrs.
400 AHr BattleBorn LiFePO
With the new Lithium batteries in place, the final thing to do was reprogram the system for a 400 AHr LiFePO4 bank and rotate the switch on the Solar controller for LiFePO4.
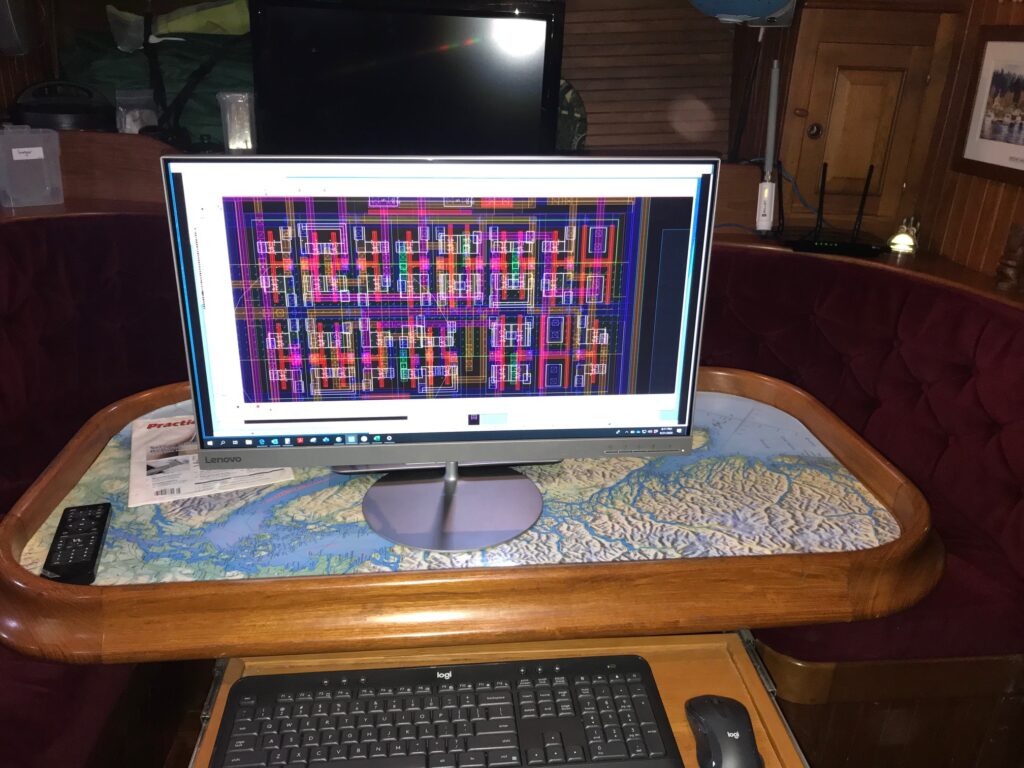
Programming
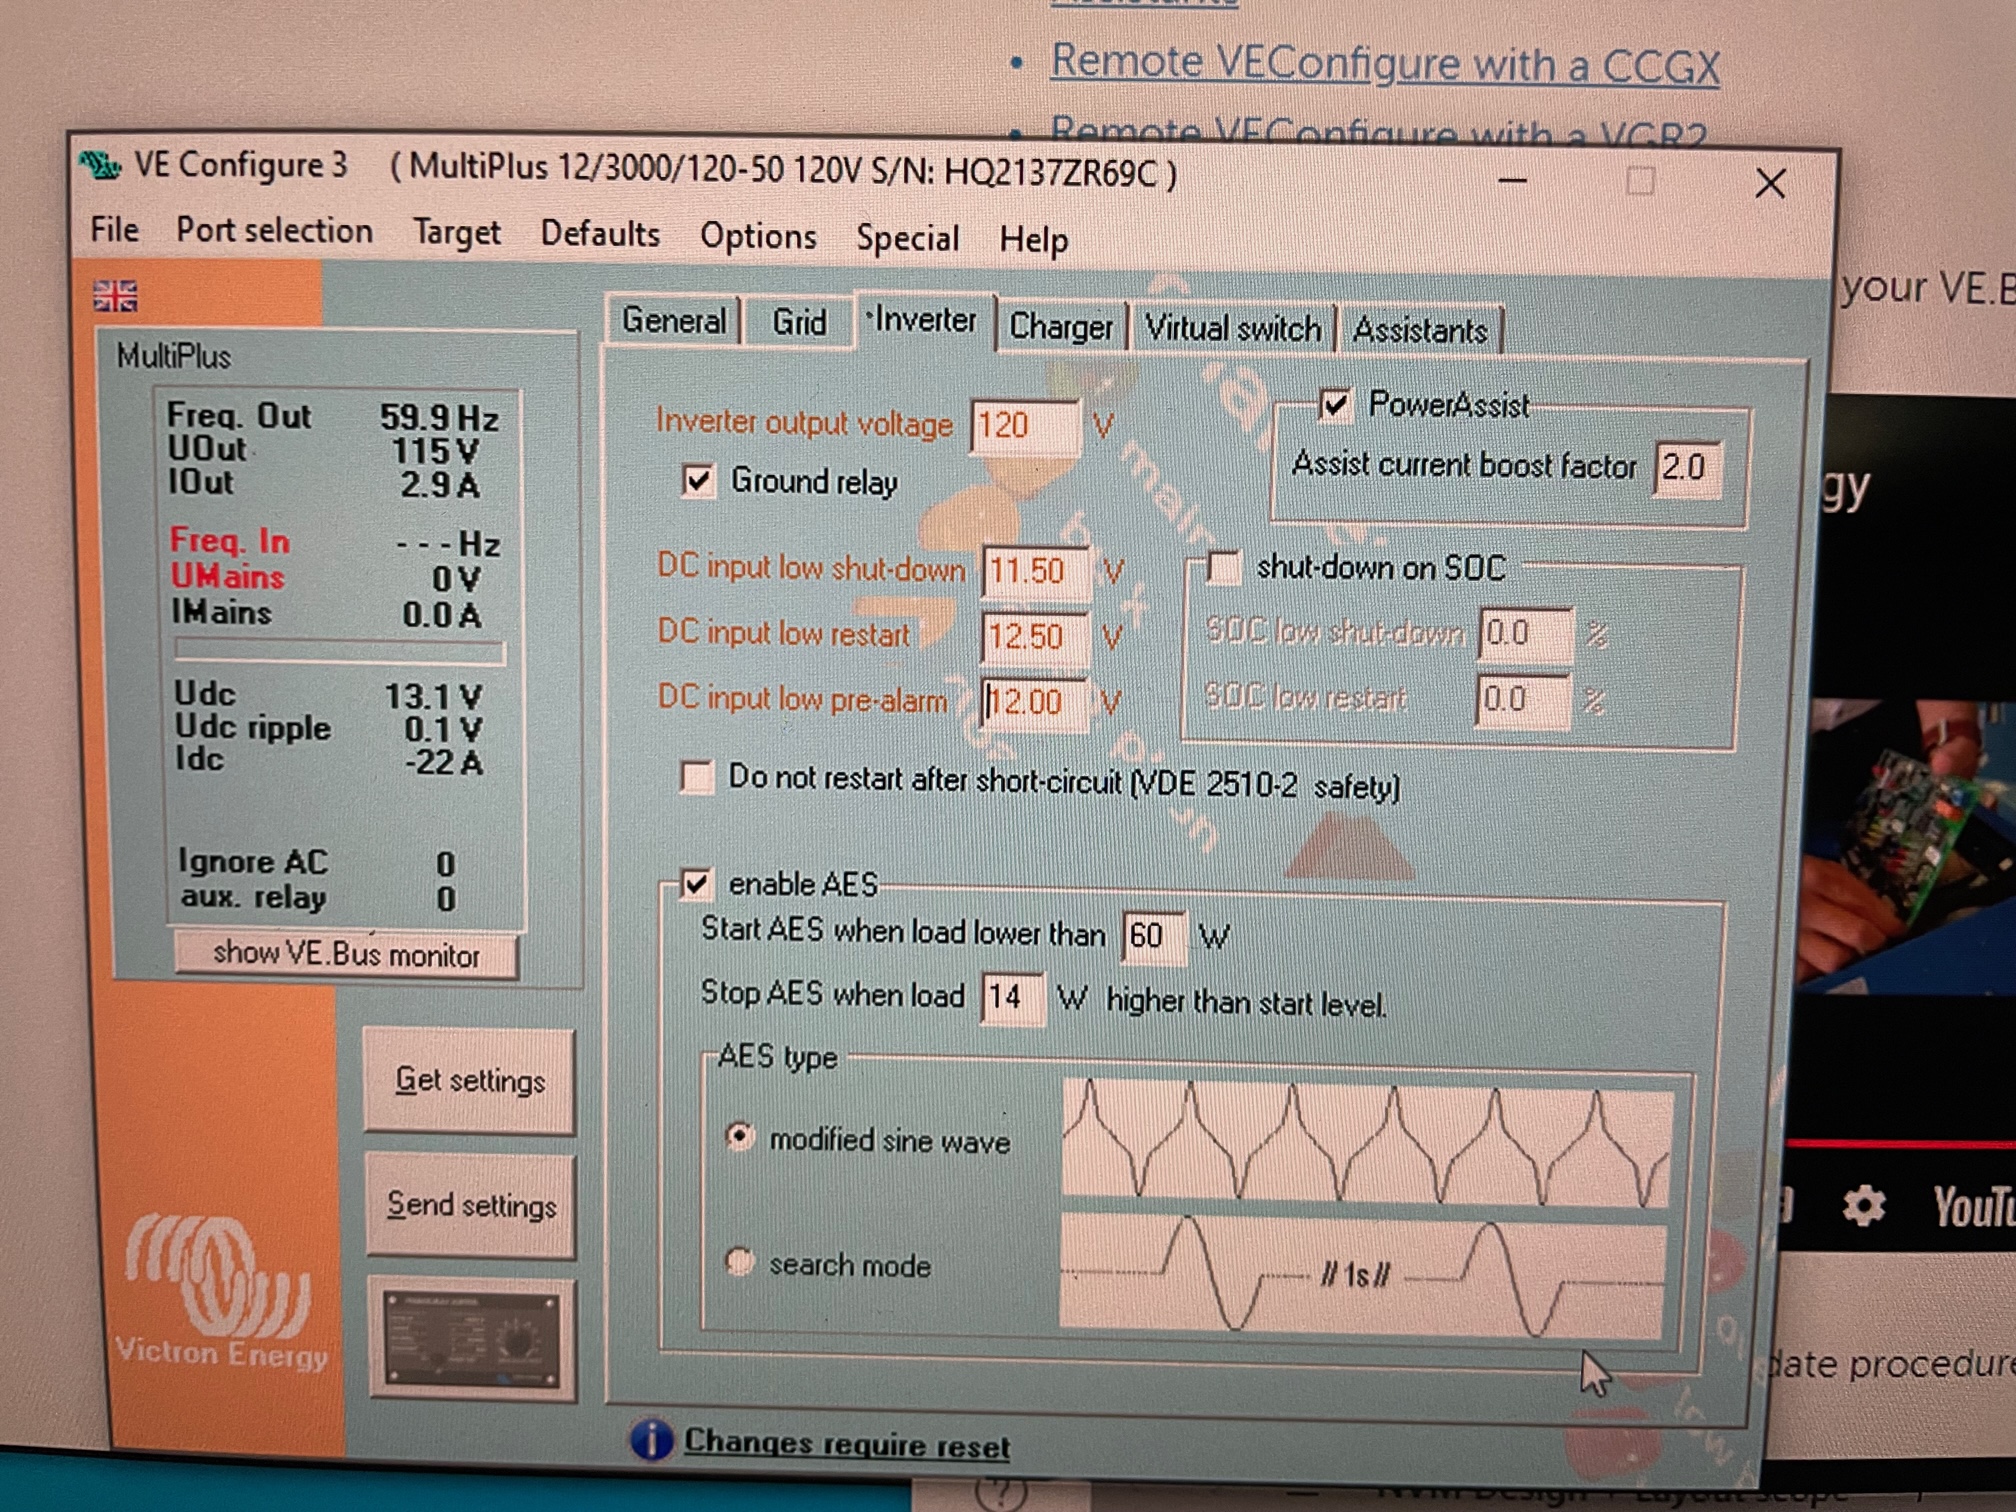
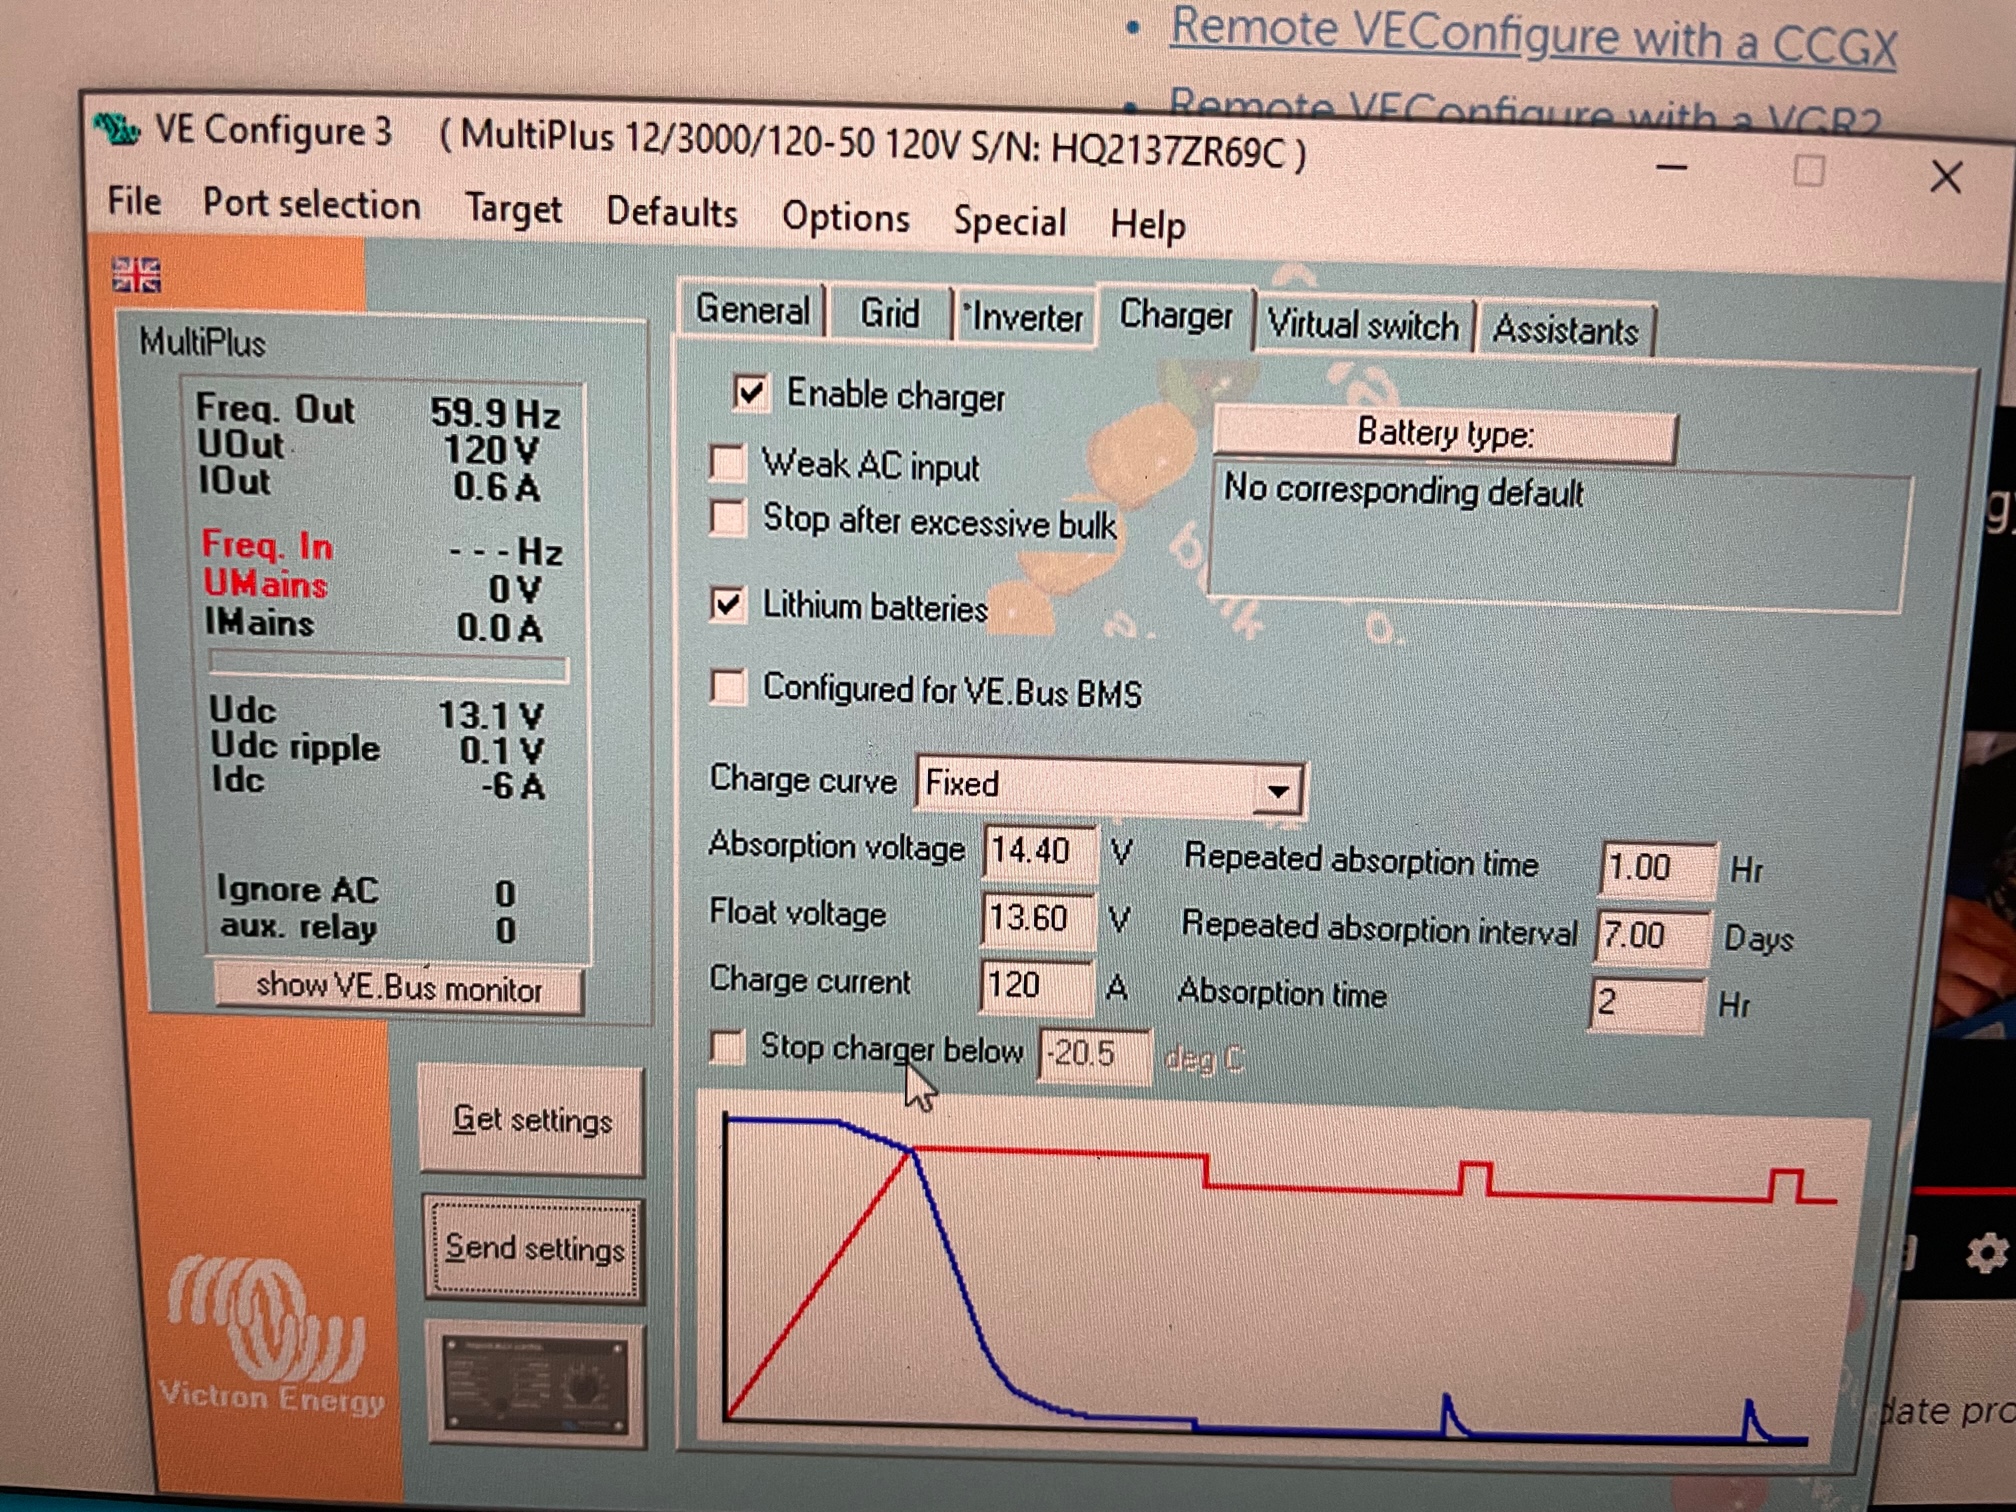
There are a few ways to program the system. For battery type, it requires a Victron program called VE Configure (runs only on a Windows machine) and a special cable called MK3 that connects a PC USB port to an RJ45 Ethernet port on the Inverter/Charger. In the “Charger” tab, I input LiFePO4 as battery type and supplied specific numbers for my BattleBorn batteries. In the “Inverter” tab, I configured the AC output voltage and shutdown/restart numbers and enabled AES mode where it reduces power by outputting a modified sin wave when very little load (less than 60W) is detected. There’s also a “General” tab where I set the max AC shore current allowed to 30A.
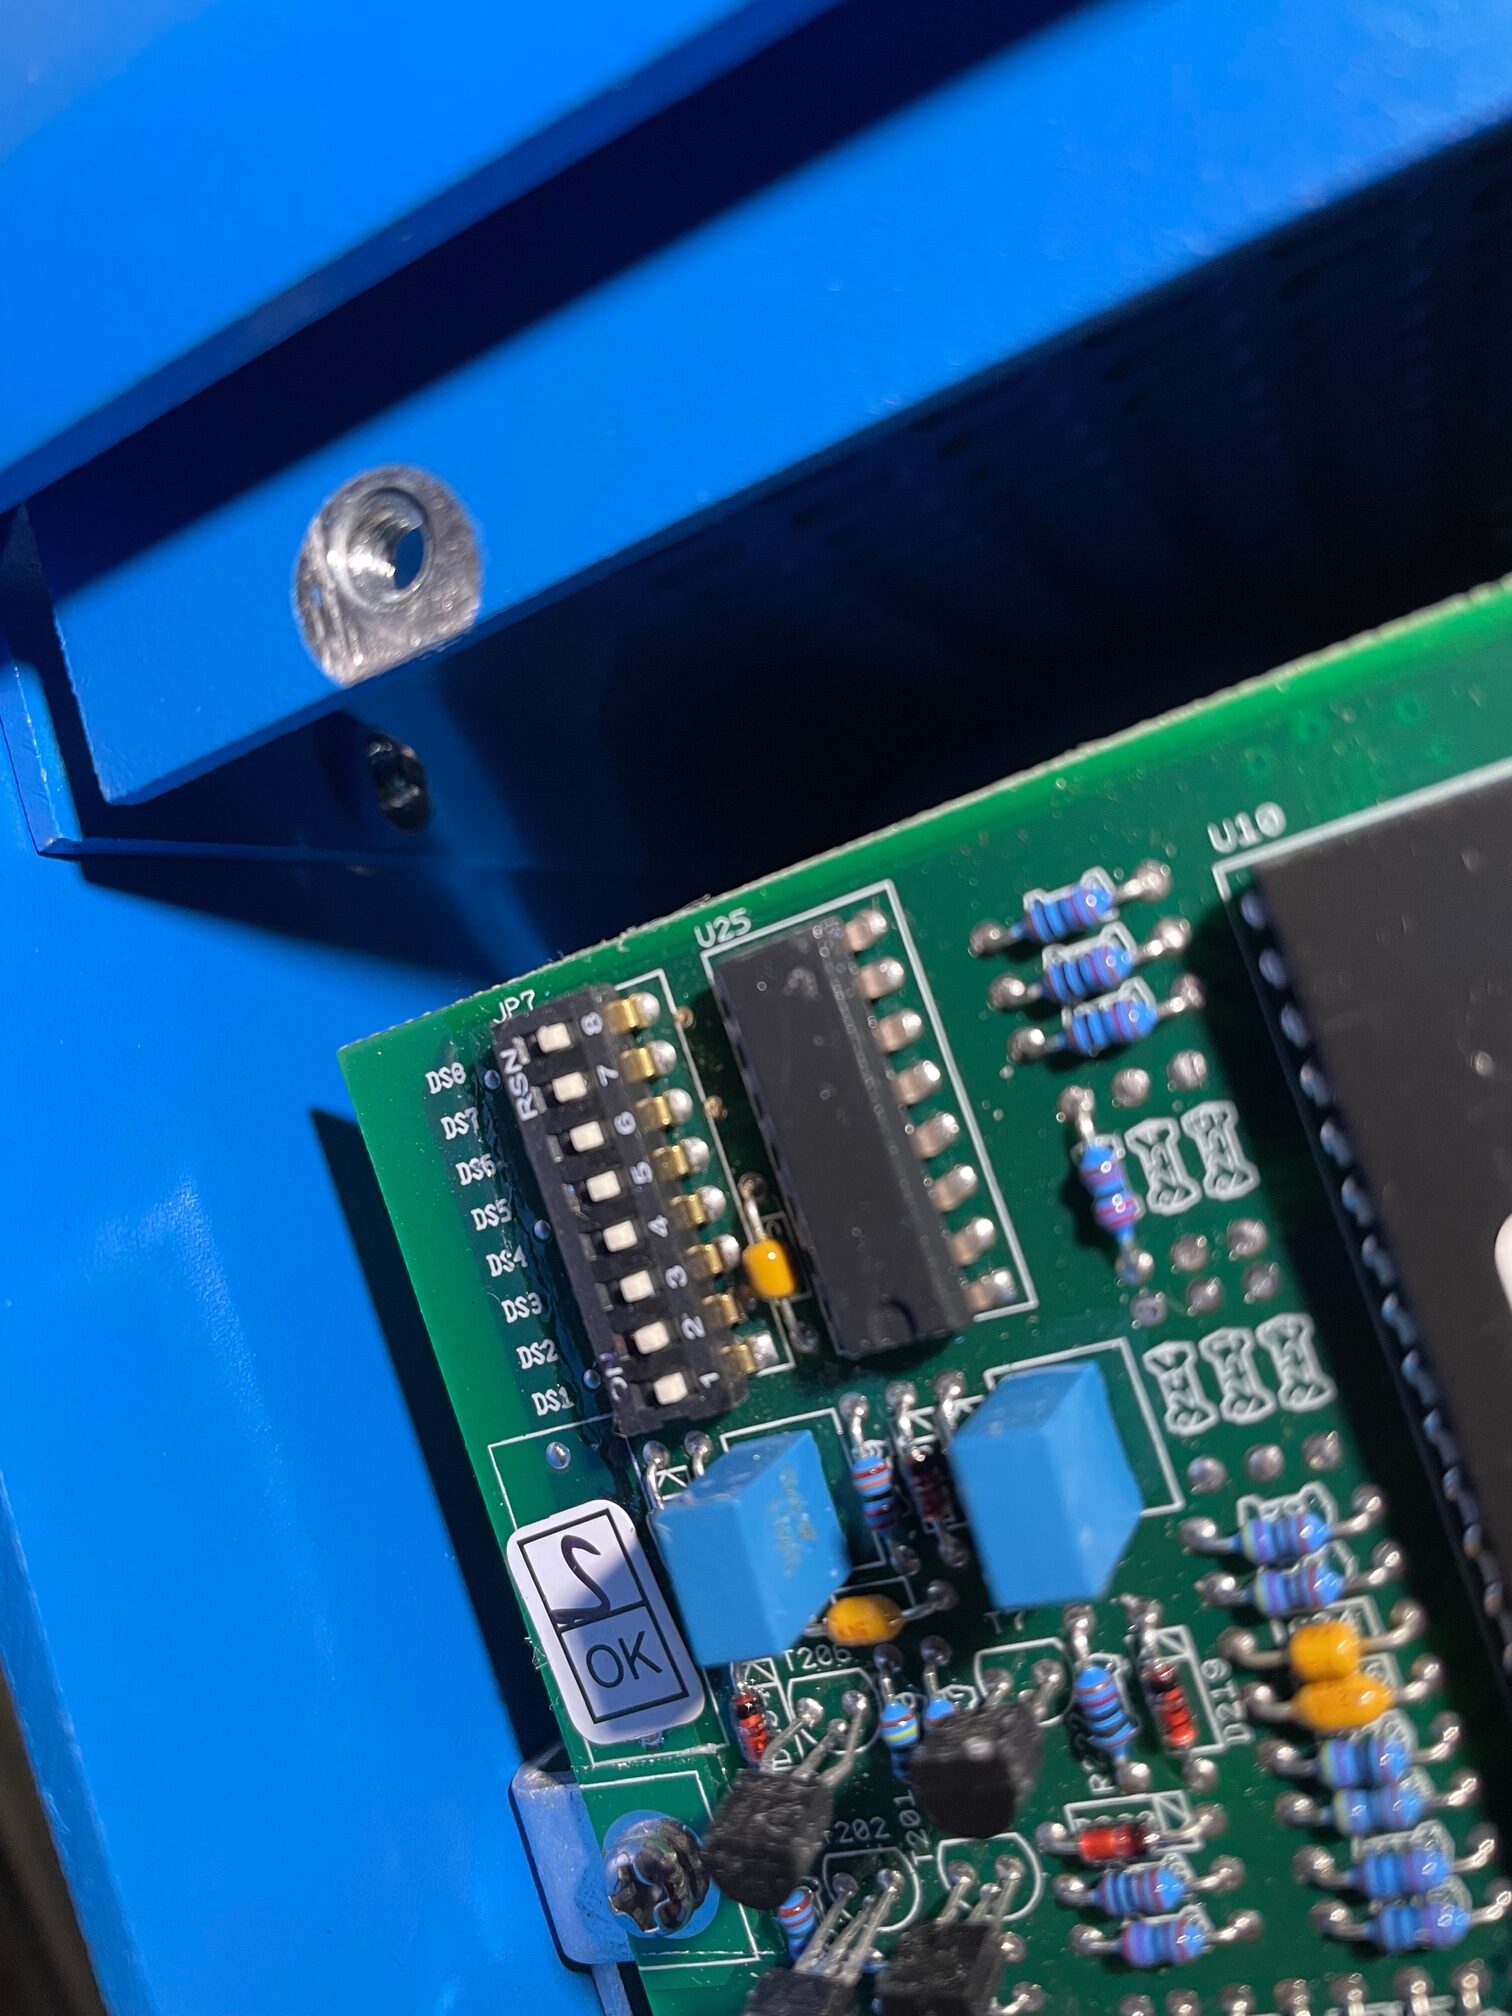
A second way to program certain things for the Inverter/Charger is with DIP switch settings. The DIP switch is located on the main circuit board in the upper left corner. The 8 switches are each used twice. Once set, an UP button programs the first set, which includes things like AC input current limit, AES, and charge level %. Then you set the switches again, and a DOWN button programs the second set without changing the first set. The second switch settings are for things like AC output voltage and frequency choices.
A third way to program the system is using the touch pad that’s connected to the Cerbo GX. This is by far the easiest method for programming since it doesn’t involve a PC or require access to the Inverter/Charger. Here is where I set the batter bank size to 400AHrs. The AC input current limit can also be set here as long as an over-ride setting was set in the VE Configure program.
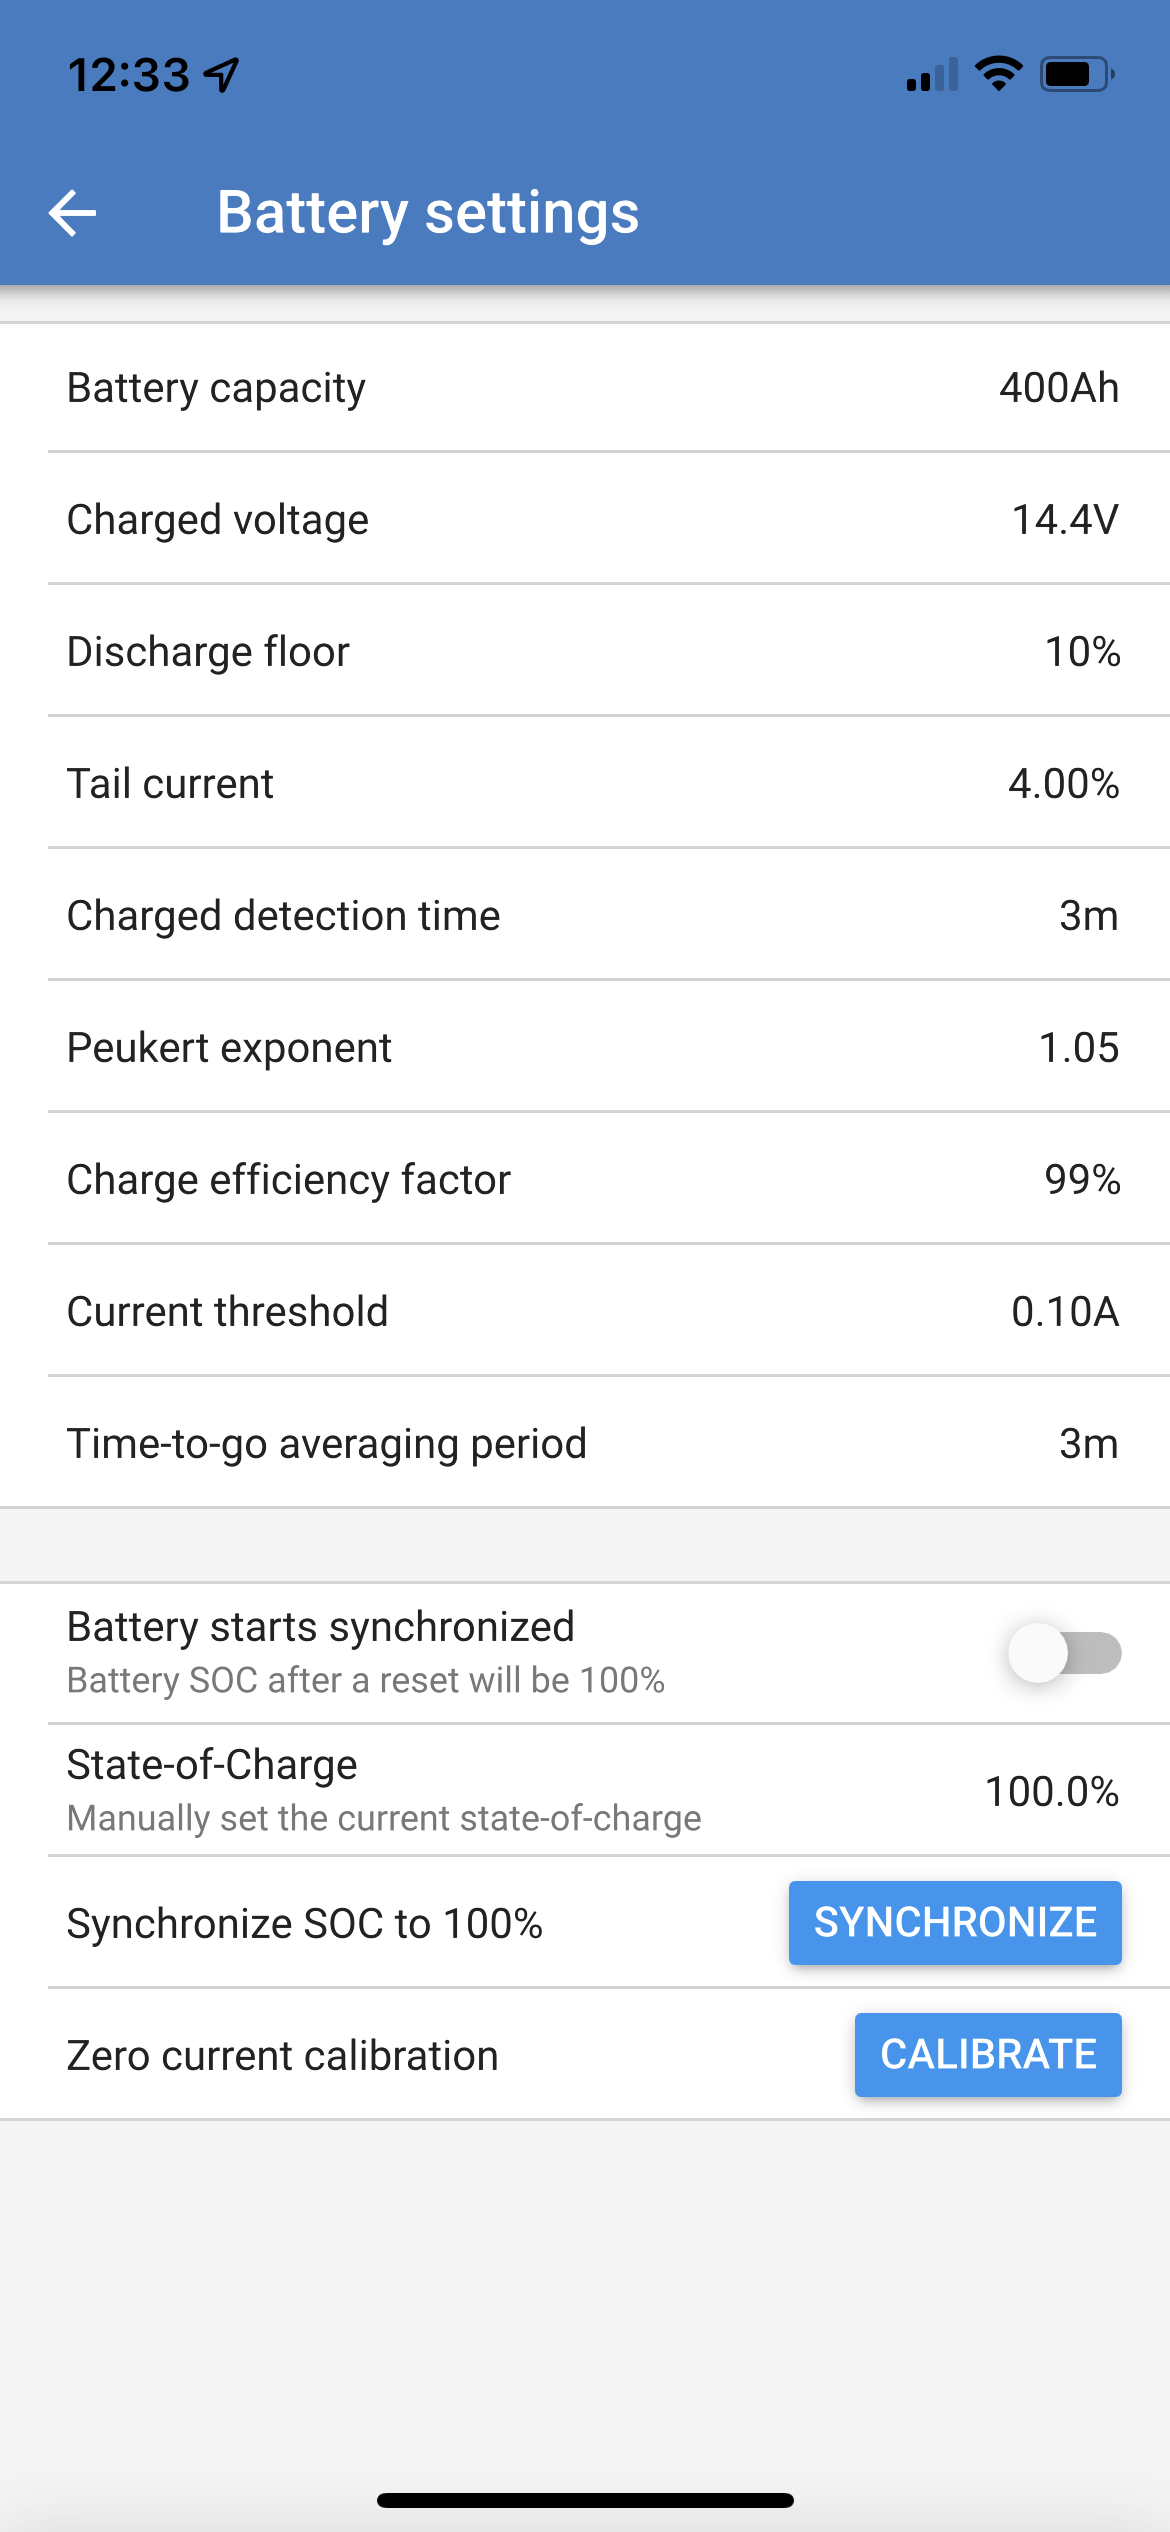
Here are the program settings for the SmartShunt (these are set in the VictronConnect app):
I had to do a lot of research to figure out the 3 programming methods and understand what each one could do. I’m hoping that Victron will simplify the programming into a single method that doesn’t require the special cable and PC program.
Next Steps
I will try out the system as-is for a few cruises and see how well it performs. Here are some enhancements I’m considering, in order of priority:
Add another 100 AHr battery for a total of 500 AHrs.
Move the alternator from charging the starter bank to the Lithium house bank.
Add a protection device to the alternator to keep diodes from blowing in case the internal BMS shuts off the LiFePO4 batteries while the engine is running.
Add a DC/DC charger from the house bank to the starter battery.
Change the alternator from 110A to 170A to take advantage of faster charge times while motoring (will require a serpentine belt conversion kit)
Update
I used the system as described above for a year–the alternator connected to the AGM start battery, DC-DC converter charging the Lithium house batteries at 30A, solar panel controller charging Lithium house batteries, and Inverter/Charger connected to Lithium house batteries for dock charging. This worked well, but the weakness was that when motoring, only 30A was available for charging the house batteries. One of the advantages of switching to Lithium is faster rate of charging away from the dock, but I was limiting that to 30A. Worst case I would need to run the engine longer to charge the house bank, especially on cloudy days when I wasn’t getting much solar charging.
Changes I made for the 2nd season are as follows:
Rewired alternator output from start battery to Lithium house batteries
Added an Alternator Protection Module (Balmar ATM) to protect the alternator in case the Lithium batteries shut down
Reversed the DC-DC converter from start battery–>house battery to house battery–>start battery
Replaced the Balmar alternator regulator with the newer Balmar MC-618. Programmed it for Lithium profile.
These changes improved the system by allowing the full alternator current to charge the lithiums. To keep the alternator from working too hard, I derated the output by 15% to produce about 95A of current for charging the lithium batteries. Now running the engine for just a short time charges the batteries much quicker. On a 2 week trip to the Gulf Islands where we anchored most of the time, the house bank never dropped below 80% state of charge. Of course it’s a lot of motoring in the PNW during summer. The real advantage will be going offshore where battery management is more crucial.
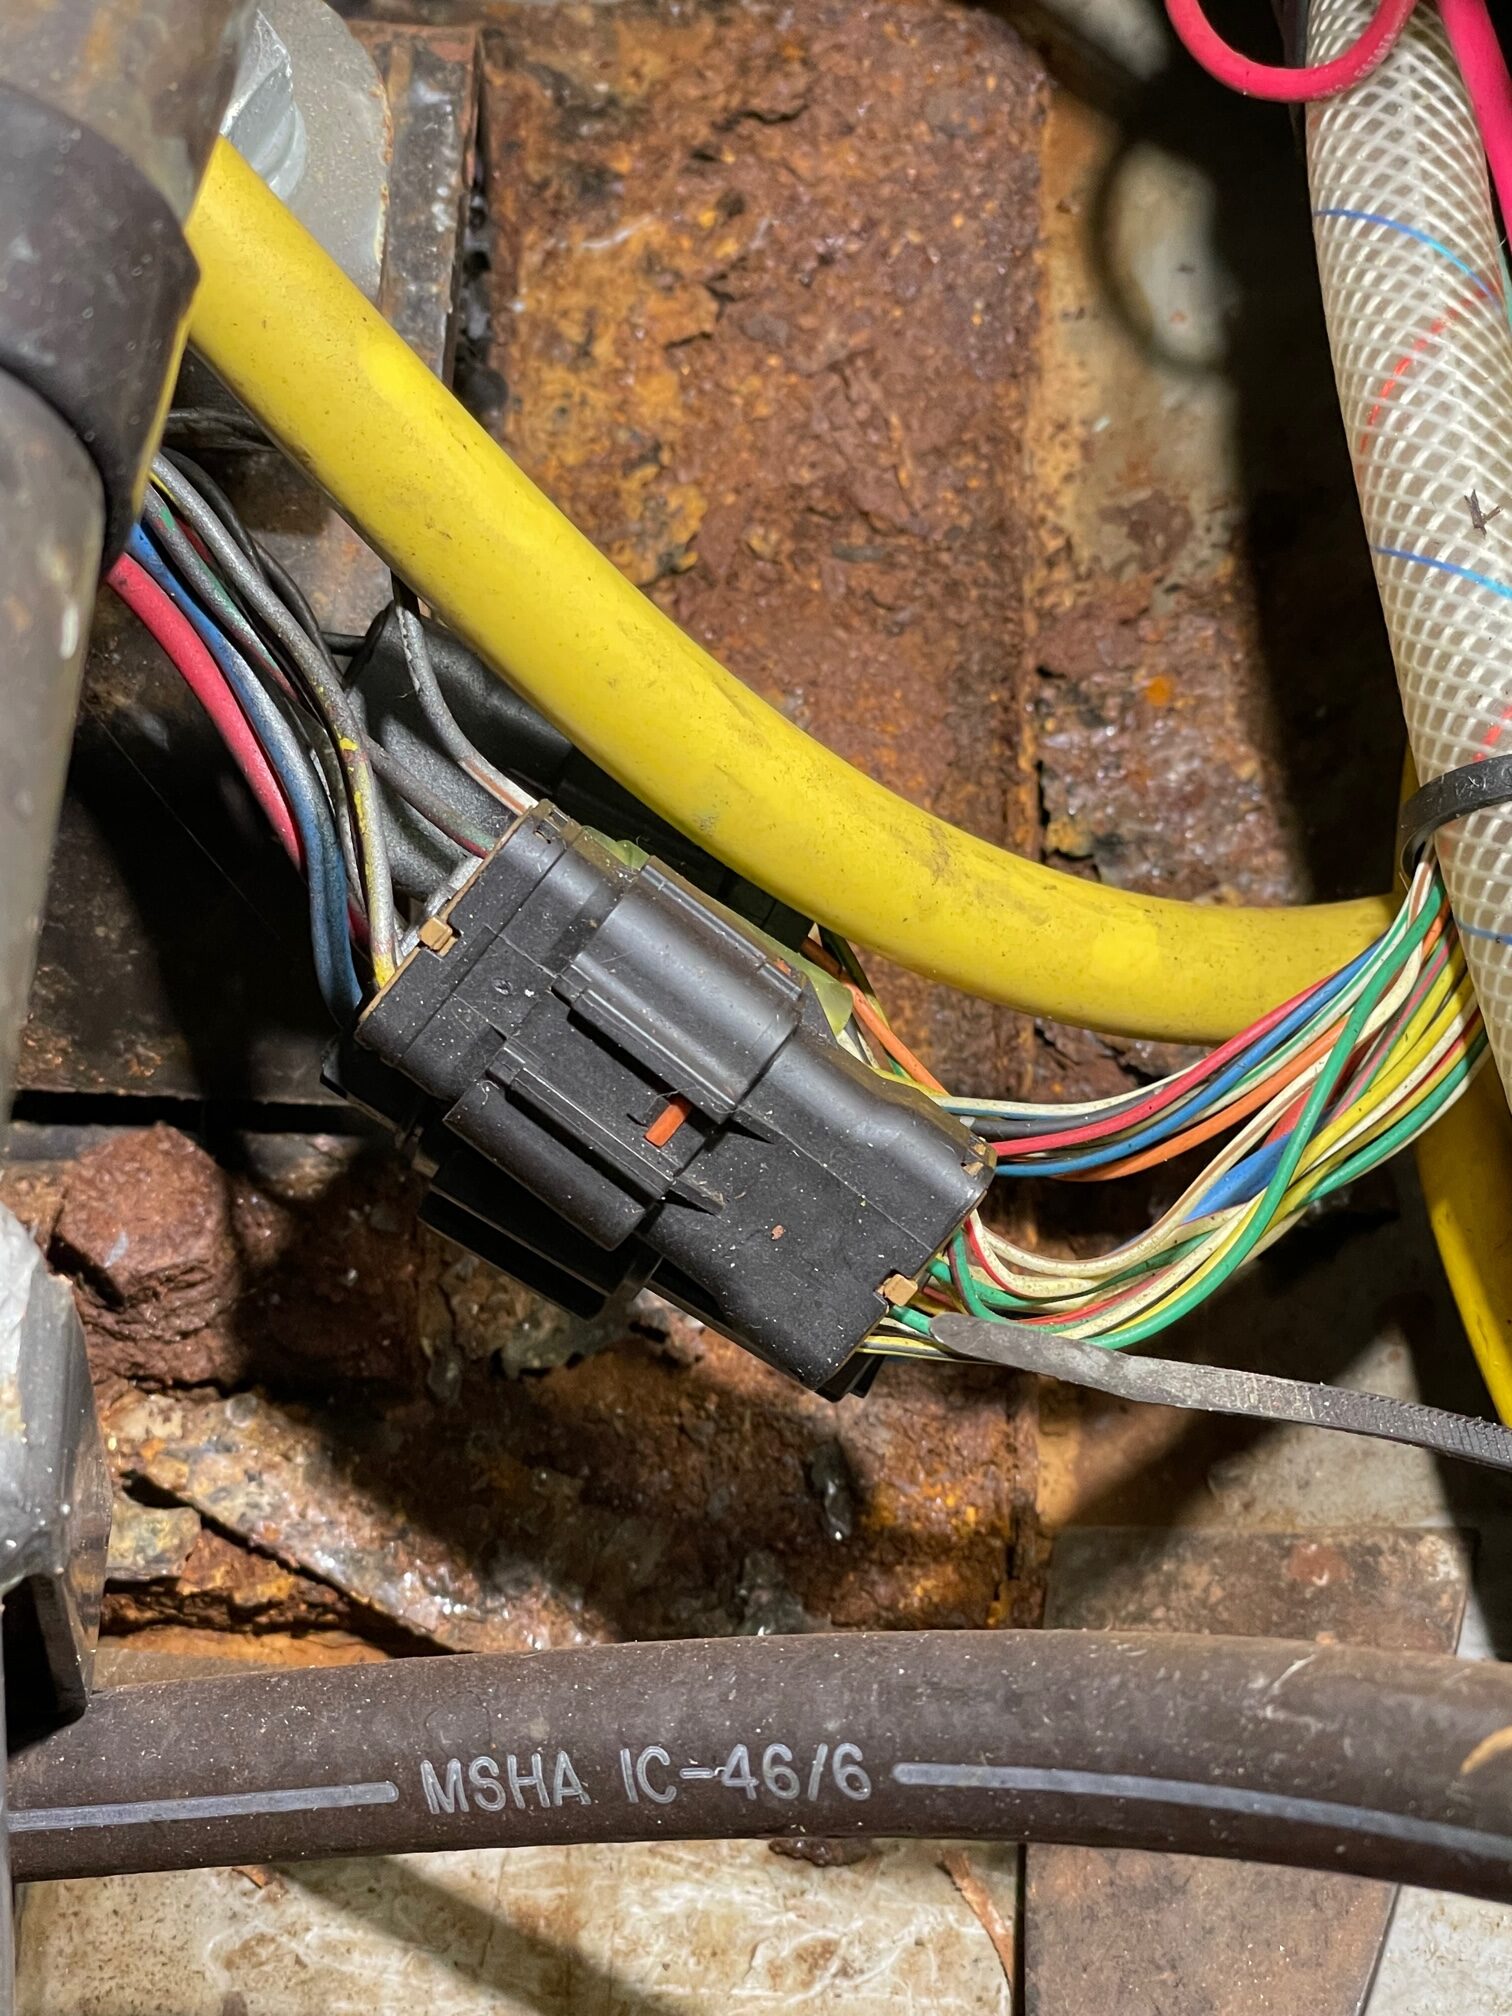
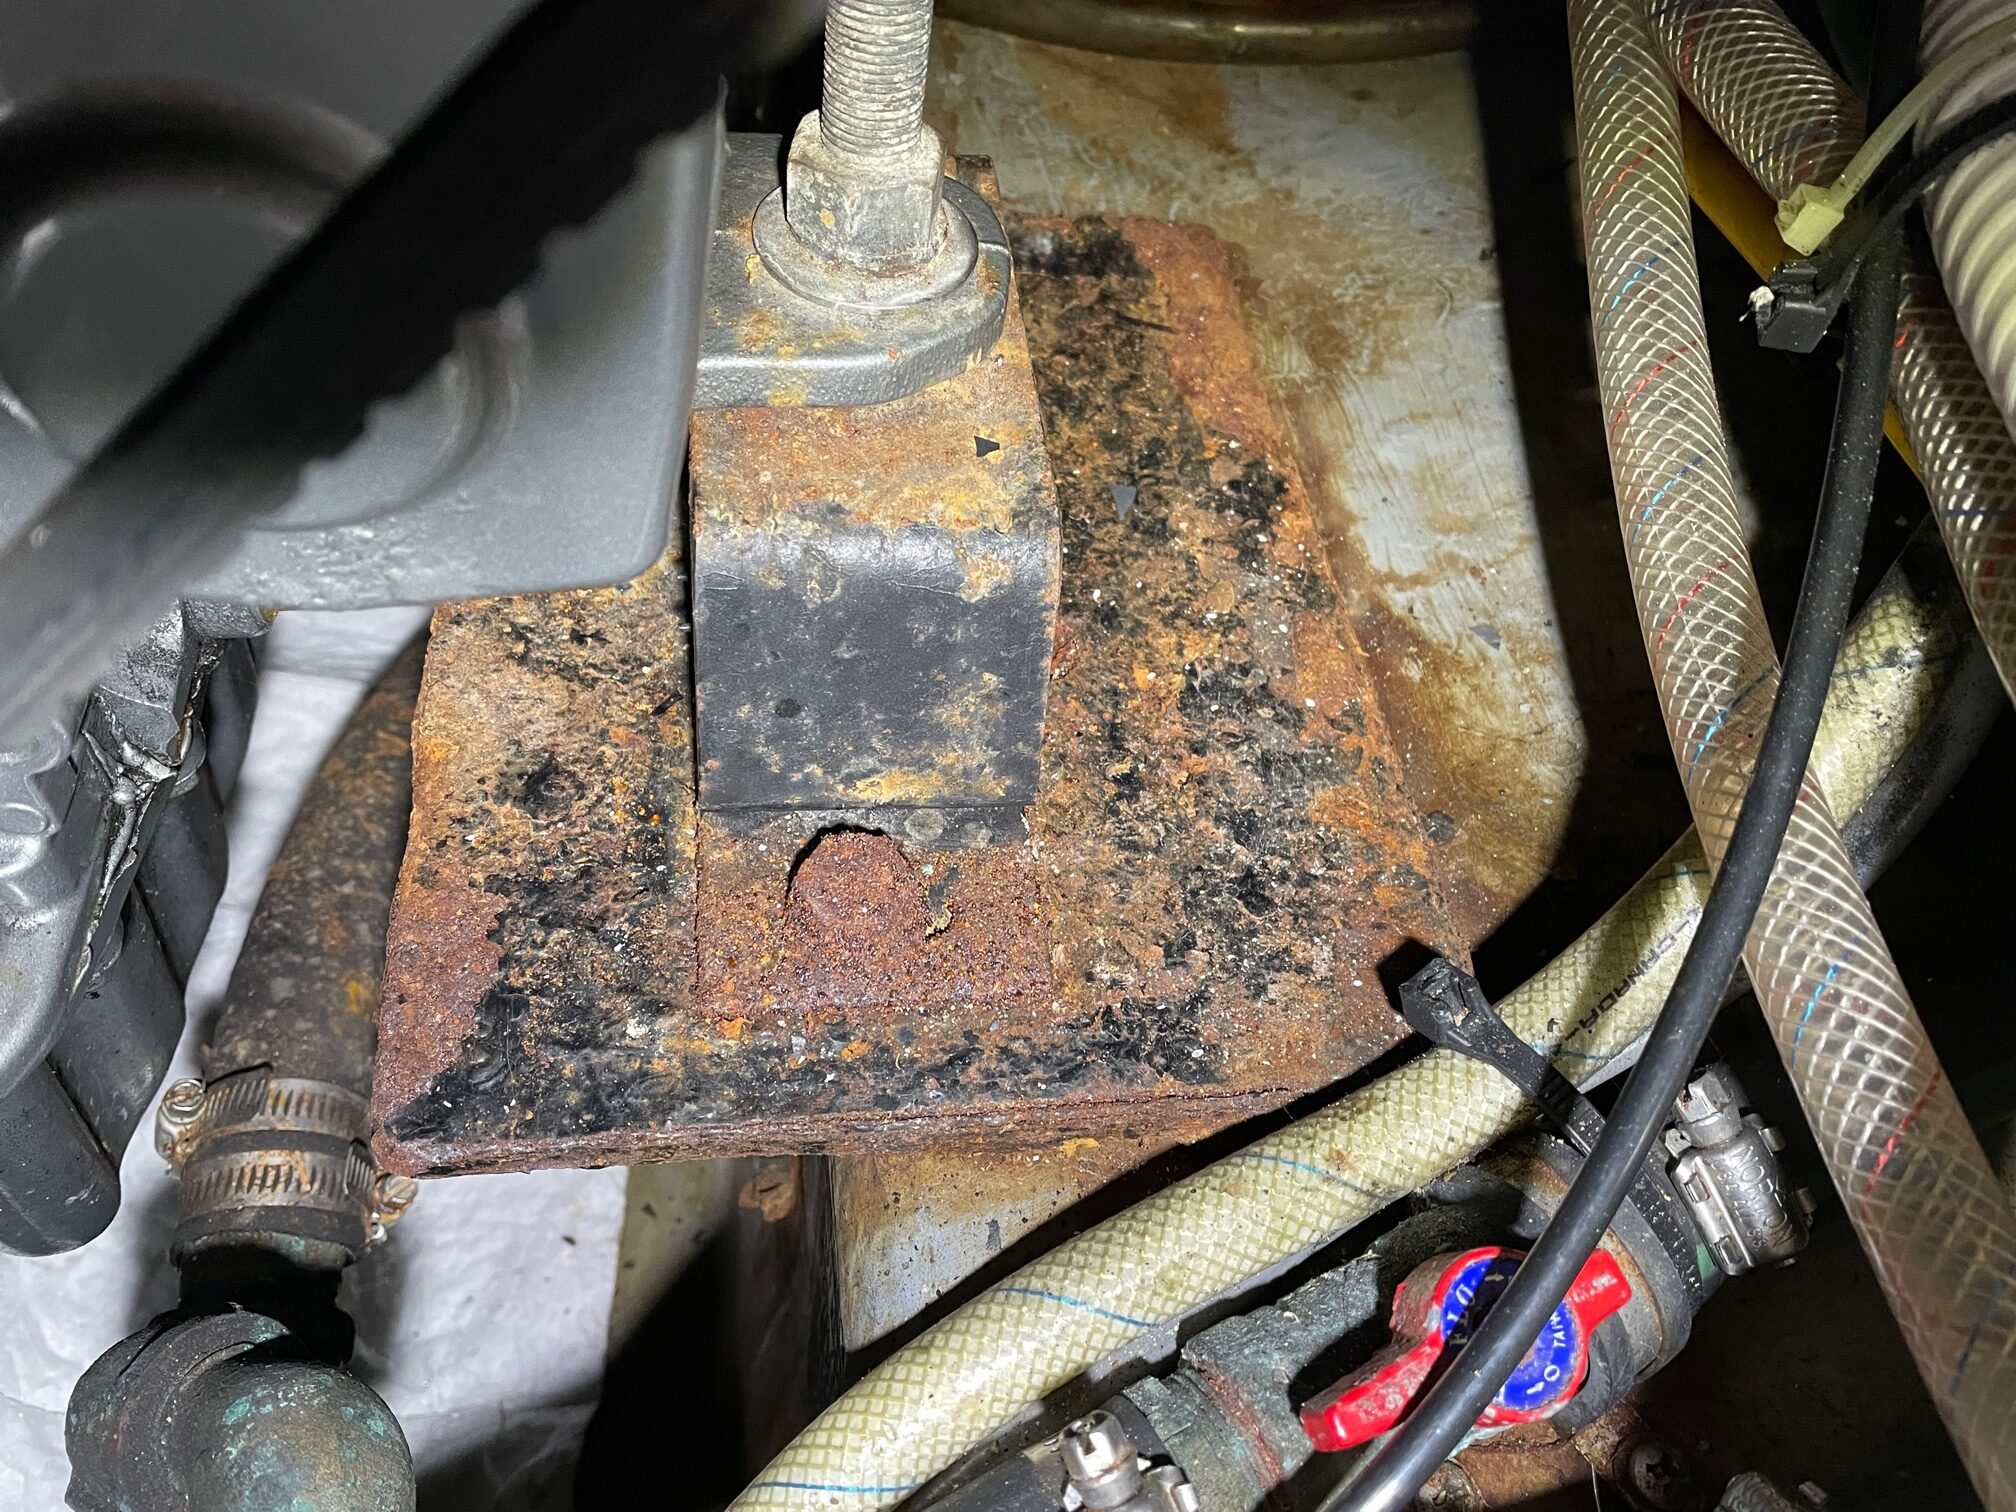
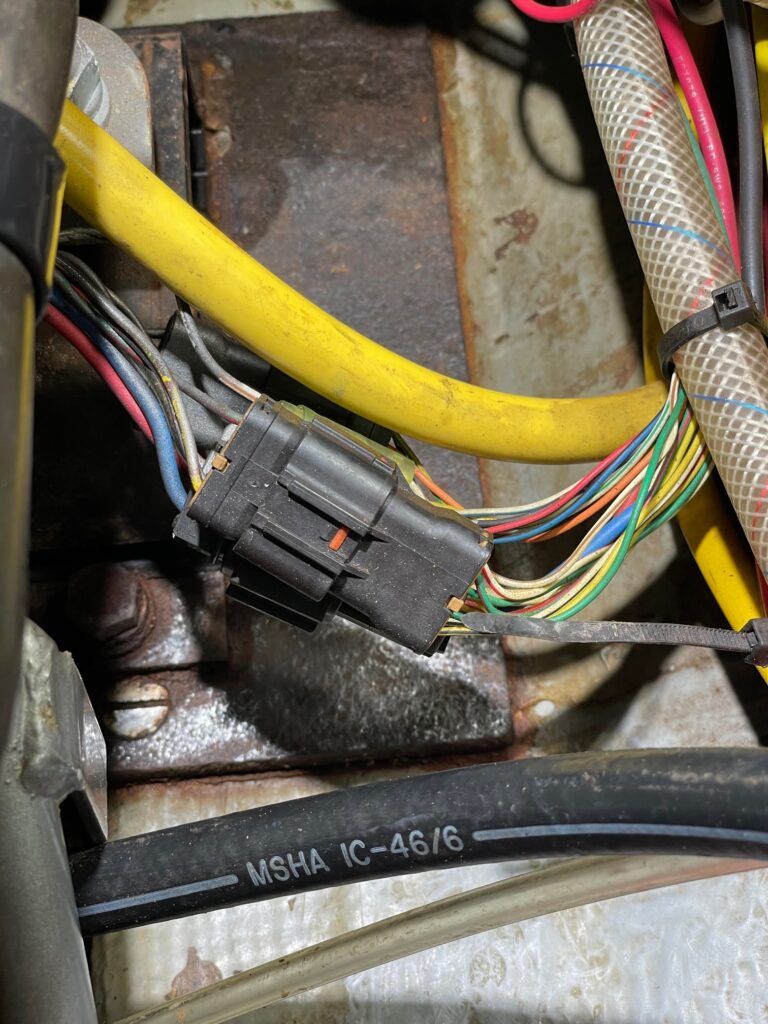
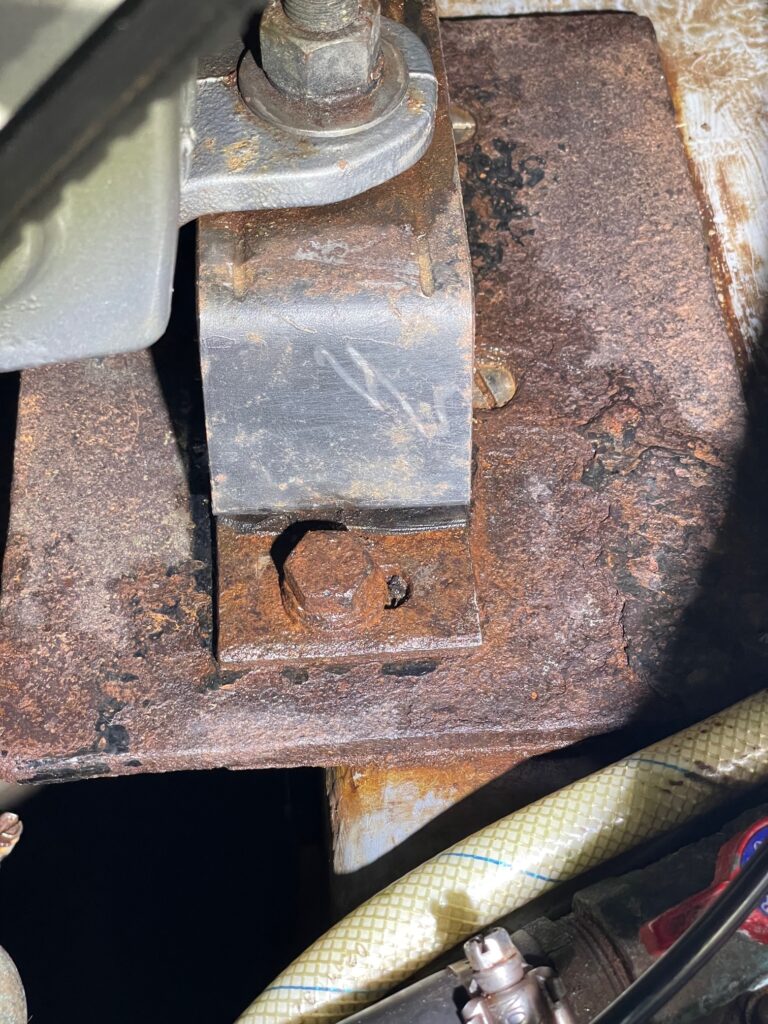
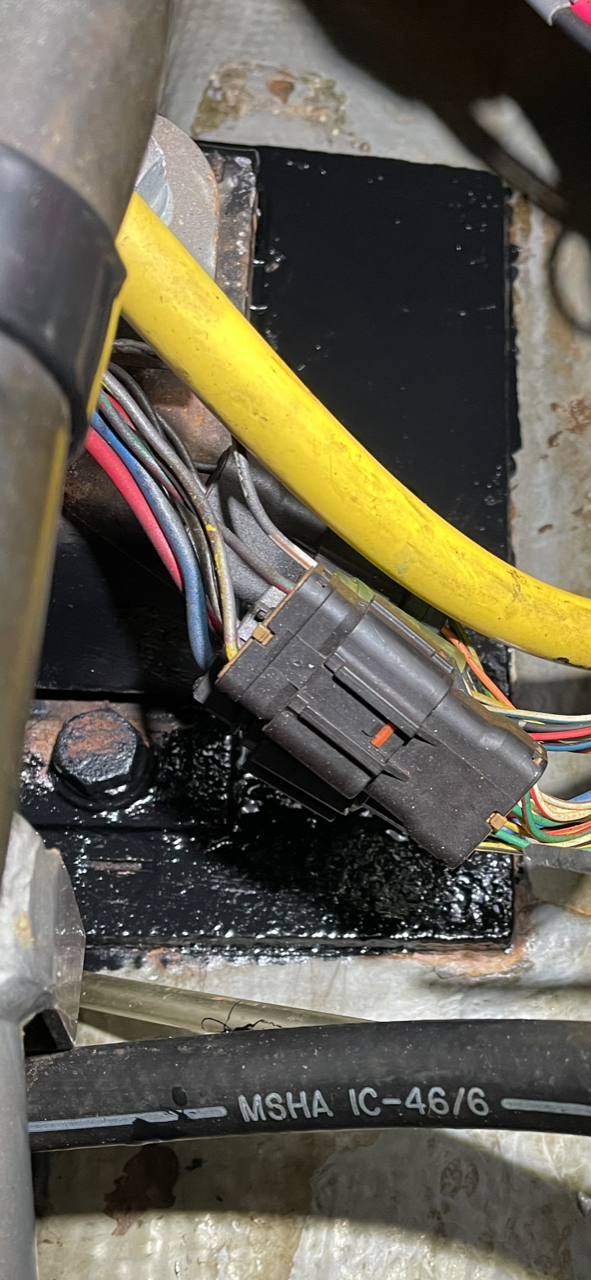
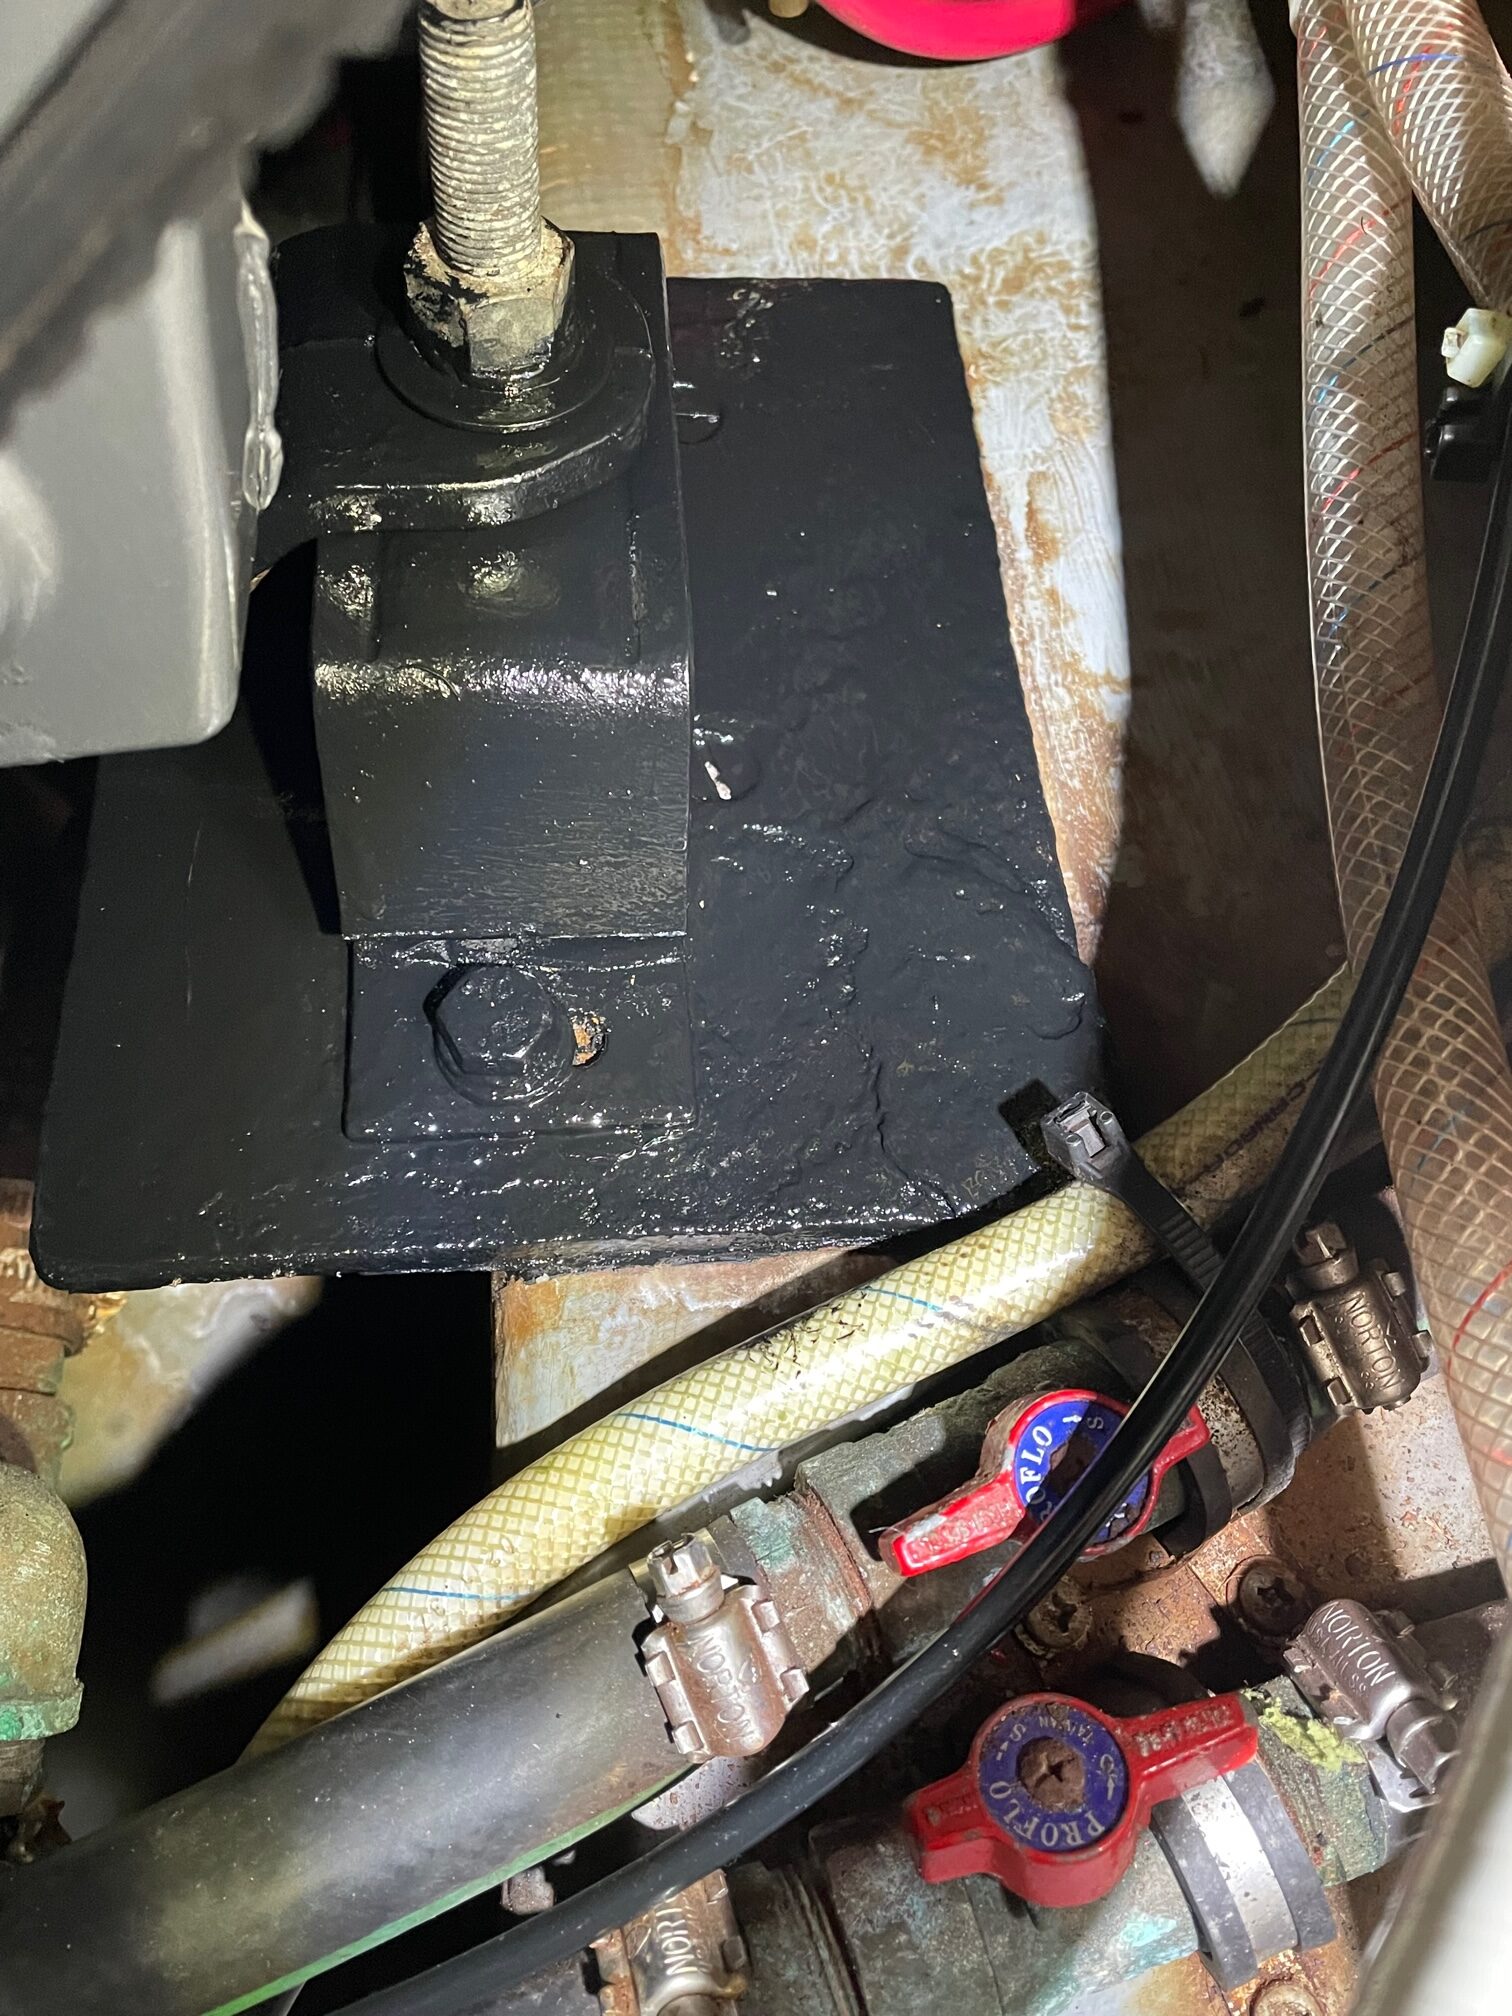
While changing the engine water pump impeller, I noticed all 4 engine mounting plates were corroded. These were newly installed during the repowering of the Yanmar 4JH3-TE in 2005, so I was hoping it was mostly surface rust and they could be cleaned up. The engine mounts are bolted to 3/8″x6″x10″ steel plates and these plates were not properly protected for the marine environment. I started with a wire brush and scraper to remove the loose stuff, then a coarse brillo-pad. At this point I realized it was just surface rust and replacement wouldn’t be necessary. Next I applied 2 coats of Ospho, which chemically seals metal and prevents rust from reoccurring by converting iron oxide (rust) to iron sulphate. Each application needed to sit 24 hours for the chemical process to complete. The final step was applying 2 coats of Rust-oleum oil base paint.
Engine Mount & Plate #1
Engine Mount & Plate #2
After Treating Plate #1 with Ospho
After Treating Plate #2 with Ospho
Plate #1 After Paint
Plate #2 After Paint
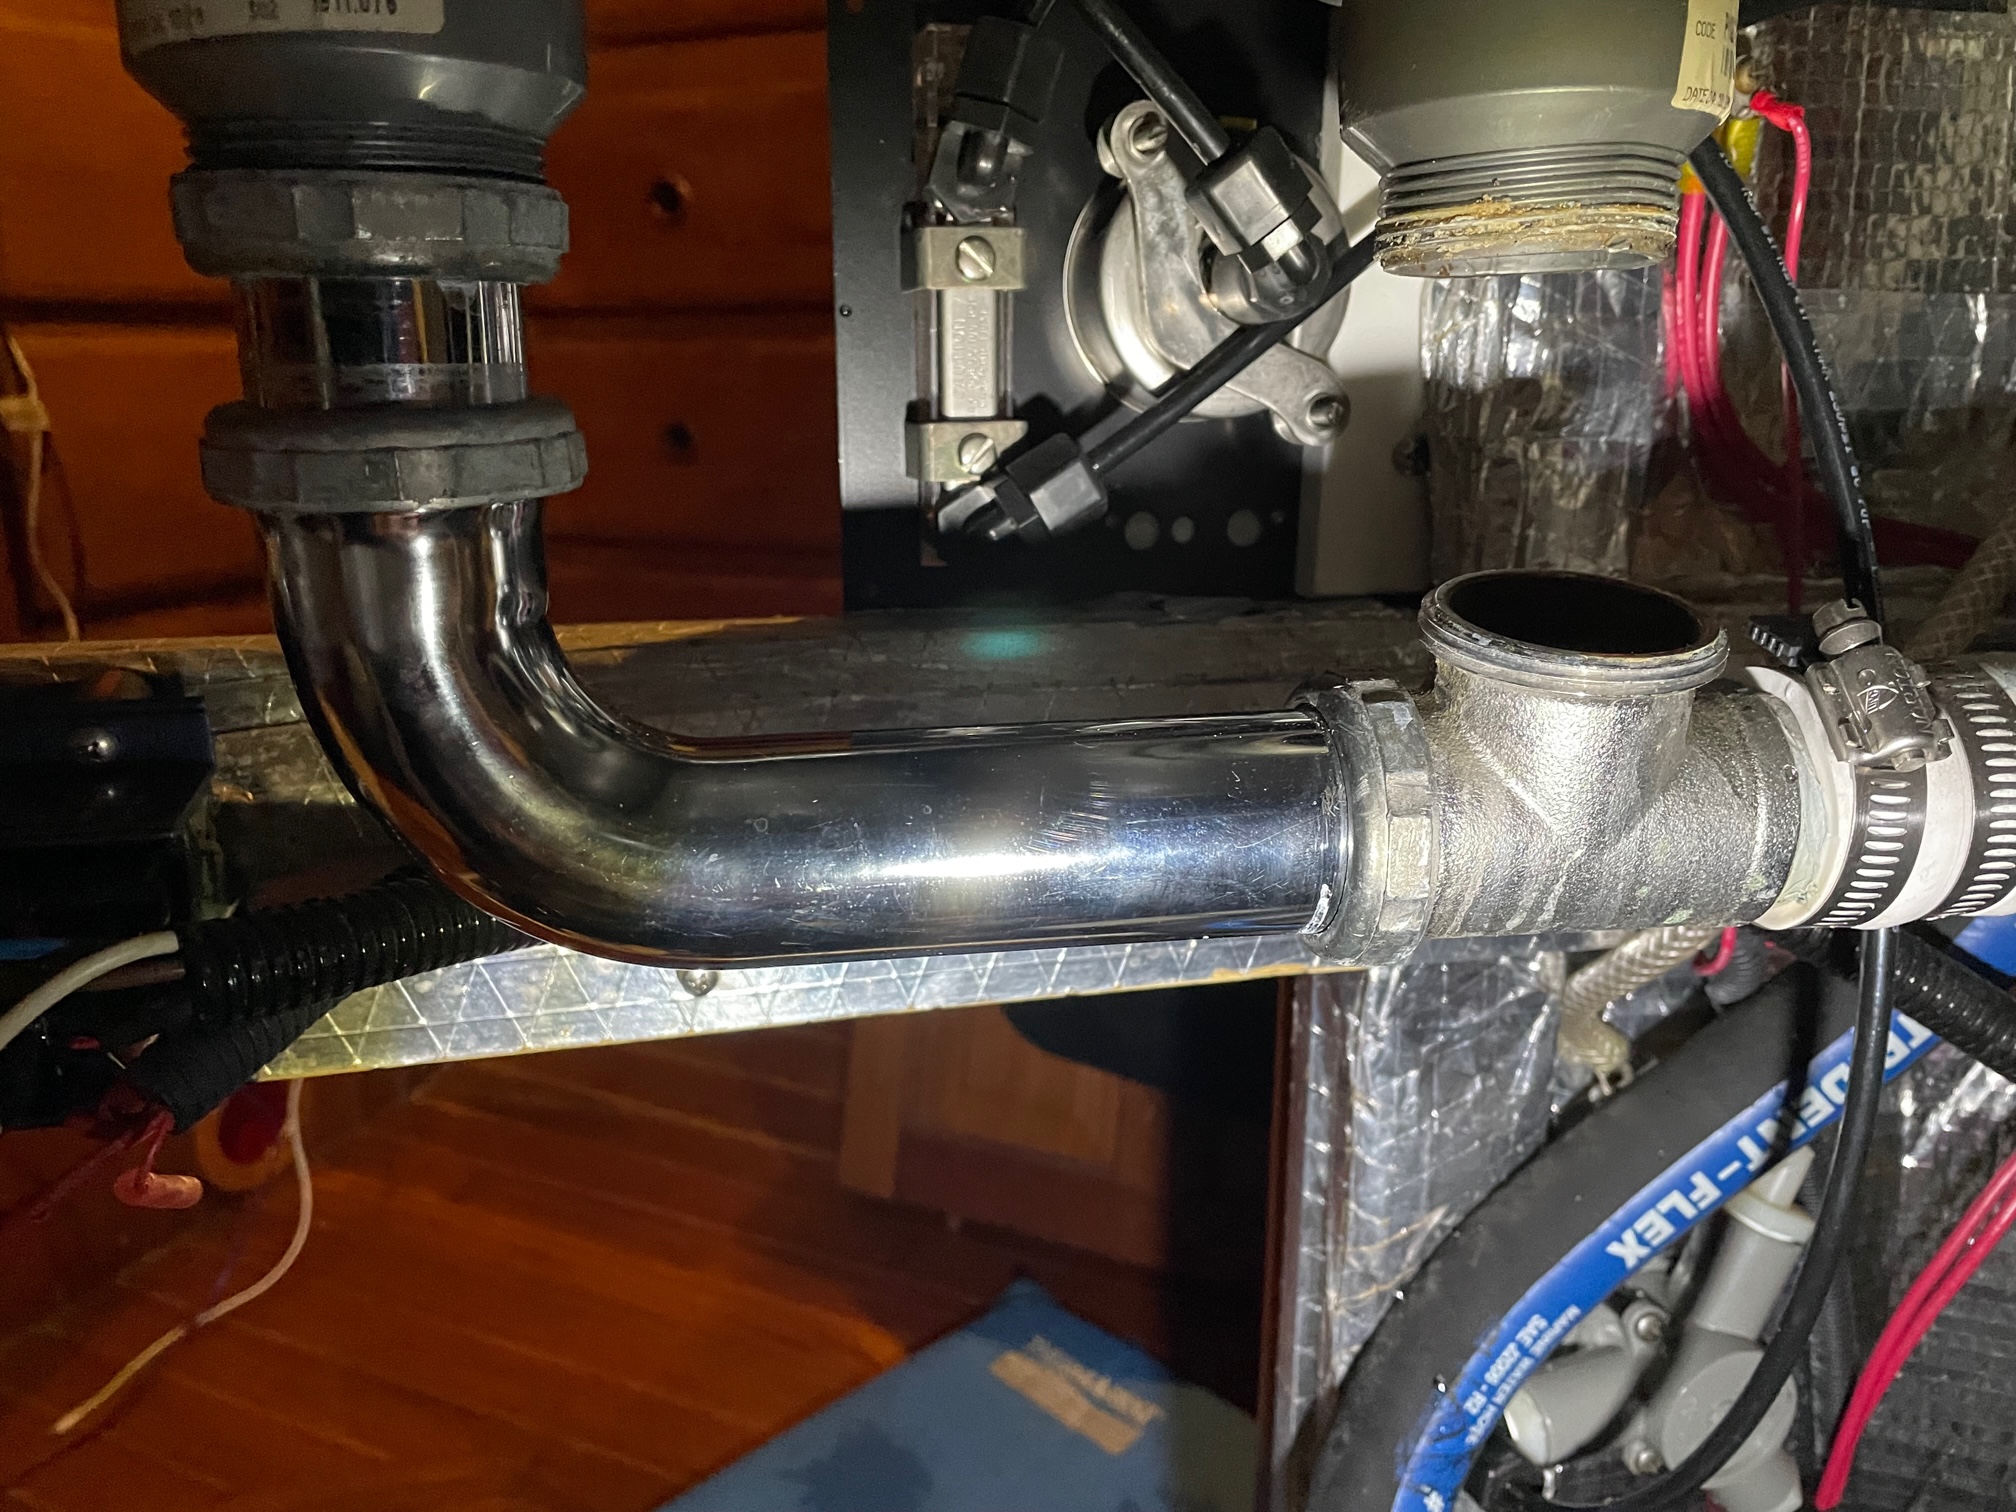
Galley Sink Plumbing
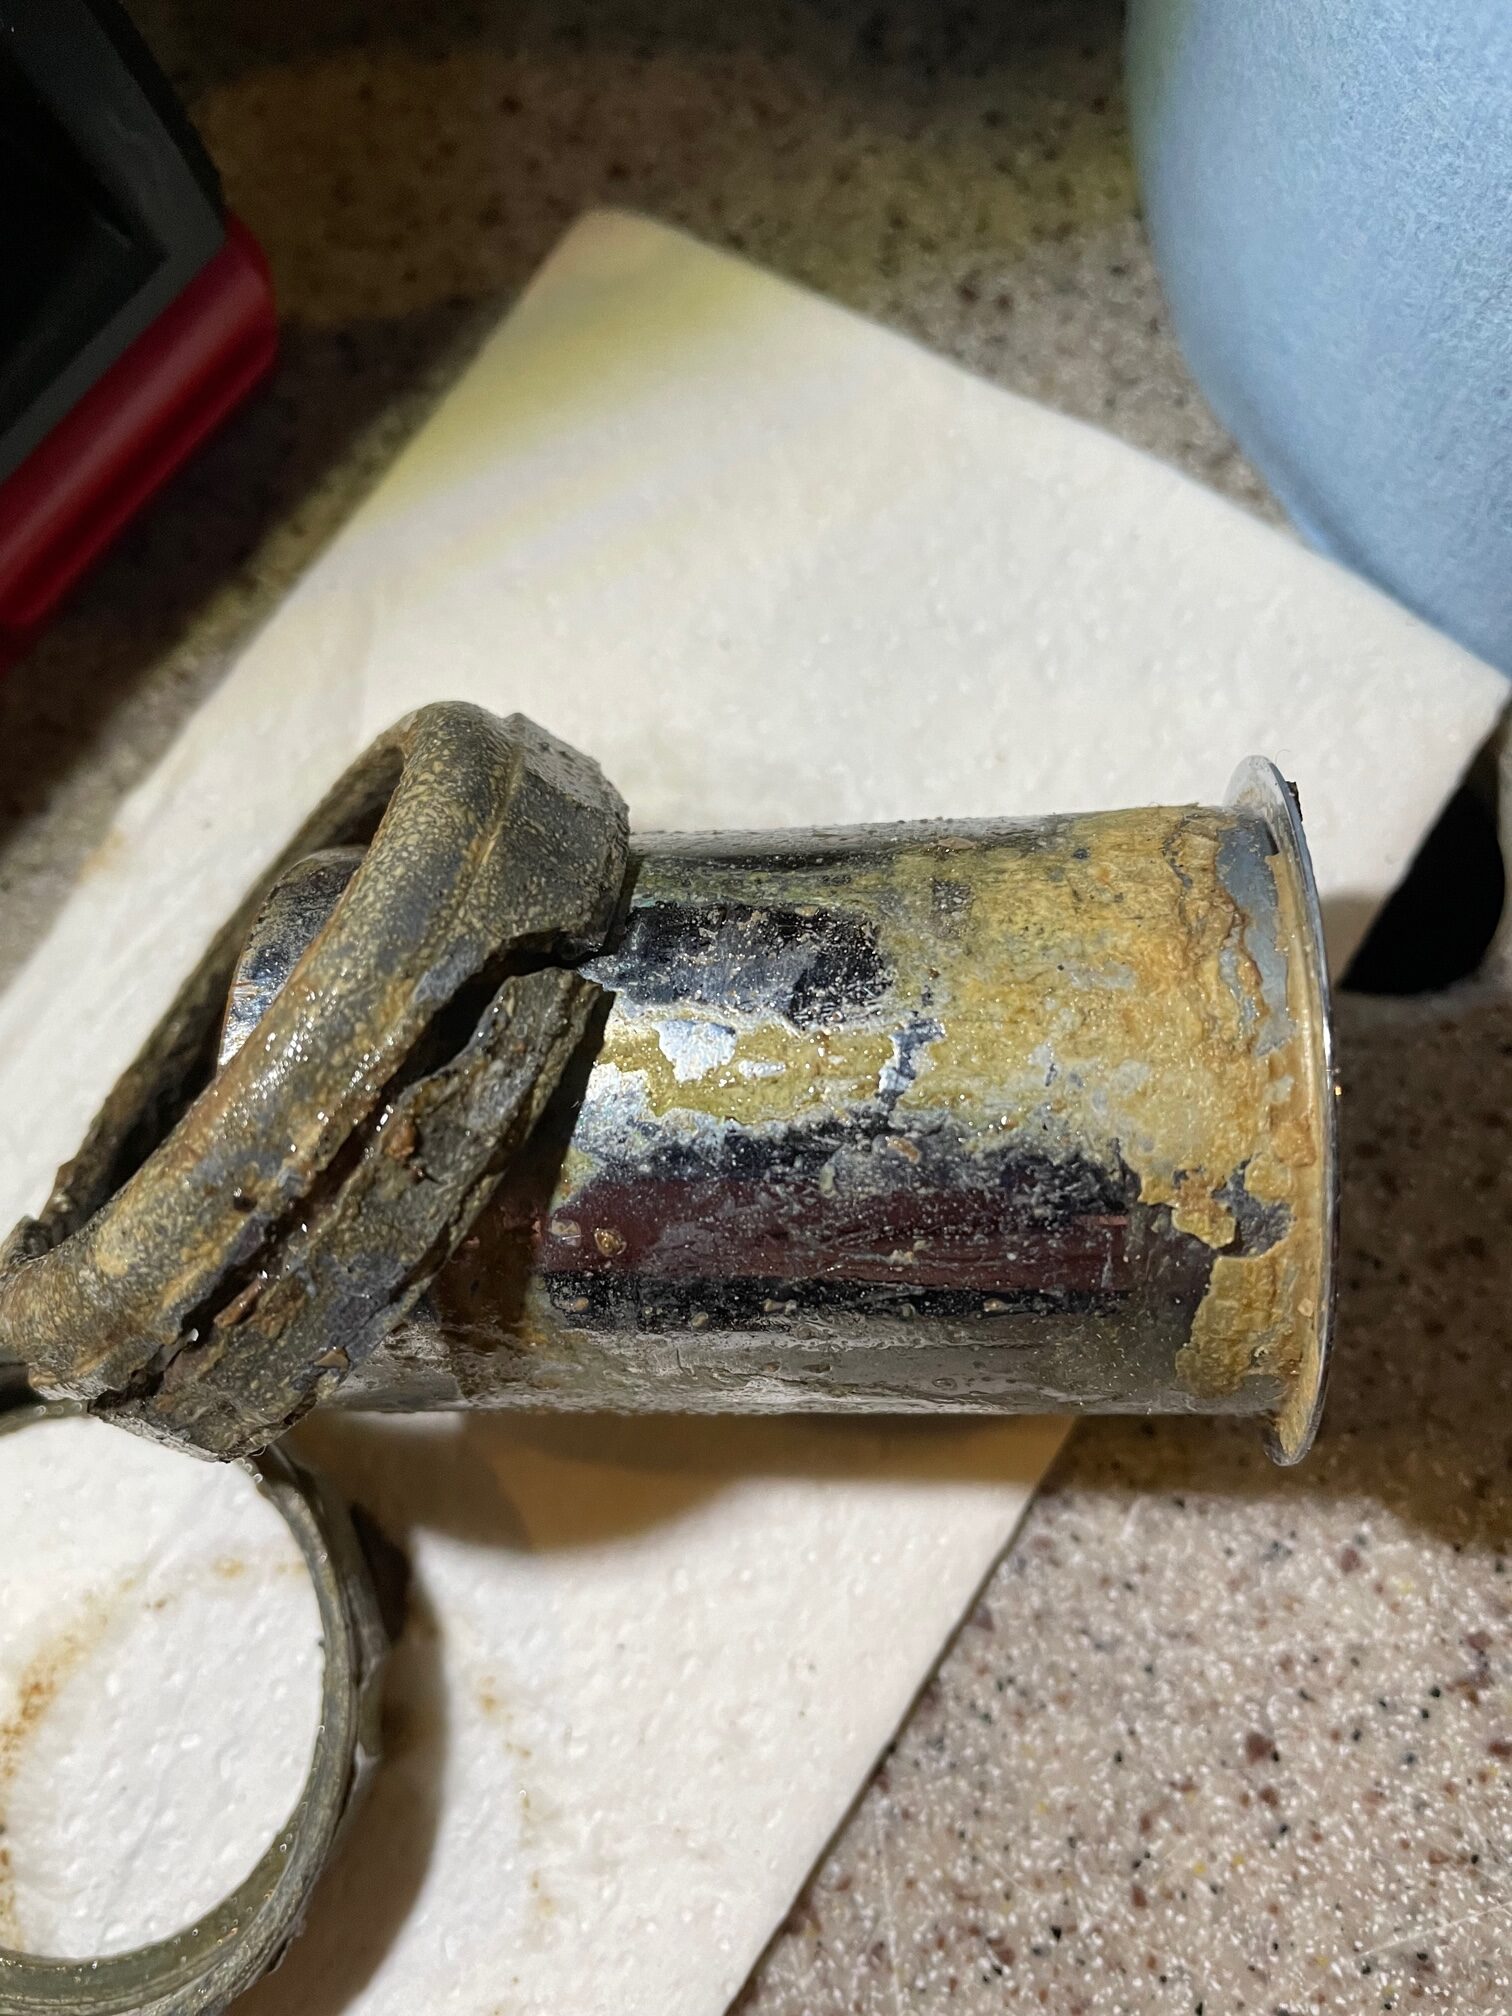
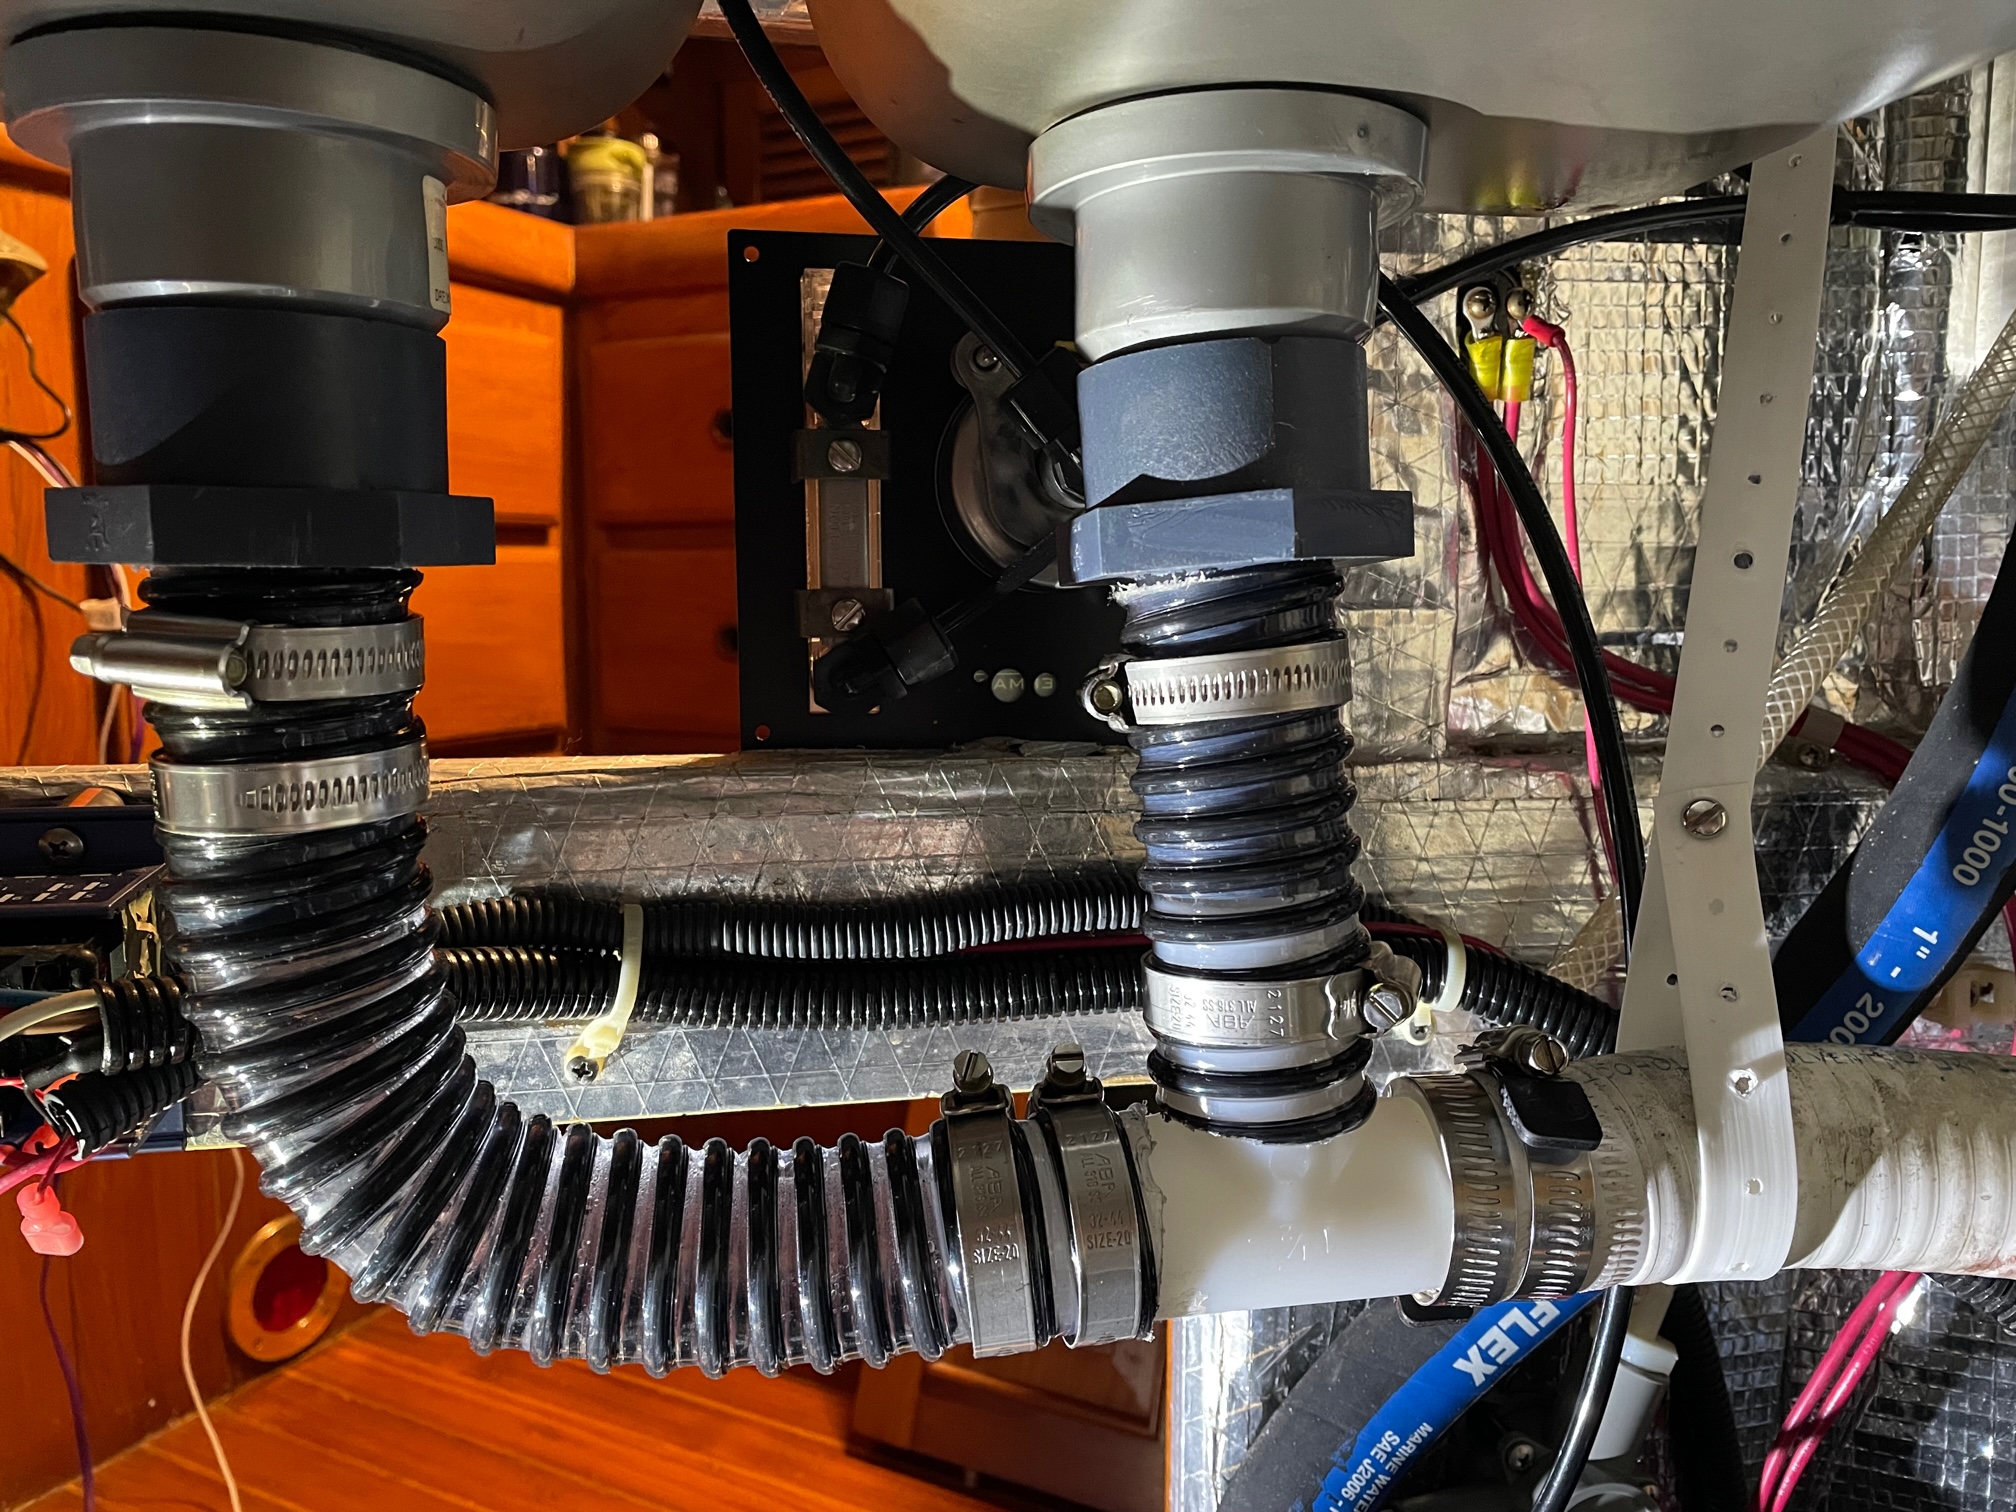
After noticing a slow leak in the galley sink drain plumbing, I removed the “house grade” plumbing that wasn’t meant for harsh marine environment, and replaced it with flexible bilge pipe, PVC fittings, and new SS clamps. The bottom of the double sink is in the engine bay. Since the horizontal part of the piping is below the water line, it remains full of water, and even though the sink is plumbed for fresh water only, sea water will come in the thru-hull and corrode any metal piping. The thin chrome elbow shown in the top picture was already replaced a few years ago after the old one rusted through. Getting rid of all metal piping should make this maintenance free for many years.
Old Drain Plumbing
Corroded Pipe and Spit Collar/Nut
New Double Galley Sink Drain Plumbing
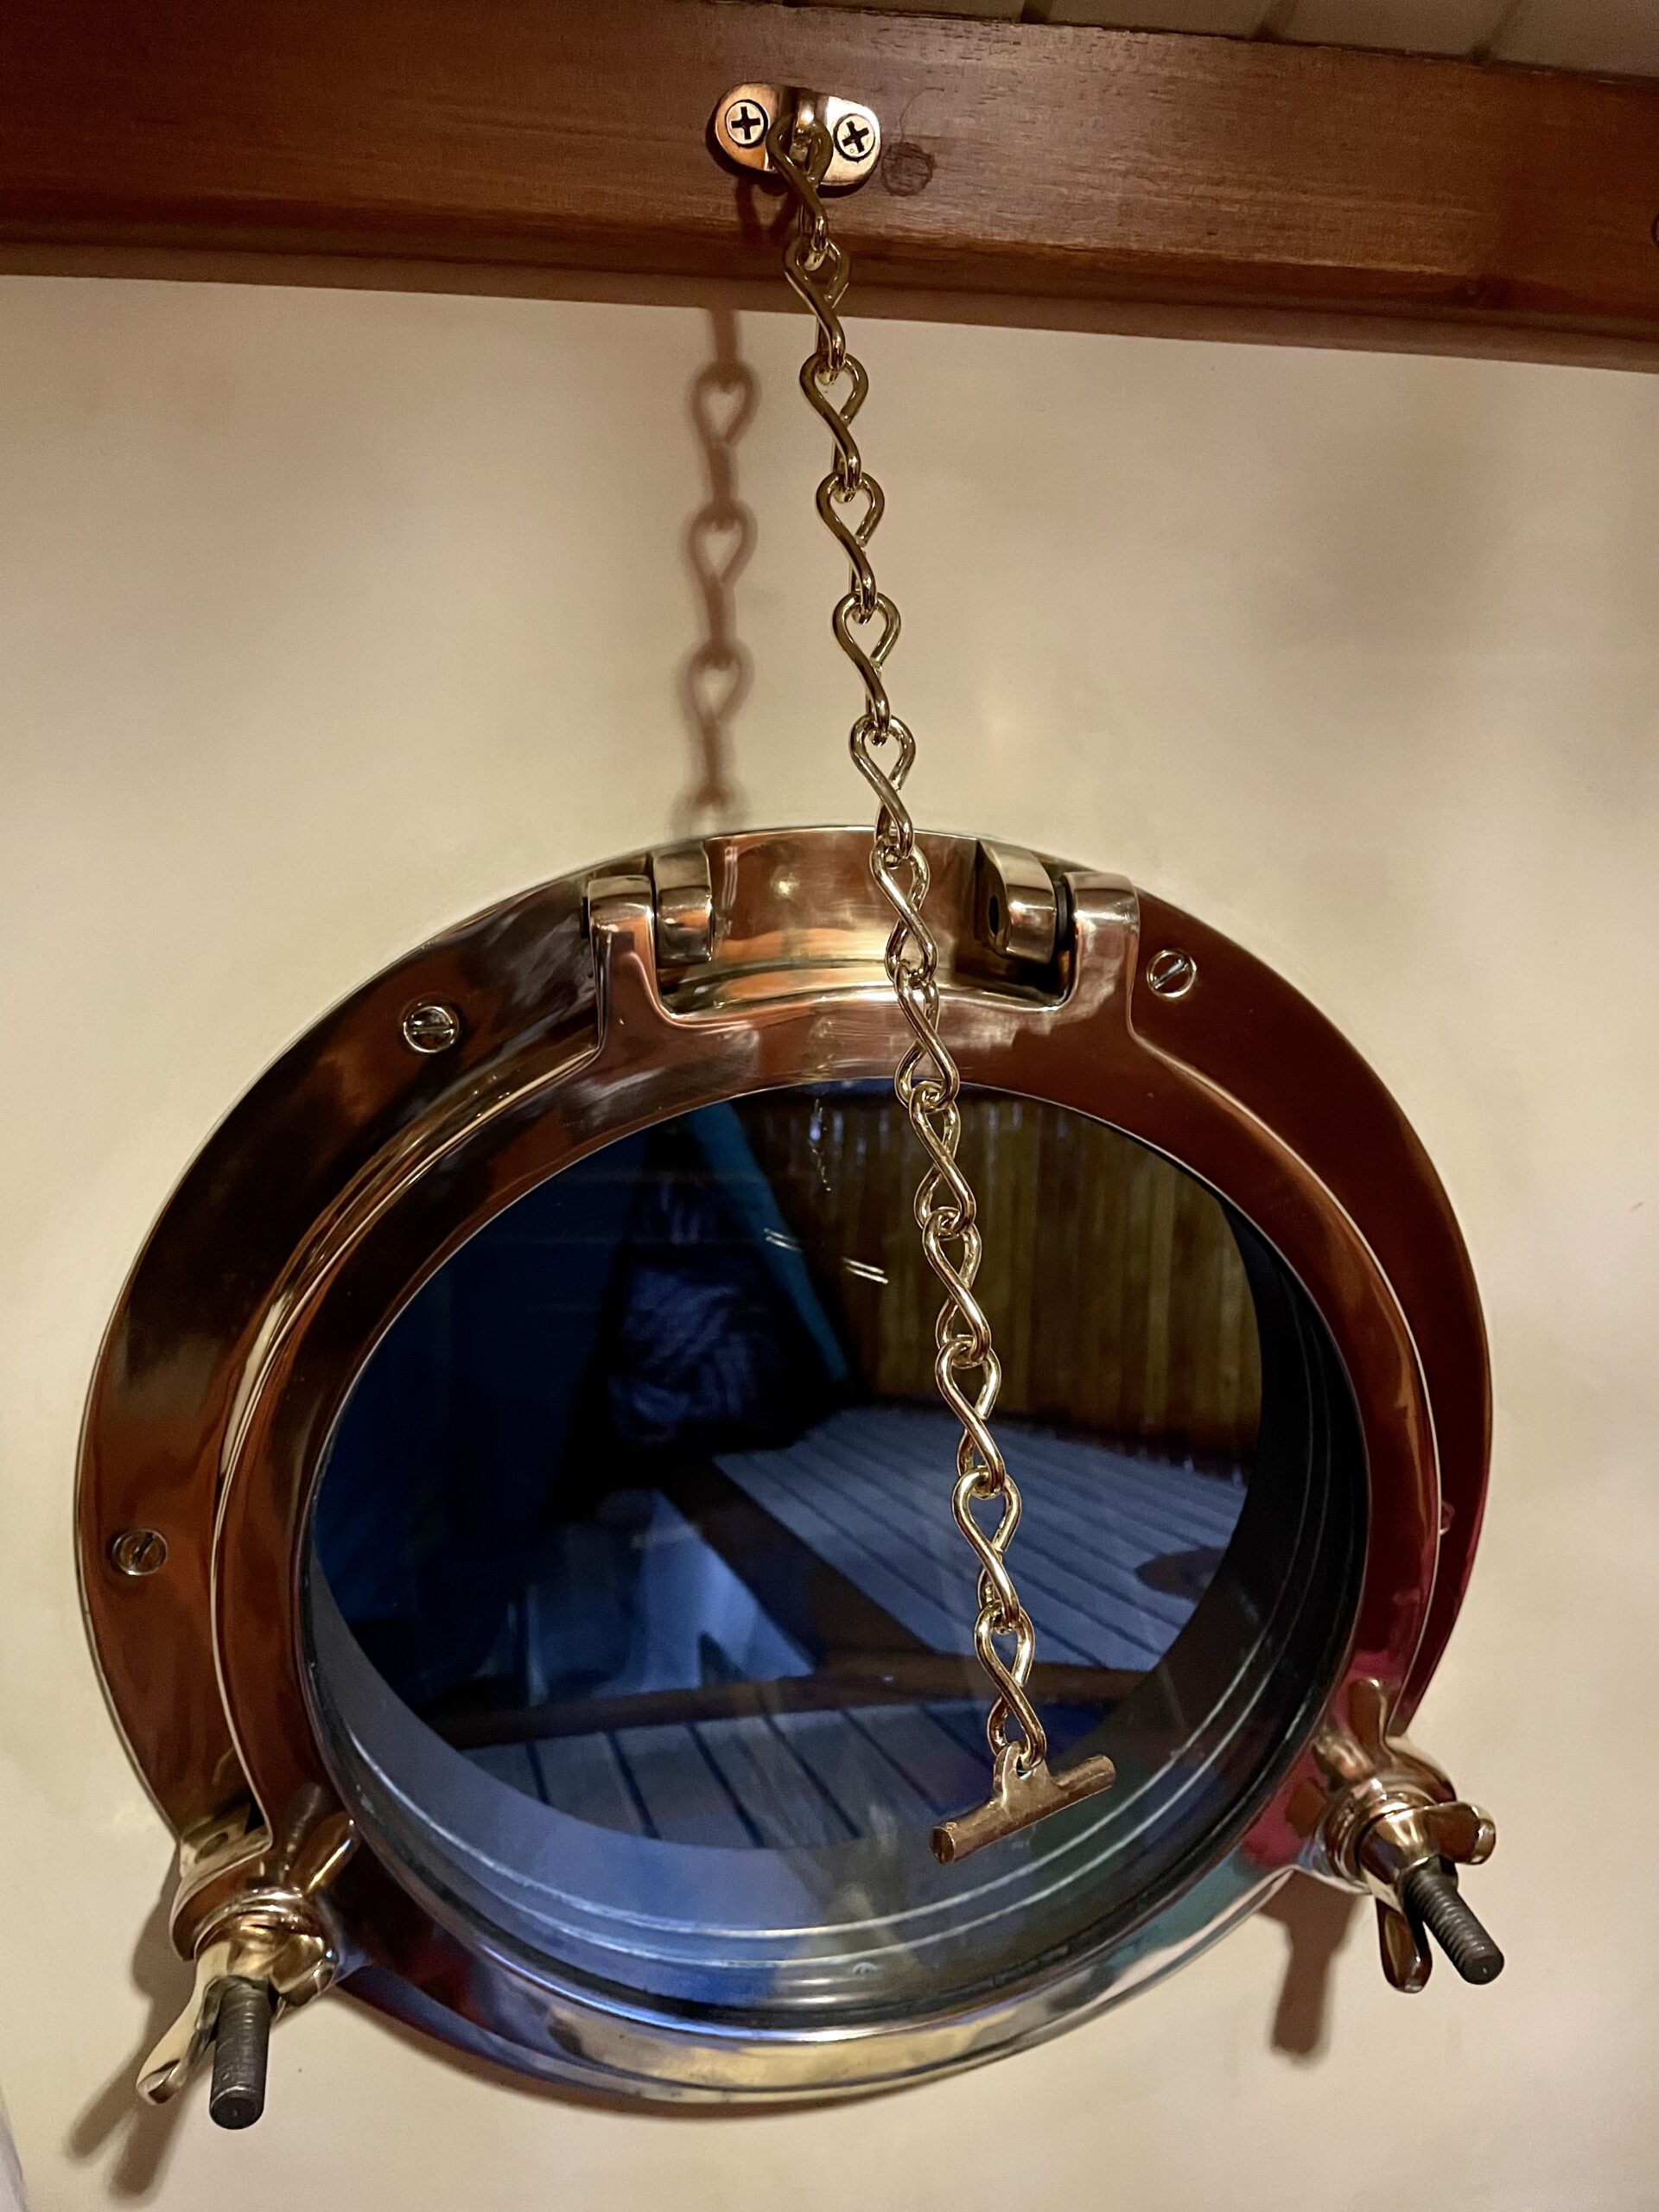
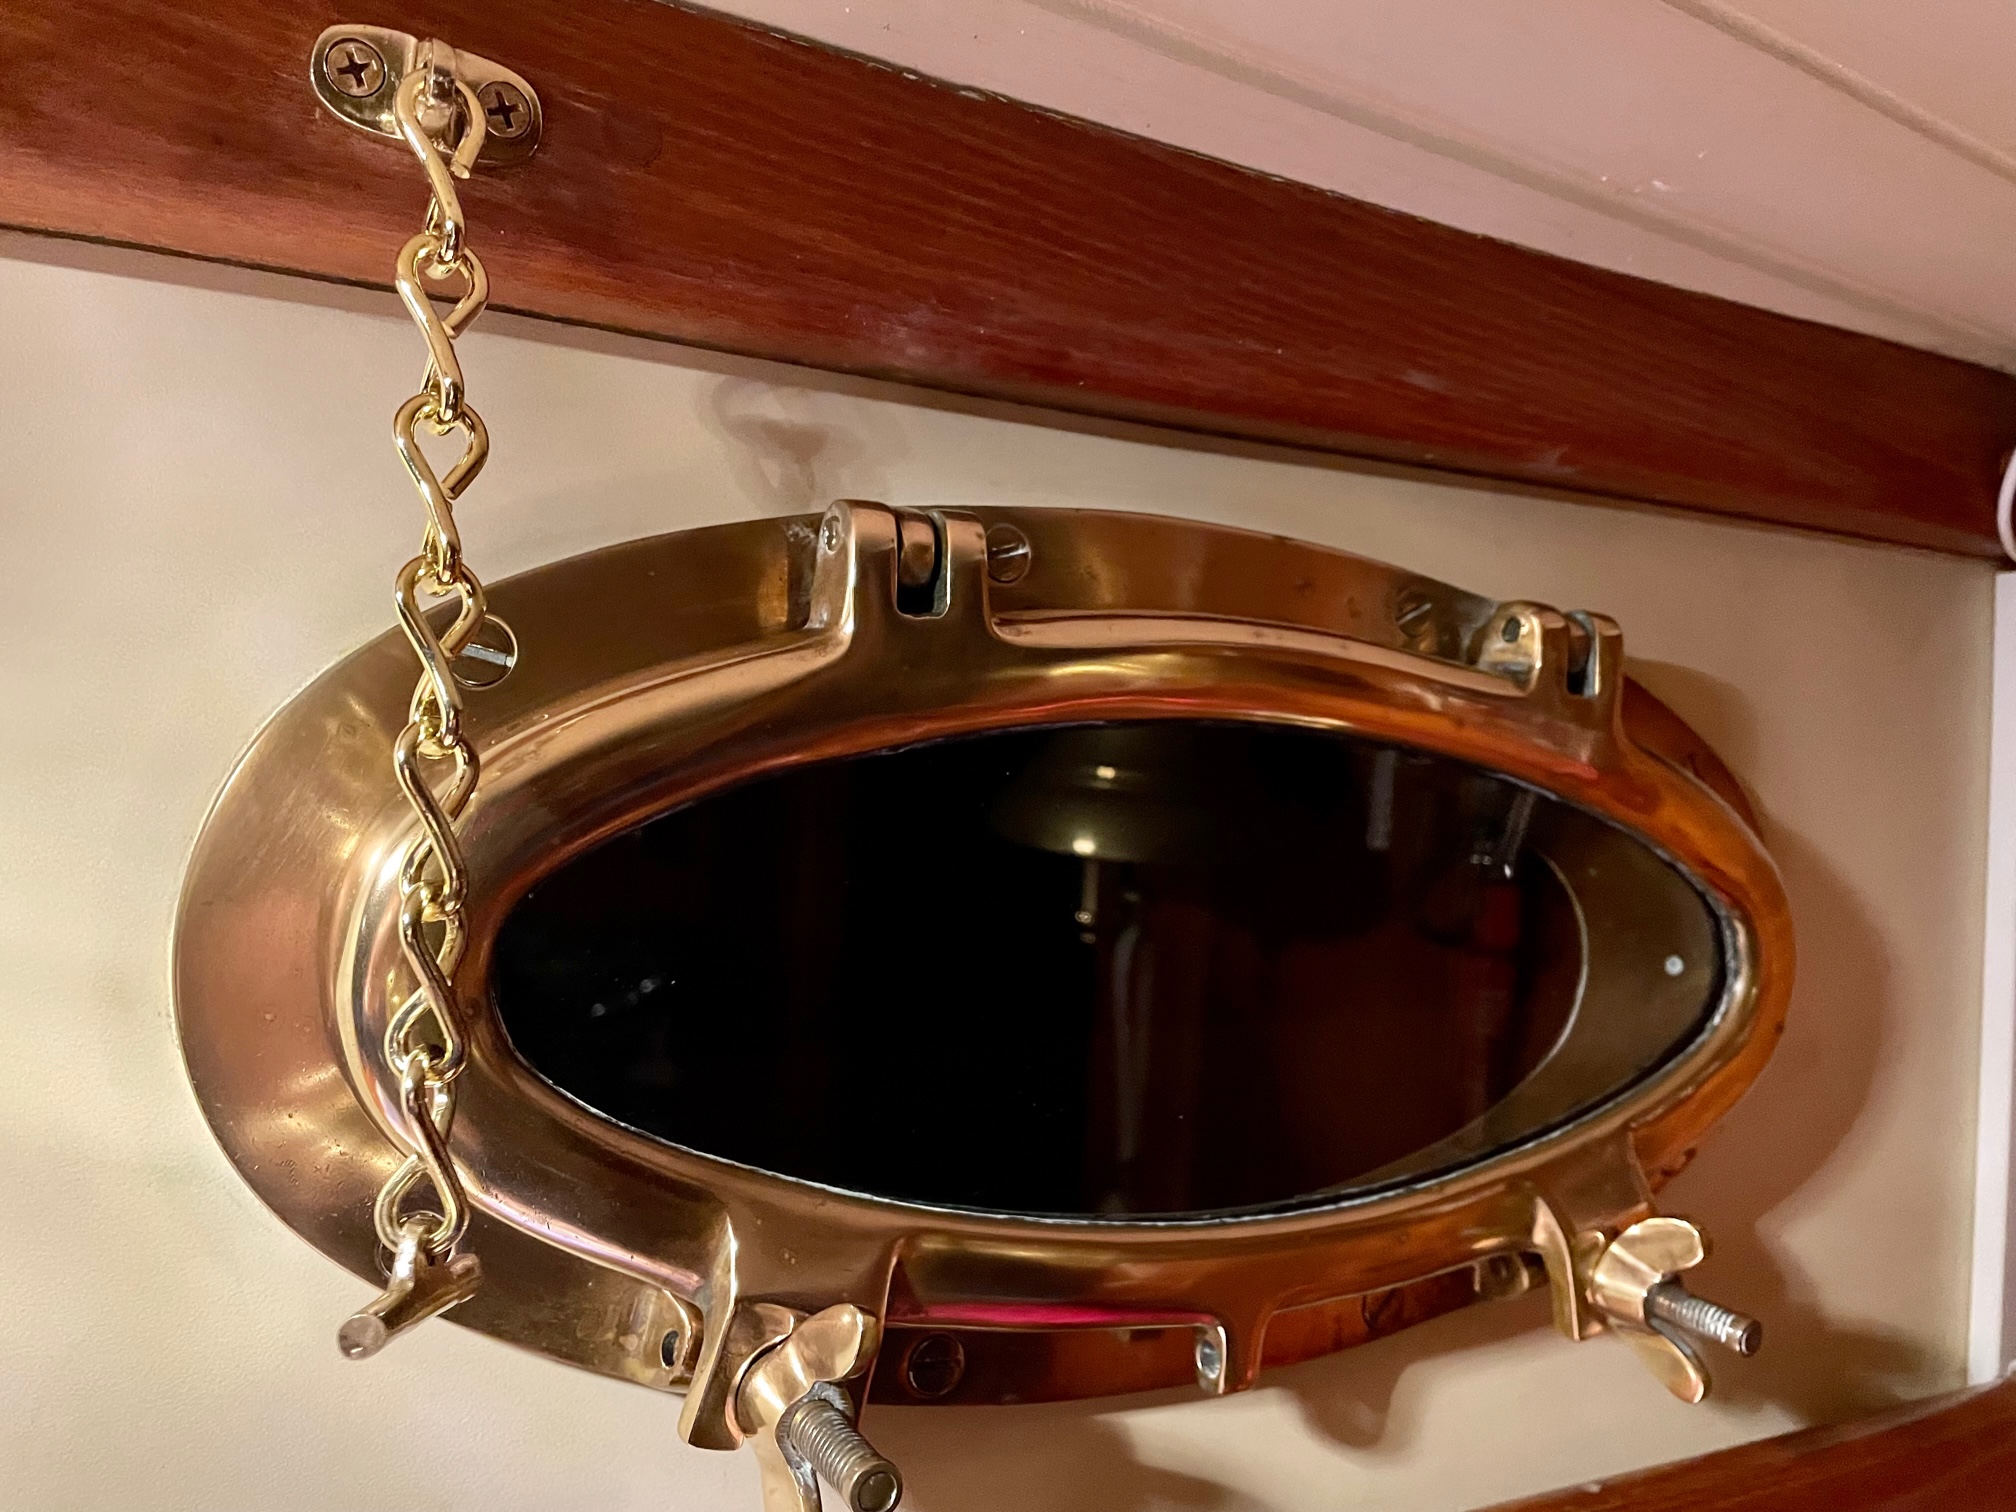
Interior Port Polishing
About every other year I go through the boat and polish up the interior side of the 16 bronze ports. A Dremel tool with a buffing attachment used with Flitz polishing compound speeds up the process. I also replaced the chain that holds the ports in the open position with new solid brass Single Jack chain.
Polished Port with New ChainPolished Port with New Chain
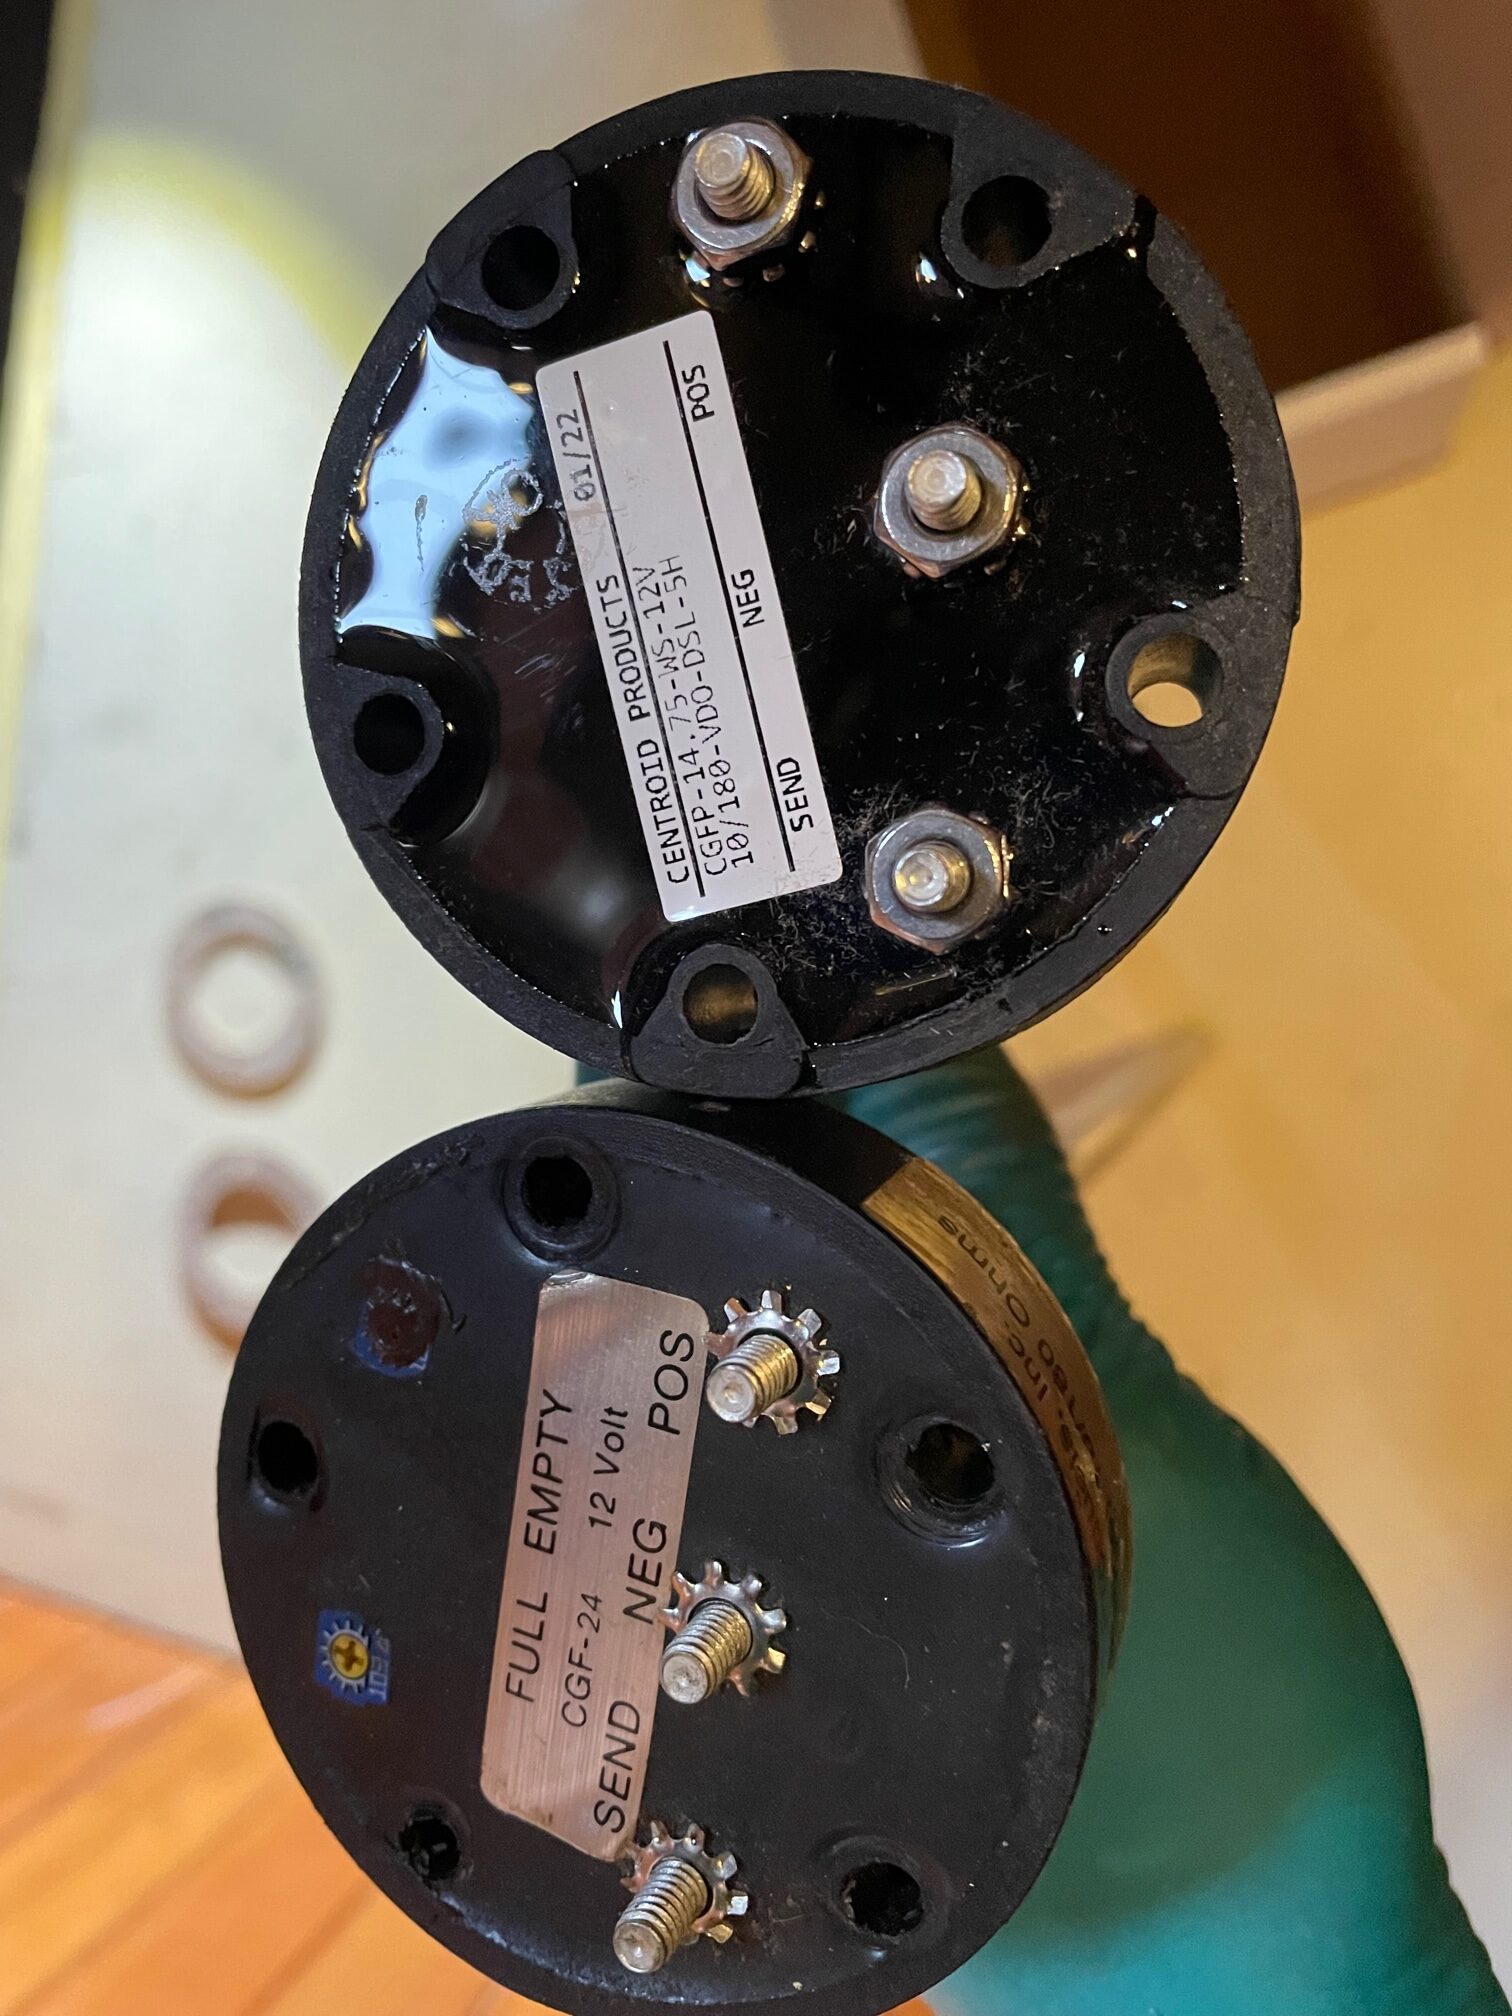
Diesel Tank Sending Units
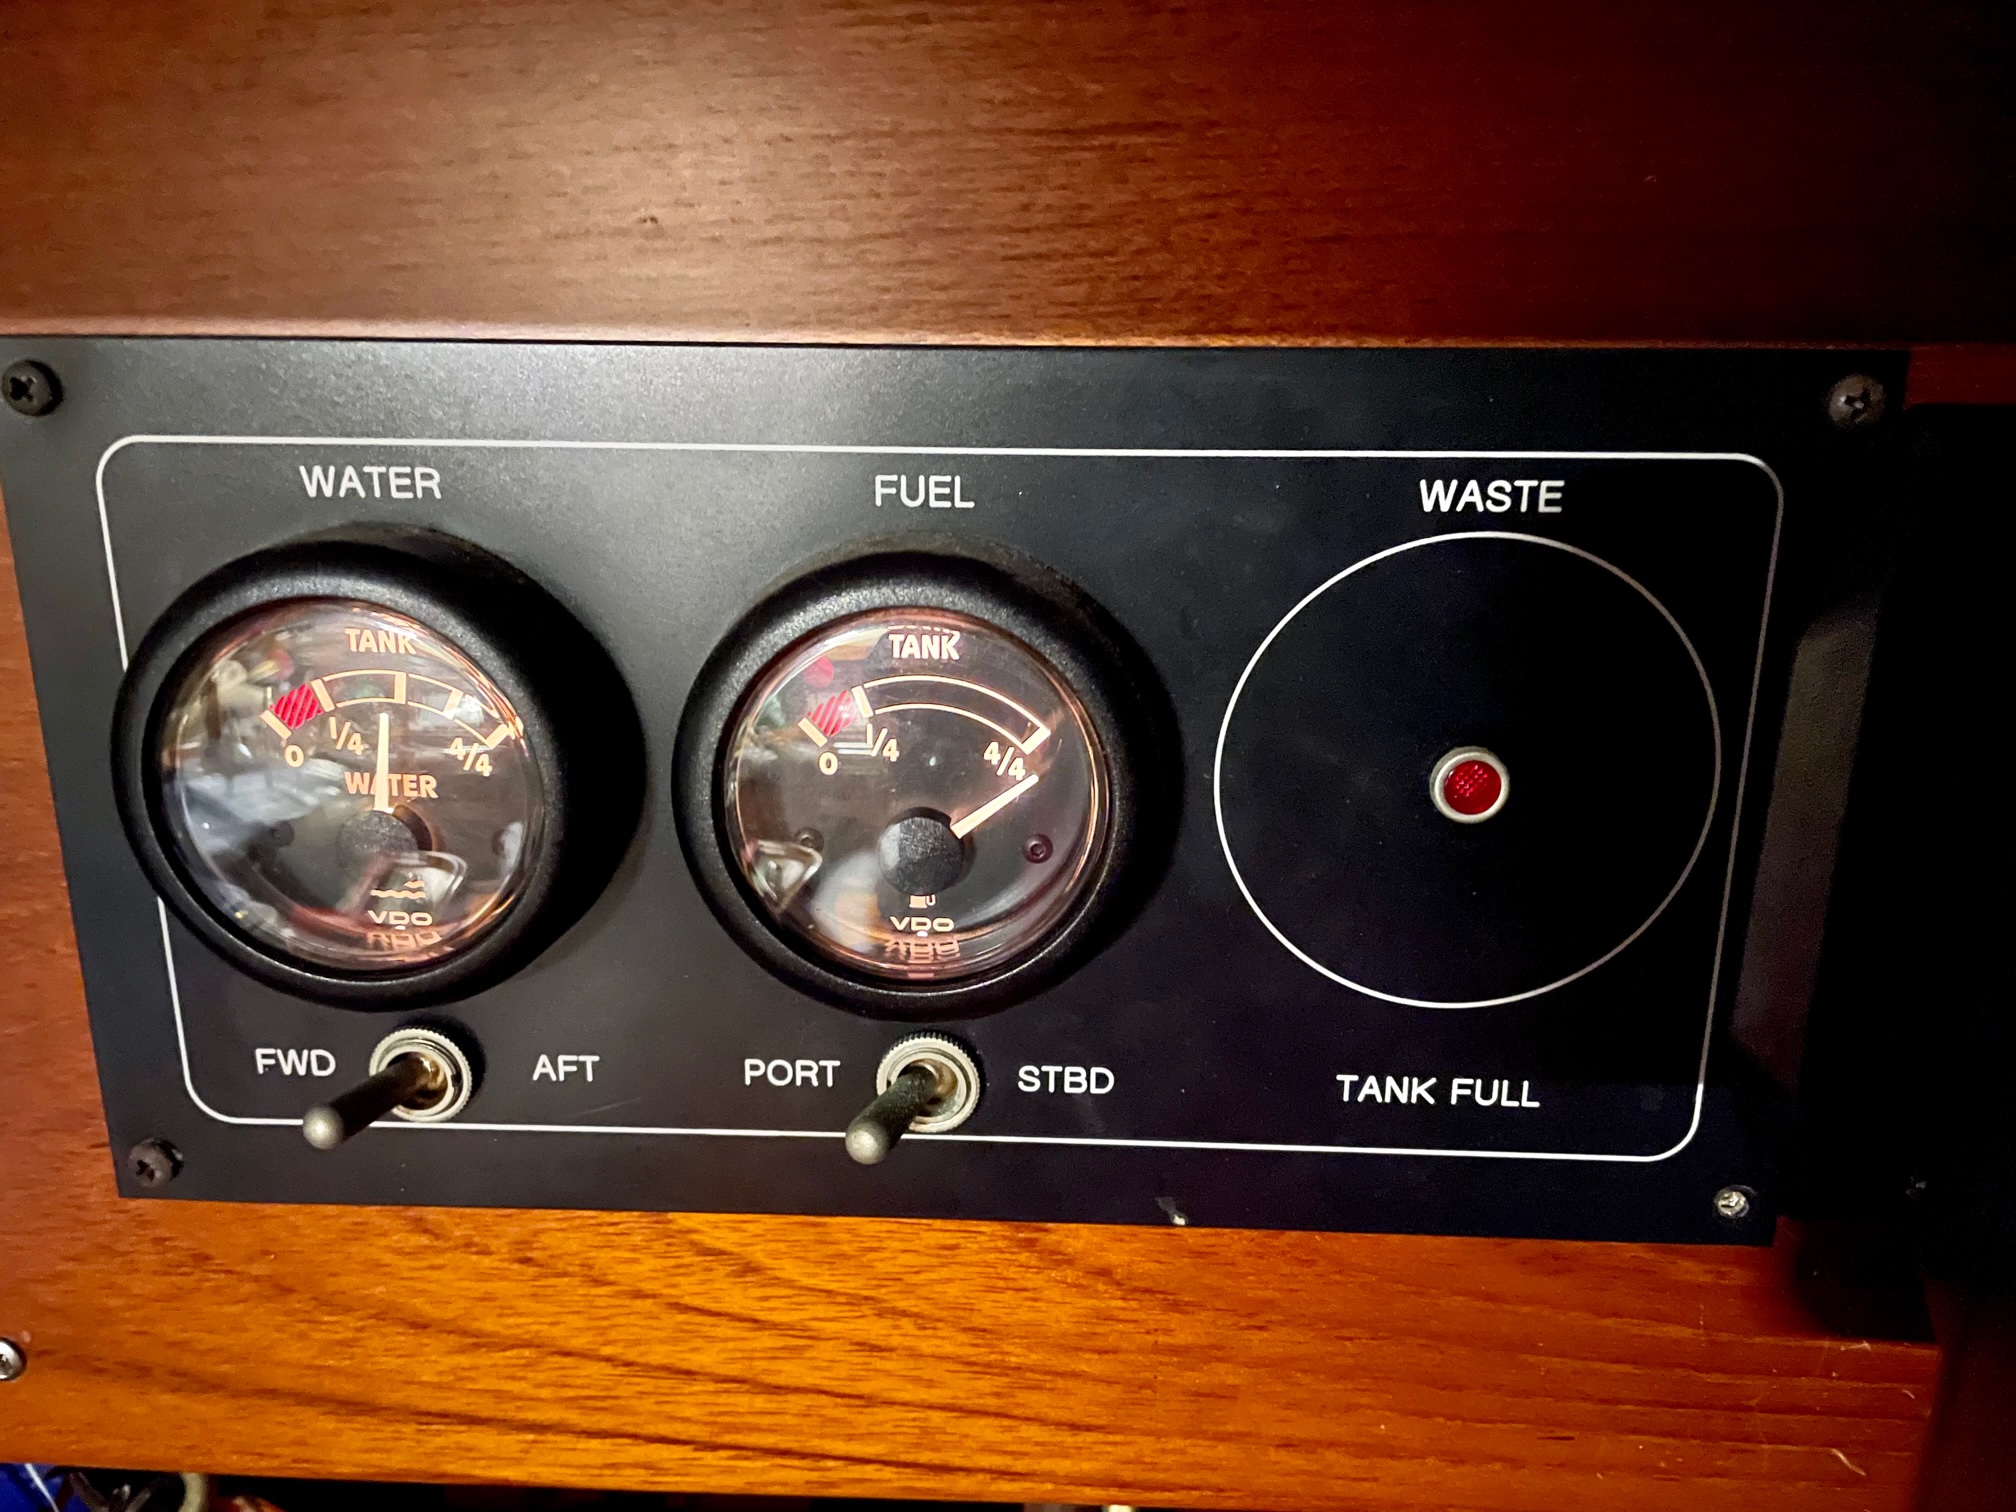
Both diesel tank sending units gradually became inaccurate and finally stopped working a few years ago. Based on measuring a capacitance change as the tank fuel level changes, they worked well for over 10 years. I keep track of engine hours and burn rate to calculate the approximate amount of diesel in the tanks, but having a tank gauge is always nice. I removed them from the tanks and was able to order new ones from the same manufacturer, Centroid Products. They even had the paper record dating back to 2004 from the original purchase filed under my boat name! The tube length is 14.5″ so it’s about a half inch from the bottom of the deepest part of the tank. Installation was easy and now I have accurate tank level readings that are displayed on a VDO gauge that has a selector switch for port and starboard tanks.
Old (bottom) and New (top) SendersWater and Fuel Gauges
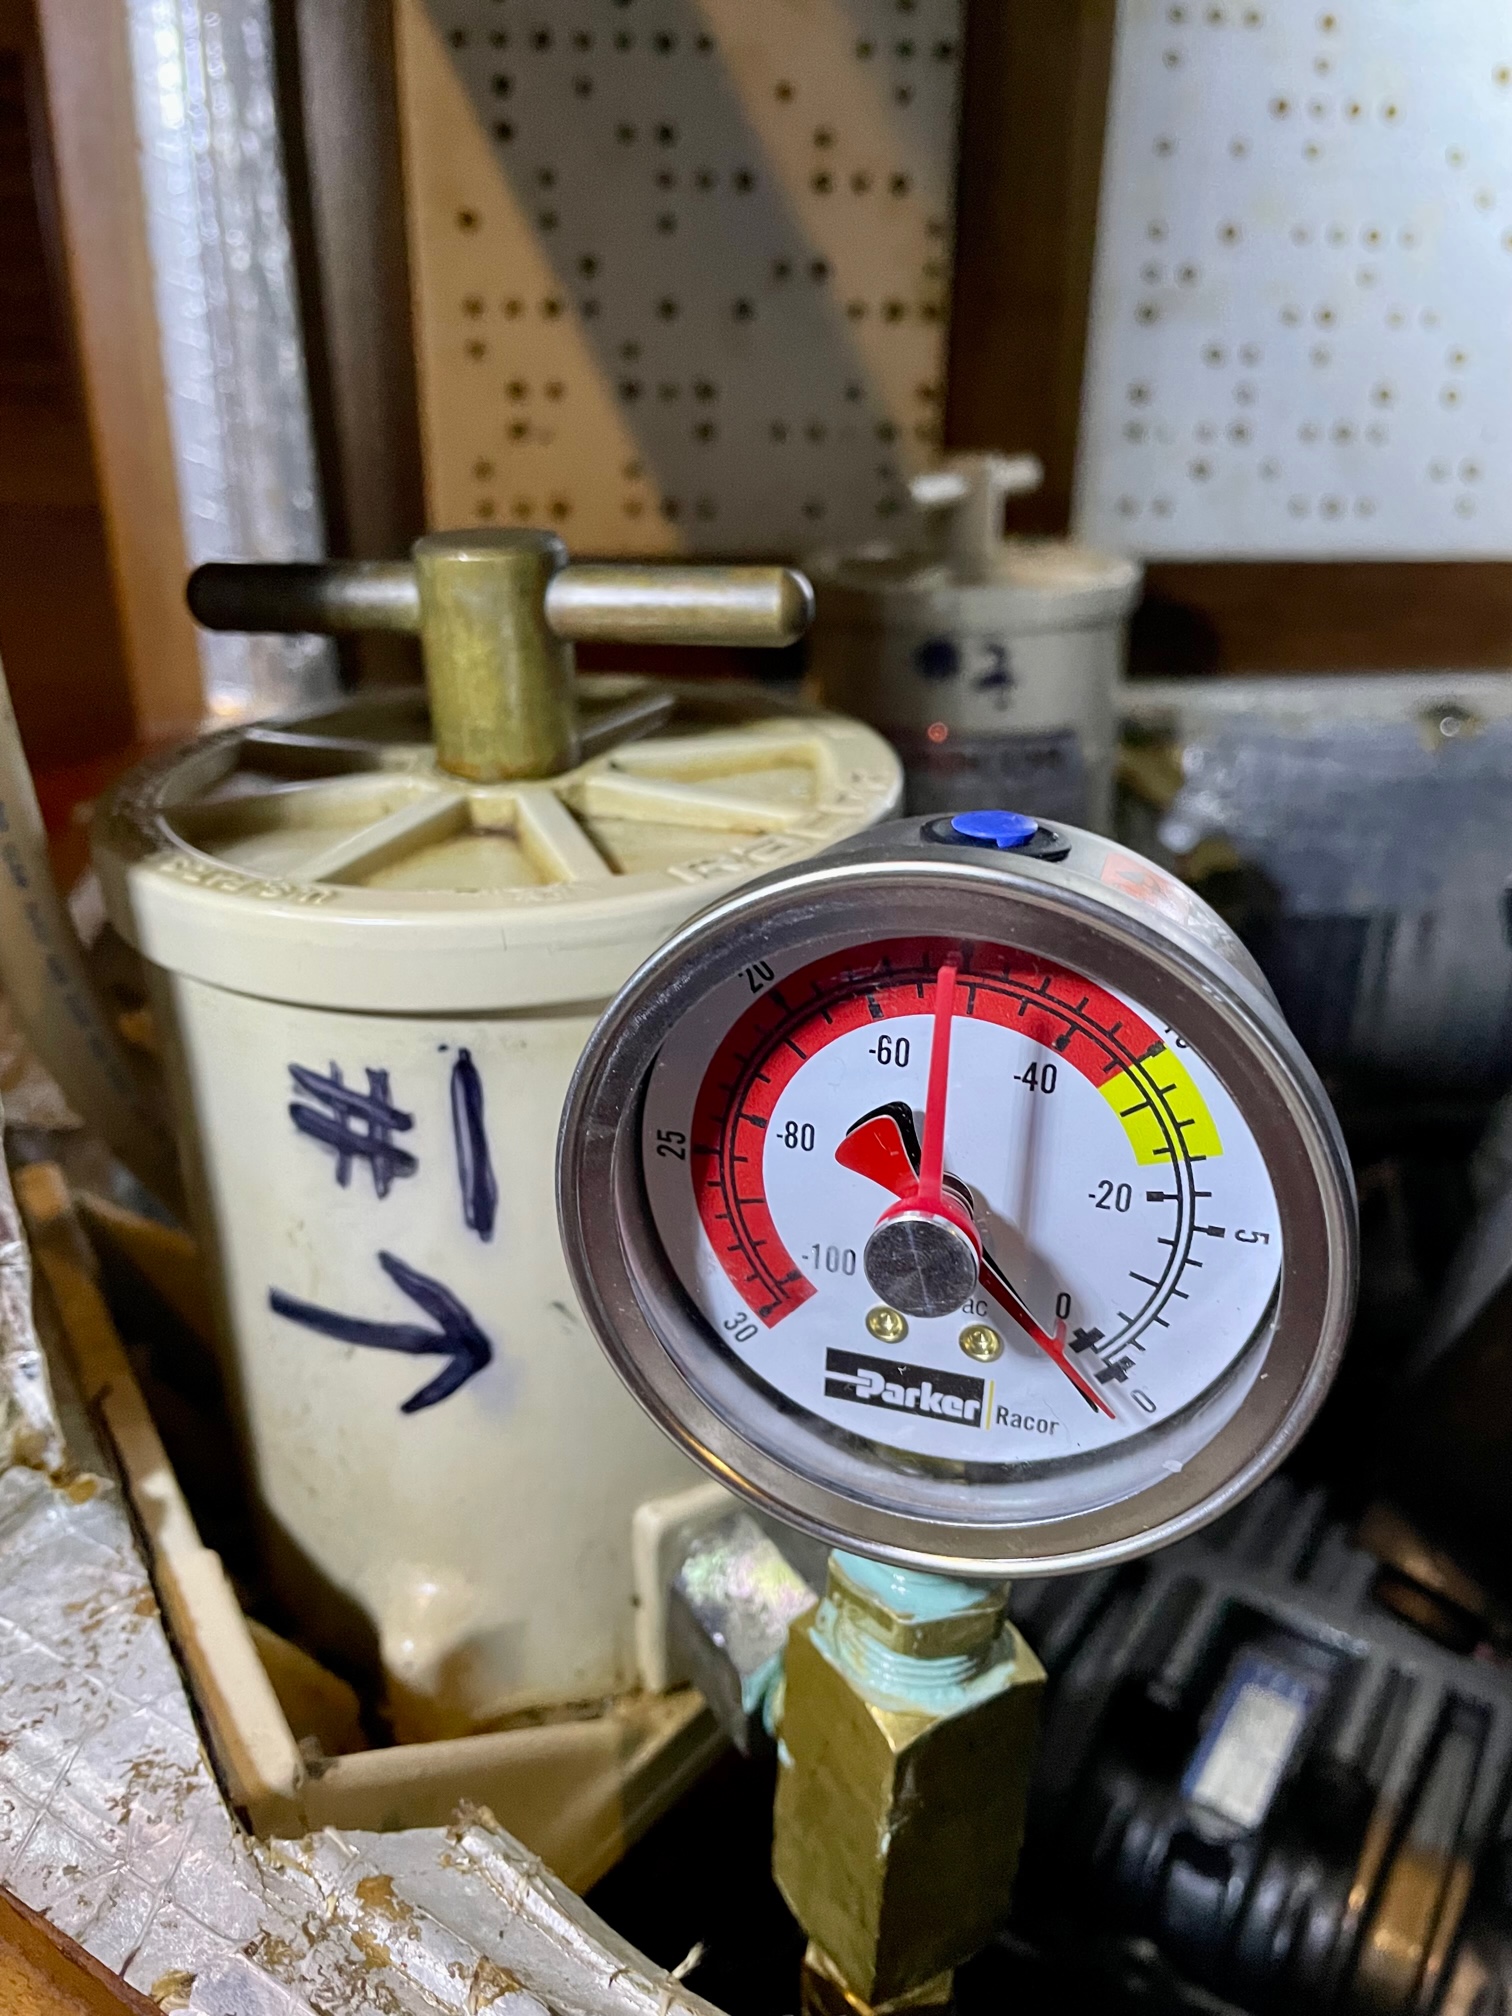
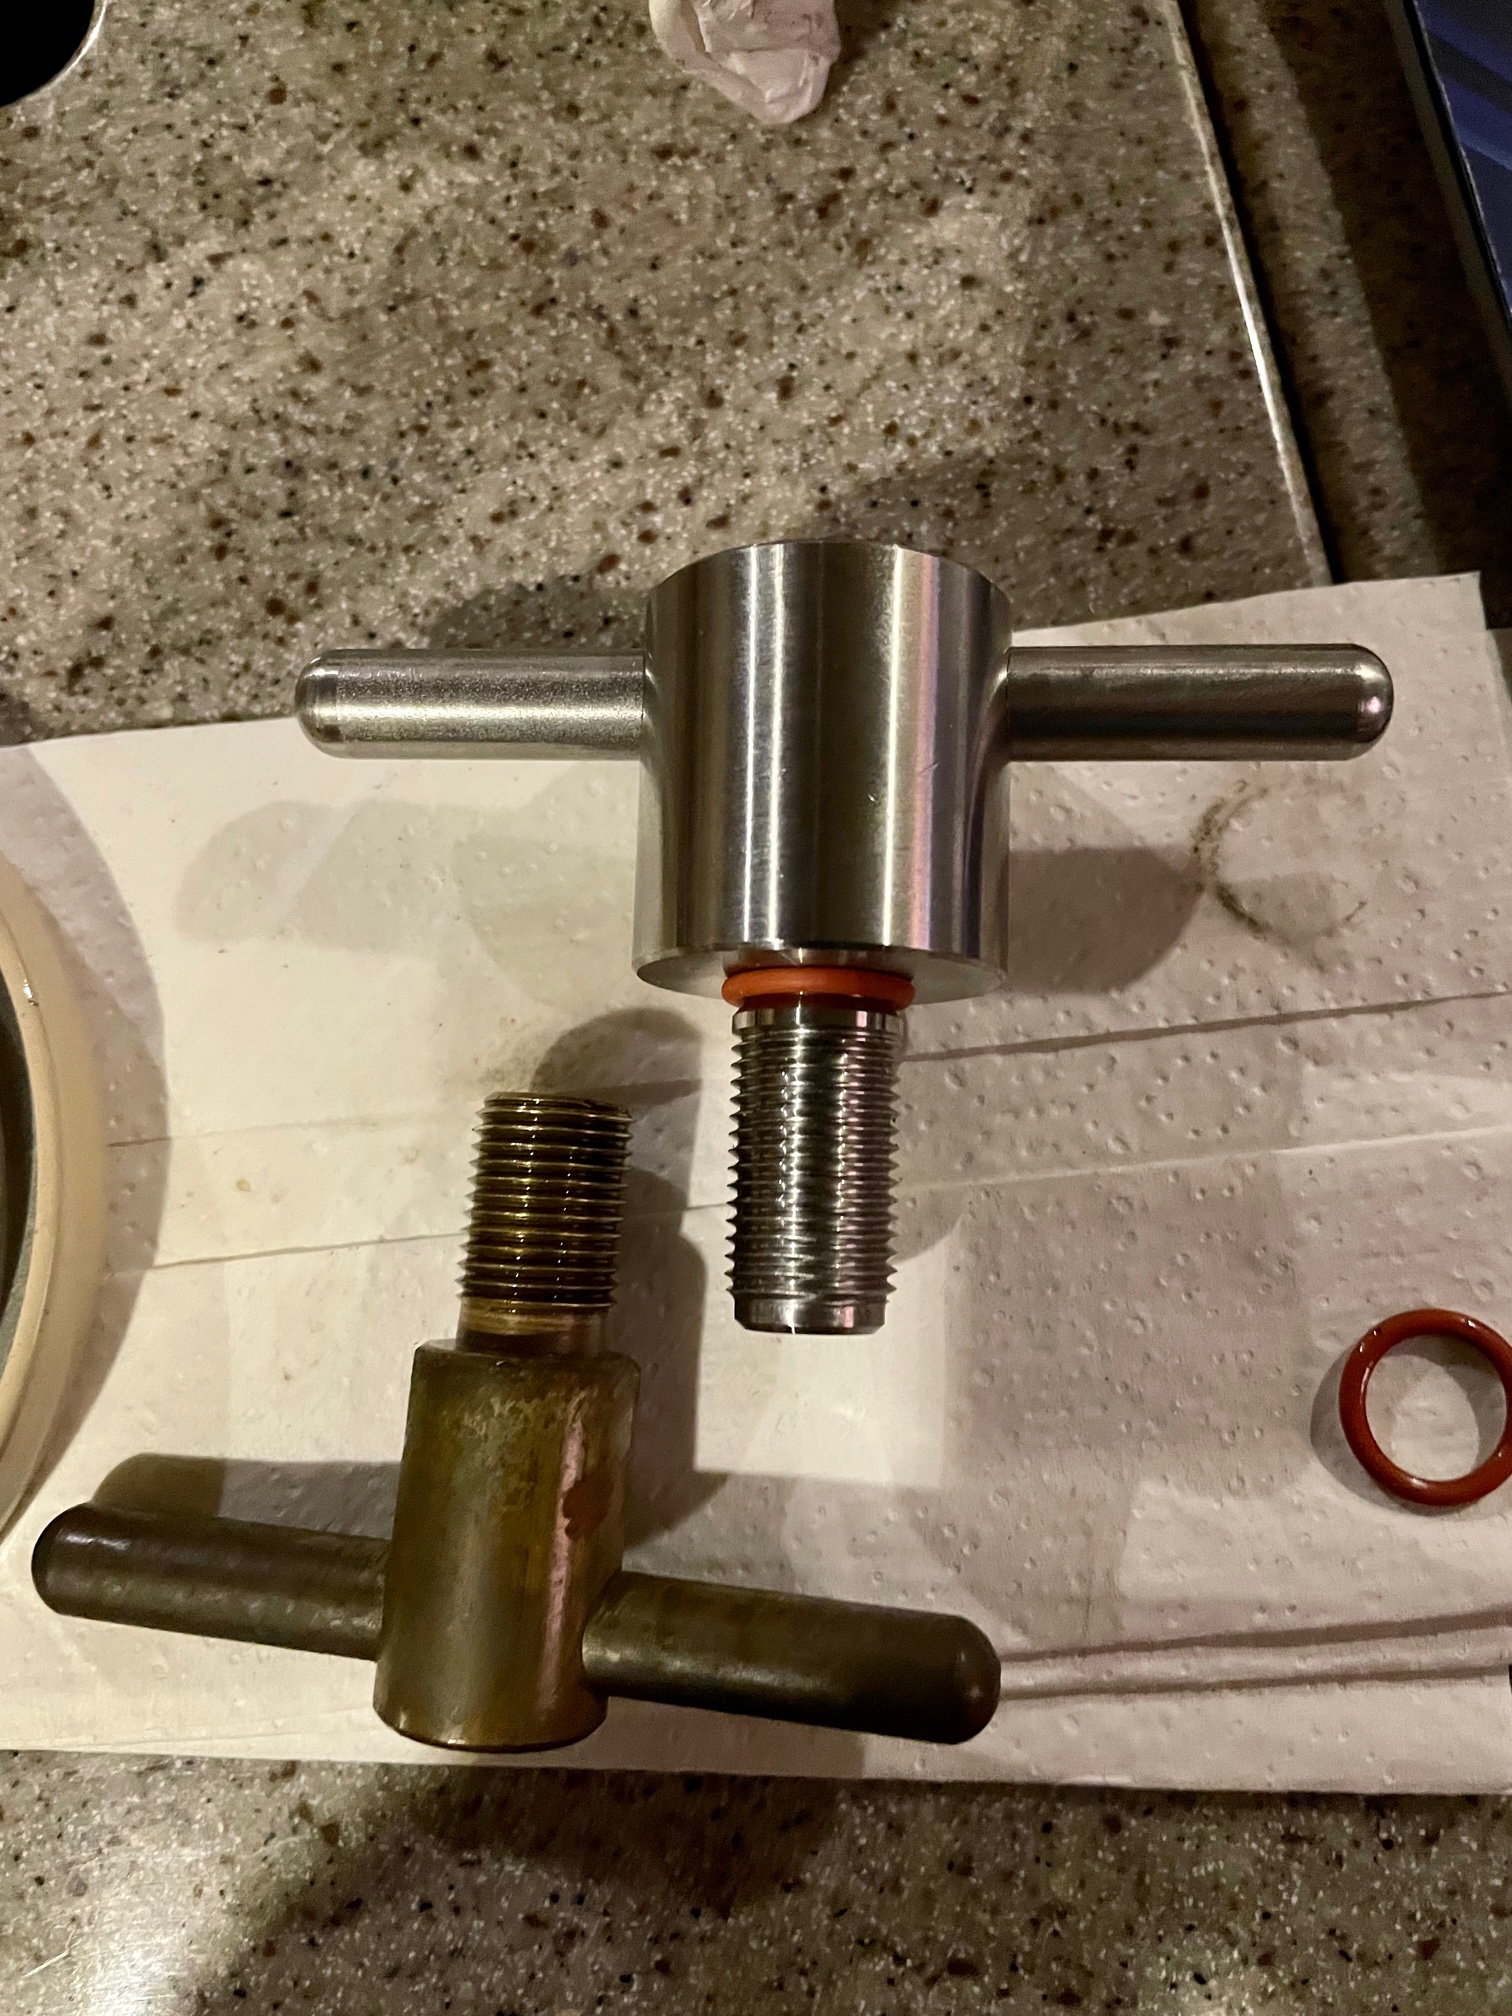
Diesel Vacuum Gauge
Diesel flows from the tanks to the engine, and in between is a Racor fuel filter. Since the fuel pump is on the engine, the diesel flows in a vacuum through the filter. Knowing the vacuum level helps to determine when the filter element needs changed. As the filter becomes clogged, vacuum increases. Parker, the maker of Racor diesel filters, makes a convenient “T” handle vacuum gauge that replaces the regular “T” handle on top of the Racor filter housing. Unfortunately, the threads on the “T” handle are too long for pre-2004 Racor housings so I wasn’t able to mount the gauge on the top. Instead, I added a bronze T-fitting at the output port of the Racor and threaded on the vacuum gauge. The gauge has a red stationary needle that can be set anywhere, a red moveable needle that indicates the maximum vacuum that was reached (and can be reset with the blue button at the top of the gauge), and a black needle that indicates the real-time vacuum. In my dual Racor system, the gauge will measure vacuum in whichever Racor is selected.
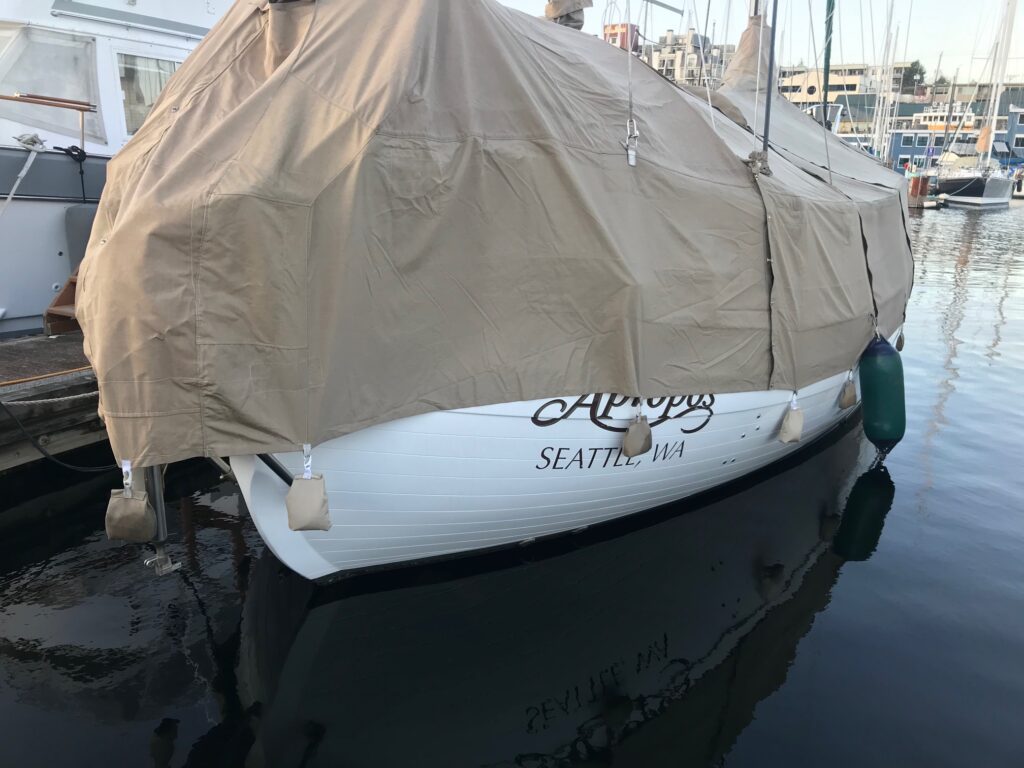
With the full cover on that protects Apropos from the winter wet season, I make progress on my long list of projects.
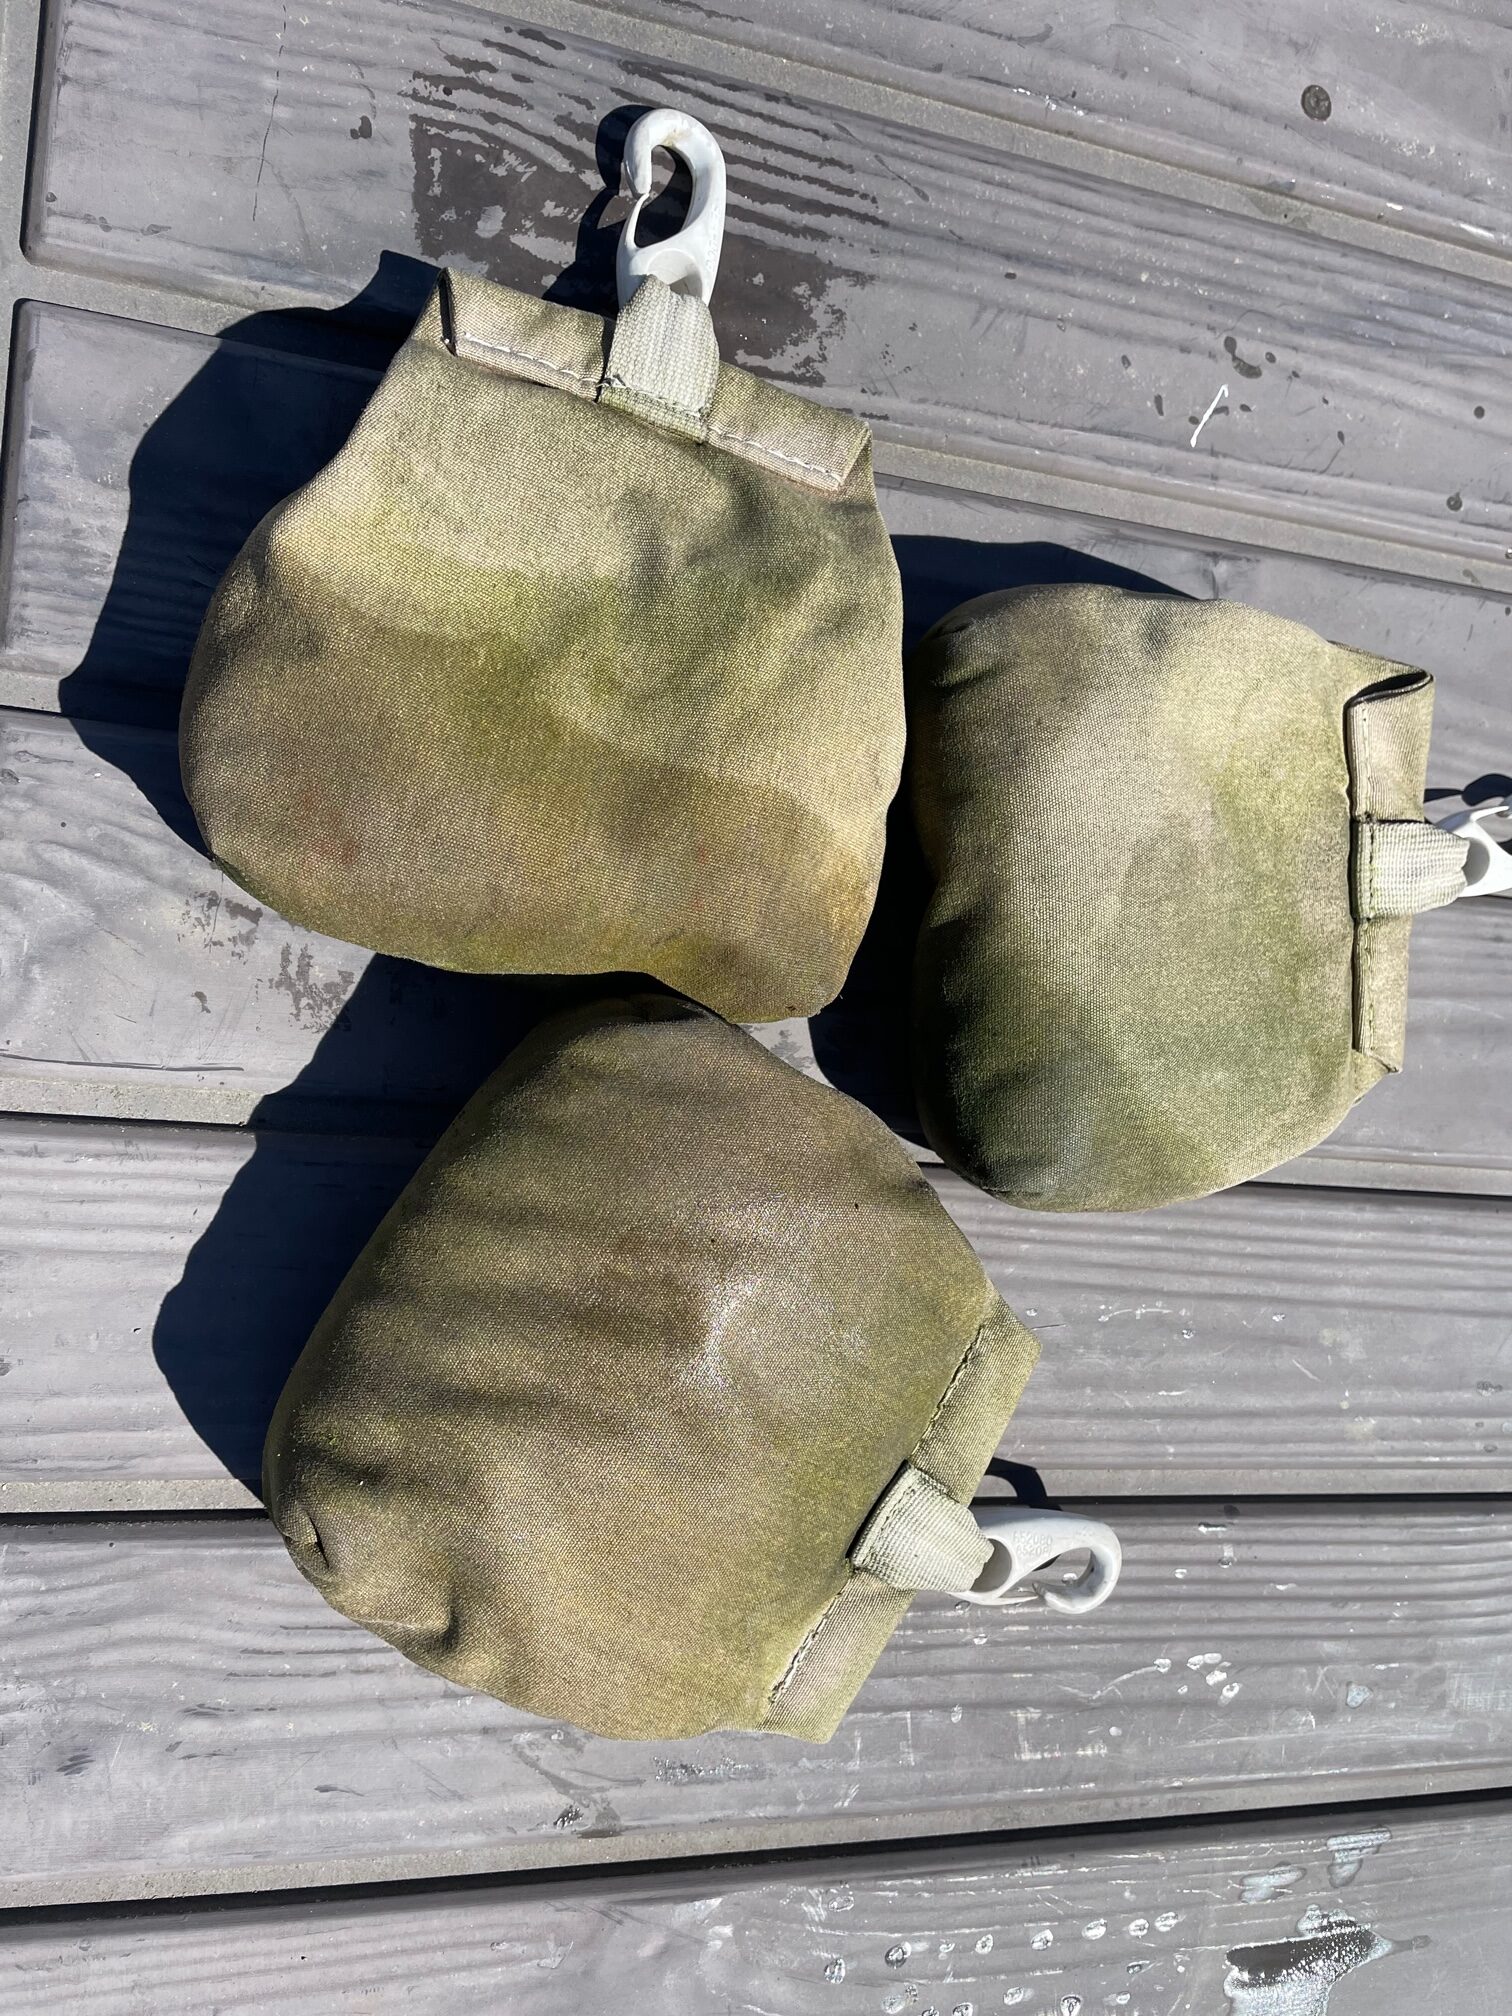
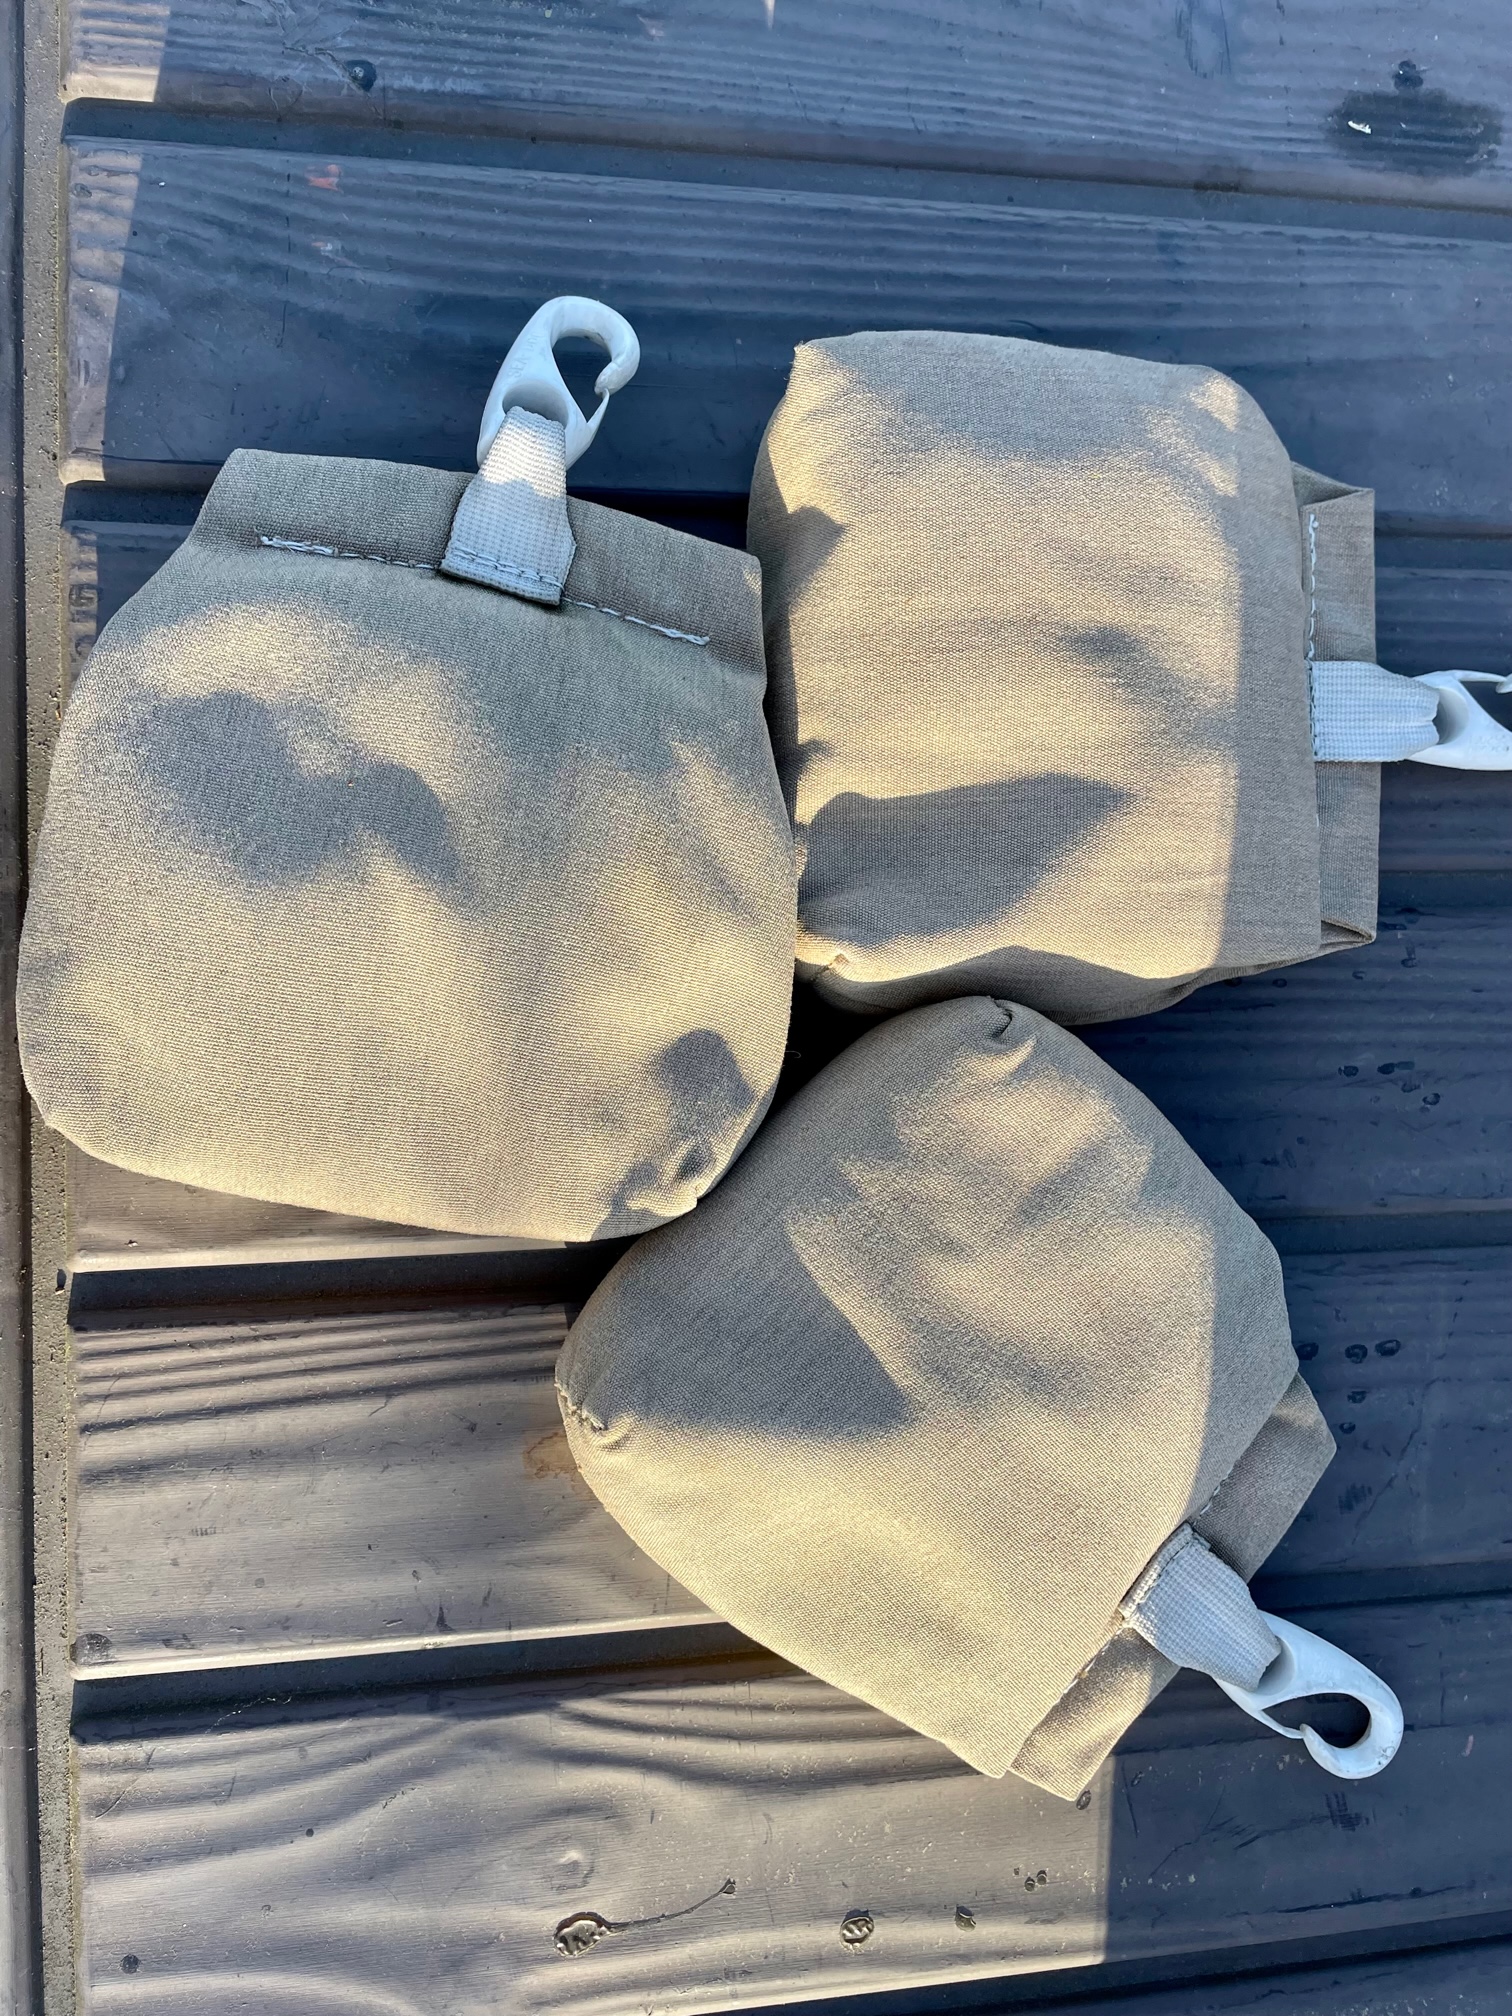
Boat cover sand bags
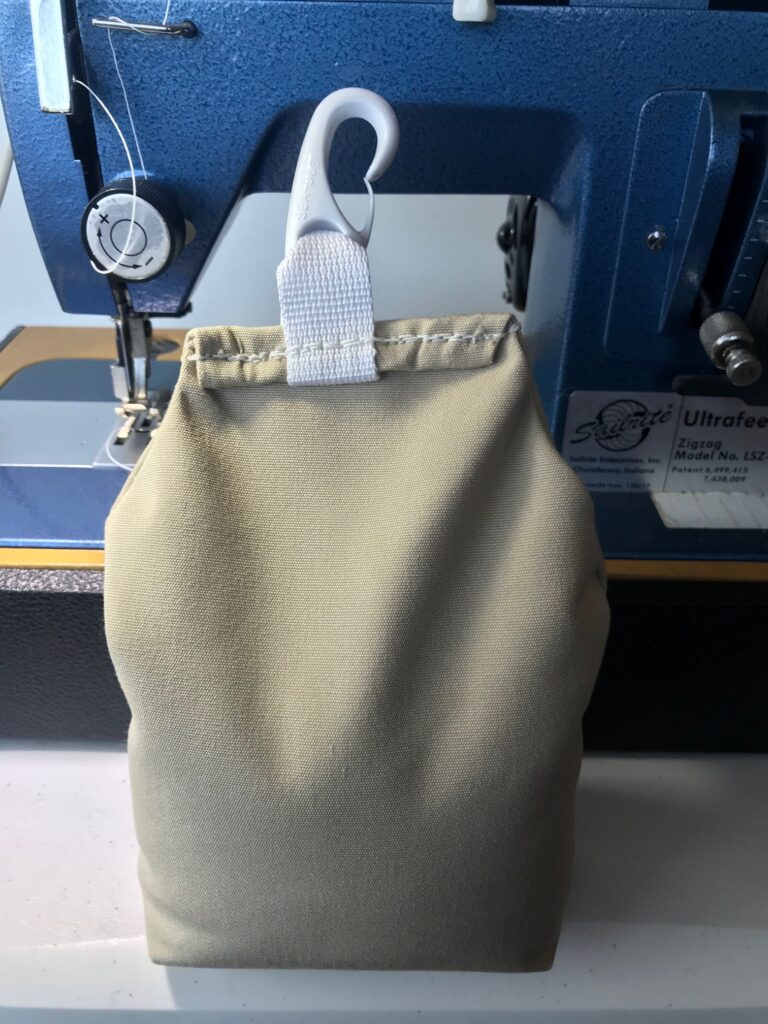
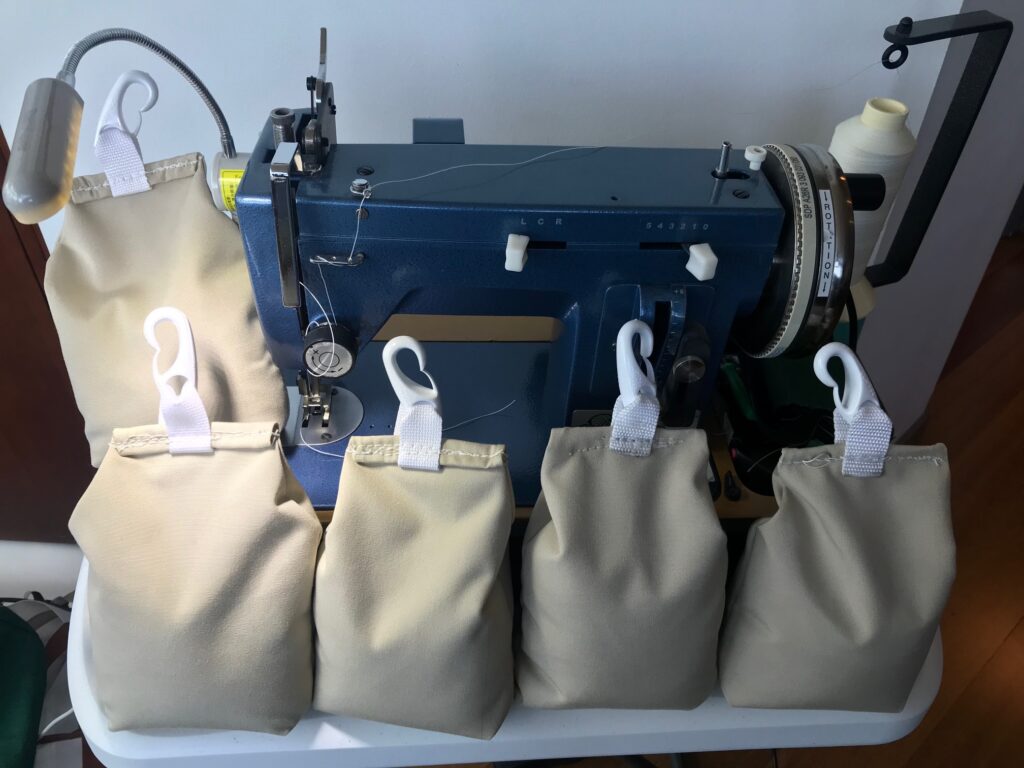
There are 19 canvas sandbags used to add weight along the bottom of the boat cover and over the 15 years since the cover was made, a few were accidentally dropped overboard. So during a rainy Seattle weekend, we set about making 5 new ones. We already had all the canvas and webbing, so this project just involved designing the pattern, sewing, and buying a 50 lb bag of sand and plastic clips. Now there are 19 sand bags again plus 1 spare.
completed sand-filled bag
finished making 5 bags
Weighted (sand-filled) Bags Used on Cover
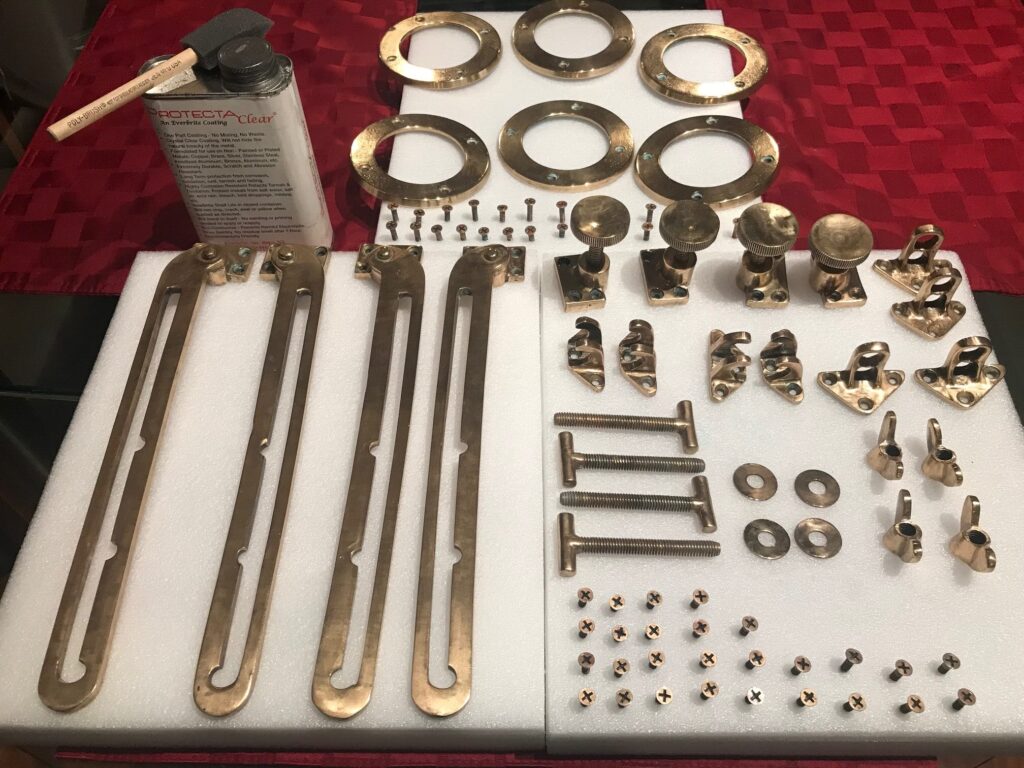
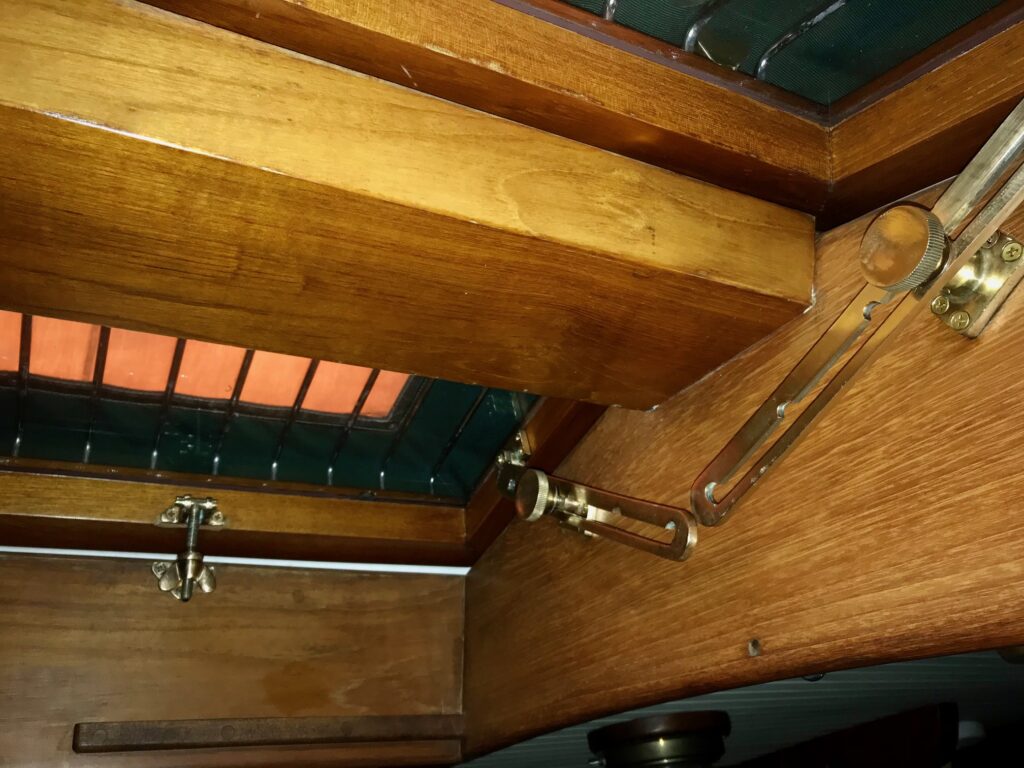
Butterfly Hatch Bronze Polishing
I removed, polished, and applied 5 coats of Everbrite ProtectaClear to the cast bronze butterfly hatch fittings and the 6 bronze rings for the courtesy lights. This adds to my list of interior bronze and brass parts that should never need polishing again, as the ProtectaClear provides a barrier to oxidation. Parts that I finished a year ago are still looking bright and shiny. The key is to do a good job in the polishing step and I use a Dremel tool and a good polishing compound for that.
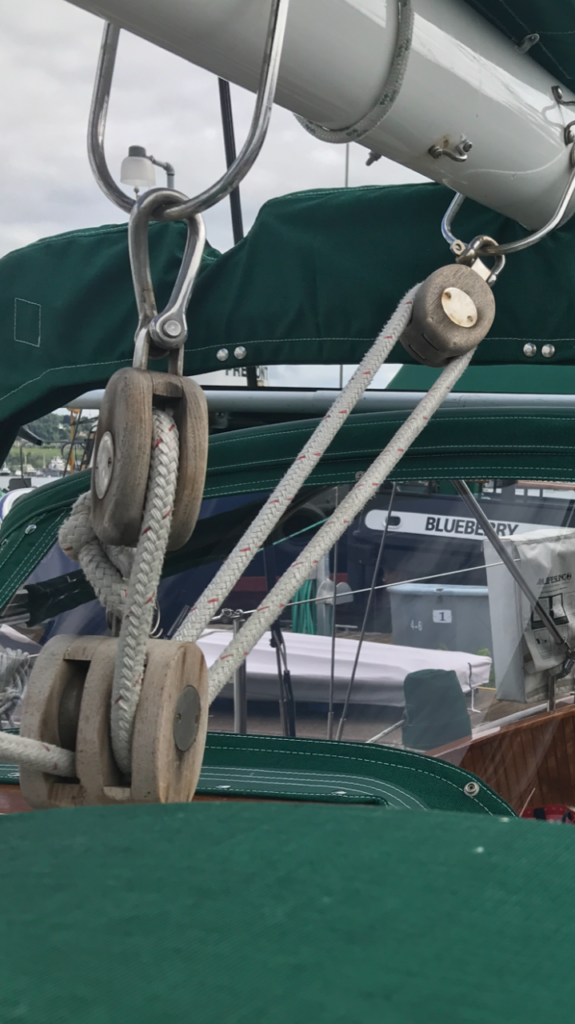
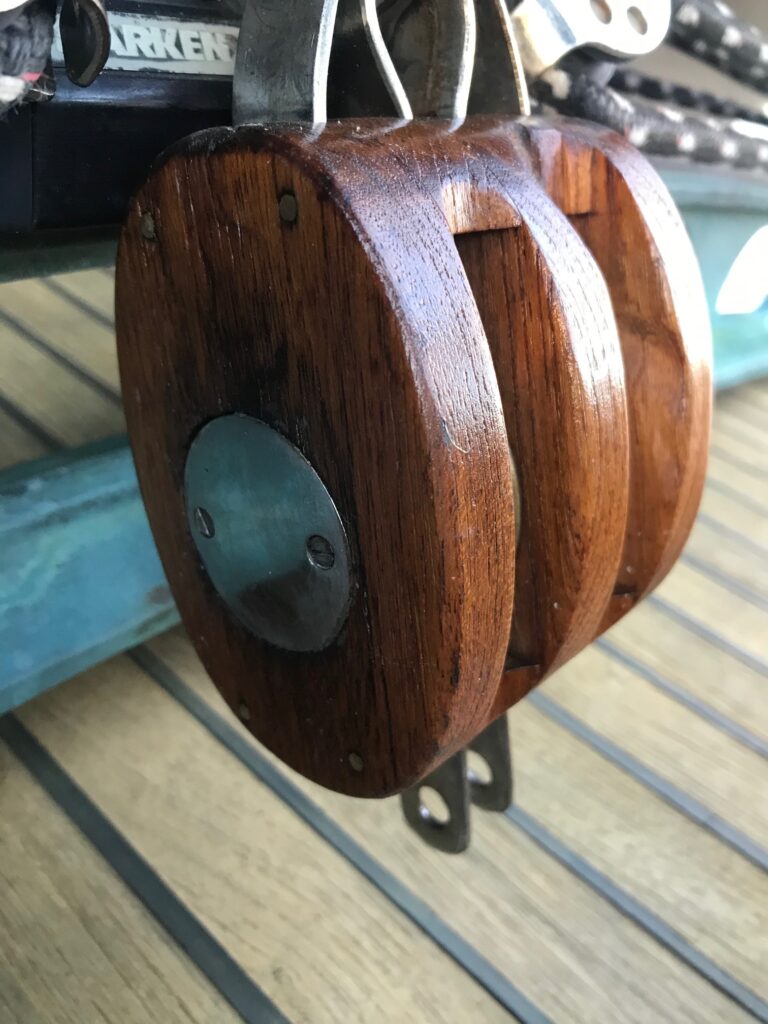
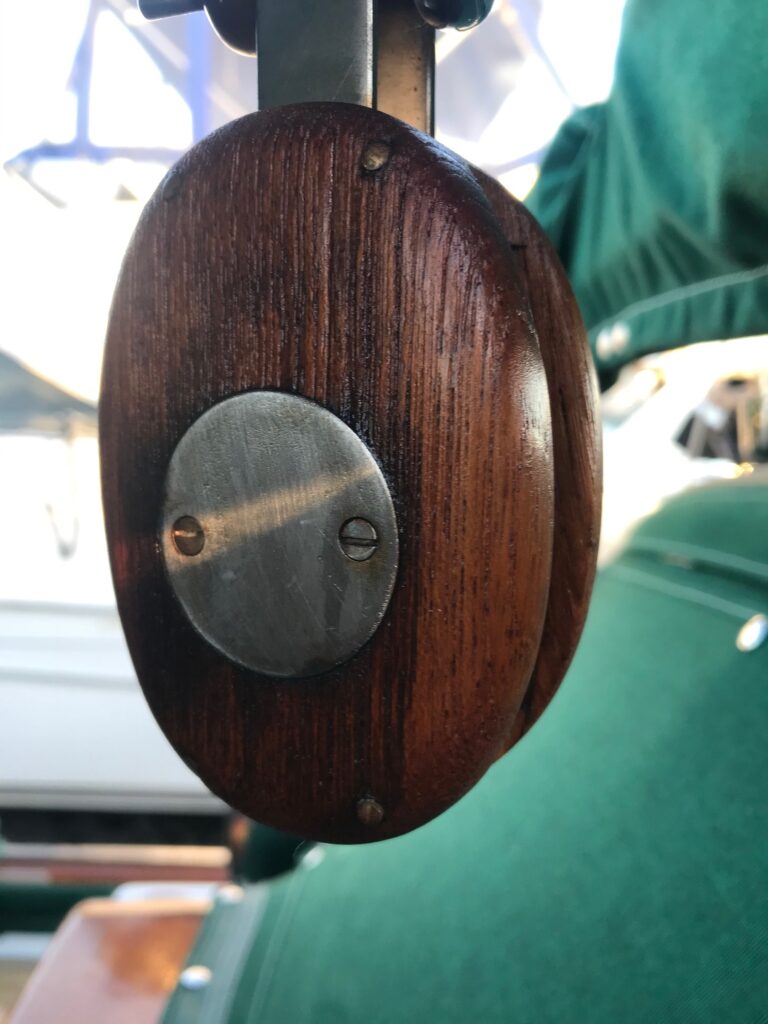
Teak Block Cleaning & Oiling
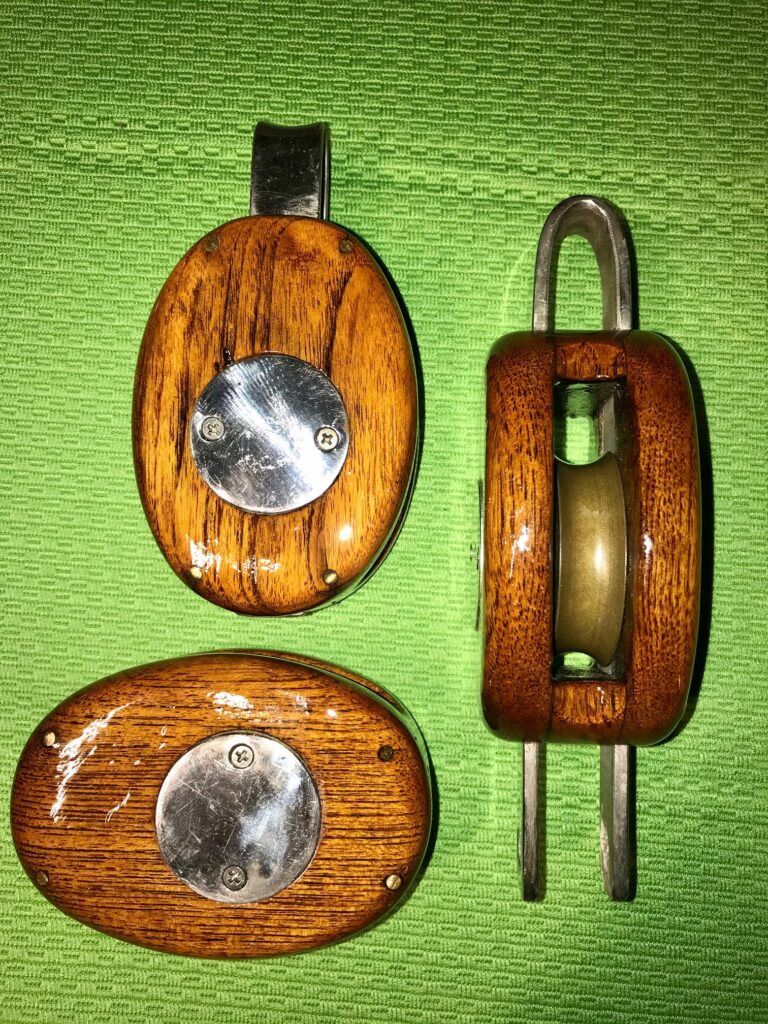
There are 8 teak blocks on Apropos–5 are used for the Main sheet and 3 for the Mizzen sheet. The 5 main sheet blocks have always remained unfinished and left to go naturally grey. I disassembled the blocks by removing the 4 small screws holding on the round stainless steel covers, then unscrewed the round covers and removed the pin and bronze sheave and ss becket. With only the teak parts remaining, I cleaned and brightened them with the same teak system I use for the decks. After lightly sanding them, I applied 5 coats of teak oil.
Before
After (double block)
After (single block)
Teak Block Finishing with Awlwood Clear
The 3 blocks used for the Mizzen sheet have always been varnished. It had been 6 years since they were last varnished, so I removed them from the boat, disassembled them, used stripping gel and a heat gun to remove the old varnish, lightly sanded them and applied Awlwood primer then 6 coats of Awlwood MA (modified acrylic) Clear. This is the same product that I have used on the exterior of all of Apropos’ brightwork over the past 4 years. It’s more durable than varnish and doesn’t break down from UV as fast as varnish.
Finished Blocks for Mizzen Sheet
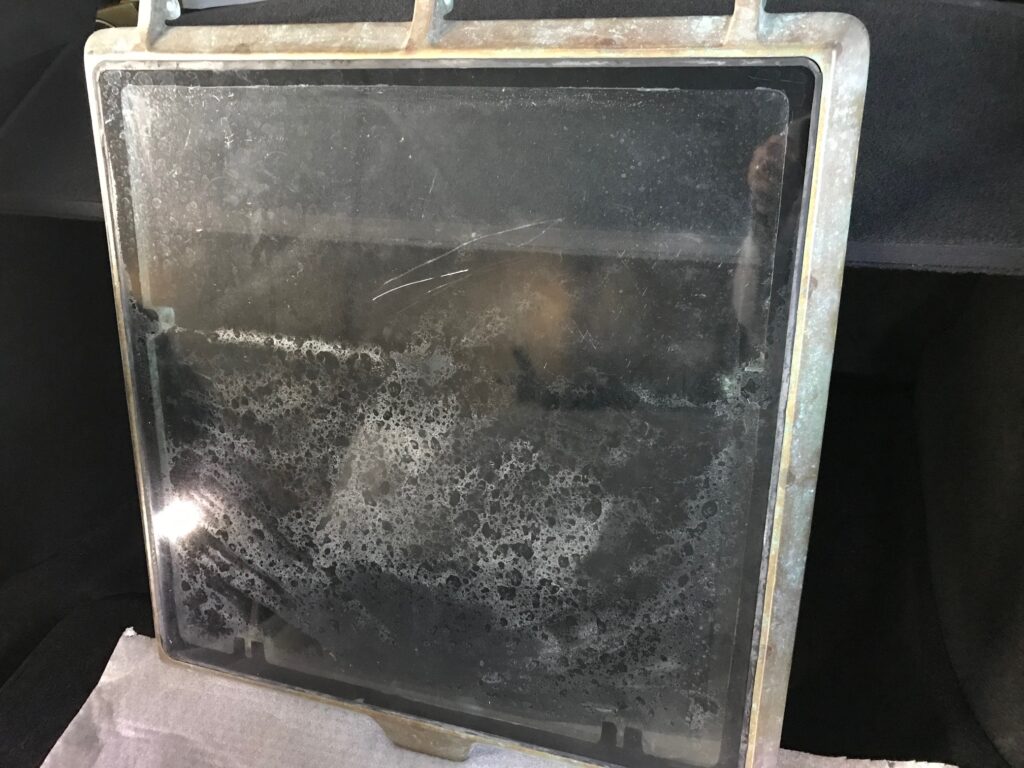
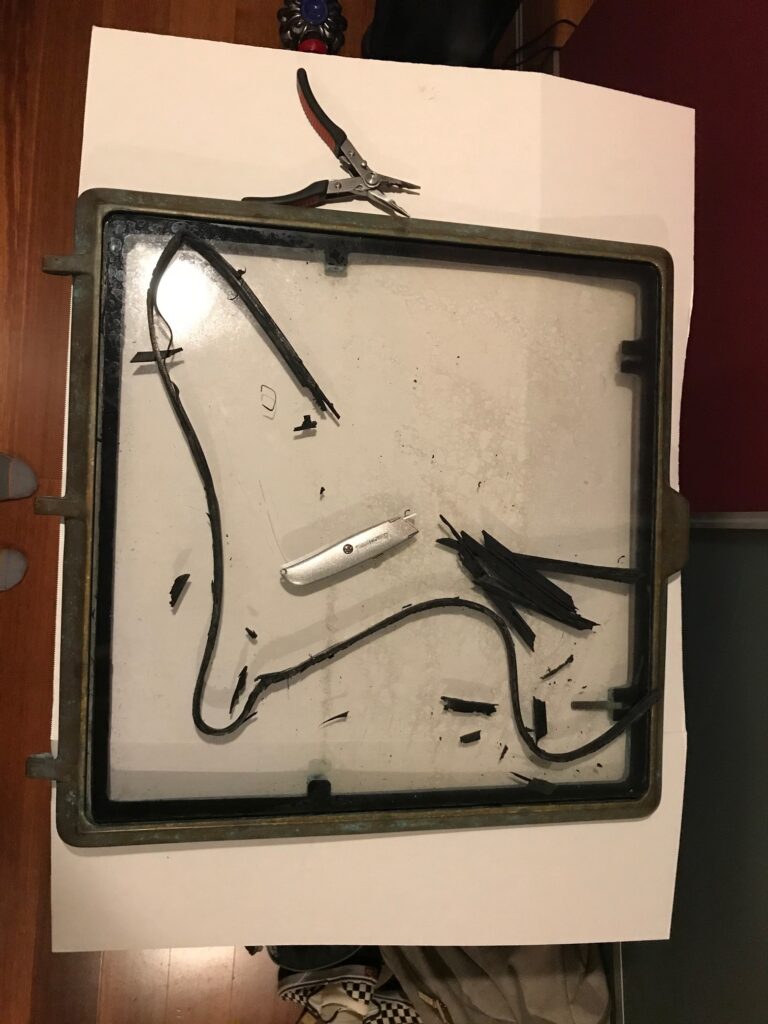
Forward Hatch Acrylic Replacement
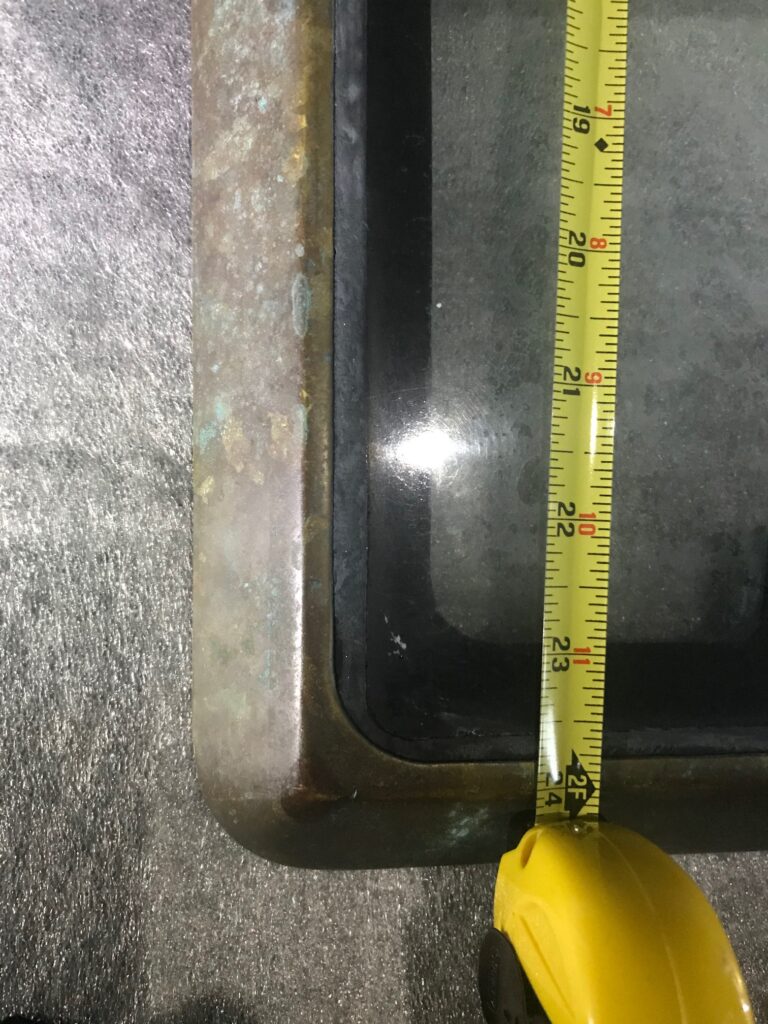
The forward hatch acrylic was probably replaced during the refit just before I bought Apropos. Over the years, the acrylic has appeared to have crazed not on the surface, but inside. After buffing failed to make any difference, I decided to replace it. I first removed the hatch by prying off the 3 hinge pins peened-on caps. Next I removed the TDS caulking and pried the acrylic out of the bronze frame. My options for replacement were laminate glass (too heavy and breakable), poly carbonite, and acrylic. I went to Tap Plastics to compare poly carb vs acrylic, and decided to go with 1/2″ acrylic after the salesperson gave me a demo of how to remove scratches in acrylic. Also, it was available in 3 shades of tint and they had it in stock and could cut it while I waited.
Before installing the new acrylic, I cleaned up and polished the heavy duty bronze frame. I used 3M Silicone to fasten the acrylic to the 1/2″ lip along the bottom of the frame. I added about 25 lbs of weight and allowed it to dry 24 hours, then used Teak Decking Systems (TDS) black caulking along the outer edges. After curing for 48 hours, I removed the masking tape, then masked over the caulking and acrylic so I could apply 5 coats of Protecta-Clear to the bronze frame.
With our summer cruise behind us, there were a few projects I wanted to get done while the weather was still nice.
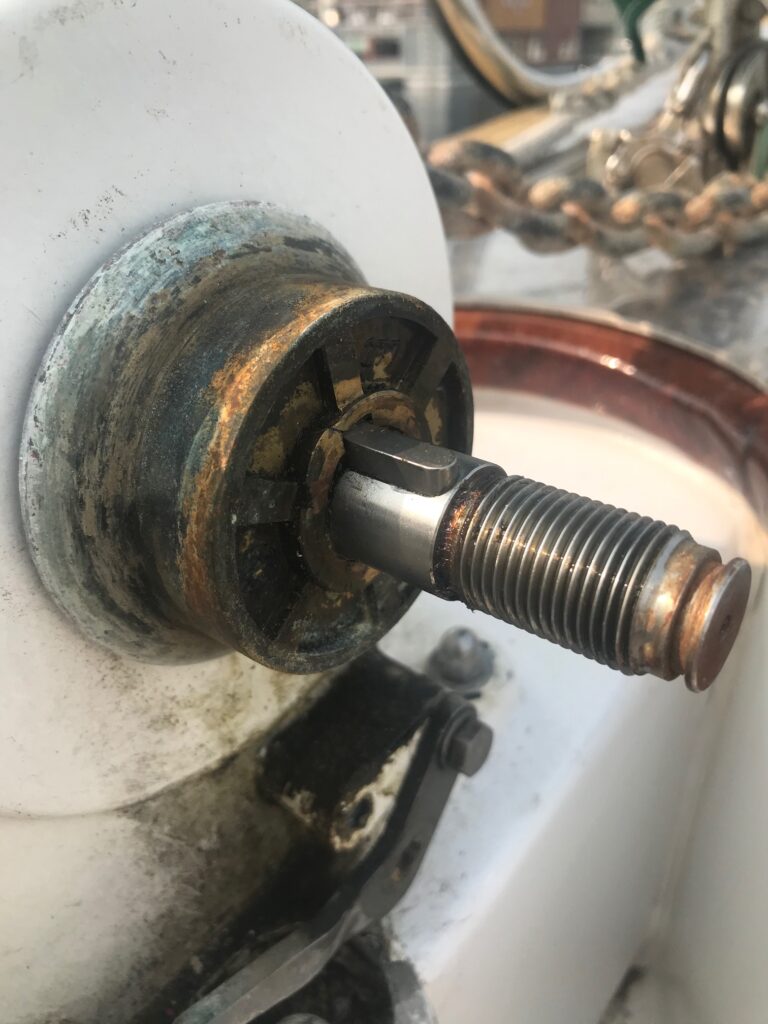
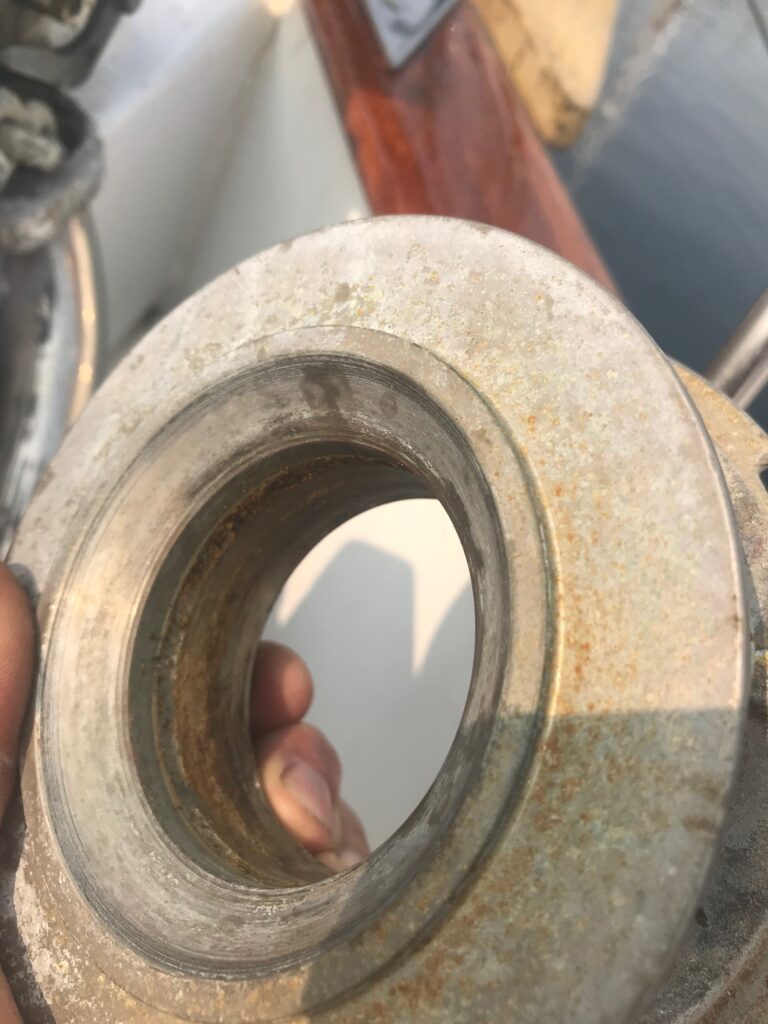
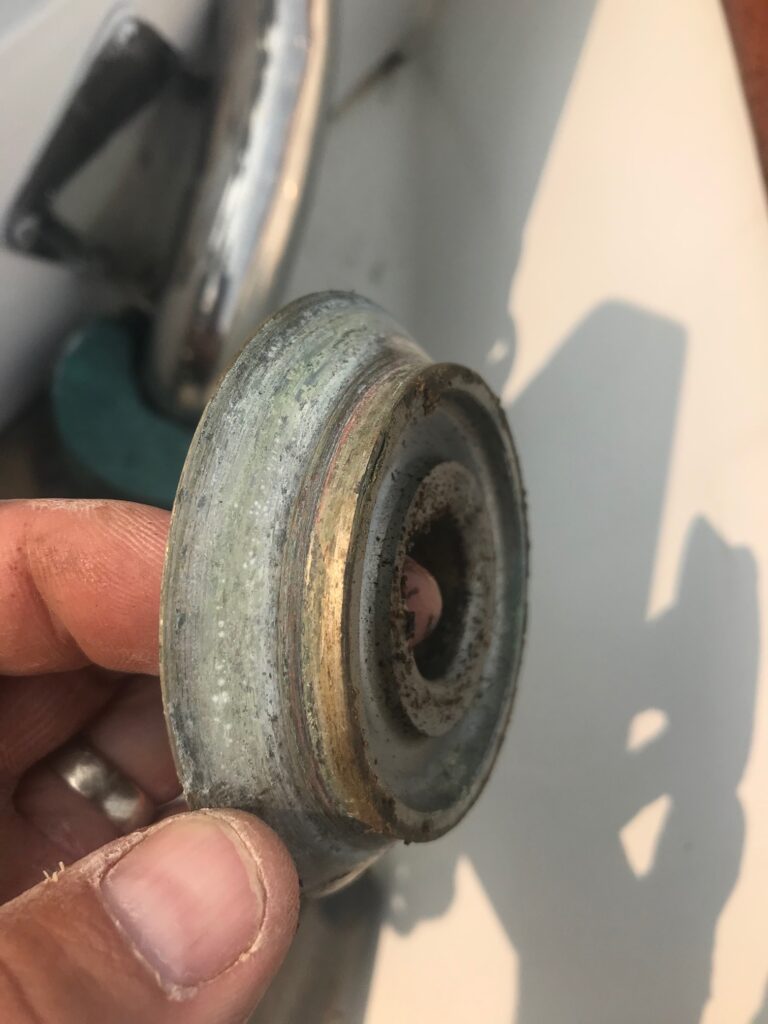
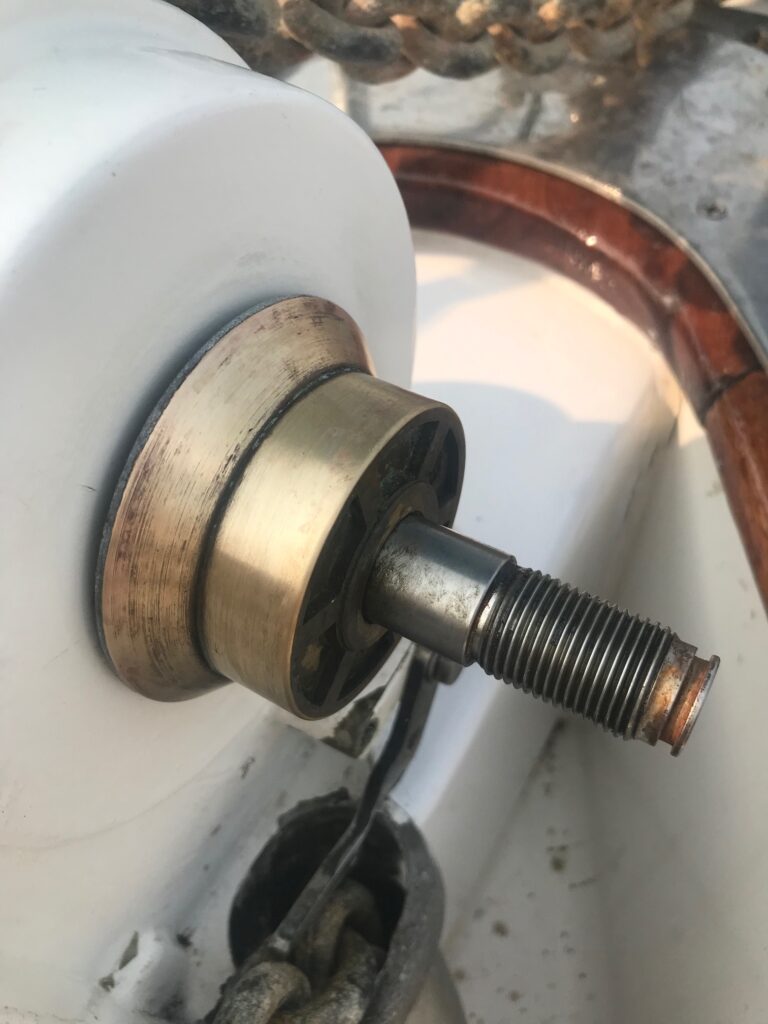
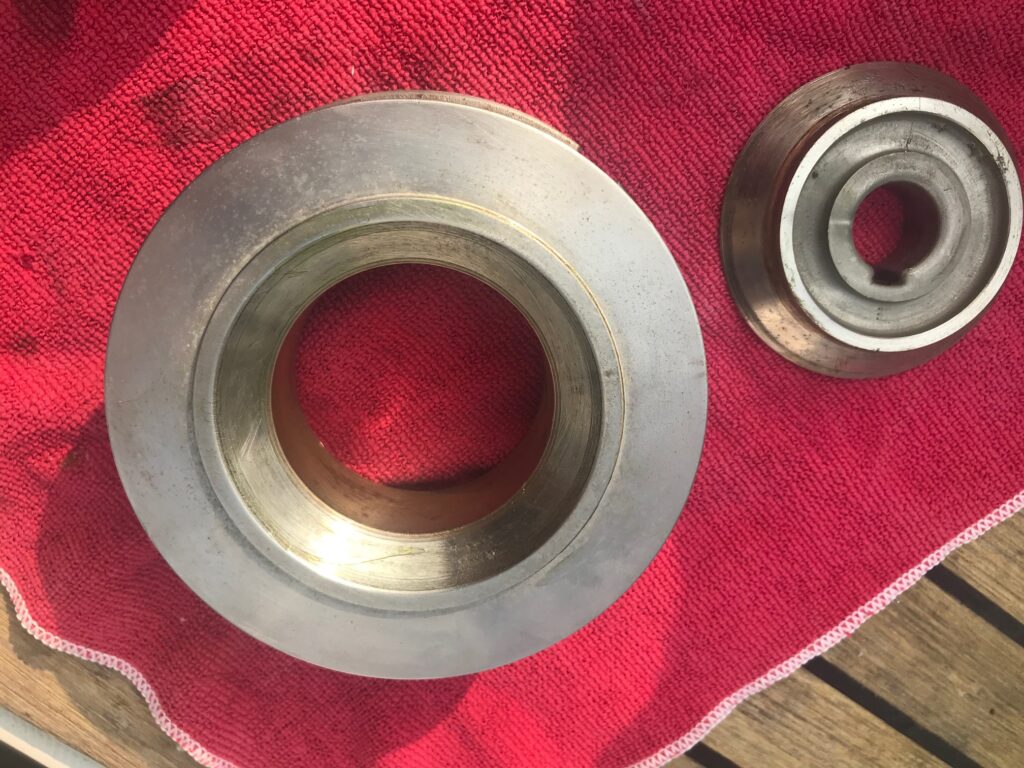
Windlass Gypsy cleaning–While anchoring, we noticed the windlass making some squeaking noises from time to time. This prompted us to watch some YouTube videos to see how to clean and grease the moving parts, which was long overdue. I removed the clutch cones, then cleaned them with Scotchbrite pads and applied a thin film of lithium grease to the moving parts.
Inner wheel of gypsy
Chain wheel
Outer clutch cone
After cleaning and lubricating
Cleaned and lubricated
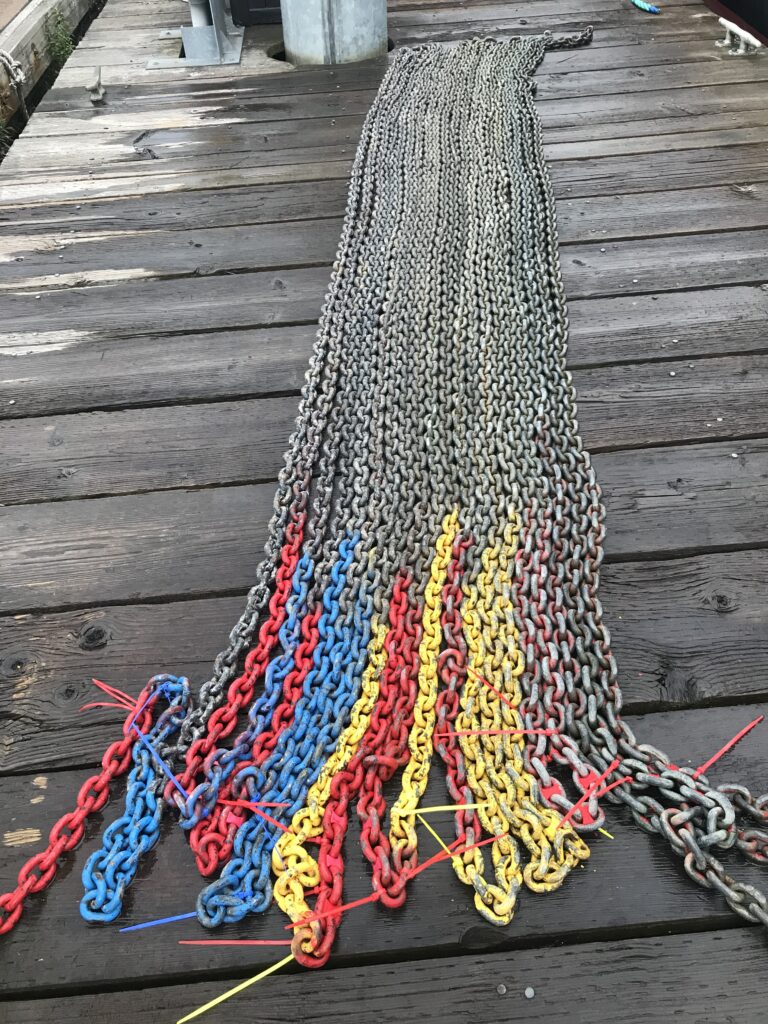
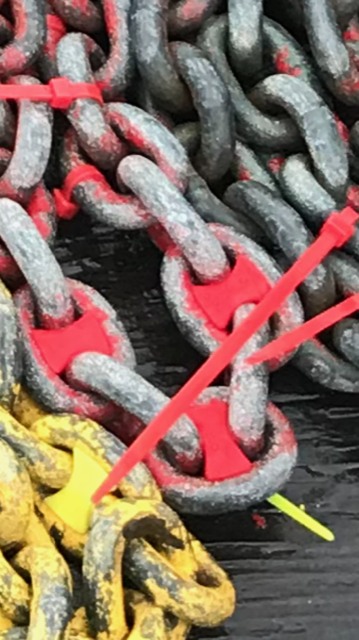
Anchor Chain Marking–knowing how much chain is out is important while anchoring. In the past, we used a combination of color-coded paint and zip ties to mark the chain every 25 feet. The zip ties last years, but eventually some break off and need to be replaced. After laying out most of the 300′ of chain on the dock, I replaced the colored zip ties and also used molded silicon chain markers in a particular color-pattern. I decided not to repaint the chain as most of the paint was still good (except the the markings below 100 foot). The colored zip tie markings are as follows: 1R=25′, 2R=50′, 3R=75′, 1Y=100′, 1Y1R=125′, 1Y2R=150′, 1Y3R=175′, 1B=200′, 1B1R=225′, 1B2R=250′, 1B3R=275′.
Chain marking
New silicon markers added
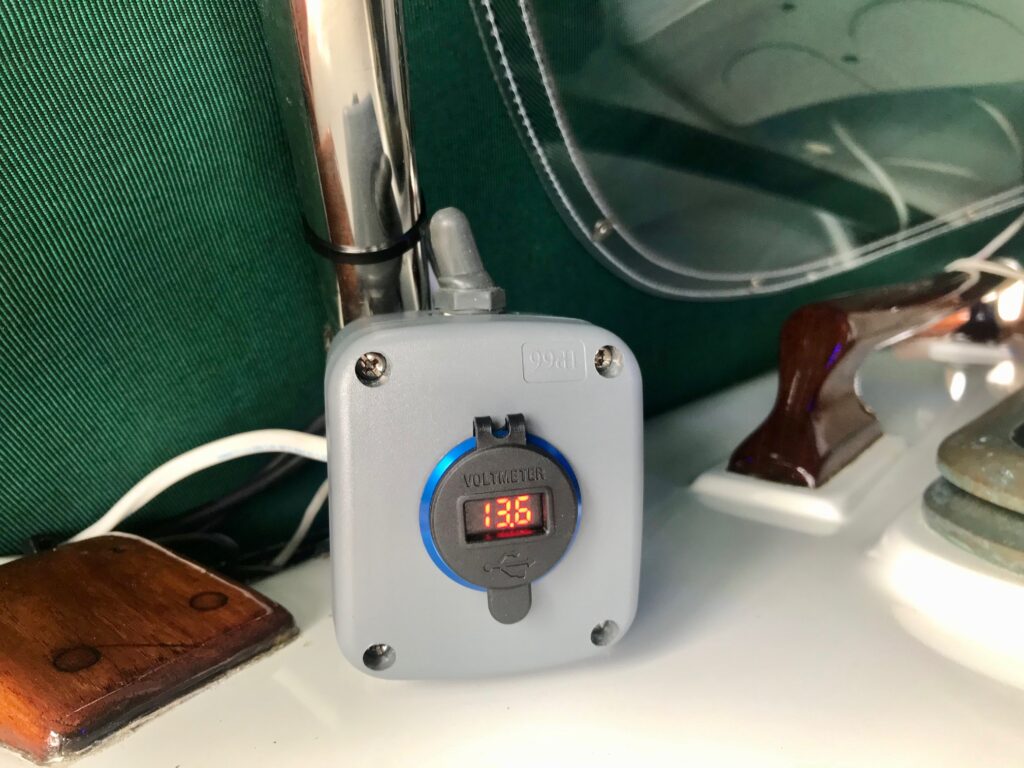
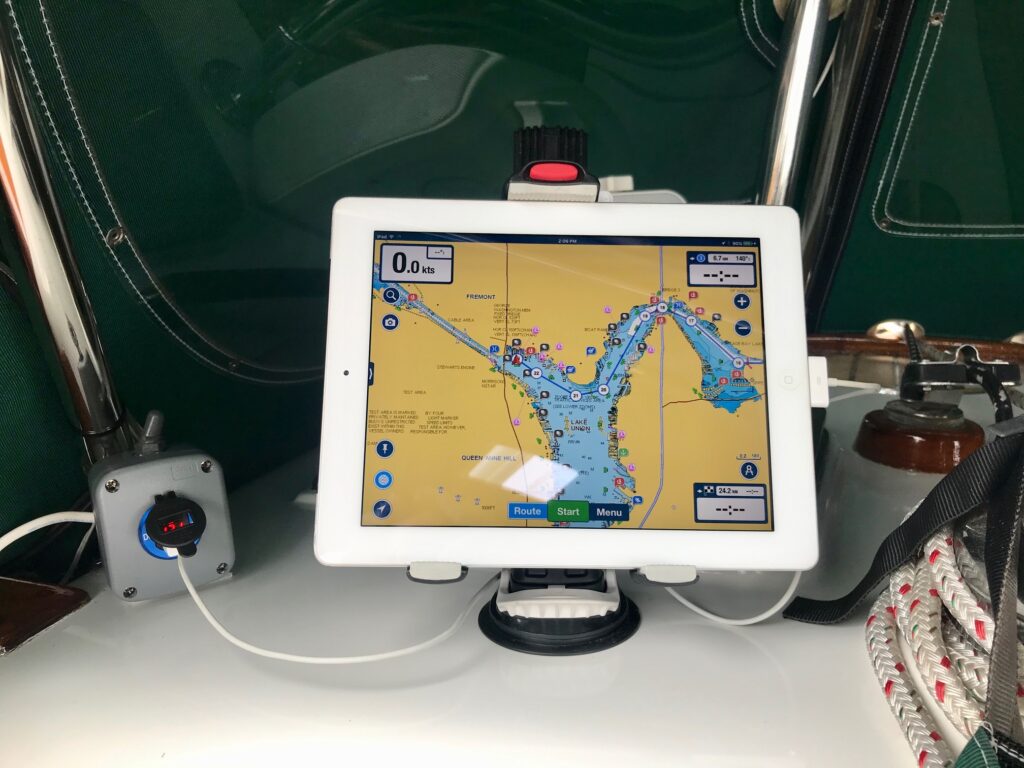
Adding Cockpit USB Port–We usually run an iPad with Navionics in the cockpit and use it for route planning and as a backup to the Garmin chartplotter. Having a USB charge port in the cockpit will allow us to keep the iPad as well as iPhones charged without needing to take them below decks. I mounted a USB dual-port with digital voltage display inside a waterproof box. The box is held in place with 3M dual lock fasteners (similar to Velcro but much better). I also added a waterproof switch on the top of the box for turning on/off an LED light strip that’s mounted under the dodger.
USB Port and LED Switch
Charging iPad
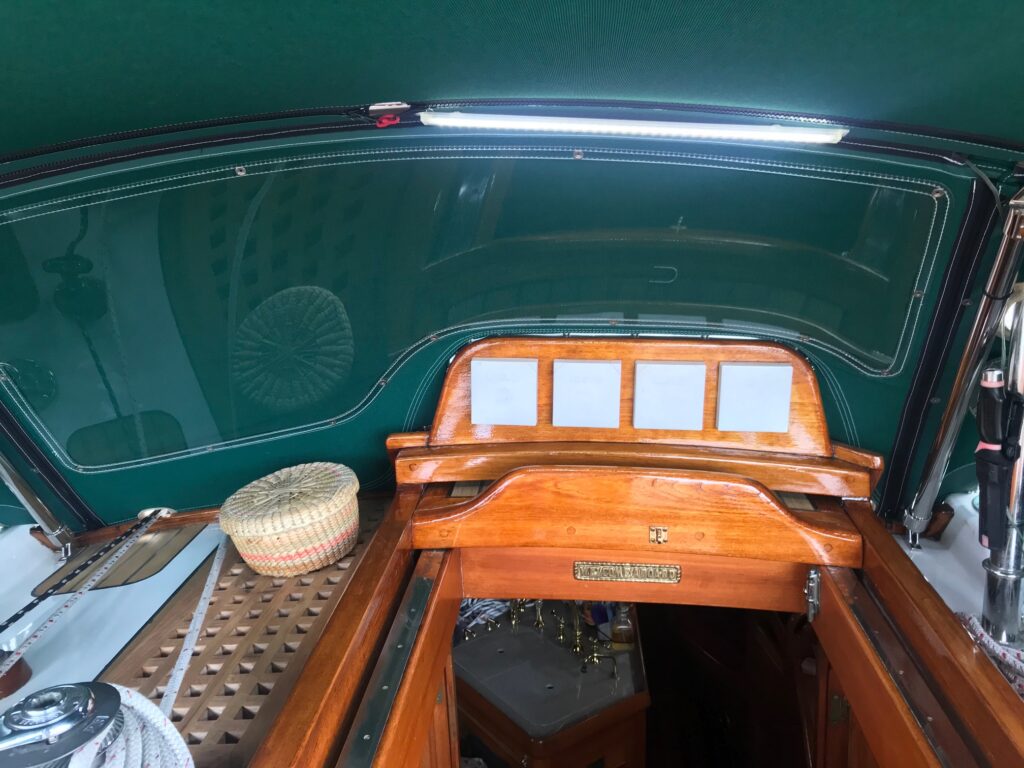
LED Light Strip (red-green-blue-white modes)
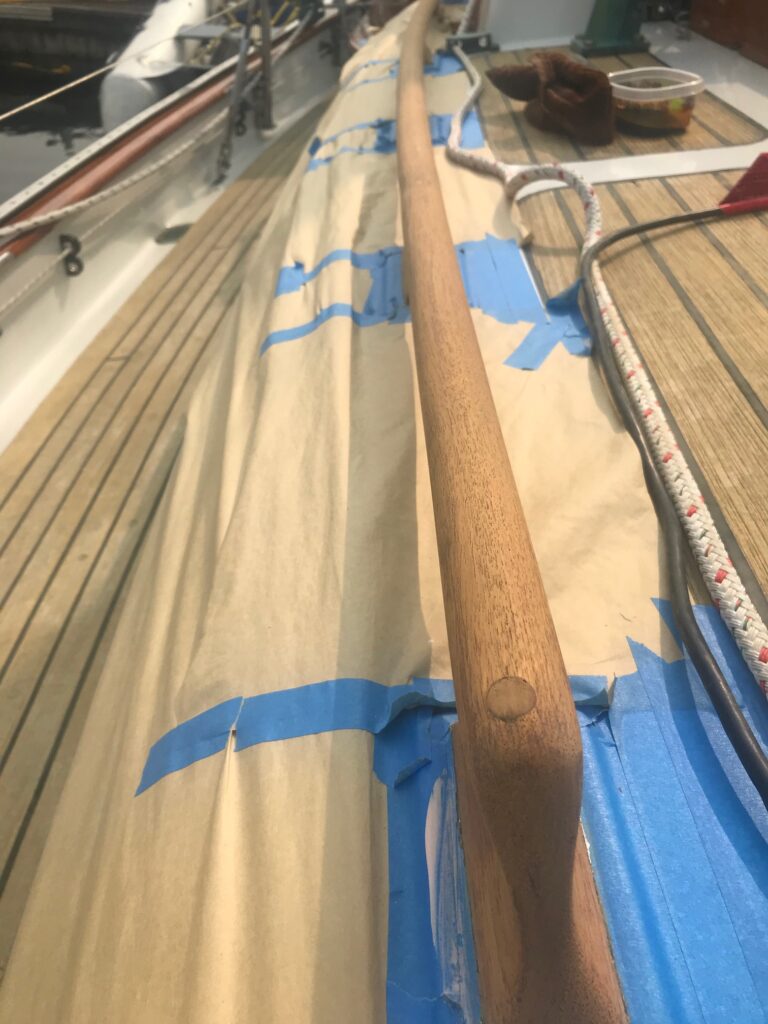
Grab Rail Refinishing–The final round of teak refinishing for the summer! I stripped and recoated 2 of the 4 grab rails in the spring-time. These are difficult to strip down to bare wood because of the curves and angles. I finally got the last two refinished during a week of dry weather in September. For stripping off the old varnish, I used a combination of Orange chemical stripper to loosen the varnish, then a heat gun and scraper to remove it. I followed up with 80 grit sandpaper, then 220 grit, applied Awlwood Primer, lightly sanded with 400 grit, then 8 coats of Awlwood clear with a light sanding after every 2 coats. I did this wearing an N-95 mask as Seattle was choked with smoke that blew in from the Oregon and California wild fires.
After stripping & sanding
After 8 coats of Awlwood Clear
WiFi Internet Connection–The marina we’re in has WiFi but the signal is weak from where the boat is. To boost the signal, I added an antenna/radio and to distribute WiFi on the boat I added a router. The end result is a very strong signal on the boat that even gives me high speed data connectivity to allow me to work from the boat. The equipment includes a Ubiquiti M2 radio and POE, a 2.4GHz omni-directional antenna, and a TP-Link dual band router. The setup was easy and most components were plug and play. Now we have excellent wireless high-speed connectivity on Apropos.
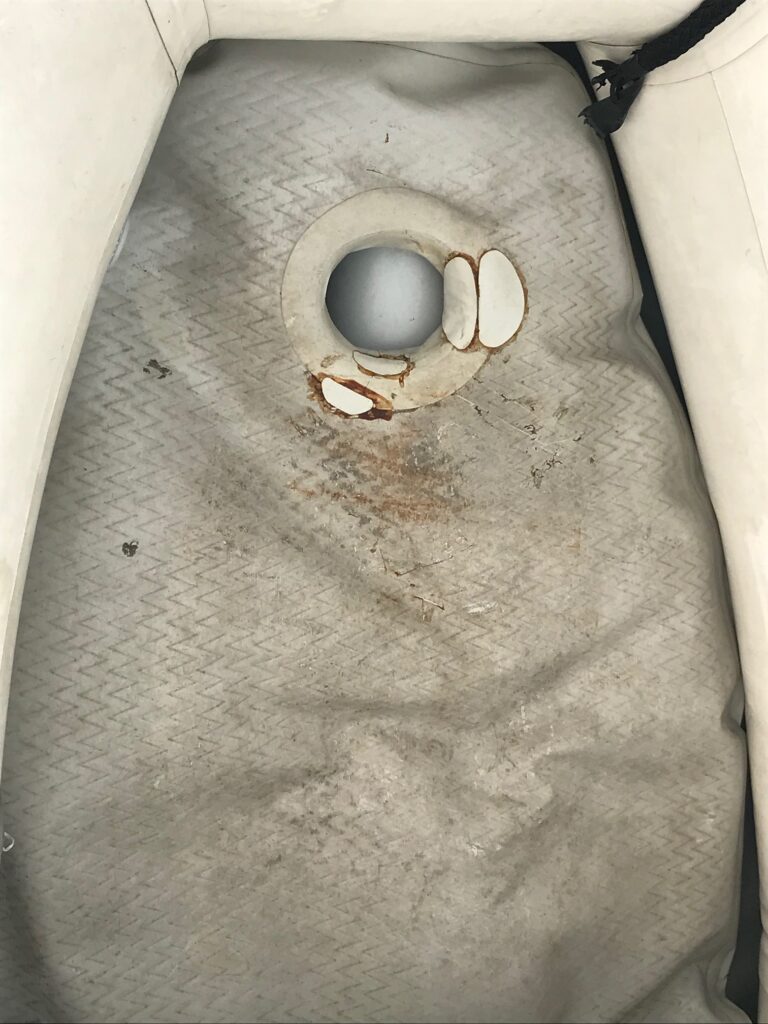
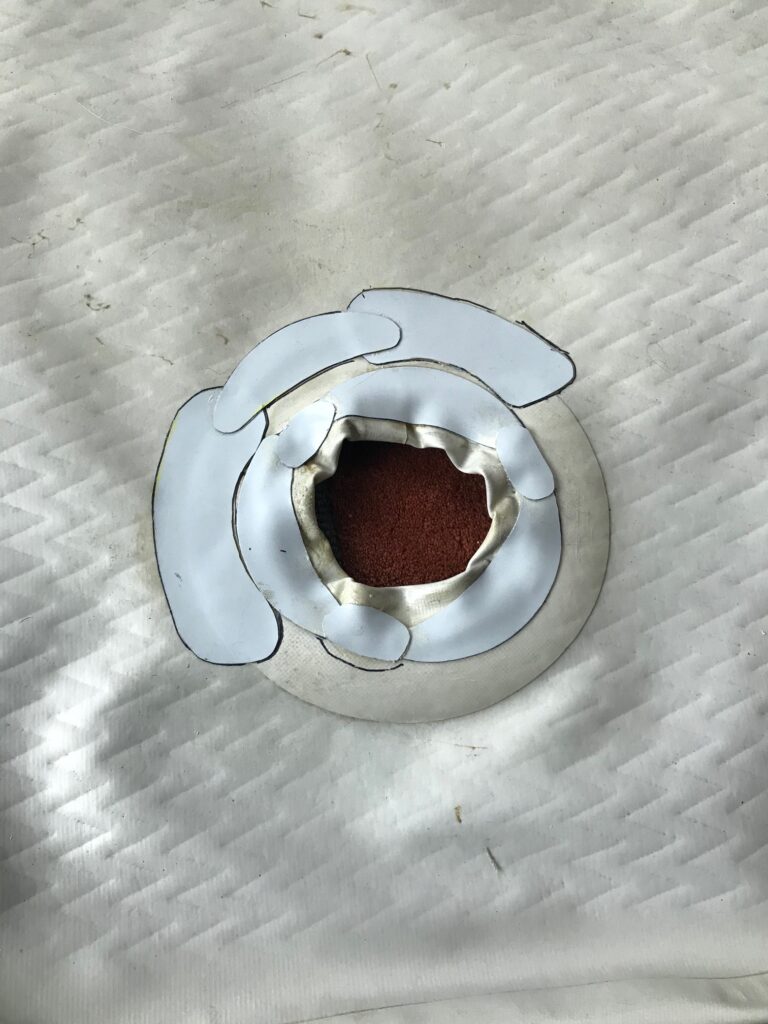
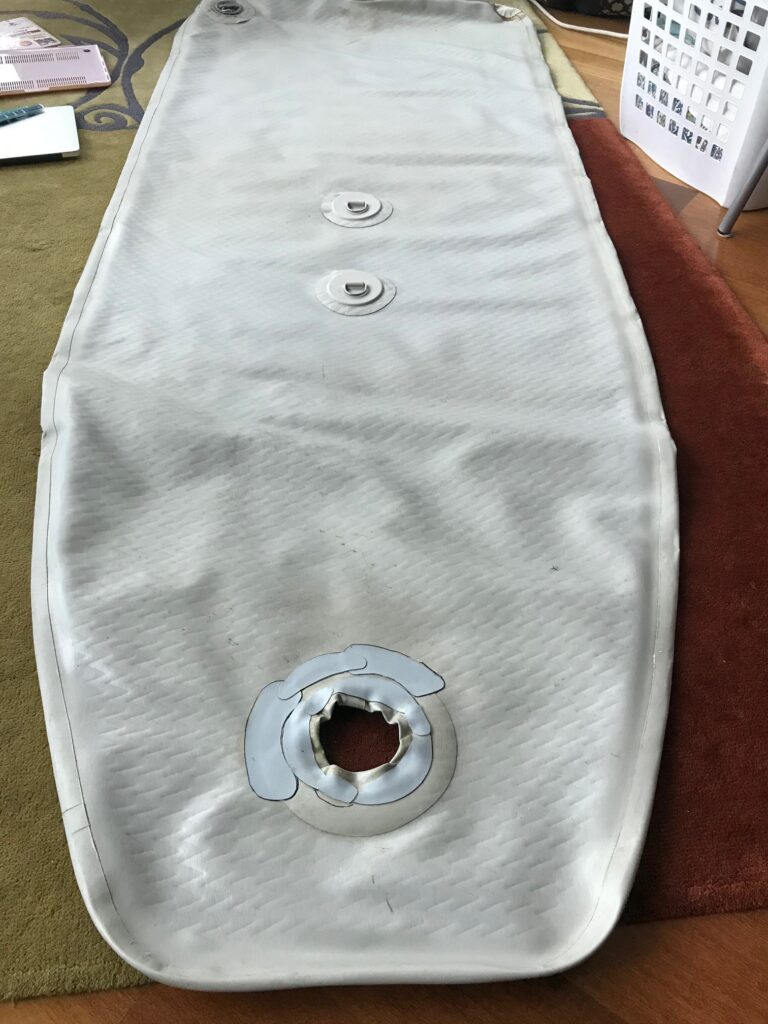
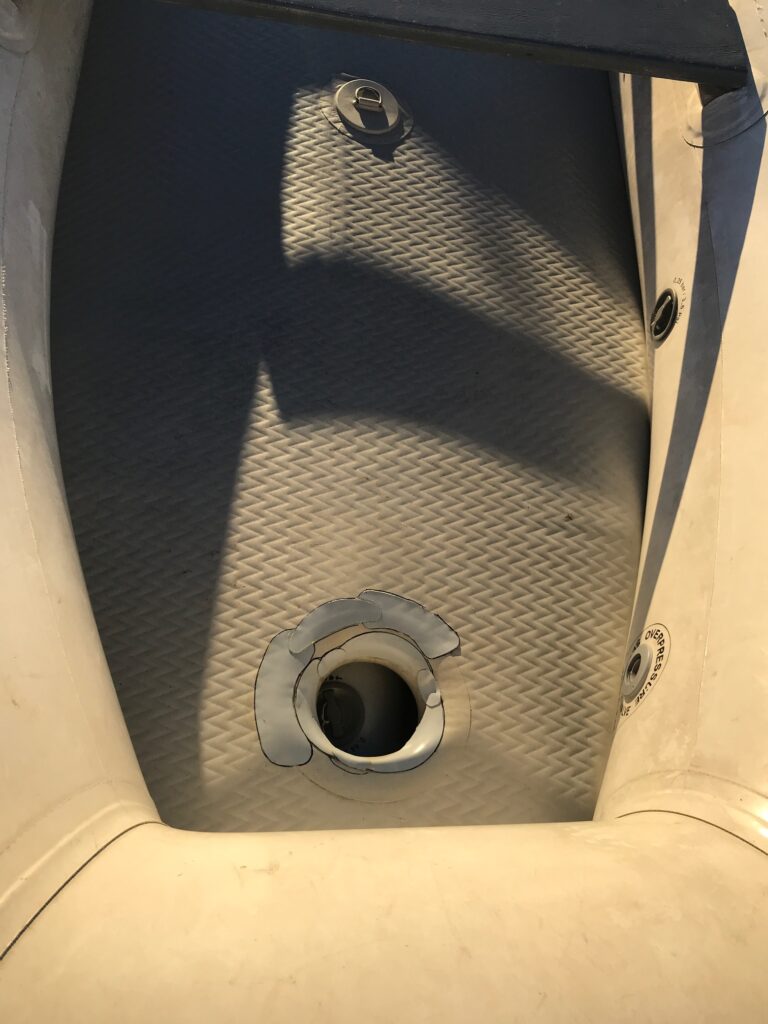
Dinghy Air Floor–After several attempts to patch the high pressure hypalon Air Floor during a two-week cruise, it still leaked at places that were difficult to apply a patch (around a doughnut-shaped hole for access to the air keel valve). The dinghy is a little over 10 years old but still in great condition. I decided to attempt patching one more time before buying a new Air Floor for $500, since the overall plan is to replace the dinghy in a few years. After removing the failed patches, I cleaned the surfaces well before applying new patches. It was much easier doing this indoors vs on the boat. The 2-part glue, mixed in a 25:1 ratio, seemed to adhere much better this time. I used 75 lbs of weights placed atop a sandbag over the patches for 24 hours, then let the Air Floor sit another 4 days to fully cure. I also gave it a good cleaning before taking it back to the boat. I put it back in the dinghy and inflated it to 3 psi, then sprayed soapy water around the patches and didn’t see any evidence of leaks. I won’t be too surprised if new leaks develop, but for now i think it’s holding air. I probably won’t be pumping it up to 10 psi any more…